Table of Contents
Advertisement
Quick Links
User's Guide (Basic Operations)
• Be sure to read the "Safety Precautions" on page E-2 and "Operating Precautions" on page
E-6 before trying to use this projector.
• This manual covers only basic operations, including how to set up the projector, basic projector
operations, and how to replace the lamp. For more detailed information, see the User's Guide
(UsersGuide_English.pdf) on the CD-ROM that comes with the projector.
Contents
Safety Precautions .....................................E-2
Operating Precautions ...............................E-6
Unpacking ...................................................E-9
General Guide ...........................................E-10
Remote Controller General Guide ..........E-12
Loading Remote Controller Batteries......E-13
Using the Laser Pointer ..........................E-13
Getting Ready ...........................................E-14
Setting Up the Projector..........................E-14
Setup Precautions ..................................E-15
• Digital Light Processing
Texas Instruments Incorporated of the United States.
• Microsoft, Windows, Windows NT, Windows XP, and the Windows logo are registered
trademarks or trademarks of Microsoft Corporation of the United States in the United States and
other countries.
• Apple and Macintosh are registered trademarks of Apple Computer, Inc. of the United States.
• Adobe and Acrobat are registered trademarks of Adobe Systems Incorporated.
• Other company and product names may be registered trademarks or trademarks of their
respective owners.
• The contents of this User's Guide are subject to change without notice.
• Copying of this manual, either in part or its entirety, is forbidden. You are allowed to use this
manual for your own personal use. Any other use is forbidden without the permission of CASIO
COMPUTER CO., LTD.
• CASIO COMPUTER CO., LTD. shall not be held liable for any lost profits or claims from third
parties arising out of the use of this product or this manual.
• CASIO COMPUTER CO., LTD. shall not be held liable for any loss or lost profits due to loss of
data caused by malfunction or maintenance of this product, or any other reason.
• The sample screens shown in this manual are for illustrative purposes only, and appear
differently from the screens actually produced by the product.
TM
TM
, DLP
, Digital Micromirror Device
E-1
English
Turning On the Projector ........................E-18
Turning Off the Projector ........................E-20
Projection Operations ..............................E-22
Projecting onto a Screen ........................E-22
Using the Setup Menu..............................E-25
User Maintenance.....................................E-26
Cleaning the Projector ............................E-26
Reattaching the Lens Cover ...................E-26
Replacing the Lamp................................E-26
Troubleshooting .......................................E-30
Indicators and Alert Tones......................E-30
Projector Troubleshooting.......................E-31
Specifications ...........................................E-32
TM
, and DMD
TM
are trademarks of
Advertisement
Table of Contents
Troubleshooting

Related Manuals for Casio XJ-460 - 1


Summary of Contents for Casio XJ-460 - 1
-
Page 1: Table Of Contents
• CASIO COMPUTER CO., LTD. shall not be held liable for any loss or lost profits due to loss of data caused by malfunction or maintenance of this product, or any other reason. -
Page 2: Safety Precautions
Safety Precautions Safety Precautions Thank you for selecting this CASIO product. Be sure to read these “Safety Precautions” before trying to use it. After reading this User’s Guide, keep it in a safe place for future reference. About safety symbols Various symbols are used in this User’s Guide and on the product itself to ensure safe use,... - Page 3 Be sure to leave all internal inspection, to turn it off and unplug it from the adjustment, and repair up to your original power outlet. Failure to do so creates dealer or authorized CASIO service center. the risk of electric shock. Dropping and impact Exhaust vents...
- Page 4 Be sure to leave all internal inspection, adjustment, and repair up to your original dealer or authorized CASIO Service Center. Never allow the remote controller to become wet. Water creates the risk of fire and electric shock.
-
Page 5: Battery Precautions
Contact your Warning original dealer or authorized CASIO service center once a year about having the interior of the projector cleaned. Note that you will be Lamp removal charged for cleaning. -
Page 6: Operating Precautions
Operating Precautions Operating Precautions Lamp Handling Precautions Continued use of a lamp that has passed its lamp life increases the risk of Caution the lamp rupturing. Replace the lamp with a new one as soon as possible after the replacement message appears. Never touch the glass of the lamp with your fingers. -
Page 7: Other Precautions
Operating Precautions Other Precautions This projector is made of precision components. Failure to observe the following precautions can result in inability to correctly save data and malfunction. G Never use or store the projector in the following locations. Doing so creates the risk of malfunction of and damage to the projector. - Page 8 Operating Precautions G Precaution when Handling the Projector after Use Exhaust vents and the top of the projector remain very hot for some time after the projector is turned off. When handling the projector after use, grasp it from the front and back as shown in the illustration.
-
Page 9: Unpacking
Unpacking Unpacking As you unpack the projector, check to make sure that all of the items listed below are present. DATA PROJECTOR XJ-460/XJ-560 Remote Controller Test Batteries (AA-size × 2) AC Power Cord USB Cable Video Cable Mini D-Sub Cable •... -
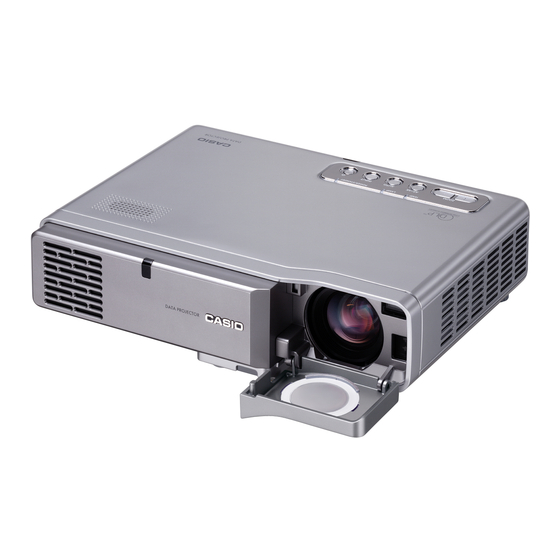
Page 10: Projector Features And Main Functions
Projector Features and Main Functions Compact, lightweight, high-brightness data projector: An easily portable compact Projector Features and Main Functions configuration (278 × 64 × 214 mm / 10.9 × 2.5 × 8.4 inches), yet enough brightness (XJ-460: 2500 ANSI lumen/XJ-560: 3000 ANSI lumen) for projection even in a brightly lit room. Automated Adjustment Features: Auto Focus, auto keystone correction, and other automatic adjustment features make projection simple and more efficient. - Page 11 General Guide Finger smudges or dirt on the sensors can cause keystone correction problems. Should the sensors ever become soiled, wipe them clean using a commercially available lens cloth or optical lens paper, like those for eyeglasses or camera lenses. [Bottom] Elevation adjustment foot Release button...
-
Page 12: Remote Controller General Guide
Doing so creates the risk of electric shock, burn injury, and other personal injury. Be sure to leave all internal inspection, adjustment, and repair up to your original dealer or authorized CASIO Service Center. Never allow the remote controller to become wet. Water creates the risk of fire and electric shock. -
Page 13: Loading Remote Controller Batteries
General Guide Loading Remote Controller Batteries Before you can use the remote controller for the first time, you need to load the two batteries that come with it. Be sure to use alkaline batteries only. Misuse of batteries can cause them to leak and stain of the area around them, or to explode, creating the risk of fire and personal injury. -
Page 14: Getting Ready
Getting Ready Getting Ready Setting Up the Projector Locate the projector on a desk, table, or stand that is firm and level. Make sure to allow sufficient space around the sides and back of the projector for proper ventilation. The following illustrations show how the projector should be oriented for optimum projection relative to the screen. -
Page 15: Setup Precautions
Getting Ready A fan inside the projector draws air through Setup Precautions an intake vent on the bottom of the projector to cool the lamp. Be sure to observe the Note that the condition of the environment following precautions whenever using the where you use the projector greatly affects its projector. -
Page 16: Adjusting The Projector Elevation Angle
Getting Ready Adjusting the Projector Elevation Angle You can change the elevation angle of the projector in a range of 0 to 8 degrees. You can also make fine adjustments to the left and right side elevation angle when necessary. To change the projector elevation angle Lift up the front of the projector and press the release button. -
Page 17: Connecting A Computer To The Projector
Getting Ready Connecting a Computer to the Projector You can use the projector to project an image of video output from a computer. You can also output audio from the computer through the projector’s speaker. After you connect a computer to the projector’s USB port, you can use the remote controller to perform computer mouse operations, and previous page and next page operations. -
Page 18: Turning On The Projector
Use a conveniently located power outlet that you can reach easily when you need to unplug the projector. If you need more information about the power supply, contact your original dealer or authorized CASIO service center. To turn on the projector Use the bundled AC power cord to plug the projector into a power outlet. - Page 19 Getting Ready Press the [ ] (power) key. Input image projection This causes the POWER/STANDBY indicator to flash green, which indicates that the projector is warming up. After warm up is complete, POWER/STANDBY indicator stops flashing and remains lit green, and the projector starts projecting an image from the device connected to it. It normally takes about 60 seconds from the point that warm up starts until an image is projected from the connected device.
-
Page 20: Turning Off The Projector
Getting Ready Specifying the Display Message Language A “Language” window will be projected the first time you turn on the projector. Use the menu on this screen to specify the display language you want to use. Use the cursor [ ] and [ ] keys to highlight the language you want to use. If the serial number You can select from among these languages: starts with this letter:... -
Page 21: Direct Power Off
Getting Ready To turn off the projector, press the [ ] (power) key again in response to the confirmation message. This causes the projector lamp to go out and stops projection. Also the POWER/STANDBY indicator starts to flash amber, which indicates that the projector is cooling down. -
Page 22: Projection Operations
Projection Operations For detailed information about projection operations, see the User’s Guide (UsersGuide_English.pdf) Projection Operations on the CD-ROM that comes with the projector. Projecting onto a Screen Auto Input Source Selection When you turn on the projector, it checks the status of each input source (whether or not the input source is sending a signal) in the sequence shown below. -
Page 23: Keystone Correction (Af/Ak, Keystone
Projection Operations Auto Adjustment of an RGB Image When the input source is RGB (computer), the projector automatically adjusts vertical and horizontal positioning, frequency, and phase whenever it detects an RGB signal (following input source selection, power up, etc.). You can also execute an automatic adjustment operation by pressing the [AUTO] key. -
Page 24: Auto Keystone Correction
Projection Operations Auto Focus (AF) At times, the projector may not focus properly when you press the [AF/AK] key. This can be caused by local environmental factors, etc. If this happens, focus the image manually or try performing the AF operation again. If you often need to adjust focus manually, perform the steps under “To adjust Auto Focus”, below. -
Page 25: Using The Setup Menu
Using the Setup Menu Pressing the [MENU] key while an image is being projected displays the setup menu on the Using the Setup Menu projected image. The setup menu can be used to configure a variety of different projector settings. Use the cursor keys to select and configure settings, and the [ENTER] key to register them. -
Page 26: User Maintenance
User Maintenance User Maintenance Cleaning the Projector Always turn off the projector before cleaning it. Periodically clean the projector exterior, lens, sensors, intake vents, and exhaust vents on a regular basis. For details about the cleaning procedure, see “Cleaning the Projector” in the User’s Guide (UsersGuide_English.pdf) on the CD-ROM that comes with the projector. -
Page 27: To Replace The Lamp
Should the lamp break, take care to avoid personal injury on the glass fragments. Never try to replace a broken lamp on your own. Be sure to contract your original dealer or authorized CASIO service center to request replacement. The lamp contains mercury. Dispose of old lamps in accordance with the rules and regulations of your local jurisdiction. - Page 28 User Maintenance Loosen the lamp cover screws, and Loosen the three screws securing the then remove the lamp cover. lamp cartridge. Screws Lamp cover Lamp cartridge Use the lamp cartridge handle to pull Insert the new lamp cartridge as far as the lamp cartridge from the projector.
-
Page 29: Resetting The Lamp Time
User Maintenance Resetting the Lamp Time The lamp time reset operation you need to perform depends on when you replace the lamp. It is time to replace the lamp. Use the procedure in the User’s Guide to replace the lamp as soon as possible. -
Page 30: Troubleshooting
After the indicator goes out, plug the AC power cord back in and turn on the projector again. If the error occurs again when you turn power back on, contact your original dealer or authorized CASIO Service Center. POWER : Amber flashing Red steady There is some problem with the fan. -
Page 31: Projector Troubleshooting
(0.5-second interval) cartridge for damage. If there is nothing wrong with the lamp Alert cartridge, take it to your original dealer or authorized CASIO Service Center. POWER : Amber flashing... -
Page 32: Specifications
Specifications Specifications Model Name XJ-460/XJ-560 Projection System DLP (DMD, single panel) Size 0.7inch Number of XGA (1024 × 768) Pixels Projection Lens Auto, optical zoom (×2); auto focus F = 2.0 to 2.8 f = 20 to 40mm Light Source 270W high-pressure mercury lamp RGB input terminal RGB mini D-Sub 15-pin ×...