Table of Contents
Advertisement
f
Save This Manual
For Future Reference
SEARS
owner's
manual
Model No.
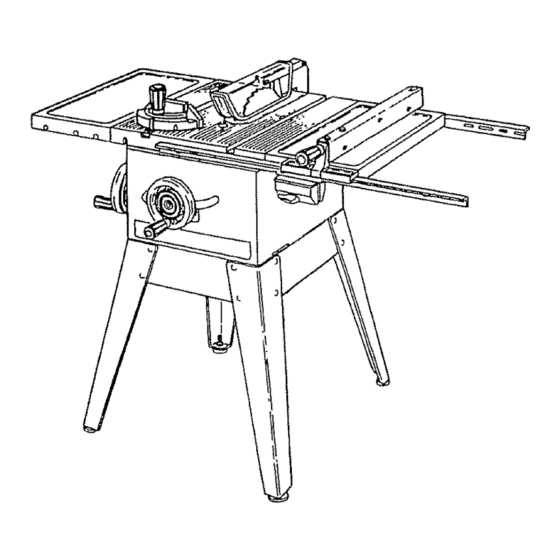
113.299210
Saw with Legs
Two Table Extensions
Motor
Rip Fence and
Miter Gauge
Serial
Number.
Model
and
sedal
numbers
may be found on the left rear
side of the base,
You should record both model
and serial
number
in a safe
place for future use,
FOR YOUR
READ ALL
INSTRUCTIONS
CAREFULLY
Part No, SP5909
10 iNCH
DIRECT DRIVE
TABLE SAW
- assembly
. operating
o repair parts
®
Sears,
Roebuck
and Co., Hoffman
Estates,
IL. 60179 U_S,A.
J
Printed in US A
Advertisement
Table of Contents

Related Manuals for Craftsman 113.29921


Summary of Contents for Craftsman 113.29921
- Page 1 Save This Manual For Future Reference SEARS owner's manual Model No. 113.299210 Saw with Legs Two Table Extensions Motor Rip Fence and Miter Gauge Serial Number. Model sedal numbers may be found on the left rear side of the base,...
-
Page 2: Warranty
Sears, Roebuck and Co°, D/817 WA Hoffman Estates, Safety Instructions Safety is a combination of common sense, staying alert and knowing how your table saw works,, Read this manual to understand this table saw Safety Signal Words... -
Page 3: Before Each Use
Never use another person as a substitute for a table extension, or as additional sup- port for a workpiece basic saw table, or to help feed, support or pull the workplace • Never confine the piece being cut off, that is, the piece... -
Page 4: Plan Ahead To Protect Your Eyes, Hands, Face And Ears
• Let the blade reach fu!t speed before cutting ° It will do the job better and safer at its designed rate o Feed the workpiece into the saw only fast enough to let the blade cut without bogging down or binding For Table Saws (continued) Plan the way you will push the workpiece through°... -
Page 5: Additional Safety Instructions
(See "Maintaining Your Table Saw - AntF Kickback Pawls" section ) . Plastic and composition (like hardboard) materials may be cut on your saw However, since these are usually quite hard and sIippery, the anti-kickback not stop a kickback... -
Page 6: Glossary Of Terms For Woodworking
Anti-Kickback Pawls Device which, when properly maintained, stop the workpiece from being thrown towards the front of the saw at the operator during ripping operation Arbor The shaft on which a cutting tool is mounted Bevel Cut An angle cutting operation made through the face of the... -
Page 7: Motor Specifications And Electrical Requirements
Motor Specifications _ower Supply and Motor Specifications WARNING: To avoid electrical ards or damage to the tool, use proper circuit pro- tection. Your tool is wired at the operation using the voltage shown. to a power line with the appropriate 15-amp branch circuit. -
Page 8: Wire Sizes
Motor is overloaded - Overloading can occur if you feed too rapidly or if saw is misaligned b, Motor circuit is fused differently from recommenda- tions - Always follow instructions for the proper fuse/ breaker... -
Page 9: Table Of Contents
Installing Rip Fence Guide Bars and Switch Box , ,15 Aligning Extensions Checking Table Insert ... Installing Blade Guard ... Getting to Know Your Table Saw ... 21 Safety Instructions for Basic Saw Operations Before Each Use To Avoid Injury From Jams, Slips Or Thrown Pieces... -
Page 10: Unpacking And Checking Contents
WARNING: The saw is heavy° To avoid back injury, get help to lift the saw. Hold the saw close to your body. Bend your knees so you can lift with your legs, not your back. -
Page 11: List Of Loose Parts
List of Loose Parts Item Part Name Tabte Saw ... Rip Fence ... Miter Gauge Blade Guard and Spreader Rip Fence Guide Bar, Rear ... Rip Fence Guide Bar with Rip Scale (Front) Loose Parts Open loose parts bag labeled "Large Pads", Check to see that the following items are included o Bag labeled "Guard"... -
Page 12: Assembly
4 Instal! leveling feet through hotes in bottom of legs as shown. 5 Adjust teveling feet as follows: a Move saw to desired location.. b. With 9/16" wrench loosen bottom nut c Back off top nut by"hand d Raise or lower foot by adjusting bottom nut using 9/16"... -
Page 13: Mounting Your Saw
Hold the saw close to your body. Bend your knees so you can lift with your 3. Place legs on saw so that holes in saw base and leg set line up and trim label is facing front. Legs will over- hang base in rear 4. -
Page 14: Assembling Table Extensions
Table Extensions items marked with asterisk (*) are shown actual size 2 Assemble with saw upside down NOTE: To protect the finished surfaces of the saw and extensions, lay a piece of heavy paper or cardboard on the floor.. WARNING:... -
Page 15: Installing Rip Fence Guide Bars And Switch Box , ,15
21164 In. Washer • FI_ wasner.._ (For Mounting __'_ Hex Nut ToBracko, 1-112 ln.Hex 2rid Slot Head Screw Front of Saw 1/4-20 Hex Nut1/4 _ ¢._---- Lockwasher 1st Hole Truss Hd. Screws 5/16 In. External 5/16 In. Lockwashers Hex Jam Nut 5/16-18 x 1 In. - Page 16 Securely tighten both nuts 4 Place front guide bar against saw table and drop it in place engaging the screws in the slots, Make sure the spacers are between the front guide bar and the...
-
Page 17: Aligning Extensions
Roll saw over onto front then up onto feet, WARNING: The saw is heavy. To avoid back injury, get help to lift the saw. Hold the saw close to your body. Bend your knees so you can lift with your legs, not your back. -
Page 18: Checking Table Insert
Assembly (continued) Checking Table Insert The table insert must be flush with the surface of the saw table to keep the workpiece from hanging up or binding with the sawbtade as the workpiece blade, 1 Lower sawblade beneath the table insert and check to... -
Page 19: Installing Blade Guard
Installing Blade Guard 1. From the bag Iabeled "Guard" remove the following hardware: Truss Head Screws, t/4-20 x 5/8" Long Socket Head Set Screws, 1/4-20 x 7/8" Long Fiat washers, 17/64 x 9/16 x 3/64 Hex Nuts 1/4_20 Lockwashers, 1/4 ExternalType Wing Nuts, 1/4-20 Square Nuts, 1/4-20 1 Spreader Support... - Page 20 Assembly (continued) 6 Lay a piece of flat straight wood and a square on saw table and rotate the spreader support until the bracket is aligned with square. 7 Make sure end of support, bracket and rod are even Using a 1/8 inch hex "L" wrench, tighten the set screws...
-
Page 21: Getting To Know Your Table Saw
A Remove key from bag labeled "Miscellaneous" insert into switch. B To turn saw ON, stand to either side of the bJade, never in line with it, insert finger under switch lever and pull end of lever out After turning switch ON, always allow the blade to come up to full speed before cutting. - Page 22 45 ° to the table and the bevel pointer should point to 45 ° NOTE: There are limit stops inside the saw which prevent the blade from tilting beyond 45 ° to the left and 90 ° to the right. (See "Adjustments"...
- Page 23 A Remove insert. B. Remove wrenches from bag labeled "Large Parts" C Place open end arbor wrench on flat surfaces of saw arbor and closed end arbor wrench on nut Position wrenches as shown, holding your hands well above...
-
Page 24: Safety Instructions For Basic Saw Operations
Before Each Use Inspect your saw. • To avoid injury from accidental starting, tum the switch off, unplug the saw, and remove the switch key before raising or removing the guard, changing tool, changing the setup, or adjusting anything, . Check for alignment of moving parts, binding of mov-... -
Page 25: Whenever Sawblade Is Spinning
• Let the blade reach full speed before cutting . It will do the job better and safer at its designed rate . Feed the workpiece into the saw only fast enough to let the blade cut without bogging down or binding... -
Page 26: Work Feed Devices
Mark the long edge of the board 2-1/2" from one end Make a crosscut into the edge on the mark, stop- ping about 3/4" into the board Set the saw and rip the width to 4-3/4" along the same edge as the stopped... -
Page 27: Auxiliary Fence
Make sure the screw heads do not stick out from the bottom of the base, they must be flush or recessed, The bottom must be flat and smooth enough to rest on the saw table without rocking 1-1/2"_._ /___ glue, glue the 3/8" x... -
Page 28: Basic Saw Operations
Basic Saw Operations Using the Miter Gauge The miter gauge is used when crosscutting, bevel cutting, compound miter cutting, dadoing and when rabbeting across the end of a narrow workpiece. the following safety precautions WARNING: For your own safety, safety instructions of pages 2, 3, 4, 5, 24 &... -
Page 29: Repetitive Crosscutting
'%" clamp workpiece, when clamping the block that the end of the block is well in front of the saw- WARNING: To avoid kickback blade. Be sure it is clamped securely° D Slide the workpiece... -
Page 30: Miter Crosscutting
Basic Saw Operations Miter Crosscutting Definition: Cutting wood at an angle other than 90 ° with the edge of the wood. Follow the same procedure as you would for crosscutting A Adjust the miter gauge to the desired angle, and... -
Page 31: Using The Rip Fence
Replace or sharpen anti-kickback become dull ° Plastic and composition (like hardboard) materials may be cut on your saw, However, since these are usually quite hard and slippery, the anti-kickback not stop a kickback, Therefore, be especially careful in your setup and cutting procedures,... - Page 32 Basic Saw Operations Ripping (continued) Once the trailing end is on the table: When "width of rip" is 2" or wider, use the push stick to finish pushing the work all the way past the blade When "width of rip" is narrower than 2" the push stick cannot be used because the guard will interfere_ use the auxiliary fence and push block.,...
-
Page 33: Bevel Ripping Narrow Work
This will provide more space between the fence and the sawblade for use of a push stick If the fence is mounted to the left, the saw- blade guard may interfere with proper use of a push stick Using Featherboards... -
Page 34: Using Featherboards For Non Thru-Sawing
2, Make sure by trial the featherboards back if one should occur WARNING: For your own safety, replace the saw- blade guard as soon as the non thru-sawing opera- tion is complete. Resawing... -
Page 35: Dadoing
The arbor on the saw, is only long enough so that the widest cut that can be made is 9/16" wide It is not necessary... -
Page 36: Ploughing And Molding
Basic Saw Operations Ploughing and Molding Ploughing fs grooving with the grain the tong way of the workpiece, using the fence Use featherboards sticks as required Molding is shaping the workpiece with the grain the long way of the workpiece, using the fence. -
Page 37: Rip Fence
Adjustment Checking the Fence Spring 1 Place fence on saw but do not lock it 2 Move the rear end of the fence slightly to the right or left, When you release it, the fence shouid "spring" back to its original position 3 ff it does net, the spring pressure must be increased, ®... -
Page 38: Rip Fence Alignment Adjustment
Adjustments (continued) Adjusting the Spring 1 Loosen the screws 2. Move spring slightly toward front of fence screws If the fence does not slide easily along the bars, the pres- sure of the spring can be reduced. 1 Loosen the screws 2 Move spring slightly toward rear of fence screws... -
Page 39: Heeling Adjustment Or Parallelism Of Sawblade To Miter Gauge Groove
Parallelism blade to Miter Gauge Groove While cutting, the materia_ must move in a straight line parallel to the sawblade Therefore, both the miter gauge groove and the rip fence must be parallel to the saw- blade must parallel gauge groove. -
Page 40: Blade Tilt, Or Squareness Of Blade To Table
3 Place the square against the blade Make sure square is net touching the tip of one of the saw teeth 4 If blade is square to table; check peinter A If pointer does net point to "0" mark en the bevel scale, bend peinter to read "0"... - Page 41 45 ° stop collar 7, PIace an accurate square against blade, Make sure square is not touching the tip of one of the saw teeth 8, It blade is not 45 ° to table, the 45 ° stop collar must be adjusted...
-
Page 42: Blade Elevation
NOTE: When adjusting the screws on the tilt bearing retainer, ho_d the nut inside using a 3/8" wrench, The screws for the elevation bearing retainer can be reached with a small screwdriver through the curved slot on the front of the saw Tilt Screw Tilt Handwheel... -
Page 43: Maintaining Your Table Saw
• Do not allow sawdust to accumulate Frequently blow out any dust that may accumulate inside the saw cabinet and the motor o Clean your cutting tools with a gum and pitch remover o The cord and the tool should be wiped with a dry clean... -
Page 44: Lubrication
Craftsman Gum and Pitch remover) 2 Elevation screw threads and pivot nut (First clean with Craftsman Gum and Pitch remover ) 3. Cradle bearing points, 4, Bearing points in guard assembly, miter gauge and rip fence... -
Page 45: Sears Recommends The Following Accessories
4 See "Adjustments" section, "Rip Fence" 5. See "Assembly" section, "Installing Blade Guard" 1. See "Adjustment" section, "Blade Tilt, or Squareness of Blade to Table" 1 See "Maintaining Your Table Saw" section, Lubrica- tion 2. See "Adjustments" section, "Tilt and Elevation Mechanism"... -
Page 46: Motor
Relay will not operate 1. Burned contacts (due to extended hold-in periods caused by low line voltage, etc.,) 2. Saw not in upright position 3. Loose or broken connectors. Motor stalls (resulting in 1. Starting relay not operating, blown fuses or tripped... -
Page 47: Repair Parts
Repair Parts Parts List for Craftsman Always Order by Part Number - not by Key Number PaN No. 62693 62692 STD551031 62775 9404336 62774 423567 62582 STD600805 62528 62529 62531 62944 508112 STD551210 STD611005 17 i62532 * Standard Hardware Item May be purchased tocalty 10 Inch "Fable Saw... - Page 48 Parts List for Craftsman 10 Inch Table Saw Model No. 113.299210 Figure...
- Page 49 * Connector, Wire 62539 Spacer, Fence Guide Bar 62710 Tape, Fence Standard Hardware item - May be purchased locally Parts List for Craftsman 10 Inch Table Saw Model No. t 13.299210 Figure Always Order by Part Number - not by Key Number...
- Page 50 Parts list for Craftsman 10 Inch Table Saw Model No. 113.299210 Figure 3 201! 23 22 \\\'"...
- Page 51 21 16O301 YrRing Retatning 3/8 * Standard Hardware Item - May be purchased locally. 1 Stock Item - May be secured through the Hardware Department of most Sears retail stores. Parts List for Craftsman 10 Inch Table Saw Model 113.299210 Figure...
- Page 52 Repair Parts Parts List for Craftsman Always Order by Part Number - not by Key Number Key ! No. I 10 I STD541231 11 162383 12 16O288 * Standard Hardware Item - May be purchased Iocatly t Stock item - May be secured through the hardware depart-...
- Page 53 Always Order by Part Number - not by Key Number Standard Hardware Item - May be purchased Iocatly If this part is removed, discard and replace with a new push nut List for Craftsman 10 Inch Table Saw Model 113.299210...
- Page 54 Repair Parts Parts List for Craftsman Rear Guide Bar (Ref) 12 STD523112 * Standard Hardware Item - May be purchased locally t Stock Item - May be secured through the hardware department of most Sears retail stores 10 Inch Table Saw Model No.
- Page 55 Repair Parts Parts List for Craftsman Key j No, I Part No. '805589-5 ;824361 1824363 _824362 i824364-2 1STD541025 ' STD551225 1803835_1 I STD541237 10 I 11 I STD523112 STD55103I 12 i STD551t31 13 ISTD541231 Standard Hardware item - May be purchased Iocaily 10 Inch Table Saw Model No.
- Page 56 113.299210 The model number of your 10 inch Table Saw wilt be found on a plate attached to your saw, at the right rear side of the base When requesting service ordering parts, always provide the following information: oProduct Type •...