Black & Decker TR1300BD - 2-Slice Toaster Manual
- Use and care manual (2 pages)
Advertisement
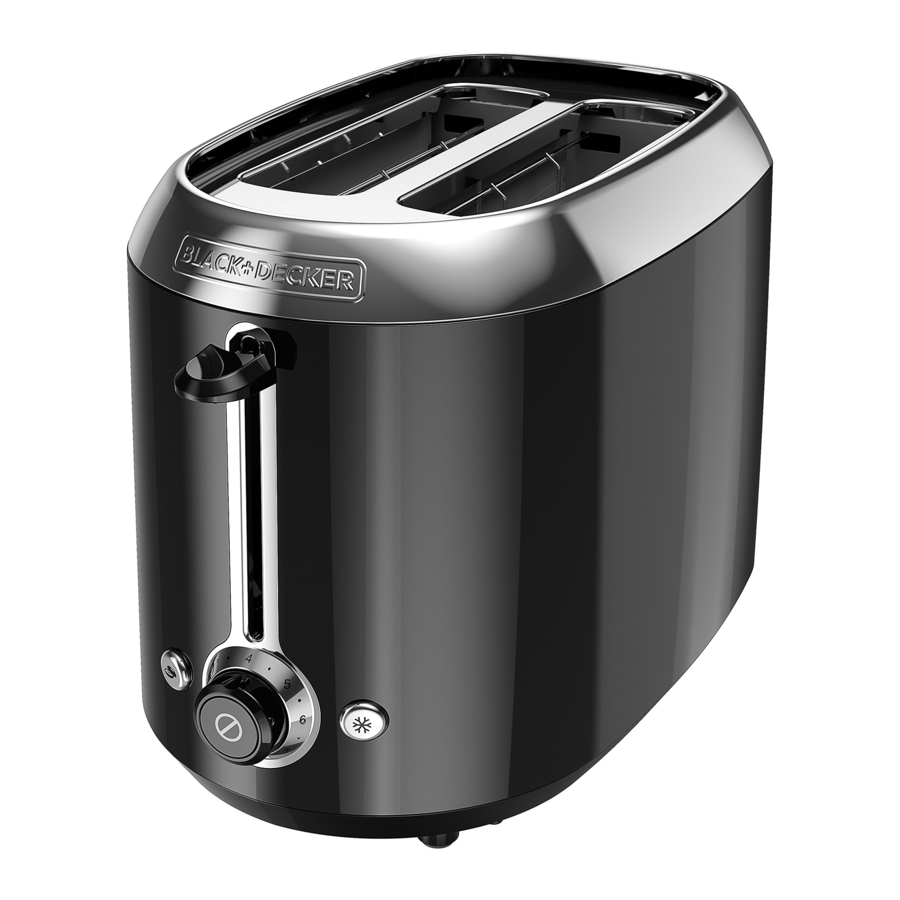
2 SLICE TOASTER
Product may vary slightly from what is illustrated.

- Extra-wide slots with automatic adjusting guides
- Toast lever
- BAGEL button
- Toast shade selector dial
- CANCEL button
- FROZEN button
- Drop down crumb tray (not shown)
- Cord wrap (under unit)
Please Read and Save this Use and Care Book.
POLARIZED PLUG (120V MODELS ONLY)
This appliance has a polarized plug (one blade is wider than the other). To reduce the risk of electric shock, this plug is intended to fit into a polarized outlet only one way. If the plug does not fit fully into the outlet, reverse the plug. If it still does not fit, contact a qualified electrician. Do not attempt to modify the plug in any way.
ELECTRICAL CORD
- A short power-supply cord is provided to reduce the risk resulting from becoming entangled in or tripping over a longer cord.
- Longer extension cords are available and may be used if care is exercised in their use.
- If a long extension cord is used,
- The marked electrical rating of the extension cord should be at least as great as the electrical rating of the appliance,
- The cord should be arranged so that it will not drape over the countertop or tabletop where it can be pulled on by children or tripped over unintentionally.
- If the appliance is of the grounded type, the extension cord should be a grounding-type 3-wire cord.
Note: If the power supply cord is damaged, it should be replaced by qualified personnel; in Latin America, by an authorized service center.
How to Use
This product is for household use only.
GETTING STARTED
- Unpack the unit. Remove all packing material, any stickers, and the plastic band around the power plug.
- Please go to www.prodprotect.com/applica to register your appliance.
- Wipe the outside of the toaster with a damp cloth and dry thoroughly.
- Plug the power cord into a standard wall outlet.
TOASTING
- Adjust the toast shade selector to the desired setting (1 to 7). For first use, set the dial to setting 4. Adjust as desired to suit your taste.
Tip: Toast thin slices on lower settings. - Place bread slices or other foods in the center of the slots and press down the toast lever until it locks in place.
- The bread guides will automatically adjust to hold thick or thin slices in place.
- When toasting is done, the toast lever goes up and the unit shuts off.
Tip: If needed, lift the toast lever upward to raise the toast above the slots.
- If food becomes jammed, the built-in auto off function automatically shuts off the power.
- Unplug the cord and move the toast lever up and down a few times to raise jammed food.
- Do not touch the metal area around the slots as it may be hot.
- Never use metal utensils to free food.
- To interrupt toasting at any time, press the
![]() CANCEL button.
CANCEL button.
BAGEL FUNCTION
- Insert cut bagel into the slots with cut side toward the inside of the toaster.
- Adjust the toast shade selector to the desired setting (1 to 7).
- Press down the toast lever until it locks in place then press the
![]() BAGEL button.
BAGEL button.
![]()
You must press down the toast lever before selecting a function. If not, the function will not be activated. - If food becomes jammed, the built-in auto off function automatically shuts off the power.
- Unplug the cord and move the toast lever up and down a few times to raise jammed food.
- Do not touch the metal area around the slots as it may be hot.
- Never use metal utensils to free food.
- To interrupt toasting at any time, press the
![]() CANCEL button.
CANCEL button.
 BAGEL button.
FROZEN FUNCTION
For best results when toasting frozen food items, follow the manufacturer's package directions.
- Place food into the toaster slots.
- Adjust the toast shade selector to the desired setting (1 to 7).
- Press down the toast lever until it locks into place, then press the
![]() FROZEN button.
FROZEN button.
 FROZEN button.
If you select the wrong button, you must press the  CANCEL button and then select the button you want after you press down the toast lever.
HELPFUL TIPS
- If food becomes jammed, unplug the cord and move the toast lever up and down a few times to raise jammed food.
- To interrupt toasting at any time, press the
![]() CANCEL button.
CANCEL button.
CARE AND CLEANING
This product contains no user-serviceable parts. Refer service to qualified service personnel.
CLEANING
Always unplug the cord from the electrical outlet and allow the toaster to cool before cleaning. Do not immerse the toaster in water.
CRUMB TRAY
- Under the toaster towards the front, place two fingers in the holes of the crumb tray. Slide the tray slightly toward the front to clear the two plastic tabs and lower that end of the crumb tray.
- Dispose of crumbs and wipe the inside of the tray with a damp cloth. Remove stubborn spots using a nylon mesh pad.
- Dry thoroughly.
- To close, secure the crumb tray over the tabs to lock into place.
Note: Do not allow debris to build up in the crumb tray
CLEANING OUTSIDE SURFACES
Unit gets hot. Allow the toaster to cool completely before cleaning.
- Wipe the exterior with a damp cloth or sponge and dry with a paper towel.
- Do not use strong cleaners or abrasives that may scratch surfaces and never spray cleaners directly onto the toaster.
STORAGE
Use the cord wrap on the bottom of the toaster to minimize clutter on your counter and for easy storage.
Customer Care Line: 1-800-231-9786
For online customer service: www.prodprotect.com/applica

Documents / Resources
References

Download manual
Here you can download full pdf version of manual, it may contain additional safety instructions, warranty information, FCC rules, etc.
Advertisement
Thank you! Your question has been received!


Need Assistance?
Do you have a question about the TR1300BD that isn't answered in the manual? Leave your question here.