Breville HeatSoft VFM029 - Hand and Stand Mixer Manual
- Instruction manual (14 pages)
Advertisement
product safety
IMPORTANT SAFETY INSTRUCTIONS. READ CAREFULLY AND KEEP FOR FUTURE REFERENCE
This appliance shall not be used by children. Keep the appliance and its cord out of reach of children. Cleaning and user maintenance shall not be made by children without supervision.
This appliance is not intended for use by persons whose physical, sensory or mental capabilities are reduced or lack of experience or knowledge, unless such persons are supervised or trained to operate the appliance by a person responsible for their safety. Close supervision is necessary if you use the appliance near children or people with disabilities.
Always disconnect the appliance from the mains supply socket if it is left unattended and before assembling, disassembling or cleaning.
Always allow the appliance to cool down before assembling, disassembling, cleaning or before storage.
If the supply cord is damaged, it must be replaced by the manufacturer, its service agent or similarly qualified persons in order to avoid a hazard.
All accessories (beaters, dough hooks and whisk) should not be used for longer than 4 minutes 30 seconds. When mixing extremely heavy loads the appliance should not be operated for more than 1 minute 30 seconds.
This appliance is intended to be used in household and similar applications such as:
 Staff kitchen areas in shops, offices and other working environments;
Farm houses;
By clients in hotels, motels and other residential type environments; ! Bed and breakfast type environments.
Always ensure that hands are dry before handling the plug or switching on the appliance.
Always use the appliance on a stable, secure, dry and level surface.
This appliance must not be placed on or near any potentially hot surfaces (such as a gas or electric hob).
Never immerse any part of the appliance or power cord and plug in water or any other liquid.
Never let the power cord hang over the edge of a work top, touch hot surfaces or become knotted, trapped or pinched.
Do not use the appliance if it has been dropped, if there are any visible signs of damage or if it is leaking.
Never use any accessory or attachment not recommended by the manufacturer.
Remove attachments from the appliance before washing or cleaning them.
Keep fingers, hair and clothing away from the moving parts of the appliance when it is in use.
Do not attempt to eject, fit or remove attachments until the appliance has come to a complete stop.
Do not touch or hold your hands beneath the heat nozzle while the HeatSoft feature is on.
Do not have the HeatSoft feature on while Hand mixer is sitting on the counter on its base.
Do not use without the heater vent cover and filter in place.
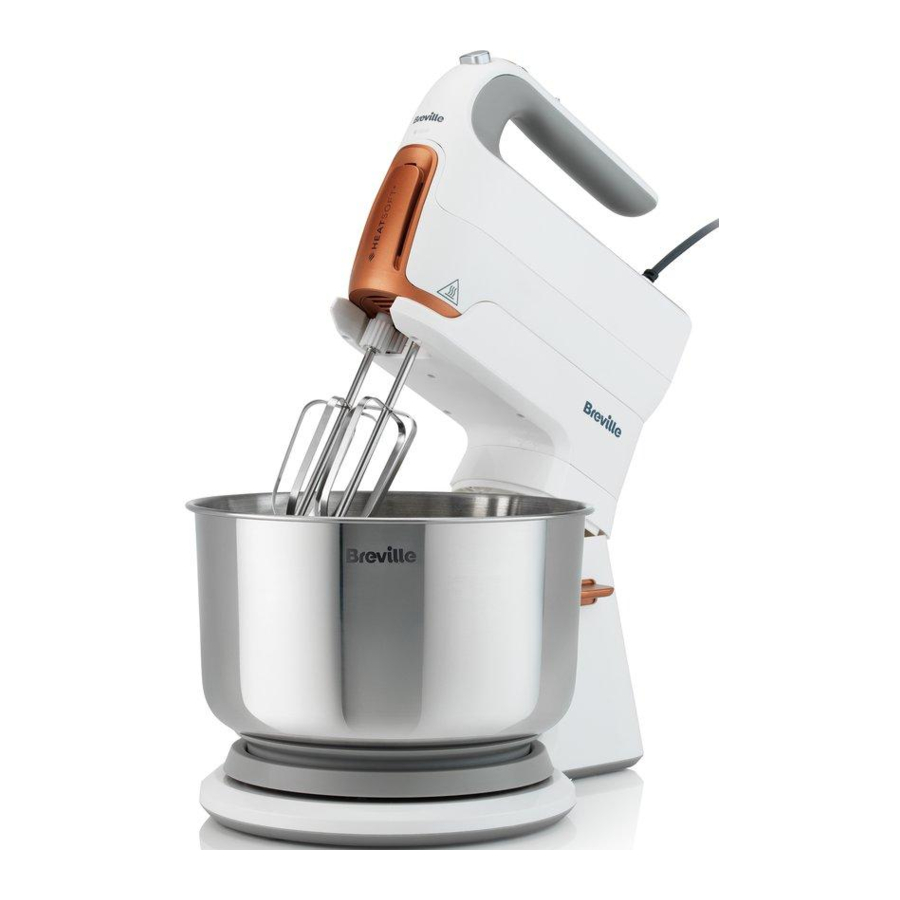
features and parts


- Beater eject button
- HeatSoft button
- Boost button
- 7-speed control
- Detachable hand mixer
- Tilt release lever to raise and lower head
- 3.7L stainless steel bowl
- Geared bowl locking plate
- Hand mixer release button
- SwivelScrape technology control switch
- Stainless steel beaters
- Stainless steel dough hooks
- Stainless steel whisk
Due to our policy of continuous improvement, the actual product may differ slightly from the one illustrated in these instructions.
Learning about your hand and stand mixer
The Breville hand and stand mixer with ![]() HeatSoft technology has been designed to allow you to bake when inspired. No more waiting for ingredients like butter to reach room temperature! Now you can soften and mix in one step!
HeatSoft technology has been designed to allow you to bake when inspired. No more waiting for ingredients like butter to reach room temperature! Now you can soften and mix in one step!
Did you know?
Many recipes require ingredients like butter to be at room temperature. Butter will only reach room temperature after hours of sitting on the counter. If you use butter that's cold, straight from the refrigerator, it will result in heavy and dense baked goods. Butter that is microwaved or melted can create an oily batter resulting in soggy, flat cookies. Using room temperature ingredients creates fluffier results and better baked goods.
![]() HeatSoft technology
HeatSoft technology
The ![]() HeatSoft button allows for butter to be softened while mixing.
HeatSoft button allows for butter to be softened while mixing. ![]() HeatSoft Technology uses gentle heat to bring cold ingredients to room temperature while mixing eliminating the need to plan ahead.
HeatSoft Technology uses gentle heat to bring cold ingredients to room temperature while mixing eliminating the need to plan ahead.
Boost button
The boost button features allows for an added boost to the selected speed setting at the press of the button.
Beater eject button
The beater eject button design allows for a separate push of the thumb to release the beaters, dough hooks or whisk.

Make sure hand mixer is unplugged before removing or inserting any attachments.
Detachable hand mixer
Can be detached from the stand for hand use.
Tilt release lever
Press to release the head lock and tilt or lower the mixer head.
SwivelScrape technology switch
Gives control to manoeuvre the beaters to scrape the bowl while mixing for uniform consistency without interruption.
Geared bowl locking plate/ 3.7L stainless steel mixing bowl
Geared bowl auto turns while you mix for optimal result. Dishwasher safe. Rotating bowl with swivel control mixer head for optimal mixing.
Hand mixer release button
Press to detach the hand mixer.
Stainless steel beaters
Suitable for making cakes, biscuits, pastry, scones, icing, fillings, etc. Dishwasher safe.
Stainless steel dough hooks
Stainless steel dough hooks ideal for kneading dough. Dishwasher safe.
Stainless steel whisk
Suitable for whipping cream and aerating egg whites for meringue. Dishwasher safe.
using your unit on the stand
Before first use
Make sure your mixer is switched off and unplugged from the mains supply socket before cleaning, detaching or fitting it to the mixer stand or before fitting or removing the beaters, dough hooks or whisk.
Before using your mixer for the first time, wash the beaters, dough hooks, whisk and stainless steel bowl in warm, soapy water. Rinse and dry thoroughly. Do not use harsh abrasives, chemicals or oven cleaners. Using a damp cloth or sponge, wipe the exterior of the hand mixer and mixer stand. Dry thoroughly.
Using on the stand
Always avoid contact with moving parts while the appliance is in operation. Keep hands, hair, clothing as well as other utensils away from the beaters, dough hooks or whisk during operation.
Never attempt to remove or replace the beaters, dough hooks or whisk whilst your food mixer is in operation, or plugged in to the mains supply.
- Ensure that your mixer is unplugged from the supply socket and the speed selector is set to 0 (off).
- Insert beaters one at a time, by placing the stem end of beaters into the opening drive holes on the bottom of the mixer. Turn beater slightly and push in until beater clicks into position.
![]()
NOTE: the beaters and dough hooks are not interchangeable. The beater and dough hook with the gear on the stem fits into the large drive hole on the mixer. The whisk should be placed into the small drive hole on the right. If the beaters, dough hooks and whisk do not click into the drive holes, reverse and try again. - Hold the geared bowl locking plate on the mixer stand, position the mixing bowl over the mixer stand and rotate the mixing bowl in a clockwise direction until it clicks into position.

- Connect the hand mixer to the mixer stand by sliding in the hand mixer into the 4 prongs on the stand and until it clicks into place. Ensure that the hand mixer and mixer stand are firmly connected together.
![]()
- Add the ingredients to the mixing bowl.
- Plug your mixer into the mains supply socket.
- Turn the on/off speed selector switch to 1 to start mixing. Adjust the speed as required (see Mixing speeds).
- Slide the SwivelScrape technology control switch to the left to manoeuvre the beaters to scrape the bowl while mixing for uniform consistency. Move the hand mixer side to side as needed to reach all areas of the bowl. When completed, move the hand mixer back to the original position and lock in place.

Note: When kneading bread dough for best results, it is recommended that the mixer head is kept in the fixed position. - For best results, use the whisk attachment with the mixer off the stand.


using your unit by hand
Always avoid contact with moving parts while the appliance is in operation. Keep hands, hair, clothing as well as other utensils away from the beaters, dough hooks or whisk during operation.
Never attempt to remove or replace the beaters/, dough hooks or whisk whilst your food mixer is in operation, or plugged in to the mains supply.
- Ensure that your mixer is unplugged from the supply socket and the speed selector is set to 0 (off). Press the mixer head lock release button and raise the mixer stand head until it clicks.
- Press down the hand mixer release clip, then lift the hand mixer from the mixer stand.
- Plug your hand mixer into the mains supply socket.
- Place the beaters, dough hooks or whisk into the ingredients to be mixed. Always support the container or bowl in which you are mixing ingredients whilst operating your hand mixer. Set the on/off speed selector switch to 1 to start mixing. Adjust the speed as required (see operating speed control section for more details).
- When mixing, guide the hand mixer through the centre and around the sides of the mixing bowl.
- When using the whisk attachment, we recommend using the mixer off the stand.
- When you have finished mixing the ingredients, set the on/off speed selector to 0 (off). Scrape the beaters/dough hooks around the bowl to remove any remaining ingredients.
- Unplug your hand mixer from the mains supply socket.
using your device
Operating HeatSoft technology
Cut cold butter into approximately 2.5cm cubes and place them into the mixing bowl with sugar.
Press the ![]() HeatSoft button once, and then turn on the beaters. Start mixing at speed setting 2 for approximately 45 seconds or until there are no more large chunks of butter. Then turn to speed 5-7 for the remainder of time recommended in the chart.
HeatSoft button once, and then turn on the beaters. Start mixing at speed setting 2 for approximately 45 seconds or until there are no more large chunks of butter. Then turn to speed 5-7 for the remainder of time recommended in the chart.
NOTE: When the HeatSoft button is functioning, a white light will illuminate and the heat fan will turn on.
Do not touch or hold your hand beneath the heat nozzle while the HeatSoft feature is ON.
NOTE: Turn off the HeatSoft feature after the amount of time listed in the chart above to avoid over creaming.
- Once the creaming is completed press the HeatSoft button again to turn off the heat and the white light will fade out and the fan will turn off.
- Continue mixing with the rest of the ingredients following the recipe. For more details continue to the mixing section.
| Sugar Amount (grams) | Butter Amount (grams) | Softening Time (minutes) |
| 100g | 100g | 1 to 1 ½ minutes |
| 200g | 200g | 2 to 2 ½ minutes |
NOTE: HeatSoft feature will run for 10 minutes before automatically turning off.
Operating speed control
- Move the speed selector from 1 to 7 and to turn off set to "0 (OFF)".
- To engage a higher speed immediately press and hold the boost button. The speed will go to 7 until released and will return to original setting.
NOTE: This feature is intended to be used for short bursts. For long mixing use speed 7.
| Speed | Mixing Tasks |
| 1 Mix | Use when stirring liquid ingredients or when mixing dry and liquid ingredients together alternately in a recipe. |
| 2 Mix/Soften | Use to start softening butter with the HeatSoft button. Also use when a recipe calls for combining ingredients together. |
| 3-4 Knead | Use when combining and kneading bread doughs. NOTE: Speed 4 is the maximum recommended speed for dough hook usage. |
| 4-5 Blend/Beat | Use when preparing cake mixes or when recipes call for medium speed. Use to cream butter and sugar together. Use when preparing a butter icing from a recipe or package. Use when whipping cream for desserts. |
| 6-7 Whip | Use to mash potatoes to develop a light and fluffy texture. Use when whipping egg whites. Use when butter and sugar are fully softened and you want to create a light fluffy texture. |
| Boost Button | During especially heavy mixing tasks, press the button to drive through the mixture with ease. |
caring for your device
Care and cleaning
Make sure your mixer is switched off and unplugged from the mains supply socket before cleaning, detaching or fitting it to the mixer stand or before fitting or removing the beaters, dough hooks or whisk.
To make cleaning easier, clean your hand mixer and the beaters, dough hooks or whisk as soon as you have finished using them.
- Set the speed selector to 0 (off) and unplug your hand mixer from the mains supply socket.
- Eject the beaters, dough hooks or whisk from your hand mixer by pressing the eject button.
- Wash the beaters, dough hooks, whisk and mixing bowl in hot soapy water. Alternatively, wash them in a dishwasher.
- Rinse and dry the beaters, dough hooks, whisk and mixing bowl before using again. Carefully store the tools inside the bowl when not in use.
- Using a dampened cloth, wipe both the body of your stand mixer, including the hand mixer.
Storage
Store your hand mixer in a clean, dry place, out of the reach of children, ensuring that all the parts are dismantled.
helpful tips for baking
Baking top tips
- When mixing liquids, especially hot liquid: add small quantities at a time to reduce spillage.
- Ingredients should be added to the mixing bowl in the order they are specified in the recipe.
- Use the mixing speed that is recommended in the recipe. Use the speed control button of the mixer to help you find the correct speed to use.
- Use mixing times as specified in recipes. BE CAREFUL NOT TO OVERMIX. Over mixing can cause the mixture to become very tough.
- Should an object, such as a spatula, fall into the bowl while the mixer is operating, turn the mixer OFF immediately, then remove the object.
- For easier cleanup remove attachments and rinse immediately with warm water.
- Use the SwivelScrape technology switch to manoevre the beaters towards the sides of the bowl. This will allow the user to continually mix recipes, without the need for stopping to manually scrape down.
Using your HeatSoft hand and stand mixer
- Before starting, read the recipe completely.
- Butter can be used straight from the fridge. Simply cut into cubes, add to the mixing bowl, select HeatSoft and begin gentle mixing on Speed 2, all other ingredients should be at room temperature. Cream is best when it is whipped cold straight from the fridge.
- Before starting your recipe, position the oven racks into the centre of the oven. Preheat the oven to the temperature recommended in the recipe and gather all the ingredients and utensils near to the mixer.
- Caster sugar is the preferred choice for cake making. Add to the bowl with the chilled butter, once softened, increase the mixer speed and cream until pale and fluffy.
- To eliminate the possibility of egg shells in your recipe, break eggs into a separate container first, then add to the mixture.
- When mixing egg whites, be sure the bowl and whisk are thoroughly cleaned and dried, as even the smallest amount of oil on the beaters or bowl may cause the egg whites not to aerate.
- Always start mixing at slow speeds, especially when mixing in flour or icing sugar. Mix these ingredients slowly at first, then gradually increase the speed as required.
- Do not over beat. Be careful that you only mix/knead mixtures as recommended in your recipe. Fold in dry ingredients until just combined. Always use the low speed. At any stage of mixing, over beating can cause toughness, close texture, lack of rising or excessive shrinkage. Climatic conditions, seasonal temperature changes, temperature of ingredients and their texture can vary from area to area. These conditions can all play their part in the required mixing time and results achieved.
- All recipes have been kitchen tested, but should you find it necessary to vary the ingredients or size of the tin etc. allow for a variation in cooking time. Always ensure that baked foods are correctly cooked before removing them from the oven or cooking appliance.
- Cooking times and temperatures are meant only as a guide. Light mixtures should spring back when lightly touched and heavy mixtures, fruit cake and the like, should be tested with a skewer towards the end of the suggested cooking time. If the skewer is clean when removed, the cake is cooked.
Common baking issues
| Symptom | Possible cause |
| Sponge cake shrink | Unbalanced ingredients, over beating of egg whites, sudden changes of temperature or draught when taking from the oven. |
| Cakes do not rise | Mostly due to gross over beating, but can also be caused by too hot an oven during the first part of cooking. Check dry ingredients are still within date. |
| Cakes sink in the centre | Too much fat, raising agent, liquid or sugar; too little flour, under baked. |
| Slow cooking. | Too much batter for size of pan, too cool an oven, too much sugar, over beating, too much raising agent. |
| Cakes run over the edges | Too much batter for size of pan, too cool an oven, too much sugar, over beating, too much raising agent. |
| Hard outer crust | Too much flour, too little sugar, ingredients not fully combined over mixing, too hot an oven. |
| Moist, sticky outside | Too much sugar, too much fat, over beating, under baking. |
| Coarse, crumbly texture | Over beating, low baking temperature. |
| Heavy, close texture | Too much fat or sugar, over mixing, under baking, or too hot an oven. |
| Fruit sinks | Mixture too soft, damp fruit, too little flour, ingredients not correctly balanced, over beating. |
Oven Temperatures
| °C | °C (fan) | °F | Gas Mark | |
| Very cool | 110 | 90 | 225 | ¼ |
| 130 | 110 | 250 | ½ | |
| Cool | 140 | 120 | 275 | 1 |
| 150 | 130 | 300 | 2 | |
| Moderate | 170 | 150 | 325 | 3 |
| 180 | 160 | 350 | 4 | |
| Moderately hot | 190 | 170 | 375 | 5 |
| 200 | 180 | 400 | 6 | |
| Hot | 220 | 200 | 425 | 7 |
| 230 | 210 | 450 | 8 | |
| Very hot | 240 | 220 | 475 | 9 |
making dough
Preparing dough
- Fit the dough hooks and bowl. (Use speed 3 & 4 for mixing and kneading bread dough) Alternatively this can be done with the mixer off the stand.
- Place the dry ingredients into the mixer bowl.
- Turn the speed control switch to 3.
- Begin to gradually add the liquid ingredients to the bowl.
- Always switch off and unplug the mixer first. Do not use the mixer near the edge of a work surface or table top because movement of the mixer during operation may cause it to fall off.
- After kneading place the dough into a large well greased mixing bowl. Place the bowl in a warm, draft-free area and cover the bowl with a light damp cloth or food wrap until the dough doubles in size.
- Plunge your fist into the centre of the risen dough to remove the excess air. Fold the outer edges into the centre and turn the dough out onto a lightly floured surface for shaping.
- Place the dough into tins for baking, or cut and shape the dough for making buns, rolls, etc.
- Allow the dough to double in size again or as directed by your recipe.
Finishing touches
- Sprinkle loaves or buns with sesame, poppy or caraway seeds before baking.
- Top loaves with shredded cheese during the last few minutes of baking.
- Glazes may be brushed over the dough at any time before, during or after baking.
- For a shiny crust, brush with a beaten egg and milk wash.
- For a matt finish, brush with melted butter or margarine after baking.
troubleshooting
For troubleshooting and FAQs visit www.breville.co.uk.
| Problems | Solutions |
Device stops working | Unplug the power cord from outlet and wait 30 minutes before the next use. |
Inserting beaters and other accessories into the device | Rotate beaters or other accessories slightly clockwise until they click into the unit. |
Removing beaters or other accessories from the unit | Unplug the mixer and then press down the beater eject button and gently pull accessories out. |
If HeatSoft continues to operate | Press the HeatSoft button once to turn off or unplug the power cord from the outlet. |
If the heater fan cover cannot be reinstalled | Check that heater fan cover locking tab is not broken, if so call Customer Service for replacement part. |
If mixing bowl not turning | Ensure the hand mixer is correctly mounted to the mixer stand. Ensure the beaters are correctly inserted. |
Missing any components | Call Customer Service to obtain replacement parts. |
connection to the mains supply
After sales service and replacement parts
In the case the appliance does not operate but is under warranty, return the product to the place it was purchased for a replacement. Please be aware that a valid form of proof of purchase will be required. For additional support, please contact our Customer Service Department at: 0800 028 7154.
Alternatively, e-mail: BrevilleEurope@newellco.com.
Electrical safety
If the plug is not suitable for the socket outlets in your home, it can be removed and replaced by a plug of the correct type.
If the fuse in a moulded plug needs to be changed, the fuse cover must be refitted. The appliance must not be used without the fuse cover fitted.
If the plug fuse requires replacement, a fuse of the same rating as that fitted by the manufacturer must be used. In order to prevent a hazard do not fit a fuse of a lower or higher rating.
If the terminals in the plug are not marked or if you are unsure about the installation of the plug please contact a qualified electrician.
Plug should be ASTA approved to BS1363
Fuse should be ASTA approved to BS1362

Ensure that the outer sheath of the cable is firmly held by the cord grip
Waste Disposal

Waste electrical products should not be disposed of with household waste. Please recycle where facilities exist. E-mail us at BrevilleEurope@newellco.com for further recycling and WEEE information.

Documents / Resources
References
Download manual
Here you can download full pdf version of manual, it may contain additional safety instructions, warranty information, FCC rules, etc.
Download Breville HeatSoft VFM029 - Hand and Stand Mixer Manual
Advertisement
Thank you! Your question has been received!


Need Assistance?
Do you have a question about the HeatSoft VFM029 that isn't answered in the manual? Leave your question here.