Smeg HMF01 - Hand Mixer Manual
- Manual (115 pages) ,
- User manual (17 pages) ,
- User manual (13 pages)
Advertisement
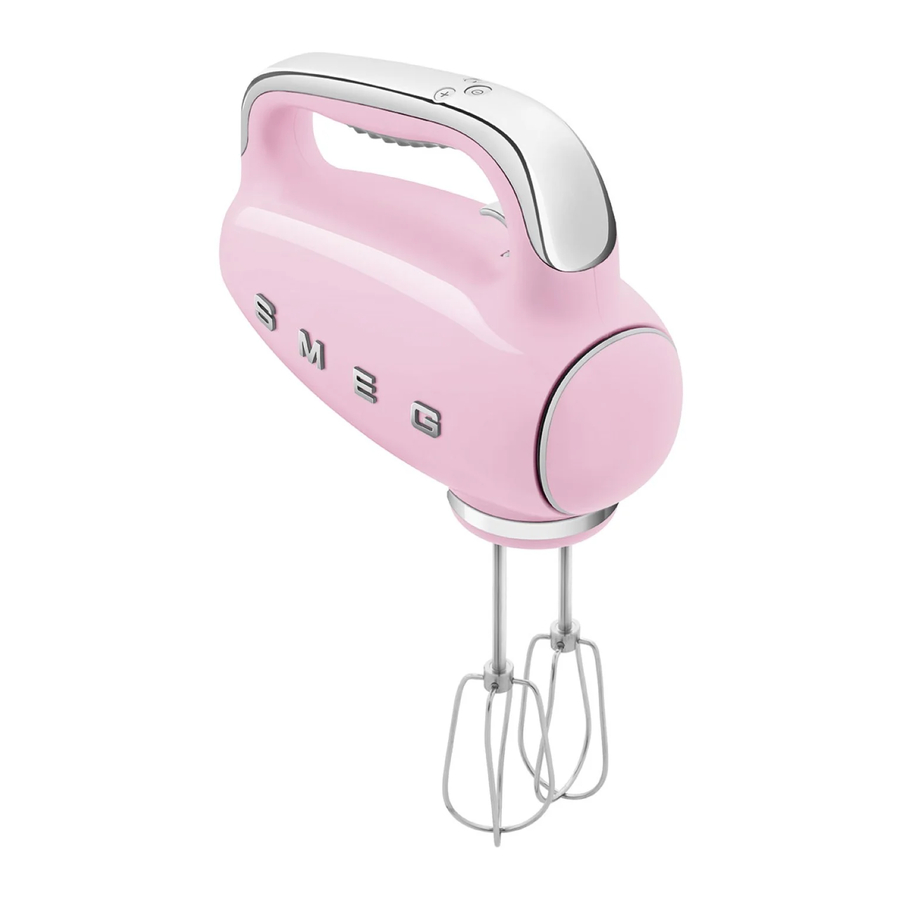
DESCRIPTION OF THE APPLIANCE

(Fig. A)
- Accessory slots
- Handle
- Accessory release trigger
- Speed and timer display
- Start/Stop button
- Speed adjustment buttons
- Optimus beaters
- Dough hooks
- Wire beaters
- Accessory bag
- Feet
- Identification plate
- Cable winding clamp
IDENTIFICATION PLATE (12)
The identification plate states the technical data, the serial number and marking. The identification plate must never be removed.
BEFORE COMMISSIONING
- Unpack the appliance carefully and remove all packaging materials and any labels and stickers.
- Clean the motor base using a damp cloth.
 Before use, check that all components are integral.
ASSEMBLY OF COMPONENTS

(Fig. B)
- Beaters and dough hooks must be inserted into the correct side, and are not interchangeable.
- Insert beater/dough hook with a round ring (A) into the round slot (A).
- Insert beater/dough hook with octagonal ring (B) into the octagonal slot (B).
 Do not use two accessories of different type together.
DESCRIPTION OF CONTROLS AND ACCESSORIES
The appliance is equipped with 3 buttons and a time and speed display.
| Display (4) | |||
| (4a) | (4b) | ||
 Selected speed |  Running timer in minutes | ||
 Running timer in seconds | |||
| Buttons | |||
| (5) |  ON - OFF Key | ||
| (6) |  Decrease speed |  Increase speed/ Turbo function (keep pressed) | |
Optimus beaters (7)
- Use this accessory for semi-hard doughs, medium-consistency creams, chocolate based doughs, pastry doughs, cakes and biscuits doughs, etc.
- Always use both beaters.
Dough hooks (8)
- Use this accessory for thick doughs, such as bread's and pizza's dough, egg pasta, etc.
- Always use both dough hooks.
Wire beaters (9)
- Use this accessory for creams with little consistency, sauces, mayonnaise, to beat cream, eggs, liquids, egg whites, etc.
- Always use both beaters.
Make sure that the bowl used is sufficiently large and high, as well as positioned on a stable surface.
USE
(Fig. A)
- Insert the plug into the power outlet, display (4) off.
- Press the button
![]() to activate the Standby mode: the display (4a) shows 0 and the display (4b) shows 00, all of them flashing.
to activate the Standby mode: the display (4a) shows 0 and the display (4b) shows 00, all of them flashing.
![information]() After 30 seconds of non-use, the display turns off.
After 30 seconds of non-use, the display turns off. - From Stand-by mode press the buttons
![]() /
/![]() to start the motor and increase or decrease the speed, display (4b) will count up from 01 seconds to 59 seconds while the display (4a) shows the selected speed.
to start the motor and increase or decrease the speed, display (4b) will count up from 01 seconds to 59 seconds while the display (4a) shows the selected speed. - After 1 minute of operation the display (4b) return to 0 and the first segment of the minutes running line light up to indicate that 1 minute is passed. The same for second minute and so up to 4 minutes and 59 seconds. After this time:
- The motor automatically stops.
- Display (4a) shows 0.
- Display (4b) shows 4m59s blinking.
- When motor is running, press button
![]() to return in Stand-by mode.
to return in Stand-by mode. - Pressing the button
![]() a second time turns the mixer off.
a second time turns the mixer off.
 /
/ to start the motor and increase or decrease the speed, display (4b) will count up from 01 seconds to 59 seconds while the display (4a) shows the selected speed.
 to return in Stand-by mode.
 Smooth Start system
At the start of the appliance, speed increases progressively until the set speed is reached. This prevents the appliance and the tools from damaging and the ingredients from escaping from the container used.
Turbo function
- Keeping pressed button
![]() for 1 second will be activated TURBO function: display (4a) will show 9 number, display (4b) will continue the seconds count up. The motor speed will be the maximum allowed.
for 1 second will be activated TURBO function: display (4a) will show 9 number, display (4b) will continue the seconds count up. The motor speed will be the maximum allowed. - After releasing the button
![]() the motor speed come back to original set one shown on display (4a). The display (4b) continues the seconds count up.
the motor speed come back to original set one shown on display (4a). The display (4b) continues the seconds count up. - When motor is running, press button
![]() to return in Stand-by mode.
to return in Stand-by mode.
Hints and tips
ADVICES
- Activate the appliance at a low speed until the ingredients are mixed and then increase the speed according to the operation to be performed.
- Climatic conditions, seasonal temperature differences, temperature and consistency of the ingredients could affect the preparation time necessary as well as the results.
- For the best results with thick dough, work it with rotational movements and check that the liquid ingredients are at least 50% of the total dough.
To work thick dough, do not exceed a maximum of 500 g of flour and let the mixer cool for about 5 minutes before reusing. Switch it off as soon as you've got the right consistency.
Place the container to be used for the processing on a stable and flat surface.
During processing or when not in use, it is possible to position the appliance on the specific feet (11) (Fig. C).
To protect your handmixer it is fitted with a protection device which will stop the handmixer operating if overloaded. If activated, the flashing symbol ![]() will appear on the display; switch off, unplug, wait 10 minutes and then plug back into the power supply.
will appear on the display; switch off, unplug, wait 10 minutes and then plug back into the power supply.
RECOMMENDED SPEEDS
Please note that these are recommendations only and the speed you select may depend upon the bowl size, quantities, the ingredients you are mixing and personal preference.
| Speed | Function | Accessory |
| Low 1 - 3 | Combine Combining ingredients |  |
| Low 1- 3 | Knead Kneading leavened doughs (bread, pizza) |  |
| Medium 4 - 6 | Mixing Mixing and beating liquid batters. Mixing compounds with eggs, butter such as cake mixes |  |
| High 7 - 9 | Whipping and whisking Whisking light or dense batters. Whipping cream, egg whites or sauce. |  |
To mix leavened dough, use only the dough hooks.
CLEANING AND MAINTENANCE

(Fig. C)
Before carrying out any cleaning operation, ALWAYS disconnect the plug from the power outlet and allow the appliance to cool down. Never immerse the motor base (1) in water or other liquids.
The instruction manual contains appropriate instructions for cleaning and maintenance operations and operations recommended to the customer by the producer. Any other intervention must be performed by a representative of an authorised service centre.
- Pull the accessory release trigger (3) upwards and remove the accessories.
- Beaters, dough hooks, wire beaters accessories are dishwasher safe.
- Dry all parts of the appliance after cleaning.
- The motor base can be cleaned by first using a damp cloth and then a dry one. Do not use detergents or abrasive materials.
What To Do If.....
| Problem | Possible causes | Solution |
| The motor works at a lower speed than the set one. | The dough in the bowl is too thick. | Remove part of it to lighten it. |
| The motor will not start. | The plug has not been inserted. | Insert the plug. |
| The product has not been activated. | Activate the product by pressing the ON/OFF button. | |
| The motor is damaged. | Contact the service centre. | |
The whisks stop rotating and the flashing symbol  appears on the display. appears on the display. | The product is equipped with a protection device that interrupts the operation of the motor in case of overload. | To reset it, turn off the appliance, unplug the product and let it cool for at least 10 minutes. Then reconnect the power supply to the socket. |
| The accessories do not fit into their seat. | The place of insertion of the accessory is not the correct one. | Respect the shape of the accessory by coupling it with its seat. |
If the problem cannot be solved or for other types of faults, contact the local after-sales service.
 |
Documents / ResourcesDownload manual
Here you can download full pdf version of manual, it may contain additional safety instructions, warranty information, FCC rules, etc.
Advertisement
Thank you! Your question has been received!


Need Assistance?
Do you have a question about the HMF01 that isn't answered in the manual? Leave your question here.