Table of Contents
Advertisement
Quick Links
–
INSTALLATION &
OPERATION
MANUAL
–
YUTAKI SERIES
AND YUTAKI CASCADE CONTROLLER
MODELS
RWM-(2-3)R1E
RWM-(4-10)N1E
RWD-(2-3)RW1E-220S(-K)
RWD-(4-6)NW1E-220S(-K)
RWH-(4.0-6.0)(V)NF(W)E
DHWS(200/260)S-2.7H2E(-W)
RASM-(2/3)VRE
RASM-(4-6)(V)NE
RAS-(2-3)WHVRP1
RAS-(4-10)WH(V)NPE
ATW-YCC-(01-03)
PMML0575 rev.2 - 03/2022
Advertisement
Table of Contents

Related Manuals for Hitachi YUTAKI RWM-2R1E


Summary of Contents for Hitachi YUTAKI RWM-2R1E
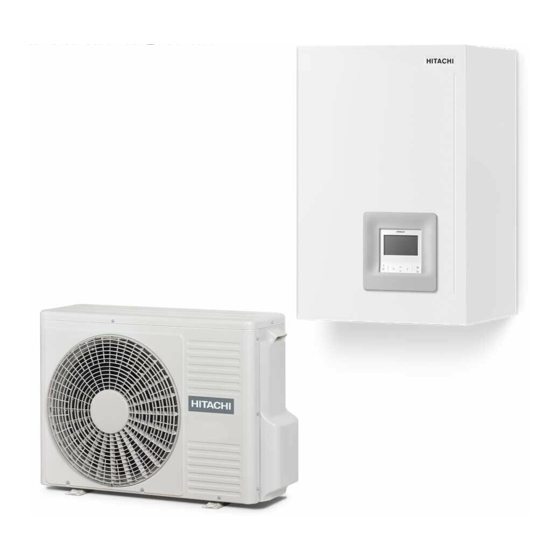
- Page 1 – INSTALLATION & OPERATION MANUAL – YUTAKI SERIES AND YUTAKI CASCADE CONTROLLER MODELS RWM-(2-3)R1E RWM-(4-10)N1E RWD-(2-3)RW1E-220S(-K) RWD-(4-6)NW1E-220S(-K) RWH-(4.0-6.0)(V)NF(W)E DHWS(200/260)S-2.7H2E(-W) RASM-(2/3)VRE RASM-(4-6)(V)NE RAS-(2-3)WHVRP1 RAS-(4-10)WH(V)NPE ATW-YCC-(01-03) PMML0575 rev.2 - 03/2022...
- Page 3 Specifikationerna i den här handboken kan ändras utan föregående meddelande för att HITACHI ska kunna leverera de senaste innovationerna till kunderna. Vi på HITACHI gör allt vi kan för att se till att alla specifikationer stämmer, men vi har ingen kontroll över tryckfel och kan därför inte hållas ansvariga för den typen av fel.
- Page 4 C A U T I O N This product shall not be mixed with general house waste at the end of its life and it shall be retired according to the appropriated local or national regulations in a environmentally correct way. Due to the refrigerant, oil and other components contained in heat pump, its dismantling must be done by a professional installer according to the applicable regulations.
- Page 5 Important note: Please, check, according to the model name, which is your heat pump system, how it is abbreviated and referred to in this instruction manual. MODELS CODIFICATION This Installation and Operation Manual is related to YUTAKI Units. Nota importante: compruebe, de acuerdo con el nombre del modelo, el tipo de bomba CODIFICACIÓN DE de calor, su abreviatura y su referencia en el presente manual de instrucciones.
- Page 6 The English version is the original one; other languages are translated from English. Should any discrepancy occur between the Eng- lish and the translated versions, the English version shall prevail. La versión en inglés es la original, y las versiones en otros idiomas son traducciones de la inglesa. En caso de discrepancias entre la versión inglesa y las versiones traducidas, prevalecerá...
-
Page 7: Table Of Contents
GENERAL INDEX General Index 1 GENERAL INFORMATION ......................1 General information ..............................1 1.1.1 General notes ................................... 1 1.1.2 Introduction ..................................1 1.1.2.1 Overview of YUTAKI system ..........................1 1.1.2.2 Summary of operations ............................2 Applied symbols ..............................4 Product guide ................................. 5 1.3.1 ... - Page 8 GENERAL INDEX 4 ELECTRICAL DATA ........................24 Considerations ..............................24 Split system - R410A Outdoor unit ........................25 Split system - R32 Outdoor unit ........................... 25 Split system - Indoor unit ............................26 4.4.1 YUTAKI S ..................................26 4.4.2 YUTAKI S COMBI................................27 4.4.3 YUTAKI S80 ...................................
- Page 9 GENERAL INDEX R410A Refrigerant circuit ............................. 53 6.4.1 Refrigerant piping ................................53 6.4.2 Precautions in the event of gas refrigerant leaks ......................54 Water piping ................................. 56 6.5.1 Water piping length................................. 56 6.5.2 Water piping size ................................56 6.5.3 Water quality................................... 59 6.5.4 Requirements and recommendations for the hydraulic circuit ..................61 6.5.5 Water flow control ................................61 water piping connection FOR YUTAKI M ......................
- Page 10 GENERAL INDEX Unit controller contents............................130 8.5 Unit + room thermostat controller contents ......................132 8.6 Controller configuration ............................134 8.6.1 Configuration Assistant ..............................134 8.6.2 Advanced Configuration ............................... 138 8.6.2.1 Examples of possible configurations ....................... 140 Main screen ................................ 146 8.7.1 Room thermostat view ..............................146 8.7.2 Comprehensive view ..............................147 8.7.3 Quick action function ..............................148 Menu ..................................
- Page 11 GENERAL INDEX Mode view ................................192 Room 1/2 view..............................192 Fan coils 1/2 view ............................... 193 9.10 Circuit 1/2 view ..............................193 9.11 DHW view ................................194 9.12 SWP view ................................194 9.13 Menu .................................. 195 9.13.1 Operation Information ..............................195 9.13.1.1 Live view ...............................
- Page 12 GENERAL INDEX 10.5 Main screen ................................ 244 10.5.1 Quick action function ..............................245 10.6 MENU ................................. 246 10.6.1 Operation information ..............................246 10.6.2 System configuration ..............................247 10.6.2.1 General options configuration ........................248 10.6.2.2 Timer and schedule configuration ......................... 249 10.6.2.3 Space Heating / Space Cooling configuration ....................252 10.6.2.4 Domestic Hot Water (DHW) configuration..................... 254 10.6.2.5 ...
- Page 13 GENERAL INDEX 11.13.3 System configuration ..............................290 11.13.3.1 Room thermostats configuration ......................... 291 11.13.3.2 Water settings configuration ........................292 11.13.3.3 Cascade configuration ..........................293 11.13.3.4 Space Heating / Space Cooling configuration ..................... 294 11.13.3.5 Hot Water Tank configuration ........................296 11.13.3.6 Swimming Pool configuration ........................298 11.13.3.7 Complementary Heating configuration ......................299 11.13.3.8 Heat Pump configuration ..........................301 11.13.3.9 Fan coils ..............................302 11.13.3.10 ...
- Page 14 GENERAL INDEX 13.2.1 General maintenance procedure for the outdoor unit ....................336 13.2.2 General maintenance procedure for the indoor unit ....................337 14 COMMISSIONING ........................344 14.1 Before operation ..............................344 14.2 Preliminary check ............................... 344 14.2.1 Checking the unit ................................ 344 14.2.2 Electrical checking ..............................344 14.2.3 H ydraulic circuit checking (space heating and DHW) ....................344 14.3 Commissioning procedure..........................345 14.4 Test run / air purge .............................
-
Page 15: General Information
This document may therefore have been subject to amendments during the life of the product. Hitachi makes every effort to offer correct, up-to-date documentation. Despite this, printing errors cannot be controlled by Hitachi and are not its responsibility. -
Page 16: Summary Of Operations
Two different models have been designed for different purposes: one model for space heating only and the other one for space heating as well as for DHW operation. For DHW operation (optional), Hitachi offers two specific YUTAKI S80 DHW tanks (DHWS200S-2.7H2E(-W) and DHWS260S-2.7H2E(-W)) which may be placed on top of the indoor unit or besides it, as an... - Page 17 In YUTAKI S80, a specific DHW tank is designed for combination with the indoor unit. For YUTAKI S and YUTAKI M (R410A) / YUTAKI M (R32), the Hitachi accessory “DHWT-(200/300)S-3.0H2E” can be used for the production of DHW. An electric heater is incorporated inside the tank in order to allow an immediate heating of the domestic hot water in accordance with the user’s needs.
-
Page 18: Applied Symbols
GENERAL INFORMATION 1.2 APPLIED SYMBOLS During normal heat pump system design work or unit installation, greater attention must be paid in certain situations requiring particular care in order to avoid damage the unit, the installation or the building or property. Situations endangering the safety of those in the surrounding area or to the unit itself are clearly indicated in this manual. -
Page 19: Product Guide
GENERAL INFORMATION 1.3 PRODUCT GUIDE 1.3.1 Classification of the units 1.3.1.1 Split system - Outdoor unit Unit type: Outdoor unit (Split air system) Position-separating hyphen (fixed) Compressor power (HP): 2, 2.5, 3, 4, 5, 6, 8, 10. For water combination Heat pump V: Single phase unit (1~ 230V 50Hz) —: Three phase unit (3N~ 400V 50Hz) -
Page 20: Monobloc System
R-410A refrigerant R-134a refrigerant —: Type1: Version for operation in DHW with a remote tank W: Type2: Version for operation with Hitachi DHW tank Made in Europe Domestic hot water tank (For combination with YUTAKI S80 indoor unit standalone version) -
Page 21: Complementary System
GENERAL INFORMATION 1.3.1.4 Complementary system YUTAKI CASCADE CONTROLLER Air to water Position-separating hyphen (fixed) YUTAKI CASCADE CONTROLLER Position-separating hyphen (fixed) Language pack (01-03) 1.3.2 Product list 1.3.2.1 Split system - R32 Outdoor unit 1~ 230V 50Hz RAS-2WHVRP1 RAS-2.5WHVRP1 RAS-3WHVRP1 1.3.2.2 Split system - R410A Outdoor unit 1~ 230V 50Hz 3N~ 400V 50Hz... -
Page 22: Split System - Indoor Unit
GENERAL INFORMATION 1.3.2.3 Split system - Indoor unit YUTAKI S ( ) ( ) ( ) ( ) 1~ 230V 50Hz 3N~ 400V 50Hz 1~ 230V 50Hz 3N~ 400V 50Hz RWM-2.0R1E RWM-2.0R1E RWM-2.5R1E RWM-2.5R1E RWM-3.0R1E RWM-3.0R1E RWM-4.0N1E RWM-4.0N1E RWM-5.0N1E RWM-5.0N1E RWM-6.0N1E RWM-6.0N1E... - Page 23 GENERAL INFORMATION YUTAKI S COMBI N O T E Icons between brackets means possible extra operations to the factory-supplied operations. For cooling operation, refer to the Cooling kit accessory for YUTAKI S COMBI units. Standard model ( ) ( ) ( ) 1~ 230V 50Hz 3N~ 400V 50Hz RWD-2.0RW1E-220S...
- Page 24 • In “TYPE 2: Version for operation with Hitachi DHW tank”, the domestic hot water tank of model DHWS200S-2.7H2E(-W) or DHWS260S- 2.7H2E(-W) is required. The DHW tank has to be ordered separately. The unit controller (PC-ARFH1E) is factory supplied with DHWS200S-2.7H2E and DHWS260S-2.7H2E models (integrated in the front cover).
-
Page 25: Monobloc System
GENERAL INFORMATION 1.3.2.4 Monobloc system YUTAKI M (R32) ) ( ) ( ) ( ) ( ) 1~ 230V 50Hz RASM-2VRE RASM-3VRE N O T E The unit controller has to be ordered as accessory (PC-ARFH1E). YUTAKI M (R410A) ) ( ) ( ) ( ) ( ) 1~ 230V 50Hz 3N~ 400V 50Hz... -
Page 26: Complementary System
GENERAL INFORMATION 1.3.2.5 Complementary system YUTAKI CASCADE CONTROLLER ATW-YCC-01 ATW-YCC-02 ATW-YCC-03 PMML0575 rev.2 - 03/2022... -
Page 27: General Safety Notes
If this is not the case, contact your distributor. • Hitachi pursues a policy of continuous improvement in product design and performance. The right is therefore reserved to vary specifications without notice. •... -
Page 28: Name Of Parts And Dimensional Data
NAME OF PARTS AND DIMENSIONAL DATA 3 NAME OF PARTS AND DIMENSIONAL DATA 3.1 RAS-2WHVRP1 / RAS-2.5WHVRP1 / RAS-3WHVRP1 Dimension Model RAS-2WHVRP1 22.5 12.7 6.35 RAS-2.5WHVRP1 22.5 12.7 6.35 RAS-3WHVRP1 26.5 127.5 15.88 9.52 Nº Description Remarks Punched drain hole 30x80 long hole Attachment hole for M10 anchor bolt 2-U cut hole... -
Page 29: Ras-(4-10)Wh(V)Npe
NAME OF PARTS AND DIMENSIONAL DATA 3.2 RAS-(4-10)WH(V)NPE 7T143459 Nº Part Name Nº Part Name Compressor Receiver Heat exchanger Accumulator Propeller fan (2pcs.) Check joint Fan motor (2pcs.) Electrical box Strainer High pressure switch for protection Distributor Sensor for refrigerant pressure Reversing Valve Pressure switch for control Micro-computer control expansion valve... -
Page 30: Rwm-(2.0-3.0)R1E
NAME OF PARTS AND DIMENSIONAL DATA 3.3 RWM-(2.0-3.0)R1E Front view Side view N O T E Water flow direction View from A Wall support dimensions Units in mm XEKS2012 Nº Part name Nº Part name Plate heat exchanger Unit controller Water pump Electrical box Electric water heater... -
Page 31: Rwm-(4.0-6.0)N1E
NAME OF PARTS AND DIMENSIONAL DATA 3.4 RWM-(4.0-6.0)N1E Front view Side view N O T E Water flow direction View from A Wall support dimensions Units in mm XEKS2013 Nº Part name Nº Part name Plate heat exchanger Unit controller Water pump Electrical box Electric water heater... -
Page 32: Rwm-(8.0/10.0)N1E
NAME OF PARTS AND DIMENSIONAL DATA 3.5 RWM-(8.0/10.0)N1E Front view Side view N O T E Water flow direction Wall support dimensions View from A Units in mm XEKS2014 Nº Part name Nº Part name Plate heat exchanger Unit controller Water pump Electrical box Electric water heater... -
Page 33: Rwd-(2.0-6.0)(N/R)W1E-220S(-K)
NAME OF PARTS AND DIMENSIONAL DATA 3.6 RWD-(2.0-6.0)(N/R)W1E-220S(-K) View from A Front view Side view N O T E Water flow direction Units in: mm XEKS2015 Nº Part name Nº Part name Water inlet pipe connection Plate heat exchanger 2.0-6.0HP: G 1” female Water outlet pipe connection Water pump 2.0-6.0HP: G 1”... -
Page 34: Rwh-(4.0-6.0)(V)Nfe
NAME OF PARTS AND DIMENSIONAL DATA 3.7 RWH-(4.0-6.0)(V)NFE Top view Side view Front view Units in: mm XEKS1717 Nº Part name Nº Part name Electronic expansion valve (R410A) Safety valve Refrigerant strainer (x2) Drain pipe Check joint (R410A) Air purger Check valve (R410A) Water strainer Plate heat exchanger (R410A-R134a) -
Page 35: Rwh-(4.0-6.0)(V)Nfwe
NAME OF PARTS AND DIMENSIONAL DATA 3.8 RWH-(4.0-6.0)(V)NFWE Top view Front view Side view XEKS 1718 Units in: mm Nº Part name Nº Part name Electronic expansion valve (R410A) Drain pipe Refrigerant strainer (x2) Connection for DHW tank outlet Check joint (R410A) Expansion vessel 12L Check valve (R410A) Air purger... -
Page 36: Rasm-(2/3)Vre
NAME OF PARTS AND DIMENSIONAL DATA 3.9 RASM-(2/3)VRE Top view Side view Front view Bottom view Units in mm. XEKS1931 Nº Part name Nº Part name Compressor Stop valve for gas line - Ø15.88 (5/8”) Stop valve for liquid line - 2HP: Ø6,35(1/4") - Water side heat exchanger 3HP: Ø9.52 (3/8”) Air side heat exchanger... -
Page 37: Rasm-(4-6)(V)Re
NAME OF PARTS AND DIMENSIONAL DATA 3.10 RASM-(4-6)(V)RE 7T143459 Nº Part Name Nº Part Name Compressor Receiver Heat exchanger Accumulator Propeller fan (2pcs.) Check joint Fan motor (2pcs.) Electrical box Strainer High pressure switch for protection Distributor Sensor for refrigerant pressure Reversing Valve Pressure switch for control Micro-computer control expansion valve... -
Page 38: Electrical Data
The power supply cables must be sized to cover this maximum current value. • Specifications in these tables are subject to change without notice in order that Hitachi may bring the latest innovations to their customers. • Please refer to the general information, cautions and notes regarding protective devices (CB, ELB) throughout the “7 Electrical and control settings”... -
Page 39: Split System - R410A Outdoor Unit
ELECTRICAL DATA 4.2 SPLIT SYSTEM - R410A OUTDOOR UNIT RAS-(4-10)WH(V)NP(E) in combination with YUTAKI S, YUTAKI S COMBI Compressor and fan motors Applicable voltage Cooling Heating Max. IPT Model Power supply (kW) U max. U min. (KW) (KW) RAS-4WHVNPE 2.11 2.12 6.93 RAS-5WHVNPE... -
Page 40: Split System - Indoor Unit
ELECTRICAL DATA 4.4 SPLIT SYSTEM - INDOOR UNIT 4.4.1 YUTAKI S RWM-(2.0-10.0)(N/R)1E Applicable voltage Max. Model Power supply Operation mode U max. U min. (kW) (kW) Without electric heater 0.06 0.63 0.06 With electric heater 13.7 3.06 13.7 3.06 1~ 230V 50Hz With DHW tank heater 13.7 3.06... -
Page 41: Yutaki S Combi
ELECTRICAL DATA 4.4.2 YUTAKI S COMBI RWD-(2.0-6.0)(N/R)W1E-220S(-K) Applicable voltage Max. Model Power supply Operation mode U max. U min. (kW) (kW) Without electric heater 0.06 0.63 0.06 With electric heater 13.7 3.06 13.7 3.06 RWD-2.0RW1E-220S(-K) 1~ 230V 50Hz With DHW tank heater 12.6 2.81 12.6... -
Page 42: Yutaki S80
ELECTRICAL DATA 4.4.3 YUTAKI S80 Version for indoor unit alone RWH-(4.0-6.0)(V)NFE Applicable voltage Max. Model Power supply Operation mode U max. U min. (kW) (kW) Without simultaneous operation of electric heater 12.1 2.73 5.33 in DHW tank RWH-4.0VNFE With simultaneous operation of electric heater in 25.4 5.73 8.33... - Page 43 ELECTRICAL DATA Version for combination with DHW tank RWH-(4.0-6.0)(V)NFWE + DHWS(200/260)S-2.7H2E(-W) Applicable voltage Max. Model Power supply Operation mode U max. U min. (kW) (kW) Without simultaneous operation of electric heater 12.1 2.73 5.33 in DHW tank RWH-4.0VNFWE With simultaneous operation of electric heater in 24.3 5.48 7.94...
-
Page 44: Monobloc System
ELECTRICAL DATA 4.5 MONOBLOC SYSTEM YUTAKI M (R32) RASM-(2/3)VRE Cooling Heating Applicable voltage Max. operation operation Model Power supply Operation mode U max. U min. (kW) (KW) (KW) Without DHW tank heater 1.00 1.14 10.6 2.32 RASM-2VRE With DHW tank heater 1.00 18.8 3.89... -
Page 45: Working Range
WORKING RANGE 5 WORKING RANGE 5.1 POWER SUPPLY WORKING RANGE Nominal power supply • Single phase: 1~ 230V 50Hz • Three phase: 3N~ 400V 50Hz Operating voltage Between 90 and 110% of the nominal voltage. Voltage imbalance for nominal power supply 3N~ 400V 50Hz Up to 3% of each phase, measured at the main terminal of the outdoor unit. - Page 46 WORKING RANGE YUTAKI M Water outlet temperature (Cº) (*): Limit for 3HP Continuous working range. Outdoor unit operation is possible, but the capacity is not guaranteed. Indoor unit and back-up heater are operating. Only back-up heater. (No outdoor unit operation). Ambient temperature (ºC (DB)) ...
-
Page 47: Dhw
N O T E The heat pump can produce domestic hot water at 57ºC as a maximum (53ºC for 2.0/2.5/3.0HP) by itself, but Hitachi recommends to set the temperature of the tank by heat pump only up to 55ºC (50ºC for 2.0/2.5/3.0HP) and keep Thpoff default value. In case of higher setting, the tank’s heater must be used to reach the setting temperature (enabled by optional function). -
Page 48: Swimming Pool Heating
WORKING RANGE For YUTAKI S80 DHW water temperature (ºC) Continuous working range. Outdoor unit operation is possible, but the capacity is not guaranteed. Indoor unit and back-up heater are operating. Ambient Only back-up heater. (No outdoor unit operation). temperature (ºC (DB)) (*): Limit for 3HP 5.2.3 Swimming pool heating... -
Page 49: R32 Temperature Working Range
WORKING RANGE 5.3 R32 TEMPERATURE WORKING RANGE MODEL 2.0HP 2.5HP 3.0HP Water temperature Refer to the graphics for each case ºC Indoor ambient temperature 5~30 5.3.1 Space heating YUTAKI (S / S COMBI) (2.0~3.0)HP Water outlet temperature (ºC) Continuous working range. ... -
Page 50: Dhw
WORKING RANGE 5.3.2 DHW For YUTAKI (S /S COMBI) (2.0~3.0)HP Water outlet temperature (ºC) Continuous working range. Starting only Back-up Heater operation. Maximum setting temperature. Minimum setting temperature. Ambient temperature (ºC(DB)) N O T E In case of heating up the DHW tank with an outdoor ambient temperature lower than -5 ºC and without using the DHW electrical heater, the setting temperature must not exceed the maximum value in the specified continuous working range. -
Page 51: Space Cooling (Necessary Cooling Kit)
WORKING RANGE 5.3.4 Space cooling (Necessary cooling kit) Water outlet temperature (ºC) Refreshing floor Continuous working range. working area Maximum setting temperature. Fan coil working Minimum setting temperature. area Ambient temperature (ºC(DB)) 5.4 R410A HYDRAULIC WORKING RANGE 5.4.1 Hydraulic data ... -
Page 52: R32 Hydraulic Working Range
WORKING RANGE YUTAKI M MODEL 4.0HP 5.0HP 6.0HP Minimum water flow rate (*1) Maximum water flow rate (*1) Minimum installation water volume (*2) Minimum allowable water pressure Maximum allowable water pressure N O T E • (*1): Values calculated based on the following conditions: - Water inlet/outlet temperature: 30/35ºC - Outdoor ambient temperature: (DB/WB): 7/6ºC •... -
Page 53: Pump Performance Curves
WORKING RANGE 5.5.2 Pump performance curves N O T E If a water flow rate is selected out of the working range of the unit, it can cause malfunction on the unit. Please, try to operate the pump within the minimum and maximum water flow of the indoor unit. - Page 54 WORKING RANGE 5.0HP 6.0HP Water flow (m Water flow (m 8.0HP 10.0HP Water flow (m Water flow (m PMML0575 rev.2 - 03/2022...
- Page 55 WORKING RANGE YUTAKI S COMBI 2.0HP 2.5HP Water flow (m Water flow (m 3.0HP 4.0HP Water flow (m Water flow (m 5.0HP 6.0HP Water flow (m Water flow (m PMML0575 rev.2 - 03/2022...
- Page 56 WORKING RANGE YUTAKI S80 Version for indoor unit alone 4.0HP 5.0HP Water flow (m Water flow (m 6.0HP Water flow (m PMML0575 rev.2 - 03/2022...
- Page 57 WORKING RANGE Version for combination with DHW tank 4.0HP 5.0HP Water flow (m Water flow (m 6.0HP Water flow (m PMML0575 rev.2 - 03/2022...
- Page 58 WORKING RANGE YUTAKI M (R410A) 4.0HP 5.0HP Water flow (m Water flow (m 6.0HP Water flow (m PMML0575 rev.2 - 03/2022...
- Page 59 WORKING RANGE YUTAKI M (R32) 2.0HP 3.0HP Water flow (m Water flow (m PMML0575 rev.2 - 03/2022...
-
Page 60: Refrigerant And Water Piping
REFRIGERANT AND WATER PIPING 6 REFRIGERANT AND WATER PIPING 6.1 GENERAL NOTES BEFORE PERFORMING PIPING WORK • Prepare locally-supplied copper pipes. • Select the piping size with the correct thickness and correct material able to withstand sufficient pressure. • Select clean copper pipes. Make sure that there is no dust or moisture inside the pipes. Blow the inside of the pipes with oxygen free nitrogen to remove any dust and foreign materials before connecting them. - Page 61 REFRIGERANT AND WATER PIPING C A U T I O N Notes to open/close the service cover: • Remove the screws following the instructions to the above figure. • Slowly press down the cover. N O T E Hold the cover with a hand to remove screws as the cover may fall down. Service cover Hook (three places): two fans Hook (two places): one fan...
- Page 62 REFRIGERANT AND WATER PIPING 2 Mount the piping cover in order to avoid water entering into the unit. Seal the holes where pipes and wires are inserted, by using a insulation (field-supplied). 3 If the field-supplied piping is connected with stop valves directly, it is recommended use a tube bender. 4 Check to ensure that the stop valves are closed completely before connecting pipes.
-
Page 63: Brazing Work
REFRIGERANT AND WATER PIPING 6.2.1 Brazing work C A U T I O N • Use nitrogen gas for blowing during pipe brazing. If oxygen, acetylene or fluorocarbon gas is used, it will cause an explosion or poisonous gas. • A lot of oxidation film will occur inside of tubes if no nitrogen gas blowing is performed during brazing work. - Page 64 REFRIGERANT AND WATER PIPING Connecting procedure 1 Insert the rubber cap into the drain boss up to the extruded portions. 2 Insert the boss into the unit base and turn approximately 40 degree counterclockwise. 3 Size of the drain boss is RAS-(4-10)WH(V)NP: 32 mm (O.D.) RASM-(4-6)(V)NE: 32 mm (O.D.) RASM-(2/3)VRE: 15 mm (O.D)
-
Page 65: R32 Refrigerant Circuit
REFRIGERANT AND WATER PIPING 6.3 R32 REFRIGERANT CIRCUIT 6.3.1 General notes R32 refrigerant This appliance is filled with R32, an odourless flammable refrigerant gas with low burning velocity (A2L class pursuant to ISO 817). If the refrigerant is leaked, there is a possibility of ignition if it enters in contact with an external ignition source. Make sure that unit installation and refrigerant piping installation comply with applicable legislation in each country. - Page 66 REFRIGERANT AND WATER PIPING Minimum area requirements In case of total refrigerant amount ≥1.84 kg, the unit should be installed, operated and stored in a room with a floor area larger than the minimum criteria. Use following graphic and table to determine these minimum criteria: Refrigerant Minimum Area Amount (kg)
-
Page 67: Refrigerant Charge
REFRIGERANT AND WATER PIPING 6.3.3 Refrigerant charge 6.3.3.1 Refrigerant charge amount YUTAKI S/S COMBI 2-3HP The R32 refrigerant is factory charged in the outdoor unit with a refrigerant charge amount for 10 m of piping length between outdoor and indoor unit. YUTAKI M YUTAKI M unit is a Monobloc system (closed refrigerant circuit) which has been factory charged, so additional refrigerant charge is not required. -
Page 68: Precautions In The Event Of Gas Refrigerant Leaks
REFRIGERANT AND WATER PIPING Refrigerant piping size Piping connection size of outdoor unit & indoor unit Indoor unit Pipe size Pipe size Model Model Gas pipe Liquid pipe Gas pipe Liquid pipe (4-6)HP Ø 15.88 (5/8”) Ø 9.52 (3/8”) (3.0-6.0)HP Ø... - Page 69 REFRIGERANT AND WATER PIPING The minimum volume of a closed room where the system is installed to avoid suffocation in case of leakage is: System combination Minimum volume (m YUTAKI S / SCOMBI 5/6HP 11.4 YUTAKI S 10HP 12.1 YUTAKI S80 4-6HP The formula used for the calculation of the maximum allowed refrigerant concentration in cases of refrigerant leakage is the following:...
-
Page 70: Water Piping
REFRIGERANT AND WATER PIPING 6.5 WATER PIPING 6.5.1 Water piping length Consider the following guidelines when designing the water circuit. YUTAKI S80 YUTAKI M (R410A) / DHW tank DHW tank Item YUTAKI S YUTAKI S COMBI YUTAKI M above the beside the (R32) indoor unit... - Page 71 REFRIGERANT AND WATER PIPING Type 2: Version for operation with an Hitachi DHW tank (RWH-(4.0-6.0)(V)NFWE) (inches) Space heating connection Heating coil connection Model Outlet Inlet connection Outlet connection Inlet connection Shut-off valves connection (3-way valve) (T-branch) G 1-1/4” G 1-1/4”...
- Page 72 For DHW tank beside the indoor unit (both right or left side), the heating coil pipes factory-supplied with the DHW tank accessory are not required. In this case, the dedicated Hitachi flexible water pipe kit (ATW-FWP-02 accessory) is needed. This kit is provided with...
-
Page 73: Water Quality
REFRIGERANT AND WATER PIPING 6.5.3 Water quality C A U T I O N • Water quality must be according to EU council directive 98/83 EC. • Water should be subjected to filtration or to a softening treatment with chemicals before application as treated water. •... - Page 74 REFRIGERANT AND WATER PIPING Repeat... Water pump Seconds Repeat... Seconds 8 If a little quantity of air is still remaining in the water circuit, it will be removed by the automatic air purger of the indoor unit during the first hours of operation. Once the air in the installation has been removed, a reduction of water pressure in the circuit is very likely to occur.
-
Page 75: Requirements And Recommendations For The Hydraulic Circuit
REFRIGERANT AND WATER PIPING 6.5.4 Requirements and recommendations for the hydraulic circuit • The maximum piping length depends on the maximum pressure availability in the water outlet pipe. Please check the pump curves. • The indoor unit is equipped with an air purger (factory supplied) at the highest location of the Indoor Unit. If this location is not the highest of the water installation, air might be trapped inside the water pipes, which could cause system malfunction. -
Page 76: Water Piping Connection For Yutaki M
REFRIGERANT AND WATER PIPING 6.6 WATER PIPING CONNECTION FOR YUTAKI M 6.6.1 Piping Location And Connection Size The unit is factory supplied with two unions to be connected to the water inlet/outlet pipe. Refer to the next figure detailing the location of the water pipes location, dimensions and connection sizes. -
Page 77: Space Heating And Dhw
REFRIGERANT AND WATER PIPING 6.7 SPACE HEATING AND DHW 6.7.1 YUTAKI S AND YUTAKI M D A N G E R Do not connect the power supply to the indoor unit prior to filling the space heating circuit (and DHW circuit if it were the case) with water and checking water pressure and the total absence of any water leakage. - Page 78 REFRIGERANT AND WATER PIPING Nature Nº Part name Water inlet (Space heating) Water outlet (Space heating) Heating coil inlet Piping connections Heating coil outlet Water inlet (DHW) Water outlet (DHW) Factory supplied Shut-off valve (factory-supplied) Domestic hot water tank (DHWT-(200/300)S-3.0H2E accessory) Accessories 3-way valve (ATW-3WV-01 accessory)
- Page 79 • 1 Water check valve (ATW-WCV-01 accessory): this Hitachi accessory (3) is connected after the recirculation water pump (4) in order to ensure the non-return of water. 2 Shut-off valves (field supplied) (5): one before the recirculation water pump (4) and other after the water check valve •...
-
Page 80: Yutaki S Combi
REFRIGERANT AND WATER PIPING 6.7.2 YUTAKI S COMBI D A N G E R Do not connect the power supply to the indoor unit prior to filling the space heating and DHW circuit with water and checking water pressure and the total absence of any water leakage. 6.7.2.1 Additional hydraulic necessary elements for space heating Nature Part name... - Page 81 1 Recirculation water pump (field supplied): this water pump (4) will help to correctly recirculate the hot water to the DHW water inlet. • 1 Water check valve (ATW-WCV-01 accessory): this Hitachi accessory (3) is connected after the recirculation water pump (4) in order to ensure the non-return of water. •...
- Page 82 REFRIGERANT AND WATER PIPING 6.7.2.4 Additional hydraulic necessary elements for DHW (only for UK market) Nature Nº Part name T&P relief valve outlet pipe Ø15 (factory supplied) Piping connections Tundish outlet pipe (Field supplied) Pressure and Temperature relief valve Accessories (Factory supplied) Tundish (Field supplied) Field supplied...
-
Page 83: Yutaki S80
REFRIGERANT AND WATER PIPING 6.7.3 YUTAKI S80 D A N G E R Do not connect the power supply to the indoor unit prior to filling the space heating and DHW circuit with water and checking water pressure and the total absence of any water leakage. 6.7.3.1 Additional hydraulic necessary elements for space heating Nature Nº... - Page 84 For DHW tank beside the indoor unit (both right or left side), the pipes factory-supplied with the DHW tank accessory (11) are not required. In this case, the dedicated Hitachi flexible water pipe kit (ATW-FWP-02 accessory) (12) is needed. This kit is provided with the following items: Š...
- Page 85 1 Recirculation water pump (field supplied): this water pump (3) will help to correctly recirculate the hot water to the DHW inlet. • • 1 Water check valve (ATW-WCV-01 accessory): this Hitachi accessory (4) is connected after the recirculation water pump (31) in order to ensure the non-return of water. •...
-
Page 86: Electrical And Control Settings
ELECTRICAL AND CONTROL SETTINGS 7 ELECTRICAL AND CONTROL SETTINGS 7.1 GENERAL CHECK • Make sure that the following conditions related to power supply installation are satisfied: The power capacity of the electrical installation is large enough to support the power demand of the YUTAKI system (outdoor unit + indoor unit + DHW tank (if apply)). - Page 87 ELECTRICAL AND CONTROL SETTINGS N O T E The data corresponding to DHW tank heater is calculated in combination with the domestic hot water tank accessory “DHWT-(200/300)S-3.0H2E”. YUTAKI S COMBI Model Power supply Operation mode (Ω) Without electric heaters With electric heater RWD-(2.0-3.0)RW1E- 1~ 230V 50Hz 220S(-K)
- Page 88 ELECTRICAL AND CONTROL SETTINGS Indoor unit in combination with DHW tank Model Power supply Operation mode (Ω) Without DHW tank heater 0.31 RWH-4.0VNFWE With DHW tank heater 0.21 Without DHW tank heater 0.27 RWH-5.0VNFWE 1~ 230V 50Hz With DHW tank heater 0.19 Without DHW tank heater 0.24...
- Page 89 ELECTRICAL AND CONTROL SETTINGS • The status of Harmonics for each model, regarding compliance with IEC 61000-3-2 and IEC 61000-3-12, is as follows: Models Monobloc Status regarding Split system system compliance with IEC 61000-3-2 and Indoor unit YUTAKI M (R410A) / IEC 61000-3-12 Outdoor unit YUTAKI M...
-
Page 90: Electrical Connection
ELECTRICAL AND CONTROL SETTINGS 7.2 ELECTRICAL CONNECTION C A U T I O N • Check to ensure that the field supplied electrical components (mains power switches, circuit breakers, wires, connectors and wire terminals) have been properly selected according to the electrical data indicated on this chapter and they comply with national and local codes. If it is necessary, contact with your local authority in regards to standards, rules, regulations, etc. - Page 91 ELECTRICAL AND CONTROL SETTINGS Split system - Indoor unit YUTAKI S Power supply Transmitting Actuator Max. cables cables cables Model Power supply Operation mode current EN60335-1 EN60335-1 EN60335-1 Without electric heaters 2 x 0.75 mm² + GND With electric heater 2 x 2.5 mm²...
- Page 92 ELECTRICAL AND CONTROL SETTINGS YUTAKI S80 Indoor unit alone Power supply Transmitting Actuator Max. cables cables cables Model Power supply Operation mode current EN60335-1 EN60335-1 EN60335-1 Without DHW tank heater 2 x 6.0 mm² + GND RWH-4.0VNFE With DHW tank heater 2 x 10.0 mm²...
- Page 93 ELECTRICAL AND CONTROL SETTINGS Monobloc system - R410A YUTAKI M Power supply Transmitting Actuator Max. cables cables cables Power supply Operation mode Model current EN60335-1 EN60335-1 EN60335-1 Without DHW tank heater 2 x 6.0 mm² + GND RASM-4VNE With DHW tank heater 2 x 10.0 mm²...
-
Page 94: Minimum Requirements Of The Protection Devices
ELECTRICAL AND CONTROL SETTINGS 7.2.2 Minimum requirements of the protection devices C A U T I O N • Ensure specifically that there is an Earth Leakage Breaker (ELB) installed for the units (outdoor and indoor unit). • If the installation is already equipped with an Earth Leakage Breaker (ELB), ensure that its rated current is large enough to hold the current of the units (outdoor and indoor unit). - Page 95 ELECTRICAL AND CONTROL SETTINGS Split system - Indoor unit YUTAKI S Applicable voltage Model Power supply Operation mode U max. U min. (nº of poles/A/mA) Without electric heaters With electric heater RWM-(2.0-3.0)R1E 1~ 230V 50Hz 2/40/30 With DHW tank heater With electric and DHW tank heaters Without electric heaters With electric heater...
- Page 96 ELECTRICAL AND CONTROL SETTINGS YUTAKI S80 Version for indoor unit alone Applicable voltage Model Power supply Operation mode (nº of poles/A/mA) U max. (V) U min. (V) Without DHW tank heater RWH-4.0VNFE With DHW tank heater 2/40/30 Without DHW tank heater RWH-5.0VNFE 1~ 230V 50Hz With DHW tank heater...
- Page 97 ELECTRICAL AND CONTROL SETTINGS Monobloc system - R410A YUTAKI M Applicable voltage Model Power supply Operation mode (nº of poles/A/mA) U max. (V) U min. (V) Without DHW tank heater 2/40/30 RASM-4VNE With DHW tank heater 2/63/30 Without DHW tank heater 2/40/30 RASM-5VNE 1~ 230V 50Hz...
-
Page 98: Setting Of Dip Switches And Rsw Switches
ELECTRICAL AND CONTROL SETTINGS 7.3 SETTING OF DIP SWITCHES AND RSW SWITCHES 7.3.1 Outdoor unit RAS-(2-3)WHVRP1, RAS-(4-10)WH(V)NPE and RASM-(2-6)(V)(N/R)E 7.3.1.1 Location of DIP switches and rotary switches The PCB in the outdoor unit is operating with DIP switches and push switches. The location is as follows: RAS-(2/2.5/3)WHVRP1 and RASM-(2/3)VRE PCB2 PCB1... - Page 99 ELECTRICAL AND CONTROL SETTINGS Test run for pump down Test run for heating Test run for cooling intermediate season (Not used) Test run for heating for intermediate season (Not used) Forced stoppage of compressor N O T E • This operation is reset once the compressor is in Thermo-ON mode. •...
- Page 100 ELECTRICAL AND CONTROL SETTINGS DSW3: Capacity Setting (No setting is required) Outdoor unit Factory setting RAS-2WHVRP1 RAS-3WHVRP1 RAS-4WHVNPE RAS-5WHVNPE RAS-6WHVNPE RAS-2.5WHVRP1 RASM-2VRE RASM-3VRE RASM-4VNE RASM-5VNE RASM-6VNE RAS-4WHNPE RAS-5WHNPE RAS-6WHNPE RAS-8WHNPE RAS-10WHNPE RASM-4NE RASM-5NE RASM-6NE DSW4 / RSW1: No setting is required (Do not change) Setting before shipment ...
- Page 101 ELECTRICAL AND CONTROL SETTINGS 7.3.1.3 LED indication RAS-(2/2.5/3)WHVRP1 and RASM-(2/3)VRE) Name Colour Indication PCB1 LED1 Power LED2 Green Communication with inverter LED3 Yellow H-LINK transmission LED4 Yellow Not used LED351 For inspection LED353 For inspection PCB2 For inspection For inspection For inspection For inspection ...
-
Page 102: Indoor Units Rwm-(2.0-10.0)(R/N)1E / Rwd-(2.0-6.0)(R/N)W1E-220S(-K) And Rwh-(4.0-6.0)(V)Nf(W)E
ELECTRICAL AND CONTROL SETTINGS 7.3.2 Indoor units RWM-(2.0-10.0)(R/N)1E / RWD-(2.0-6.0)(R/N)W1E-220S(-K) and RWH-(4.0-6.0)(V)NF(W)E 7.3.2.1 Location of DIP switches and rotary switches 7.3.2.2 Function of DIP switches and rotary switches N O T E • The mark “■” indicates the dip switches positions. •... - Page 103 ELECTRICAL AND CONTROL SETTINGS DSW1: Additional setting 0 Factory setting. No setting is required. YUTAKI S (*) YUTAKI S COMBI (*) YUTAKI S80 1~ 230V 50Hz 3N~ 400V 50Hz YUTAKI M N O T E (*): In case of installing the “Cooling kit” accessory, set the pin 4 of DSW1 to ON in order to enable the cooling operation. ...
- Page 104 ELECTRICAL AND CONTROL SETTINGS DSW4: Additional setting 2 Setting before shipment Setting before shipment for YUTAKI S80: PIN 2 - ON N O T E YUTAKI S80: PIN 2 must be switched OFF after vacuum procedure DHW defrost Heater forced OFF Unit and installation pipes antifreeze protection Standard / ECO water pump operation Electric heater or boiler emergency mode...
- Page 105 ELECTRICAL AND CONTROL SETTINGS DSW5: Additional setting 3 In the cases where the outdoor unit is installed into a location where its own outdoor ambient temperature sensor can not give a suitable temperature measurement to the system, it is available the 2nd outdoor ambient temperature sensor as accessory. By means of DSW1&2 setting, the preferable sensor for each circuit can be selected.
- Page 106 ELECTRICAL AND CONTROL SETTINGS DSW15 & RSW2 / DSW16 & RSW1: Not used DSW15 / DSW16 RSWW / RSW1 Factory setting N O T E Don’t change this setting, otherwise malfunction will be occur. DSW18: Not used (only for YUTAKI S COMBI) Factory setting (Do not change) ...
-
Page 107: Yutaki Cascade Controller Atw-Ycc-(01-03)
ELECTRICAL AND CONTROL SETTINGS 7.3.3 YUTAKI CASCADE CONTROLLER ATW-YCC-(01-03) ATW- ATW- ATW- Series Unit model YCC-01 YCC-02 YCC-03 RWM-(2.0-3.0)R1E YUTAKI S RWM-(4.0-6.0)N1E RWM-(8.0/10.0)N1E RWD-(2.0-3.0)RW1E-220S(-K) YUTAKI S COMBI RWD-(4.0-6.0)NW1E-220S(-K) RASM-(4-6)(V)NE YUTAKI M RASM-(2/3)VRE YUTAKI S80 RWH-(4.0-6.0)(V)NFE YUTAKI S80Combi RWH-(4.0-6.0)(V)NFWE 7.3.4 Location of DIP switches and rotary switches PMML0575 rev.2 - 03/2022... - Page 108 ELECTRICAL AND CONTROL SETTINGS 7.3.4.1 Function of DIP switches and rotary switches N O T E • The mark “■” indicates the dip switches positions. • No mark “■” indicates pin position is not affected. • The figures show the settings before shipment or after selection. •...
- Page 109 ELECTRICAL AND CONTROL SETTINGS DHW defrost Heater forced OFF Unit and installation pipes antifreeze protection Standard / ECO water pump operation Electric heater or boiler emergency mode DHW tank’s heater operation C A U T I O N • Never turn all DSW4 dip switch pins ON. If this happens, the software of the unit will be removed. •...
- Page 110 ELECTRICAL AND CONTROL SETTINGS DSW7: Additional setting 4 Factory setting Compatibility with ATW-RTU-04 (When cooling mode operation is needed) DSW8: Not used Factory setting (Do not change) DSW15 & RSW2: Refrigerant cycle number setting for YUTAKI CASCADE CONTROLLER Set and assign to each outdoor unit a different refrigerant cycle number through DSW4 and RSW1 on the outdoor units PCB.
- Page 111 ELECTRICAL AND CONTROL SETTINGS DSW16 & RSW1: Not used DSW16 RSW1 Factory setting N O T E Don’t change this setting, otherwise malfunction will be occur. SSW1: Remote/Local Factory setting Remote Remote operation Local Remote Local operation Local N O T E (*) Don’t change this setting, otherwise malfunction will be occur.
-
Page 112: Terminal Board Connections
ELECTRICAL AND CONTROL SETTINGS 7.4 TERMINAL BOARD CONNECTIONS 7.4.1 Table board 1 Main power supply The main power supply connection is wired to the Terminal board (TB1) as follows: YUTAKI (S / S COMBI) Operating Line Outdoor unit Outdoor unit Operating Line (Twisted shielded pair cable or RAS-WHNP(1)E... - Page 113 ELECTRICAL AND CONTROL SETTINGS 7.4.2 Table board 2 for YUTAKI M and YUTAKI S80 7.4.2.1 Summary of the terminal board connections YUTAKI M - RASM-(2/3)VRE Mark Part name Description TERMINAL BOARD 1 (TB1) 1~ 230V 50Hz Main power supply connection TERMINAL BOARD 2 (TB2) The H-LINK transmission has to be done between the indoor unit and the terminals 1-2 of either H-LINK commutation...
- Page 114 ELECTRICAL AND CONTROL SETTINGS Mark Part name Description 30(N) If DHW tank contains an electric heater, the air to water heat pump can activate it if the heat pump Electrical Heater DHW Output cannot achieve the required DHW temperature by itself. 31(L) 32(C) Common line Common terminal for the 3-way valve for DHW tank.
- Page 115 ELECTRICAL AND CONTROL SETTINGS Mark Part name Description For the connection of an external tariff switch device to switch OFF the heat pump during peak Input 5 (Smart function) (*) electricity demand period. Depending on the setting, the heat pump or DHWT will be blocked when signal is open/closed.
- Page 116 ELECTRICAL AND CONTROL SETTINGS Mark Part name Description DHW tank’s thermistor The DHW sensor is used to control the temperature of the domestic hot water tank. Common thermistor Common terminal for thermistor. Thermistor for water outlet temperature The sensor is used for the second temperature control and should be positioned after the mixing of second cycle valve and the circulation pump.
- Page 117 ELECTRICAL AND CONTROL SETTINGS Mark Part name Description The boiler can be used to alternate with the heat pump when the heat pump cannot achieve the required temperature by itself. Output 3 (Auxiliary boiler or electric heater) (*) A water electric heater (as accessory) can be used to provide the additional heating required on the coldest days of the year.
- Page 118 ELECTRICAL AND CONTROL SETTINGS 7.4.2.5 Input terminals (Default input functions) PC-ARFH1E connection In those cases where the unit controller is ordered as a required accessory (YUTAKI S80 or YUTAKI M), or those cases where another PC-ARFH1E must be connected as a second thermostat, the connections between PC-ARFH1E and the indoor unit must be done in terminals 3 and 4, as it is shown in the next picture: RCS H-LINK (PC-ARFH1E)
- Page 119 ELECTRICAL AND CONTROL SETTINGS Water outlet thermistor for circuit 2 (TWO2) When the installation is configured with a second circuit the thermistor for the water outlet temperature have to be connected between terminals 6 and 7 of the terminal board 2. Circuit 2 ...
- Page 120 ELECTRICAL AND CONTROL SETTINGS N O T E • If wireless intelligent thermostat is selected, optional ON/OFF thermostat has no effect. • Set the configuration in the user’s control. See chapter “9 Unit controller (PC-ARFH2E)” for more information. • In case of setting an installation with 2 circuits (Circuit 1 and Circuit 2) and a different Demand ON/OFF is used for each of them, please refer to “7.4.2.5 Input terminals (Default input functions)”...
- Page 121 ELECTRICAL AND CONTROL SETTINGS DHW boost (Default for input 6) This function allows a request for a one-time heating up of the domestic hot water temperature. The input can be sent by a push button, a NC contact and a NO contact. This input is switched on terminals 16 and 20 of the TB2. Common Line DHW Boost...
- Page 122 DHWT (EH C A U T I O N When using a DHW tank other than those from Hitachi, the maximum connectable heater load is 3 kW (connected to TB2 terminals 30-31). 3 Way valve for DHW tank output YUTAKI units can be used to heat DHW.
- Page 123 ELECTRICAL AND CONTROL SETTINGS Output terminals (Optional output functions) 3 Way valve for Swimming pool (Default for Output 1) YUTAKI units can be used to heat the water of a swimming pool. The signal is used on a 3-way motorized diverting valve and to provide control of supply water flow for the swimming pool.
- Page 124 ELECTRICAL AND CONTROL SETTINGS 7.4.3 Table board 2 for YUTAKI S and YUTAKI S COMBI 7.4.3.1 Indoor/outdoor communication wiring (TB2) / ATW-RTU Communication / Central Devices Communication • The transmission is wired to terminals 1-2. • The H-LINK II wiring system requires only two transmission cables that connect the indoor unit and the outdoor unit in case of split system and also connect the indoor unit with ATW-RTU or Central devices like ATW-TAG-02, ATW-KNX-02 and ATW-MBS-02.
- Page 125 ELECTRICAL AND CONTROL SETTINGS Mark Part name Description The air to water heat pump system has been designed to allow the connection of a remote Input 1 (Demand ON/OFF) (*) thermostat to effectively control your home’s temperature. Depending on the room temperature, the thermostat will turn the split air to water heat pump system ON and OFF.
- Page 126 ELECTRICAL AND CONTROL SETTINGS 7.4.3.3 Input terminals (Default input functions) Room thermostat communication cables There are two different room thermostat types as accessory Optional wireless intelligent room thermostat (TB2) ATW-RTU Only for wireless room thermostat accessory: the receiver is connected to the polarity-free terminals1 and 2. The Wireless room thermostat and the Intelligent receiver are already configured to communicate with each other.
- Page 127 ELECTRICAL AND CONTROL SETTINGS Water outlet thermistor for circuit 2 (TWO2) When the installation is configured with a second circuit the thermistor for the water outlet temperature have to be connected between terminals 6 and 7 of the terminal board 2. Circuit 2 ...
- Page 128 ELECTRICAL AND CONTROL SETTINGS ECO (Default for input 2) When enabled at Unit controller, both for circuit 1 and circuit 2, also for heating and cooling, this input switches the indoor unit into an ECO mode by adjusting its settings only when input is closed. The input can come from a push button, a thermostat or any other external device with that purpose.
- Page 129 ELECTRICAL AND CONTROL SETTINGS Power Meter (Default for input 7) This function is used to monitor real consumption of the system by means an external power meter device connected at this input. The calculation method is done by measuring real consumption of the whole installation with one power meter device or 2 separate power meter (one for indoor unit and another one for outdoor unit).
- Page 130 DHWT (EH C A U T I O N When using a DHW tank other than those from Hitachi, the maximum connectable heater load is 3 kW (connected to TB2 terminals 30-31). 3 Way valve for DHW tank output YUTAKI units can be used to heat DHW.
- Page 131 ELECTRICAL AND CONTROL SETTINGS Auxiliary boiler or heater (Default for Output 3) The auxiliary boiler or heater can be used when the heat pump cannot achieve the require temperature by itself. Free contact Auxiliary Heat Solar (Default for output 4) This output is used when solar mode is enabled (from Unit controller) and the temperature in the solar panel rises above the water temperature in the domestic hot water tank (DHWT).
- Page 132 ELECTRICAL AND CONTROL SETTINGS 7.4.3.4 Summary of terminal board connections YUTAKI S COMBI - RWD-(4.0-6.0)(N/R)W1E-220S(-K) Mark Part name Description TERMINAL BOARD 1 (TB1) 1~ 230V 50Hz 3N~ 400V 50Hz Main power supply connection TERMINAL BOARD 2 (TB2) The H-LINK transmission has to be done between the indoor unit and the terminals 1-2 of either H-LINK commutation outdoor unit, ATW-RTU or any other central device.
- Page 133 ELECTRICAL AND CONTROL SETTINGS Mark Part name Description Auxiliary power Power supply for ATW-RTU and central device 30(N) If DHW tank contains an electric heater, the air to water heat pump can activate it if the heat Electrical Heater DHW Output pump cannot achieve the required DHW temperature by itself.
- Page 134 ELECTRICAL AND CONTROL SETTINGS Earth Earth Earth Water outlet thermistor for circuit 2 (T When the installation is configured with a second circuit the thermistor for the water outlet temperature have to be connected between terminals 6 and 7 of the terminal board 2. Circuit 2 ...
- Page 135 ELECTRICAL AND CONTROL SETTINGS ECO (Default for input 2) When enabled at Unit controller, both for circuit 1 and circuit 2, also for heating and cooling, this input switches the indoor unit into an ECO mode by adjusting its settings only when input is closed. The input can come from a push button, a thermostat or any other external device with that purpose.
- Page 136 ELECTRICAL AND CONTROL SETTINGS Power Meter (Default for input 7) This function is used to monitor real consumption of the system by means an external power meter device connected at this input. The calculation method is done by measuring real consumption of the whole installation with one power meter device or 2 separate power meter (one for indoor unit and another one for outdoor unit).
- Page 137 Heater DHWT (EH C A U T I O N When using a DHW tank other than those from Hitachi, the maximum connectable heater load is 3 kW (connected to TB2 terminals 30-31). Output 9 Output terminals (Optional output functions) ...
- Page 138 ELECTRICAL AND CONTROL SETTINGS Auxiliary boiler or heater (Default for Output 3) The auxiliary boiler or heater can be used when the heat pump cannot achieve the require temperature by itself. Free contact Auxiliary Heat Solar (Default for output 4) This output is used when solar mode is enabled (from Unit controller) and the temperature in the solar panel rises above the water temperature in the domestic hot water tank (DHWT).
-
Page 139: Unit Controller (Pc-Arfh1E)
UNIT CONTROLLER (PC-ARFH1E) 8 UNIT CONTROLLER (PC-ARFH1E) The unit controller for YUTAKI series (PC-ARFH1E) is an user-friendly remote control which ensures a strong and safe communication through H-LINK. Available for the following unit models: • RWM-(4.0-10.0)NE(-W) • RWD-(4.0-6.0)NW(S)E-(200/260)S(-K)(-W) • RASM-(3-6)(V)NE •... -
Page 140: Description Of The Icons
UNIT CONTROLLER (PC-ARFH1E) 8.2 DESCRIPTION OF THE ICONS 8.2.1 Common icons Icon Name Explanation Circuit I or II is in Demand-OFF Circuit I or II is on Thermo-OFF Status for circuit 1, 2, DHW and swimming Circuit I or II is working between 0 < X ≤ 33% of the desired water outlet temperature pool. -
Page 141: Icons For The Comprehensive View
UNIT CONTROLLER (PC-ARFH1E) 8.2.2 Icons for the comprehensive view Icon Name Explanation This icon informs about pump operation. Pump There are three available pumps on the system. Each one is numbered, and its corresponding number is displayed below to the pump icon when it is operating Heater step Indicates which of the 3 possible heater steps is applied on space heating DHW Heater... -
Page 142: Icons For The Room Thermostat View
UNIT CONTROLLER (PC-ARFH1E) 8.2.3 Icons for the room thermostat view Icon Name Explanation Manual mode Manual/Auto mode Auto mode with timer setting Auto mode without timer setting Setting temperature Setting/Room temperature Room temperature End of timer period The end hour of the timer period is indicated below this icon End of holiday period The end hour of the holiday period is indicated below this icon Setting temperature... -
Page 143: Room Thermostat Contents
UNIT CONTROLLER (PC-ARFH1E) 8.3 ROOM THERMOSTAT CONTENTS Menu Contents Menu Contents Level 1 Level 2 Level 3 Level 4 Level 5 Level 6 Level 1 Level 2 Level 3 Level 4 Level 5 Level 6 Timer Type Operation Information Simple General Schedule Circuit 1... -
Page 144: Unit Controller Contents
UNIT CONTROLLER (PC-ARFH1E) 8.4 UNIT CONTROLLER CONTENTS Menu Contents Menu Contents Level 1 Level 2 Level 3 Level 4 Level 5 Level 6 Level 1 Level 2 Level 3 Level 4 Level 5 Level 6 Space Heating Operation Information Circuit 1 General Water Calculation Mode Circuit 1... - Page 145 UNIT CONTROLLER (PC-ARFH1E) Menu Contents Level 1 Level 2 Level 3 Level 4 Level 5 Level 6 Heating Auto On/Off Auto Heat/Cool Circuit pump Recirculation timer DHW Boost Emergency Operation I/O and Sensors Inputs Outputs Auxiliary sensors Controller Settings Controller Options Room Names Date and Time Adjust Date and Time...
-
Page 146: Unit + Room Thermostat Controller Contents
UNIT CONTROLLER (PC-ARFH1E) 8.5 UNIT + ROOM THERMOSTAT CONTROLLER CONTENTS Menu Contents Menu Contents Level 1 Level 2 Level 3 Level 4 Level 5 Level 6 Level 1 Level 2 Level 3 Level 4 Level 5 Level 6 Simple Operation Information Schedule General Delete All Timer Configuration... - Page 147 UNIT CONTROLLER (PC-ARFH1E) Menu Contents Menu Contents Level 1 Level 2 Level 3 Level 4 Level 5 Level 6 Level 1 Level 2 Level 3 Level 4 Level 5 Level 6 Adjust Date and Time Hydraulic Sep. Status European Summer Time Energy Configuration UTC Zone Smart Function...
-
Page 148: Controller Configuration
UNIT CONTROLLER (PC-ARFH1E) 8.6 CONTROLLER CONFIGURATION • Select the desired language using the arrow keys. • Press OK button. • Select the date and time using the arrow keys. • Press OK button. 8.6.1 Configuration Assistant • Select the configuration assistant for an easy configuration. - Page 149 UNIT CONTROLLER (PC-ARFH1E) • Select No when the device acts as Room Thermostat only. It does not control the unit. • Press OK button. • Select No when the device is not used as a room thermostat. • Select Yes, in zone 1/ Yes, in zone 2 / Yes, in both zones, depending on the number of circuits controlled.
- Page 150 UNIT CONTROLLER (PC-ARFH1E) • Select Yes if Domestic Hot Water tank is installed. • Press OK button. • Select Yes if Swimming Pool is installed. • Press OK button. • Select Yes if Boiler is installed. • Press OK button.
- Page 151 UNIT CONTROLLER (PC-ARFH1E) • Select the bivalent point for boiler or electric backup heater (from -20 ºC to 20 ºC). • Press OK button. • Select the type of room thermostat installed in circuit 1 or 2 (depending on the previous setting): None, wired or wireless. •...
-
Page 152: Advanced Configuration
UNIT CONTROLLER (PC-ARFH1E) 8.6.2 Advanced Configuration • Select the advance configuration for a complete configuration. • Press OK button. • Select the controller type: Unit: the device controls the unit. Room: the device acts as a room thermostat of a zone. Unit + Room: the device controls the unit and acts as a room thermostat. - Page 153 UNIT CONTROLLER (PC-ARFH1E) • Configure circuit 1 and circuit 2 options: Disabled, Points, Gradient, Fix. • Only available for cooling mode. • Enable or disable Cascade Mode. • Configure Central mode options: Full, water, air or local. Only available when Cascade Mode is disabled. •...
-
Page 154: Examples Of Possible Configurations
UNIT CONTROLLER (PC-ARFH1E) 8.6.2.1 Examples of possible configurations N O T E • Other installation configurations are possible. These are examples only for illustration purposes. • It is recommended to set firstly the Master device so as the ease the configuration of the slave devices. ... - Page 155 UNIT CONTROLLER (PC-ARFH1E) Example 2 1 Move Unit controller to the living room (use as Unit controller + Room Thermostat) 2 Master unit controller moved to living room Zone 1 3 Slave Unit controller as a room thermostat for Zone 2 Bedroom Zone 2 Indoor unit Living room Zone 1...
- Page 156 UNIT CONTROLLER (PC-ARFH1E) Example 3 1 Move Unit controller to the living room (use as Unit controller + Room Thermostat) 2 Wired unit controller as a Room Thermostat for Zone 1 3 Wired room sensor for Zone 2 Bedroom Zone 2 Indoor unit Living room Zone 1 Outdoor unit...
- Page 157 UNIT CONTROLLER (PC-ARFH1E) Example 4 1 PC-ARFH1E attached into the unit and used as unit controller and room thermostat for both zones. 2 Wired room sensor for Zone 1 3 Wired room sensor for Zone 2 Bedroom Zone 2 Indoor unit Living room Zone 1 Outdoor unit...
- Page 158 UNIT CONTROLLER (PC-ARFH1E) Example 5 1 Master unit controller as unit configuration 2 Wireless intelligent thermostat for zone 1 (ATW-RTU-07) (Receiver + Room thermostat) 3 Wireless intelligent thermostat for zone 2 (ATW-RTU-06) (Only Room thermostat) Bedroom Zone 2 Indoor unit Living room Zone 1 Outdoor unit Order...
- Page 159 UNIT CONTROLLER (PC-ARFH1E) Mixed configurations (Wireless + Wired) 1 Move Unit controller to the living room (use as Unit controller + Room Thermostat) 2 Master unit controller moved to living room Zone 1 3 Wireless intelligent thermostat for zone 2 (ATW-RTU-07) (Receiver + Room thermostat) Bedroom Zone 2 Indoor unit Living room Zone 1...
-
Page 160: Main Screen
UNIT CONTROLLER (PC-ARFH1E) 8.7 MAIN SCREEN Depending on the working mode of the user controller, the main screen is shown in a different way. When the user controller is working as a master unit controller, a comprehensive view with all the elements is shown, whereas when the user controller is working as a room thermostat (located in one of the controlled zones), the main screen appears with simplified information. -
Page 161: Comprehensive View
UNIT CONTROLLER (PC-ARFH1E) 8.7.2 Comprehensive view Swimming pool control Time and date It gives information about the swimming pool setting The current time/date information is displayed. This information temperature and displays a throughput icon indicating the can be changed on the configuration menu percentage of the actual temperature with respect to the ... -
Page 162: Quick Action Function
UNIT CONTROLLER (PC-ARFH1E) 8.7.3 Quick action function The following quick actions are shown when pressing the OK button at the selected zone in comprehensive view or room thermostat view: Comprehensive view quick actions Room thermostat view quick actions Timer: Menu for the selection and configuration of simple timer and schedule timer. -
Page 163: Menu
UNIT CONTROLLER (PC-ARFH1E) 8.8 MENU 8.8.1 Operation information In operation information menu it is possible to find the most important setting parameters of the system besides the information of the operation conditions. Detailed information about: Detailed information about Heat Pump: •... -
Page 164: System Configuration
UNIT CONTROLLER (PC-ARFH1E) 8.8.2 System configuration In system configuration menu it is possible to configure all the system settings. Water settings: (Screen visible only for room thermostats) 1 / 2 General configuration: • Space Heating • Holiday Mode • Space Cooling •... -
Page 165: General Options Configuration
UNIT CONTROLLER (PC-ARFH1E) 8.8.2.1 General options configuration Holiday Mode: Configure holiday come back • Year • Month • Day • Returning time Maximum Setting T. (Air): • Setting temperature • Circuit 1 • Start/Stop Holiday Mode • Circuit 2 Air Eco Offset for Circuit 1-2: Central operation: Configure the offset air temperature for the •... -
Page 166: Timer And Schedule Configuration
UNIT CONTROLLER (PC-ARFH1E) 8.8.2.2 Timer and schedule configuration N O T E Timer settings are only valid if the corresponding zone is in ON state at the time of execution of the respective timer program. The LCD controller must be set to the correct date and time before using the timer function. Select the desired area to apply the timer function or delete all timers configuration: Heating/Cooling (Air): To set the timer to adjust the room temperature. - Page 167 UNIT CONTROLLER (PC-ARFH1E) Setting of Schedule timer Setting of temperature, operation mode (ECO or Comfort) or change of operation state from ON to OFF for a defined period, after which operation returns to the previous settings. Manual operation of the unit controller has priority over schedule settings. Timer type: Selection of the timer type •...
-
Page 168: Water Settings Configuration
UNIT CONTROLLER (PC-ARFH1E) 8.8.2.3 Water settings configuration This menu is only visible for a room thermostat if the controller is not controlling the unit. Select the desired area to apply the water settings configuration: Space Heating or Space Cooling water settings Fixed temperature: Selection of the temperature for Circuit 1 or Circuit 2 (heating or... -
Page 169: Space Heating / Space Cooling Configuration
UNIT CONTROLLER (PC-ARFH1E) 8.8.2.4 Space Heating / Space Cooling configuration Control the temperature for Space Heating or Space Cooling by configuring the following parameters. Water calculation mode: Selection of the water set point for Circuit 1 or Circuit 2 (Space Heating or Space Cooling). - Page 170 UNIT CONTROLLER (PC-ARFH1E) Water calculation mode Disabled The “Disabled” option sets the circuit as disabled. Points Points is the most versatile calculation type. Set 4 points and one vertex point, to create a line representing the function that the air to water heat pump will use to give the temperature setting according to the current ambient temperature.
-
Page 171: Domestic Hot Water (Dhw) Configuration
UNIT CONTROLLER (PC-ARFH1E) 8.8.2.5 Domestic Hot Water (DHW) configuration Status of DHW: • Disabled • Enabled. Setting temperature: Mode: Only available when DHW heater is Setting for domestic hot water activated (DSW4 pin 3 ON). temperature selected by the user. The •... - Page 172 UNIT CONTROLLER (PC-ARFH1E) Space priority status: If space priority function is enabled, Heat Pump operation by DHW mode stops (and continue Maximum time: with DHW heater, if necessary). Maximum time that DHW operation This function is only performed if space can work using heat pump mode.
-
Page 173: Swimming Pool Configuration
UNIT CONTROLLER (PC-ARFH1E) 8.8.2.6 Swimming Pool configuration Status: Enable or disable swimming pool. Set input 3, output 1 and sensor 2. (see section “8.8.2.10 Inputs, Outputs and Sensors configuration”) Setting temperature: Adjustment of the swimming pool water temperature setting. • Range: 24~33 ºC Offset temperature: The setting temperature is increased by the indicated parameter. -
Page 174: Complementary Heating Configuration
UNIT CONTROLLER (PC-ARFH1E) 8.8.2.7 Complementary Heating configuration Heating Source: • HP Only • HP + Heater • HP + Boiler • HP + Heater + Boiler (Only for YUTAKI S and YUTAKI S COMBI) Electrical heater: (Only when heating source is configured as HP+Heater or HP+Heater + Solar combination: Boiler) . - Page 175 UNIT CONTROLLER (PC-ARFH1E) Solar combination - Total control DHW maximum time: • Maximum time YUTAKI allows to heat tank by means Solar. At the end of this time Solar pump is ΔT connection: stopped regardless temperature conditions at Solar •...
-
Page 176: Heat Pump Configuration
UNIT CONTROLLER (PC-ARFH1E) 8.8.2.8 Heat Pump configuration Outdoor average temperature: OTC average is used to neutralise the effect of occasional temperature variations. 1 / 2 Water pump configuration: The average value of outdoor temperature sampled over a selected period (between 1 and 24 hours) is Configure the water pump of the used for the calculation of weather-dependent set point heat pump. - Page 177 UNIT CONTROLLER (PC-ARFH1E) Water pump configuration 1 / 2 Operation mode: Swimming pool speed: • ΔT: To control the pump speed to guarantee the ΔT between Two and Twi. Selection of the % for the pump speed when using Swimming pool. •...
-
Page 178: Optional Functions Configuration
UNIT CONTROLLER (PC-ARFH1E) 8.8.2.9 Optional functions configuration This menu allows to configure the optional functions for system, space heating or space cooling, DHW and Emergency operation. System: Configure the optional functions for the system. See detailed information below. Space functions: Configure the optional functions for the space heating or space cooling. - Page 179 UNIT CONTROLLER (PC-ARFH1E) Smart Function Status: Enable or disable smart function. Smart Action: 1 / 2 Check that Smart Act/SG1 is set in input 5 (see section “8.8.2.10 Inputs, Outputs and Sensors configuration”) Trigger type: • HP Block: Heat Pump is forbidden in any •...
- Page 180 UNIT CONTROLLER (PC-ARFH1E) DHW optional functions Circuit Pump: By using this output, user can heat all the water inside DHW piping system. Output must be configured at the I/O and sensors menu. (see section “8.8.2.10 Inputs, Outputs and Sensors configuration”) •...
-
Page 181: Inputs, Outputs And Sensors Configuration
UNIT CONTROLLER (PC-ARFH1E) 8.8.2.10 Inputs, Outputs and Sensors configuration Inputs: The system allows to set 7 inputs depending Auxiliary sensors: on the operations and preferences of the There are 7 available auxiliary sensors to installation set. Outputs: There are 8 available outputs to set. There are conditions of setting depending on the installation. -
Page 182: Commissioning
UNIT CONTROLLER (PC-ARFH1E) List of available outputs: • Disabled • SWP 3WV: (Fixed in output 1 if swimming pool is enabled): Signal control of the 3-way valve of the swimming pool. • Water pump 3: (Fixed in output 2 if hydraulic separator or buffer tank is installed): Signal control of the water pump for hydraulic separator or buffer tank. -
Page 183: Controller Settings
UNIT CONTROLLER (PC-ARFH1E) 8.8.4 Controller settings Under the controller settings menu it is possible to adjust the several parameters: Controller options: • Operation view (Unit / Room) • Favourite action (Eco/Comfort, Night Shift, DHW Boost, Timer) • Temperature sensor offset Room names: •... -
Page 184: Factory Reset
UNIT CONTROLLER (PC-ARFH1E) 8.8.6 Factory reset This function is only visible for the installer. It asks for removing all the settings and returns to the factory setting configuration. 8.8.7 Return to User Mode This function allows to getting out of the “Installer mode”. PMML0575 rev.2 - 03/2022... -
Page 185: Unit Controller (Pc-Arfh2E)
UNIT CONTROLLER (PC-ARFH2E) 9 UNIT CONTROLLER (PC-ARFH2E) The new unit controller for YUTAKI series (PC-ARFH2E) is an user-friendly remote control which ensures a strong and safe communication through H-LINK. Available for the following unit models: • RWM-(2.0-3.0)R1E • RWD-(2.0-3.0)RW1E-220S(-K) The following information applies in the case of PC-ARFH2E software of version H-0122 and later used in combination with PCB indoor unit software of version H-0114 and later. -
Page 186: Description Of The Icons
UNIT CONTROLLER (PC-ARFH2E) 9.2 DESCRIPTION OF THE ICONS Icon Name Explanation Circuit I or II is in Demand-OFF Circuit I or II is on Thermo-OFF Status for circuit 1, 2, DHW and swimming Circuit I or II is working between 0 < X ≤ 33% of the desired water outlet temperature pool. - Page 187 UNIT CONTROLLER (PC-ARFH2E) Icon Name Explanation Heater step Indicates which of the 3 possible heater steps is applied on space heating DHW Heater Informs about DHW Heater operation. (If it is enabled) Solar Combination with solar energy Compressor enabled (For YUTAKI S, S COMBI) Compressor Compressors enabled.
-
Page 188: Unit Controller Contents
UNIT CONTROLLER (PC-ARFH2E) 9.3 UNIT CONTROLLER CONTENTS Menu Contents Menu Contents Level 1 Level 2 Level 3 Level 4 Level 5 Level 1 Level 2 Level 3 Level 4 Level 5 Type Operation Information Until next action Live view Specific time Recent Status Register Forever General... - Page 189 UNIT CONTROLLER (PC-ARFH2E) Menu Contents Level 1 Level 2 Level 3 Level 4 Level 5 Water Pump Configuration Outdoor average Timer Minimum ON Time Minimum OFF Time Seizure Protection Status Operation Day Starting Time Fan Coils Controlled Fan Zones Delay ON Time Demand OFF Actions Optional Functions Hydraulic Sep.
- Page 190 UNIT CONTROLLER (PC-ARFH2E) Installer mode Icon means that this menu is available only for installer, a special user with higher access privileges to configure the system. In order to access the controller as Installer, go to “Installer access” menu. After that, the “Enter password”...
-
Page 191: Controller Configuration
UNIT CONTROLLER (PC-ARFH2E) 9.4 CONTROLLER CONFIGURATION • Select the desired language using the arrow keys. • Press OK button. • Select the date and time using the arrow keys. • Press OK button. • Select Yes when the device is controlling the unit which it is attached. Jump to screen 6. •... - Page 192 UNIT CONTROLLER (PC-ARFH2E) • Select No when the device acts as Room Thermostat only. It does not control the unit. • Press OK button. • Select No when the device is not used as a room thermostat. • Select Yes, in zone 1/ Yes, in zone 2 / Yes, in both zones, depending on the number of circuits controlled. •...
- Page 193 UNIT CONTROLLER (PC-ARFH2E) • Select Yes if Domestic Hot Water tank is installed. • Press OK button. • Select Yes if Swimming Pool is installed. • Press OK button. • Select Yes if Boiler is installed. • Press OK button.
- Page 194 UNIT CONTROLLER (PC-ARFH2E) • Select the bivalent point for boiler or electric backup heater (from -20 ºC to 20 ºC). • Press OK button. • Select Yes if fan coil can be controlled through the outputs. • Press OK button. ...
-
Page 195: Timer Assitant For Room Thermostat
UNIT CONTROLLER (PC-ARFH2E) 9.4.1 Timer Assitant for Room Thermostat In case that the device is selected as a room thermostat of a zone, a timer assitant is displayed after the initial wizard. • Select Yes to launch the timer assistant for Room Thermostat 1. •... -
Page 196: Examples Of Possible Configurations
UNIT CONTROLLER (PC-ARFH2E) 9.4.2 Examples of possible configurations N O T E • Other installation configurations are possible. These are examples only for illustration purposes. • It is recommended to set firstly the Main device so as the ease the configuration of the Sub devices. ... - Page 197 UNIT CONTROLLER (PC-ARFH2E) Example 2 1 Move Unit controller to the living room (use as Unit controller + Room Thermostat) 2 Main unit controller moved to living room Zone 1 3 Sub Unit controller as a room thermostat for Zone 2 Bedroom Zone 2 Indoor unit Living room Zone 1...
- Page 198 UNIT CONTROLLER (PC-ARFH2E) Example 3 1 Move Unit controller to the living room (use as Unit controller + Room Thermostat) 2 Wired unit controller as a Room Thermostat for Zone 1 3 Wired room sensor for Zone 2 Bedroom Zone 2 Indoor unit Living room Zone 1 Outdoor unit...
- Page 199 UNIT CONTROLLER (PC-ARFH2E) Example 4 1 PC-ARFH2E attached into the unit and used as unit controller and room thermostat for both zones. 2 Wired room sensor for Zone 1 3 Wired room sensor for Zone 2 Bedroom Zone 2 Indoor unit Living room Zone 1 Outdoor unit...
- Page 200 UNIT CONTROLLER (PC-ARFH2E) Example 5 1 Main unit controller as unit configuration 2 Wireless intelligent thermostat for zone 1 (ATW-RTU-07) (Receiver + Room thermostat) 3 Wireless intelligent thermostat for zone 2 (ATW-RTU-06) (Only Room thermostat) Bedroom Zone 2 Indoor unit Living room Zone 1 Outdoor unit Order...
- Page 201 UNIT CONTROLLER (PC-ARFH2E) Mixed configurations (Wireless + Wired) 1 Move Unit controller to the living room (use as Unit controller + Room Thermostat) 2 Main unit controller moved to living room Zone 1 3 Wireless intelligent thermostat for zone 2 (ATW-RTU-07) (Receiver + Room thermostat) Bedroom Zone 2 Indoor unit Living room Zone 1...
-
Page 202: Main View
UNIT CONTROLLER (PC-ARFH2E) 9.5 MAIN VIEW Main view of the device is composed by a bottom tab widget to move around the different views: • Home • Mode • Room 1 (if space is small it shows R1) • Room 2 (if space is small it shows R2) •... -
Page 203: Quick Actions Function
UNIT CONTROLLER (PC-ARFH2E) 9.5.1 Quick actions function The following quick actions are shown when pressing the OK button at the selected zone in comprehensive view or room thermostat view: Room 1/2 • Timer • • Holiday (If Zone is enabled) •... - Page 204 UNIT CONTROLLER (PC-ARFH2E) Domestic Hot Water Tank (DHW) • Timer • Boost (If DHW is ON and Boost is availbable. It can also be cancelled from quick actions). • Holiday (If Zone is enabled) • Status Swimming Pool (SWP) •...
-
Page 205: Home View
UNIT CONTROLLER (PC-ARFH2E) 9.6 HOME VIEW Home view shows on the middle the date and time On the left side it shows: • Inside temperature (home icon): If LCD works as Room 1, it took it from the controller sensor or auxiliary sensor If LCD works as Room 2, it took it from the controller sensor or auxiliary sensor If LCD works as Room 1+2, it took it from the controller sensor or auxiliary sensor, or the average of the ones used per each zones. -
Page 206: Mode View
UNIT CONTROLLER (PC-ARFH2E) 9.7 MODE VIEW • Mode view shows the selected mode. • In case of being a heating and cooling unit, it lets also to change the mode by using the top/bottom arrows, and it shows the mode spinner on the left side. •... -
Page 207: Fan Coils 1/2 View
UNIT CONTROLLER (PC-ARFH2E) 9.9 FAN COILS 1/2 VIEW Room 1 or 2 could control Fan Coils. Once configured to control them on the menu, the bottom bar includes the option to manage those fan coils: • Fan speeds: Low, Medium, High and Auto •... -
Page 208: Dhw View
UNIT CONTROLLER (PC-ARFH2E) 9.11 DHW VIEW DHW view displays: • Water setting feedback • When editing it shows the setting temperature • On right side it has zone notifications for: Next timer action Boost, throughput, operating in comfort and timer icons •... -
Page 209: Menu
UNIT CONTROLLER (PC-ARFH2E) 9.13 MENU 9.13.1 Operation Information In operation information menu it is possible to find the most important setting parameters of the system besides the information of the operation conditions. Detailed information about: Summary of system status information: •... - Page 210 UNIT CONTROLLER (PC-ARFH2E) 3 / 4 Detailed information about Boiler combination: Detailed information about Electrical • Operation (Demand ON/OFF) Heater: • Current temperature • Operation (Demand ON/OFF) • Setting temperature • Current temperature • Setting temperature • Load Factor • Step Detailed information about Solar combination: •...
-
Page 211: Live View
UNIT CONTROLLER (PC-ARFH2E) 9.13.1.1 Live view Live view is a summary of system status information shown on operation information. It has the following screens: Refrigerant Cycle Considerations: • Arrows move in anti-clock direction in Heating mode. When Cooling arrows move in clock direction. •... - Page 212 UNIT CONTROLLER (PC-ARFH2E) Circuit 1 Considerations: • When demand on, inlet pipe is in orange, outlet in blue. • When cooling, inlet pipe is in blue, outlet in orange. If thermo off, it is shown in gray. • shows value of T in case there is buffer tank and T sensor is used.
- Page 213 UNIT CONTROLLER (PC-ARFH2E) Hot Water Tank Considerations: • When Operation status is DHW ON: inlet pipe has orange color inside and arrows moving. Outlet pipe is blue with arrows too. • When not working on DHW ON pipes are shown in light grey. •...
- Page 214 UNIT CONTROLLER (PC-ARFH2E) Room icons for synoptic view Circuit 1 and 2 can be displayed with the following icons: Icon Name Fan Coils Radiant floor Radiators 9.13.1.2 Recent Status Register Recent Status Register is an historical data that displays the main variables during the last hours. Considerations: •...
-
Page 215: Energy Data
UNIT CONTROLLER (PC-ARFH2E) 9.13.2 Energy data In energy data menu it is possible to check the input power or capacity for space heating / cooling, DHW, SWP or total input power / capacity. In case no external pulse power meter is used, YUTAKI unit performs an estimation of the consumption taking into consideration, compressor, tank heaters, space heating heaters, compressor crankase heater, WP1 and electronics. - Page 216 UNIT CONTROLLER (PC-ARFH2E) • Pressing OK the chart view changes for a table view of the data: • By pressing right/left, it can be changed between zones: Total Space Heating Space Cooling Swimming Pool • By pressing up/down, the different periods are shown. •...
-
Page 217: Timer And Schedule Configuration
UNIT CONTROLLER (PC-ARFH2E) 9.13.3 Timer and schedule configuration N O T E Timer settings are only valid if the corresponding zone is in ON state at the time of execution of the respective timer program. The LCD controller must be set to the correct date and time before using the timer function. Select the desired area to apply the timer function or delete all timers configuration: 1 / 2 Heating/Cooling (Air): To set the... - Page 218 UNIT CONTROLLER (PC-ARFH2E) 9.13.3.1 Setting of timer for Room Thermostats Setting of temperature or change of operation state from ON to OFF for a defined period, after which operation returns to the previous settings. Manual operation of the unit controller has priority over schedule settings. Timer configuration: New screen appears to configure a schedule timer.
- Page 219 UNIT CONTROLLER (PC-ARFH2E) Setting with Timer assistant It is possible to set the timer for Room thermostats with a timer assistant. When launching the timer assistant the current timer will be deleted. Timer assistant asks if user stays at home during weekend and weekdays •...
- Page 220 UNIT CONTROLLER (PC-ARFH2E) 9.13.3.2 Setting of timer for Circuit 1/2 To change the operation mode (ECO or Comfort) or change of operation state from ON to OFF for a defined period, after which operation returns to the previous settings. Manual operation of the unit controller has priority over schedule settings. Timer configuration: New screen appears to configure a schedule timer.
- Page 221 UNIT CONTROLLER (PC-ARFH2E) 9.13.3.3 Setting of timer for Hot water tank or Swimming Pool Setting the temperature or change of operation state from ON to OFF for a defined period, after which operation returns to the previous settings. Manual operation of the unit controller has priority over schedule settings. Timer configuration: New screen appears to Timer status:...
- Page 222 UNIT CONTROLLER (PC-ARFH2E) 9.13.3.4 Override Configuration When a different configuration from the defined by the timer of a zone is done, it is possible to override the timer configuration during a specific time. • Until next action: derogation remains until next action of the timer. •...
-
Page 223: System Configuration
UNIT CONTROLLER (PC-ARFH2E) 9.13.4 System configuration In system configuration menu it is possible to configure all the system settings. Room thermostats configuration: (Screen visible only for room thermostats) • Setting temperature range (air) • Air Eco Offset 1 / 3 •... -
Page 224: Room Thermostats Configuration
UNIT CONTROLLER (PC-ARFH2E) 9.13.4.1 Room thermostats configuration Maximum / Minimum temperature for heating and cooling: Configure for Circuit 1/2: Thermostat configuration: • Heating maximum temperature Configure the wired or wireless room • Heating minimum temperature thermostats: • Cooling maximum temperature •... -
Page 225: Water Settings Configuration
UNIT CONTROLLER (PC-ARFH2E) 9.13.4.2 Water settings configuration This menu is only visible for a room thermostat if the controller is not controlling the unit. Select the desired area to apply the water settings configuration: Space Heating or Space Cooling water settings ∆θ... -
Page 226: Space Heating / Space Cooling Configuration
UNIT CONTROLLER (PC-ARFH2E) 9.13.4.3 Space Heating / Space Cooling configuration Control the temperature for Space Heating or Space Cooling by configuring the following parameters. Water calculation mode: Selection of the water set point for Circuit 1 or Circuit 2 (Space Heating or Space Cooling). - Page 227 UNIT CONTROLLER (PC-ARFH2E) Water calculation mode Deactivated The “Deactivated” option sets the circuit as disabled. Points Points is the most versatile calculation type. Set 4 points and one vertex point, to create a line representing the function that the air to water heat pump will use to give the temperature setting according to the current ambient temperature.
-
Page 228: Hot Water Tank Configuration
UNIT CONTROLLER (PC-ARFH2E) 9.13.4.4 Hot Water Tank configuration Setting temperature: Status of Hot Water Tank: Setting for domestic hot water temperature selected by the user. The • Deactivated maximum value of this setting depends on the Maximum setting temperature set •... - Page 229 UNIT CONTROLLER (PC-ARFH2E) DHW Heater: Only available when DHW heater is activated (DSW4 pin 3 ON). • Waiting time: Enable or disable waiting time for DHW heater. • Electrical Heater waiting time: To select the delay time since the moment HP has Space priority temperature: started in order to start the electric heater.
-
Page 230: Swimming Pool Configuration
UNIT CONTROLLER (PC-ARFH2E) 9.13.4.5 Swimming Pool configuration Status: Enable or disable swimming pool. Set input 3, output 1 and sensor 2. (See section “9.13.4.10 Inputs, Outputs and Sensors configuration”) Setting temperature: Adjustment of the swimming pool water temperature setting. • Range: 24~33 ºC Offset temperature: The setting temperature is increased by the indicated parameter. -
Page 231: Complementary Heating Configuration
UNIT CONTROLLER (PC-ARFH2E) 9.13.4.6 Complementary Heating configuration Heating Source: • HP Only • HP + Heater Solar combination: • HP + Boiler • HP + Heater + Boiler (Only for YUTAKI S The solar combination will enable you to heat and YUTAKI S COMBI) up your domestic water by means of the sun whenever the sun is available. - Page 232 UNIT CONTROLLER (PC-ARFH2E) Solar combination - Total control DHW maximum time: • Maximum time YUTAKI allows to heat tank by ΔT connection: means Solar. At the end of this time Solar pump • Allows to specify a difference is stopped regardless temperature conditions at temperature between tank and Panel Solar Panel.
-
Page 233: Heat Pump Configuration
UNIT CONTROLLER (PC-ARFH2E) 9.13.4.7 Heat Pump configuration Night shift: Reduces compressor load in order to reduce environmental noise, preferably at night. See detailed information in the next page. 1 / 2 Water pump configuration: Outdoor average temperature: Configure the water pump of the heat pump. - Page 234 • Standard: WP2 is connected after WP3 by means an hydraulic separator or directly by means Hitachi mixing kit Pumps during DHW: accessory. Whenever WP2 is switched ON, WP3 is also This option allows to stop Water Pumps during switched ON in order to transfer heat to C2.
-
Page 235: Fan Coils
UNIT CONTROLLER (PC-ARFH2E) 9.13.4.8 Fan coils Controlled fan zones: Fan coil usage assignation in function of Mode and Room: • Deactivated • Heating • Cooling • Heating & Cooling Delay ON time: Delay time to start Fan operation for Fan 1 or Fan 2 only in heating operation. -
Page 236: Optional Functions Configuration
UNIT CONTROLLER (PC-ARFH2E) 9.13.4.9 Optional functions configuration This menu allows to configure the optional functions for system, space heating or space cooling, DHW and Emergency operation. Energy configuration: Setup of power consumption readings. See detailed information below. 1 / 2 Hydraulic separator: Enable or disable a Hydraulic separator Heating Auto On/Off:... - Page 237 UNIT CONTROLLER (PC-ARFH2E) Energy configuration Input calculation: Enable or disable energy configuration options. Power meter 1 or 2: • The power meter does a real measuring of the power consumption. • If the power meter is enabled, it is possible Capacity configuration: to see the information collected through the Due to usage of water temperature...
- Page 238 UNIT CONTROLLER (PC-ARFH2E) Heating Auto On / Off Switch-Off Temperature: • Switch Off temperature: System is Status: stopped in case that the outdoor • Enable or disable heating auto on/off temperature is higher than the Switch- OFF temperature. function. •...
- Page 239 UNIT CONTROLLER (PC-ARFH2E) Hot water tank optional functions Circuit Pump: By using this output, user can heat all the water inside DHW piping system. Output must be configured at the I/O and sensors menu. (see section “9.13.4.10 Inputs, Outputs and Sensors configuration”).
-
Page 240: Inputs, Outputs And Sensors Configuration
UNIT CONTROLLER (PC-ARFH2E) 9.13.4.10 Inputs, Outputs and Sensors configuration Optional outputs: There 4 additional available outputs to set. These Inputs: 4 additional outputs are not wired to the YUTAKI terminal board. The system allows to set 7 inputs depending on the operations and preferences of the In order to use them it is required accessory (field installation. - Page 241 UNIT CONTROLLER (PC-ARFH2E) List of available outputs: • Deactivated • SWP 3WV: (Fixed in output 1 if swimming pool is enabled): Signal control of the 3-way valve of the swimming pool. • Water pump 3: (Fixed in output 2 if hydraulic separator or buffer tank is installed): Signal control of the water pump for hydraulic separator or buffer tank.
-
Page 242: Holiday Mode
UNIT CONTROLLER (PC-ARFH2E) 9.13.5 Holiday mode This menu allows to configure the date, time and the temperature conditions for the holiday come back. 1 / 2 Affected zones: Holiday Mode: Enable (switch off) or disable (switch on) the Configure holiday come back zones during the holiday period. -
Page 243: Controller Settings
UNIT CONTROLLER (PC-ARFH2E) 9.13.6 Controller settings Under the controller settings menu it is possible to adjust the several parameters: Room Configuration: • Room names: create or edit a name for circuit 1 or circuit 2. • Synoptic view icons: selection of the icon shown in Live view menu for cooling / heating emitters. -
Page 244: Commissioning
UNIT CONTROLLER (PC-ARFH2E) 9.13.7 Commissioning Under the commissioning menu it is possible to adjust the several parameters: Air purge procedure: Screed Drying: • Duration • Circuit 1 setting temperature • Start air purge • Circuit 2 setting temperature • Start screed drying Unit test run: •... -
Page 245: Factory Reset
UNIT CONTROLLER (PC-ARFH2E) 9.13.9 Factory reset This function is only visible for the installer. It asks for removing all the settings and returns to the factory setting configuration. 9.13.10 Installer access Menu to enable the access to configure the system. The login password for the Installer is: Right , Down... -
Page 246: Return To User Mode
UNIT CONTROLLER (PC-ARFH2E) 9.13.11 Return to user mode This function allows to getting out of the “Installer mode”. 9.13.12 Lock the controller This function is only visible for the installer and allows to lock the menu in case of exhibition. This action can also be launched from central. -
Page 247: Yutaki Cascade Controller Atw-Ycc-(01-02)
YUTAKI CASCADE CONTROLLER ATW-YCC-(01-02) 10 YUTAKI CASCADE CONTROLLER ATW-YCC-(01-02) The YUTAKI CASCADE CONTROLLER for YUTAKI series (PC-ARFH1E) is an user-friendly remote control which ensures a strong and safe communication through H-LINK. Available for the following unit models: • RWM-(4.0-10.0)NE(-W) • RWD-(4.0-6.0)NW(S)E-(200/260)S(-K)(-W) •... -
Page 248: Description Of The Icons
YUTAKI CASCADE CONTROLLER ATW-YCC-(01-02) 10.2 DESCRIPTION OF THE ICONS 10.2.1 Common icons Icon Name Explanation Circuit I or II is in Demand-OFF Circuit I or II is on Thermo-OFF Status for circuit 1, 2, DHW and swimming Circuit I or II is working between 0 < X ≤ 33% of the desired water outlet temperature pool. -
Page 249: Icons For The Comprehensive View
YUTAKI CASCADE CONTROLLER ATW-YCC-(01-02) 10.2.2 Icons for the comprehensive view Icon Name Explanation This icon informs about pump operation. Pump There are three available pumps on the system. Each one is numbered, and its corresponding number is displayed below to the pump icon when it is operating Heater step Indicates which of the 3 possible heater steps is applied on space heating DHW Heater... -
Page 250: Contents
YUTAKI CASCADE CONTROLLER ATW-YCC-(01-02) 10.3 CONTENTS Menu Contents Menu Contents Level 1 Level 2 Level 3 Level 4 Level 5 Level 6 Level 1 Level 2 Level 3 Level 4 Level 5 Level 6 Simple Operation Information Schedule General Delete All Timer Configuration Modules information Water settings Circuit 1... - Page 251 YUTAKI CASCADE CONTROLLER ATW-YCC-(01-02) Menu Contents Menu Contents Level 1 Level 2 Level 3 Level 4 Level 5 Level 6 Level 1 Level 2 Level 3 Level 4 Level 5 Level 6 Controller Settings Water Pump Configuration Outdoor average Timer Controller Options Room Names Minimum ON Time...
-
Page 252: Cascade Controller Configuration
YUTAKI CASCADE CONTROLLER ATW-YCC-(01-02) 10.4 CASCADE CONTROLLER CONFIGURATION • Select the desired language using the arrow keys. • Press OK button. • Select the date and time using the arrow keys. • Press OK button. 10.4.1 Configuration Assistant ... - Page 253 YUTAKI CASCADE CONTROLLER ATW-YCC-(01-02) • Select the heat emitters on the circuit 1: Underfloor heating, Fan coils or Radiators. • Repeat this step in case of circuit 2. • Press OK button. • Select Yes if Domestic Hot Water tank is installed. •...
- Page 254 YUTAKI CASCADE CONTROLLER ATW-YCC-(01-02) • Select Yes if an electrical backup heater is installed. • This screen appears only when no boiler is installed. • Press OK button. • Select the bivalent point for boiler or electric backup heater (from -20 ºC to 20 ºC). •...
-
Page 255: Advanced Configuration
YUTAKI CASCADE CONTROLLER ATW-YCC-(01-02) • Configuration assistant is completed. • Press OK button to go to the main screen. 10.4.2 Advanced Configuration • Select the advance configuration for a complete configuration. • Press OK button. • Select the favourite action: Eco/Comfort, Timer, DHW Boost. •... - Page 256 YUTAKI CASCADE CONTROLLER ATW-YCC-(01-02) • Configure circuit 1 and circuit 2 OTC: Disabled, Points, Gradient, Fix. • Enable or disable DHW and Swimming Pool. • Select the heating source: HP only, HP + EH, HP + Boiler. • Configure electrical heater use: Disabled or Backup. •...
- Page 257 YUTAKI CASCADE CONTROLLER ATW-YCC-(01-02) • Configure Central mode options: Local or Full. • Configure thermostat (1 or 2): None, wired or wireless. • Check RT address if wired is selected. • Select Wireless binding ID (1 or 2) if wireless is selected. •...
-
Page 258: Main Screen
YUTAKI CASCADE CONTROLLER ATW-YCC-(01-02) 10.5 MAIN SCREEN Swimming pool control Time and date It gives information about the swimming pool setting The current time/date information is displayed. This information temperature and displays a throughput icon indicating the can be changed on the configuration menu percentage of the actual temperature with respect to the ... -
Page 259: Quick Action Function
YUTAKI CASCADE CONTROLLER ATW-YCC-(01-02) 10.5.1 Quick action function The following quick actions are shown when pressing the OK button at the selected zone: Timer: Menu for the selection and configuration of simple timer and schedule timer. OTC: Menu for the OTC selection. Only available for circuit 1 and circuit 2 in Comprehensive view. Eco / Comfort: Activation of the Eco/Comfort Mode. -
Page 260: Menu
YUTAKI CASCADE CONTROLLER ATW-YCC-(01-02) 10.6 MENU 10.6.1 Operation information In operation information menu it is possible to find the most important setting parameters of the system besides the information of the operation conditions. Detailed information about: • Operation status • Water setting temperature •... -
Page 261: System Configuration
YUTAKI CASCADE CONTROLLER ATW-YCC-(01-02) 10.6.2 System configuration In system configuration menu it is possible to configure all the system settings. 1 / 2 General configuration: • Holiday Mode • Air Eco Offset • Room Thermostats • Central Operation Cascade configuration: •... -
Page 262: General Options Configuration
YUTAKI CASCADE CONTROLLER ATW-YCC-(01-02) 10.6.2.1 General options configuration Holiday Mode: Configure holiday come back • Year • Month • Day • Returning time • Setting temperature • Start/Stop Holiday Mode Central operation: Air Eco Offset for Circuit 1-2: • Control type selection: Local or full. Configure the offset air temperature for the ECO mode. -
Page 263: Timer And Schedule Configuration
YUTAKI CASCADE CONTROLLER ATW-YCC-(01-02) 10.6.2.2 Timer and schedule configuration N O T E Timer settings are only valid if the corresponding zone is in ON state at the time of execution of the respective timer program. The LCD controller must be set to the correct date and time before using the timer function. Select the desired area to apply the timer function or delete all timers configuration: Heating/Cooling (Air): To set the timer to adjust the room temperature. - Page 264 YUTAKI CASCADE CONTROLLER ATW-YCC-(01-02) Setting of Schedule timer Setting of temperature, operation mode (ECO or Comfort) or change of operation state from ON to OFF for a defined period, after which operation returns to the previous settings. Manual operation of the unit controller has priority over schedule settings. Timer type: Selection of the timer type •...
- Page 265 YUTAKI CASCADE CONTROLLER ATW-YCC-(01-02) CASCADE configuration Supply setting offset Modules configuration: • To set YUTAKI Slave Units to work at a setting temperature • Configure the status, refrigerant cycle address, higher than setting temperature indoor unit address and individual DHW for each determined by YUTAKI CASCADE CONTROLLER module.
-
Page 266: Space Heating / Space Cooling Configuration
YUTAKI CASCADE CONTROLLER ATW-YCC-(01-02) 10.6.2.3 Space Heating / Space Cooling configuration Control the temperature for Space Heating or Space Cooling by configuring the following parameters. Water calculation mode: Selection of the water set point for Circuit 1 or Circuit 2 (Space Heating or Space Cooling). - Page 267 YUTAKI CASCADE CONTROLLER ATW-YCC-(01-02) Water calculation mode Disabled The “Disabled” option sets the circuit as disabled. Points Points is the most versatile calculation type. Set 4 points and one vertex point, to create a line representing the function that the air to water heat pump will use to give the temperature setting according to the current ambient temperature.
-
Page 268: Domestic Hot Water (Dhw) Configuration
YUTAKI CASCADE CONTROLLER ATW-YCC-(01-02) 10.6.2.4 Domestic Hot Water (DHW) configuration Status of DHW: • Disabled • Enabled. Setting temperature: Mode: Only available when DHW heater is activated Setting for domestic hot water (DSW4 pin 3 ON). temperature selected by the user. The maximum value of this setting depends •... - Page 269 YUTAKI CASCADE CONTROLLER ATW-YCC-(01-02) Space priority status: If space priority function is enabled, Heat Pump operation by DHW mode stops (and continue with DHW heater, if necessary). Maximum time: This function is only performed if space heating Maximum time that DHW operation can or space cooling can be done.
-
Page 270: Swimming Pool Configuration
YUTAKI CASCADE CONTROLLER ATW-YCC-(01-02) 10.6.2.5 Swimming Pool configuration Status: Enable or disable swimming pool. Set input 3, output 1 and sensor 2. (see section “10.6.2.9 Setup of inputs, outputs and sensors”) Setting temperature: Adjustment of the swimming pool water temperature setting. •... -
Page 271: Complementary Heating Configuration
YUTAKI CASCADE CONTROLLER ATW-YCC-(01-02) 10.6.2.6 Complementary Heating configuration Heating Source: • HP Only • HP + Heater • HP + Boiler • HP + Heater + Boiler (Only for YUTAKI S and YUTAKI S COMBI) Electrical heater: (Only when heating source is configured as HP+Heater or HP+Heater + Solar combination: Boiler). - Page 272 YUTAKI CASCADE CONTROLLER ATW-YCC-(01-02) Solar combination - Total control DHW maximum time: ΔT connection: • Maximum time YUTAKI allows to heat tank by means • Allows to specify a difference Solar. At the end of this time Solar pump is stopped temperature between tank and Panel regardless temperature conditions at Solar Panel.
-
Page 273: Heat Pump Configuration
YUTAKI CASCADE CONTROLLER ATW-YCC-(01-02) 10.6.2.7 Heat Pump configuration Water pump configuration: Configure the water pump of the Minimum ON time: In order to reduce a possible heat pump. compressor damage, demand ON cycles can be See detailed information in the reduced by determining the time that must pass next page. -
Page 274: Optional Functions Configuration
YUTAKI CASCADE CONTROLLER ATW-YCC-(01-02) 10.6.2.8 Optional functions configuration This menu allows to configure the optional functions for system, space heating or space cooling, DHW and Emergency operation. System: Configure the optional functions for the system. See detailed information below. Space functions: Configure the optional functions for the space heating or space cooling. - Page 275 YUTAKI CASCADE CONTROLLER ATW-YCC-(01-02) Space optional functions Auto Heat/Cool: Only available in units capable of heating Heating Auto On/Off: and cooling operation, and when cooling operation is enabled. To stop automatically stop heating operation when the daily average outdoor temperature Allows to set automatic switch over to of the previous day is higher than the defined heating and cooling operation using the...
-
Page 276: Setup Of Inputs, Outputs And Sensors
YUTAKI CASCADE CONTROLLER ATW-YCC-(01-02) Emergency Operation Space Heating: Mode: Enable or disable emergency operation Selection of the emergency operation mode: for space heating. Only available in case “Heating source” • Manual: Emergency operation is active when “10.6.2.6 Complementary Heating is manually enabled (by DSW4 pin 4 ON). -
Page 277: Controller Settings
YUTAKI CASCADE CONTROLLER ATW-YCC-(01-02) List of available outputs: • Disabled • SWP 3WV: (Fixed in output 1 if swimming pool is enabled): Signal control of the 3-way valve of the swimming pool. • Water pump 3: (Fixed in output 2 if hydraulic separator or buffer tank is installed): Signal control of the water pump for hydraulic separator or buffer tank. -
Page 278: Commissioning
YUTAKI CASCADE CONTROLLER ATW-YCC-(01-02) 10.6.4 Commissioning Under the commissioning menu it is possible to adjust the several parameters: Screed Drying: • Circuit 1 setting temperature • Circuit 2 setting temperature • Start screed drying 10.6.5 About In this section of the LCD controller it is possible to find the following information: System information: •... -
Page 279: Factory Reset
YUTAKI CASCADE CONTROLLER ATW-YCC-(01-02) 10.6.6 Factory reset This function is only visible for the installer. It asks for removing all the settings and returns to the factory setting configuration. 10.6.7 Return to user mode This function allows to getting out of the “Installer mode”. PMML0575 rev.2 - 03/2022... -
Page 280: Yutaki Cascade Controller Atw-Ycc-03
YUTAKI CASCADE CONTROLLER ATW-YCC-03 11 YUTAKI CASCADE CONTROLLER ATW-YCC-03 The new YUTAKI CASCADE CONTROLLER for YUTAKI series (PC-ARFH2E) is an user-friendly remote control which ensures a strong and safe communication through H-LINK. Available for the following unit models: • RWM-(2.0-3.0)N1E •... -
Page 281: Description Of The Icons
YUTAKI CASCADE CONTROLLER ATW-YCC-03 11.2 DESCRIPTION OF THE ICONS Icon Name Explanation Circuit I or II is in Demand-OFF Circuit I or II is on Thermo-OFF Status for circuit 1, 2, DHW and swimming Circuit I or II is working between 0 < X ≤ 33% of the desired water outlet temperature pool. - Page 282 YUTAKI CASCADE CONTROLLER ATW-YCC-03 Icon Name Explanation Heater step Indicates which of the 3 possible heater steps is applied on space heating DHW Heater Informs about DHW Heater operation. (If it is enabled) Solar Combination with solar energy Compressor enabled (For YUTAKI S, S COMBI) Compressor Compressors enabled.
-
Page 283: Cascade Controller Contents
YUTAKI CASCADE CONTROLLER ATW-YCC-03 11.3 CASCADE CONTROLLER CONTENTS Menu Contents Menu Contents Level 1 Level 2 Level 3 Level 4 Level 5 Level 1 Level 2 Level 3 Level 4 Level 5 System Configuration Operation Information Room Thermostats General Setting temperature range (air) Modules information Air Eco Offset Circuit 1... - Page 284 YUTAKI CASCADE CONTROLLER ATW-YCC-03 Menu Contents Level 1 Level 2 Level 3 Level 4 Level 5 Water Pump Configuration Outdoor average Timer Minimum ON Time Minimum OFF Time Seizure Protection Status Operation Day Starting Time Fan Coils Controlled Fan Zones Delay ON Time Demand OFF Actions Optional Functions...
- Page 285 YUTAKI CASCADE CONTROLLER ATW-YCC-03 Installer mode Icon means that this menu is available only for installer, a special user with higher access privileges to configure the system. In order to access the controller as Installer, go to “Installer access” menu. After that, the “Enter password”...
-
Page 286: Cascade Controller Configuration
YUTAKI CASCADE CONTROLLER ATW-YCC-03 11.4 CASCADE CONTROLLER CONFIGURATION • Select the desired language using the arrow keys. • Press OK button. • Select the date and time using the arrow keys. • Select Enabled or Deactivated for European summer time. •... - Page 287 YUTAKI CASCADE CONTROLLER ATW-YCC-03 • Configure circuit 1 and circuit 2 OTC: Deactivated, Points, Gradient, Fix. • Enable or disable DHW and Swimming Pool. • Select the heating source: HP only, HP + EH, HP + Boiler. • Configure electrical heater use: Starting or Backup. •...
- Page 288 YUTAKI CASCADE CONTROLLER ATW-YCC-03 • Enable or disable the individual DHW for each module. • Select Next and press OK button. • Configure thermostat (1 or 2): None, wired or wireless. • Check RT address if wired is selected. •...
-
Page 289: Main View
YUTAKI CASCADE CONTROLLER ATW-YCC-03 11.5 MAIN VIEW Main view of the device is composed by a bottom tab widget to move around the different views: • Home • Mode • Room 1 (if space is small it shows R1) • Room 2 (if space is small it shows R2) •... -
Page 290: Quick Actions Function
YUTAKI CASCADE CONTROLLER ATW-YCC-03 11.5.1 Quick actions function The following quick actions are shown when pressing the OK button at the selected zone in comprehensive view or room thermostat view: Room 1/2 • Timer • • Holiday (If Zone is enabled) •... - Page 291 YUTAKI CASCADE CONTROLLER ATW-YCC-03 Domestic Hot Water Tank (DHW) • Timer • Boost (If DHW is ON and Boost is availbable. It can also be cancelled from quick actions). • Holiday (If Zone is enabled) • Status Swimming Pool (SWP) •...
-
Page 292: Home View
YUTAKI CASCADE CONTROLLER ATW-YCC-03 11.6 HOME VIEW Home view shows on the middle the date and time On the left side it shows: • Inside temperature (home icon): If LCD works as Room 1, it took it from the controller sensor or auxiliary sensor If LCD works as Room 2, it took it from the controller sensor or auxiliary sensor If LCD works as Room 1+2, it took it from the controller sensor or auxiliary sensor, or the average of the ones used per each zones. -
Page 293: Mode View
YUTAKI CASCADE CONTROLLER ATW-YCC-03 11.7 MODE VIEW • Mode view shows the selected mode. • In case of being a heating and cooling unit, it lets also to change the mode by using the top/bottom arrows, and it shows the mode spinner on the left side. -
Page 294: Fan Coils 1/2 View
YUTAKI CASCADE CONTROLLER ATW-YCC-03 11.9 FAN COILS 1/2 VIEW Room 1 or 2 could control Fan Coils. Once configured to control them on the menu, the bottom bar includes the option to manage those fan coils: • Fan speeds: Low, Medium, High and Auto •... -
Page 295: Dhw View
YUTAKI CASCADE CONTROLLER ATW-YCC-03 11.11 DHW VIEW DHW view displays: • Water setting feedback • When editing it shows the setting temperature • On right side it has zone notifications for: Next timer action Boost, throughput, operating in comfort and timer icons •... -
Page 296: Menu
YUTAKI CASCADE CONTROLLER ATW-YCC-03 11.13 MENU 11.13.1 Operation information In operation information menu it is possible to find the most important setting parameters of the system besides the information of the operation conditions. Detailed information about: Detailed information modules: • Operation status •... -
Page 297: Timer And Schedule Configuration
YUTAKI CASCADE CONTROLLER ATW-YCC-03 3 / 3 Detailed information about Solar combination: • Operation (Demand ON/OFF) • Solal Panel temperature Shows a list of the alarm history of the system Detailed information about Communication status: • H-Link • H-Link Central •... - Page 298 YUTAKI CASCADE CONTROLLER ATW-YCC-03 When a timer is being switched on, if that zone is stopped, it will request to switch on the zone or not. 11.13.2.1 Setting of timer for Room Thermostats Setting of temperature or change of operation state from ON to OFF for a defined period, after which operation returns to the previous settings.
- Page 299 YUTAKI CASCADE CONTROLLER ATW-YCC-03 Pressing the “Gear” button during the edition of the timer events for a given weekday displays a menu to copy the daily pattern to other weekdays or to suppress the selected timer event. Setting with Timer assistant It is possible to set the timer for Room thermostats with a timer assistant.
- Page 300 YUTAKI CASCADE CONTROLLER ATW-YCC-03 Timer assistant asks if user is sensistive to cold. • If senstive to cold is marked as Yes, an offset of 1ºC is applied for heating. PMML0575 rev.2 - 03/2022...
- Page 301 YUTAKI CASCADE CONTROLLER ATW-YCC-03 11.13.2.2 Setting of timer for Circuit 1/2 To change the operation mode (ECO or Comfort) or change of operation state from ON to OFF for a defined period, after which operation returns to the previous settings. Manual operation of the unit controller has priority over schedule settings. Timer configuration: New screen appears to configure a schedule timer.
- Page 302 YUTAKI CASCADE CONTROLLER ATW-YCC-03 11.13.2.3 Setting of timer for Hot water tank or Swimming Pool Setting the temperature or change of operation state from ON to OFF for a defined period, after which operation returns to the previous settings. Manual operation of the unit controller has priority over schedule settings. Timer configuration: New screen appears to configure a schedule timer.
- Page 303 YUTAKI CASCADE CONTROLLER ATW-YCC-03 11.13.2.4 Override Configuration When a different configuration from the defined by the timer of a zone is done, it is possible to override the timer configuration during a specific time. • Until next action: derogation remains until next action of the timer. •...
-
Page 304: System Configuration
YUTAKI CASCADE CONTROLLER ATW-YCC-03 11.13.3 System configuration In system configuration menu it is possible to configure all the system settings. Room thermostats configuration: (Screen visible only for room thermostats) 1 / 3 • Setting temperature range (air) • Air Eco Offset Cascade configuration: •... -
Page 305: Room Thermostats Configuration
YUTAKI CASCADE CONTROLLER ATW-YCC-03 11.13.3.1 Room thermostats configuration Maximum / Minimum temperature for heating and cooling: Configure for Circuit 1/2: Thermostat configuration: • Heating maximum temperature Configure the wired or wireless room • Heating minimum temperature thermostats: • Cooling maximum temperature •... -
Page 306: Water Settings Configuration
YUTAKI CASCADE CONTROLLER ATW-YCC-03 11.13.3.2 Water settings configuration This menu is only visible for a room thermostat if the controller is not controlling the unit. Select the desired area to apply the water settings configuration: Space Heating or Space Cooling water settings ∆θ... -
Page 307: Cascade Configuration
YUTAKI CASCADE CONTROLLER ATW-YCC-03 11.13.3.3 Cascade configuration Supply setting offset • To set YUTAKI Sub Units to work at a setting Modules configuration: temperature higher than setting temperature • Configure the status, refrigerant cycle determined by YUTAKI CASCADE address, indoor unit address and CONTROLLER individual DHW for each module. -
Page 308: Space Heating / Space Cooling Configuration
YUTAKI CASCADE CONTROLLER ATW-YCC-03 11.13.3.4 Space Heating / Space Cooling configuration Control the temperature for Space Heating or Space Cooling by configuring the following parameters. Water calculation mode: Selection of the water set point for Circuit 1 or Circuit 2 (Space Heating or Space Cooling). - Page 309 YUTAKI CASCADE CONTROLLER ATW-YCC-03 Water calculation mode Deactivated The “Deactivated” option sets the circuit as disabled. Points Points is the most versatile calculation type. Set 4 points and one vertex point, to create a line representing the function that the air to water heat pump will use to give the temperature setting according to the current ambient temperature.
-
Page 310: Hot Water Tank Configuration
YUTAKI CASCADE CONTROLLER ATW-YCC-03 11.13.3.5 Hot Water Tank configuration Setting temperature: Setting for domestic hot water Status of Hot Water Tank: temperature selected by the user. The maximum value of this setting depends • Deactivated on the Maximum setting temperature set •... - Page 311 YUTAKI CASCADE CONTROLLER ATW-YCC-03 DHW Heater: Only available when DHW heater is Space priority temperature: activated (DSW4 pin 3 ON). Threshold value of outdoor ambient • Waiting time: Enable or disable waiting time temperature for the activation of the for DHW heater. space priority function.
-
Page 312: Swimming Pool Configuration
YUTAKI CASCADE CONTROLLER ATW-YCC-03 11.13.3.6 Swimming Pool configuration Status: Enable or disable swimming pool. Set input 3, output 1 and sensor 2. (see section “11.13.3.11 Inputs, Outputs and Sensors configuration”) Setting temperature: Adjustment of the swimming pool water temperature setting. •... -
Page 313: Complementary Heating Configuration
YUTAKI CASCADE CONTROLLER ATW-YCC-03 11.13.3.7 Complementary Heating configuration Heating Source: • HP Only • HP + Heater • HP + Boiler • HP + Heater + Boiler (Only for YUTAKI S and YUTAKI S COMBI) Electrical heater: See detailed information in “Electrical heater”... - Page 314 YUTAKI CASCADE CONTROLLER ATW-YCC-03 Solar combination - Total control DHW maximum time: • Maximum time YUTAKI allows to heat tank by ΔT connection: means Solar. At the end of this time Solar pump is stopped regardless temperature conditions at •...
-
Page 315: Heat Pump Configuration
YUTAKI CASCADE CONTROLLER ATW-YCC-03 11.13.3.8 Heat Pump configuration Water pump configuration: Configure the water pump of the heat Outdoor average temperature: pump. OTC average is used to neutralise the effect of See detailed information in the next page. occasional temperature variations. The average value of outdoor temperature Minimum OFF time: sampled over a selected period (between 1 and... -
Page 316: Fan Coils
Only when Economic mode is active • Standard: WP2 is connected after WP3 by (DSW) means an hydraulic separator or directly by means Hitachi mixing kit accessory. Whenever WP2 is switched ON, WP3 is also switched ON in order to transfer heat to C2 •... -
Page 317: Optional Functions Configuration
YUTAKI CASCADE CONTROLLER ATW-YCC-03 11.13.3.10 Optional functions configuration This menu allows to configure the optional functions for system, space heating or space cooling, DHW and Emergency operation. Heating Auto On/Off: To stop automatically stop heating Smart function: operation when the daily average outdoor To block or limit the heat pump or increase temperature of the previous day is higher demand due to electricity availability. - Page 318 YUTAKI CASCADE CONTROLLER ATW-YCC-03 Smart Function Status: Smart Action: Enable or disable smart function. 1 / 3 Check that Smart Act/SG1 is set in input 5 (see section “11.13.3.11 Inputs, Outputs and Sensors Trigger type: configuration”). • Closed: Action when input is closed •...
- Page 319 YUTAKI CASCADE CONTROLLER ATW-YCC-03 Heating Auto On / Off Switch-Off Temperature: • Switch Off temperature: System is Status: stopped in case that the outdoor • Enable or disable heating auto on/off temperature is higher than the Switch- OFF temperature. function.
- Page 320 YUTAKI CASCADE CONTROLLER ATW-YCC-03 Hot water tank optional functions Circuit Pump: By using this output, user can heat all the water inside DHW piping system. Output must be configured at the I/O and sensors menu. (see section “11.13.3.11 Inputs, Outputs and Sensors configuration”) •...
-
Page 321: Inputs, Outputs And Sensors Configuration
YUTAKI CASCADE CONTROLLER ATW-YCC-03 11.13.3.11 Inputs, Outputs and Sensors configuration Optional outputs: Inputs: There 4 additional available outputs to set. These The system allows to set 7 inputs 4 additional outputs are not wired to the YUTAKI depending on the operations and terminal board. - Page 322 YUTAKI CASCADE CONTROLLER ATW-YCC-03 List of available outputs: • Deactivated • SWP 3WV: (Fixed in output 1 if swimming pool is enabled): Signal control of the 3-way valve of the swimming pool. • Water pump 3: (Fixed in output 2 if buffer tank is installed): Signal control of the water pump for buffer tank. Boiler: (Fixed in input 3 if boiler is enabled): Signal control of the boiler.
-
Page 323: Holiday Mode
YUTAKI CASCADE CONTROLLER ATW-YCC-03 11.13.4 Holiday mode This menu allows to configure the date, time and the temperature conditions for the holiday come back. 1 / 2 Affected zones: Holiday Mode: • Enable (switch off) or disable (switch on) the Configure holiday come back zones during the holiday period. -
Page 324: Controller Settings
YUTAKI CASCADE CONTROLLER ATW-YCC-03 11.13.5 Controller settings Under the controller settings menu it is possible to adjust the several parameters: Room Configuration: • Room names: create or edit a name for circuit 1 or circuit 2 • Synoptic view icons: selection of the icon shown in Live view menu for cooling / heating emitters. -
Page 325: Commissioning
YUTAKI CASCADE CONTROLLER ATW-YCC-03 11.13.6 Commissioning Under the commissioning menu it is possible to adjust the several parameters: Screed Drying: • Circuit 1 setting temperature • Circuit 2 setting temperature • Start screed drying 11.13.7 About In this section of the LCD controller it is possible to find the following information: System information: Contact information: •... -
Page 326: Factory Reset
YUTAKI CASCADE CONTROLLER ATW-YCC-03 11.13.8 Factory reset This function is only visible for the installer. It asks for removing all the settings and returns to the factory setting configuration. 11.13.9 Installer access Menu to enable the access to configure the system. The login password for the Installer is: Right , Down... -
Page 327: Return To User Mode
YUTAKI CASCADE CONTROLLER ATW-YCC-03 11.13.10 Return to user mode This function allows to getting out of the “Installer mode”. 11.13.11 Lock the controller This function is only visible for the installer and allows to lock the menu in case of exhibition. This action can also be launched from central. -
Page 328: Troubleshooting
TROUBLESHOOTING 12 TROUBLESHOOTING N O T E • (o): Option configurable from Unit controller. This alarm will be displayed if the system has been configured. • o: Default. This alarm will be displayed in the Unit controller. • –: No applicable. 12.1 ALARM CODE INDICATION ON REMOTE CONTROL SWITCH (PC-ARFH1E) Alarm indication... - Page 329 TROUBLESHOOTING Retry Alarm YUTAKI YUTAKI YUTAKI Stop Origin Detail of Abnormality Main Factors Code S/SC Code No Cascade Messages. Triggered in case unit is configured to work against cascade control and: - No messages have been received for 180 seconds. Loose, disconnected, broken or Indoor short-circuited connector...
- Page 330 TROUBLESHOOTING Retry Alarm YUTAKI YUTAKI YUTAKI Stop Origin Detail of Abnormality Main Factors Code S/SC Code "Compressor failure. This alarm code appears when the following alarms 02, 07, 08, 45, 47 occur three times within 6 hours." Indoor-LCD Compressor protection N O T E This alarm is shown in the outdoor unit with alarm code “EE”.
-
Page 331: Alarms For Yutaki Cascade Controller Atw-Ycc-(01/02)
TROUBLESHOOTING 12.1.2 Alarms for YUTAKI CASCADE CONTROLLER ATW-YCC-(01/02) Retry Alarm Stop Origin Detail of Abnormality Main Factors Code Code Loose, disconnected, broken or Communication Lost communication with all slave YUTAKI Units short-circuited connector Loose, disconnected, broken or Indoor Water Circuit 2 thermistor abnormally (THMwo2) short-circuited connector Loose, disconnected, broken or Indoor... -
Page 332: Alarms For Lcd
TROUBLESHOOTING Code Category Type of abnormality Main cause number Excessive Refrigerant Charge, Failure of Thermistor, Incorrect Decrease in discharge gas superheat Wiring, Incorrect Piping Connection, Expansion Valve Locking at Opened Position (Disconnected Connector). Cycle Excessively high discharge gas temperature at Insufficient refrigerant charge, refrigerant leakage. -
Page 333: Alarm Code Indication On Remote Control Switch (Pc-Arfh2E)
TROUBLESHOOTING 12.2 ALARM CODE INDICATION ON REMOTE CONTROL SWITCH (PC-ARFH2E) Alarm code Alarm indication 12.2.1 Alarms for Indoor units Retry Alarm YUTAKI YUTAKI Stop Origin Detail of Abnormality Main Factors Code S COMBI Code Transmission Alarm (Not outdoor unit Loose, disconnected, broken or short- Communication detected) circuited connector... - Page 334 TROUBLESHOOTING Retry Alarm YUTAKI YUTAKI Stop Origin Detail of Abnormality Main Factors Code S COMBI Code Indoor Unit over-temperature limit protection Two > Tmax +5K Freeze Protection Stop by indoor liquid Indoor temperature thermistor No Opentherm/Hlink communication for Indoor-LCD Receiver Communication failure a continuous period of 10 minutes.
-
Page 335: Alarms For Yutaki Cascade Controller Atw-Ycc-03
TROUBLESHOOTING 12.2.2 Alarms for YUTAKI CASCADE CONTROLLER ATW-YCC-03 Retry Alarm Stop Origin Detail of Abnormality Main Factors Code Code Loose, disconnected, broken or short- Communication Lost communication with all Sub YUTAKI Units circuited connector Loose, disconnected, broken or short- Indoor Water Circuit 2 thermistor abnormally (THMwo2) circuited connector Loose, disconnected, broken or short-... -
Page 336: Alarms For Outdoor Units
TROUBLESHOOTING 12.2.3 Alarms for Outdoor units Alarm Category Type of abnormality Main cause Code Activation of PSH, locked motor, abnormal operation in the power supply phase. Activation of protection device Failure of fan motor, drain discharge, PCB, relay, float switch Outdoor unit (high pressure cut) activated. -
Page 337: Alarms For Lcd
TROUBLESHOOTING Alarm Category Type of abnormality Main cause Code Outdoor fan Abnormality in current detection circuit "Compressor failure. This alarm code appears when the following Compressor Compressor protection alarms 02, 07, 08, 45, 47 occur three times within 6 hours." Indoor unit Incorrect setting of unit model No setting of unit capacity or incorrect setting of unit capacity. -
Page 338: Maintenance
MAINTENANCE 13 MAINTENANCE 13.1 REMOVING THE COVERS If it is necessary to access to the indoor unit components, please follow these operations. 13.1.1 YUTAKI S 13.1.1.1 Removing the indoor unit service cover N O T E The indoor unit service cover needs to be removed for any task inside the indoor unit. 1 Remove the screws which fix the service cover. - Page 339 MAINTENANCE 13.1.1.2 Removing indoor unit electrical box D A N G E R • Disconnect the unit from the power supply before touching any of the parts in order to avoid an electrical shock. • Do not touch the switch for DHW tank heater operation when handling the electrical box. Keep the position of this switch in factory setting position (“Automatic”...
- Page 340 MAINTENANCE RWM-(4.0-10.0)N1E 1 Remove the indoor unit service cover as explained above. 2 Unscrew the 4 front screws of the electrical box cover and then, remove it. C A U T I O N Take care with the electrical box components in order to avoid damaging it. 13.1.1.3 Space heating pipes connection The unit is factory supplied with two shut-off valves which have to be connected to the water inlet / outlet connections.
- Page 341 MAINTENANCE 13.1.1.5 Cover assembly 1 Place the indoor unit service cover at the same level of the wall mounted unit by taking it from the bottom side (one person can perform this operation, during this operation it is possible to rest the cover on the electrical box). 2 Place the holes on the right side of the indoor unit cover over the back plate hooks (x2 locations).
-
Page 342: Yutaki S Combi
MAINTENANCE 4 Fix the indoor unit service cover using the screw which had been previously removed during the unpacking procedure. (x2) Both sides 13.1.2 YUTAKI S COMBI 13.1.2.1 Removing the indoor unit covers N O T E • Front cover needs to be removed for any task inside the indoor unit. •... - Page 343 MAINTENANCE 13.1.2.2 Removing indoor unit electrical box D A N G E R • Disconnect the unit from the power supply before touching any of the parts in order to avoid an electrical shock. • Do not touch the switch for DHW tank heater operation when handling the electrical box. Keep the position of this switch in factory setting position (“Automatic”...
- Page 344 MAINTENANCE 13.1.2.3 Space heating pipes connection The unit is factory supplied with two shut-down valves to be connected to the water inlet/outlet pipe. With these shut-down valves it is very practical to connect the indoor unit to the heating system by using the factory supplied gaskets just below the valves (2-3HP: G 1”;...
-
Page 345: Test And Check
MAINTENANCE 13.1.3 Test and check Finally, test and check the following items: • Water leakage • Refrigerant leakage • Electrical connection • N O T E Please refer to the chapters of “6.3.3 Refrigerant charge”, “6.5.3.1 Water filling” “5 Once all the water has been drained, and all maintenance operations have been finished, close again the drain port and open again the valve of the water inlet pipe to restart the normal operation of the unit.”... - Page 346 MAINTENANCE 2 Pull the indoor unit front cover forward and then remove it. Removing the indoor unit upper cover 1 Remove the indoor unit front cover. 2 Unscrew the 2 upper fixing screws. 3 Pull the indoor unit upper cover forward and then remove it. ...
- Page 347 MAINTENANCE TYPE 1 (5 screws) TYPE 2 (6 screws) 4 Remove the indoor unit lateral cover. PMML0575 rev.2 - 03/2022...
- Page 348 MAINTENANCE 13.1.4.2 Removing indoor unit electrical box D A N G E R • Disconnect the unit from the power supply before touching any of the parts in order to avoid an electrical shock. • Do not touch the switch for DHW tank heater operation when handling the electrical box. Keep the position of this switch in factory setting position (“Automatic”...
-
Page 349: Space Heating Pipes Connection
MAINTENANCE Removing the electrical box cover In order to access to the electrical components, follow these steps: 1 Remove the indoor unit front cover. 2 Unscrew the 2 front screws and the 2 lower screws which fixes the electrical box to the unit structure. -
Page 350: Test And Check
MAINTENANCE 13.1.7 Test and check Finally, test and check the following items: • Water leakage • Refrigerant leakage • Electrical connection • N O T E Please refer to the chapters of “6.3.3 Refrigerant charge”, “6.5.3.1 Water filling” “14 Commissioning” in this document and refer the Outdoor unit Installation and Operation manual for the specific details about refrigerant charge tasks. -
Page 351: General Maintenance Procedure For The Indoor Unit
MAINTENANCE 5 Electrical equipment • Activation: Check for an abnormal activation of the magnetic contactor, the auxiliary relay, the PCB and others. • Line condition: Pay attention to the working voltage, the working amperage and the working phase balance. Check for any faulty contact that is caused by the loosened terminal connections, the oxidized contacts, the foreign matter and other items. - Page 352 MAINTENANCE 6 YUTAKI S80 - Electrical equipment • Activation: Check for an abnormal activation of the magnetic contactor, the auxiliary relay, the PCB and others. • Line condition: Pay attention to the working voltage, the working amperage and the working phase balance. Check for any faulty contact that is caused by the loosened terminal connections, the oxidized contacts, the foreign matter and other items.
- Page 353 MAINTENANCE YUTAKI S80 Type 2 YUTAKI S80 has special configurations for the position of the manometer. While it is factory supplied in only one position (left side), it can be moved by the installer to the right side or to the front of the unit. For example, in case of a wall at the left side or at both sides of the YUTAKI S80 unit, respectively.
- Page 354 MAINTENANCE 12 Filter +: The Filter + valve is an on-off ball valve containing an interchangeable cylindrical filter which is easy to inspect and remove for normal maintenance operations. Normally, Filter + ball valve it is used as a shut-off valve by turning the handle 90º clockwise (1). Filter+ ball valve makes the maintenance operations easier.
- Page 355 MAINTENANCE 15 Water pump: • Pump performance curves: Check as explained in point 3 that water flow and pressure is in accordance with the Pump performance curves. • Electrical connection: Check the correct connection of the electrical wiring of the water pump. If moisture is detected in the pump surface, revise the water pipes, since a water leakage could have been occurred.
- Page 356 MAINTENANCE Draining N O T E Draining operation is unique for each model. Refer to the service manual of the specific unit for drain operation procedure. Draining operation for YUTAKI S YUTAKI S models have no drain port factory supplied. It must be considered the installation of a drain port after the shut-off valve (factory supplied) and before the water inlet of the unit when proceeding to the installation of the unit.
- Page 357 MAINTENANCE Draining operation for YUTAKI S80 To drain the indoor unit follow the next procedure: 1 Switch OFF the main power supply of the indoor unit. 2 Close the 2 shut-off valves (factory-supplied) installed at the space heating connections (Water inlet and outlet connections). 3 Connect a drain pipe to the drain port of the shut-off valves and lead it to the general draining system.
-
Page 358: Commissioning
COMMISSIONING 14 COMMISSIONING 14.1 BEFORE OPERATION C A U T I O N • Supply electrical power to the system for approximately 12 hours before start-up after a long shut-off. Do not start the system immediately after power supply, it may cause compressor failure because the compressor is not well-heated. •... -
Page 359: Commissioning Procedure
As a result, Heating up to 15ºC when outdoor temperature is lower than 10ºC is performed by the Electrical Heater. N O T E In case of Heater Forced OFF (by optional dip switch setting) these condition is not performed and heating is performed by Heat Pump. Hitachi is not responsible for its operation. -
Page 360: Test Run / Air Purge
COMMISSIONING 14.4 TEST RUN / AIR PURGE Test run is a working mode used when commissioning the installation. Some settings are made to let the installer an easy job. Air purge function drives the pump in a way for evacuating air bubbles in the installation. Example for PC-ARFH2E This menu shows the following test to be launched: •... - Page 361 COMMISSIONING In case of test run, user can also select the mode of the test (cooling or heating). When user confirms the test run or the air purge, the YUTAKI user controller sends the order to the indoor. During the execution of this test, the following screen is shown: •...
- Page 364 Johnson Controls-Hitachi Air Conditioning Spain, S.A.U. Ronda Shimizu, 1 - Políg. Ind. Can Torrella 08233 Vacarisses (Barcelona) Spain © Copyright 2022 Johnson Controls-Hitachi Air Conditioning Spain, S.A.U. – All rights reserved. Printed in Spain...