
Related Manuals for Makita DLX2176TJ


Summary of Contents for Makita DLX2176TJ
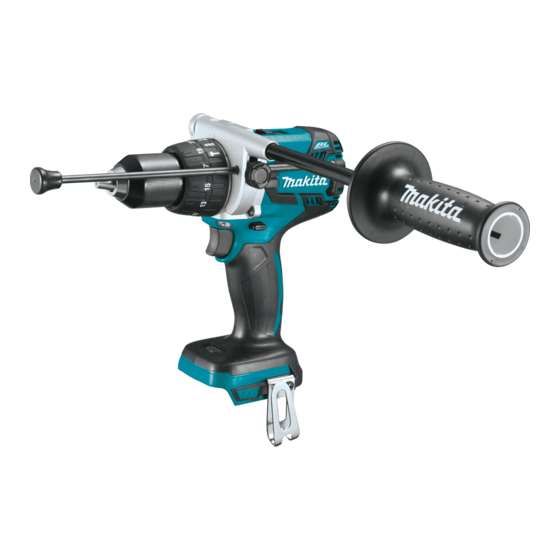
- Page 1 INSTRUCTION MANUAL Cordless Hammer Driver Drill DHP481 014694 IMPORTANT: Read Before Using.
-
Page 2: General Power Tool Safety Warnings
ENGLISH (Original instructions) SPECIFICATIONS Model DHP481 Drilling into concrete 16 mm Drilling into steel 13 mm Capacities Drilling into wood 76 mm Fastening wood screw 10 mm x 90 mm Fastening machine screw 6 mm High (2) 0 - 2,100 No load speed (min Low (1) 0 - 550... - Page 3 Do not expose power tools to rain or wet Power tool use and care conditions. Water entering a power tool will 17. Do not force the power tool. Use the correct increase the risk of electric shock. power tool for your application. The correct Do not abuse the cord.
- Page 4 ENC007-8 Service 28. Have your power tool serviced by a qualified IMPORTANT SAFETY repair person using only identical INSTRUCTIONS replacement parts. This will ensure that the safety of the power tool is maintained. FOR BATTERY CARTRIDGE 29. Follow instruction lubricating changing accessories.
- Page 5 Battery protection system FUNCTIONAL DESCRIPTION (Lithium-ion battery with star marking) CAUTION: 1. Star marking Always be sure that the tool is switched off and the • battery cartridge is removed before adjusting or checking function on the tool. Installing or removing battery cartridge 1.
- Page 6 The lamp turns off cool down the tool fully. If the condition does not in one minute. change, have the tool repaired by a Makita local Use a dry cloth to wipe the dirt off the lens of lamp. •...
-
Page 7: Speed Change
Speed change Adjusting the fastening torque (screwdriver mode " ") CAUTION: Always set the speed change lever fully to the 1. Adjusting ring • 2. Graduation correct position. If you operate the tool with the 3. Arrow speed change lever positioned halfway between the "1"... -
Page 8: Installing Or Removing Driver Bit Or Drill Bit
Installing or removing driver bit or drill bit Hook 1. Sleeve 1. Groove 2. Hook 3. Screw 014698 014700 Turn the sleeve counterclockwise to open the chuck The hook is convenient for temporarily hanging the tool. jaws. Place the bit in the chuck as far as it will go. Turn This can be installed on either side of the tool. -
Page 9: Drilling Operation
• any other maintenance or adjustment should be the diameter of the screw. It makes driving easier performed by Makita Authorized Service Centers, and prevents splitting of the workpiece. always using Makita replacement parts. If the tool is operated continuously until the battery •... - Page 10 Only use accessory or attachment for its stated purpose. If you need any assistance for more details regarding these accessories, ask your local Makita Service Center. Drill bits • Hammer drill bits • Screw bits •...
- Page 12 Makita Corporation www.makita.com 885341-3...
- Page 13 INSTRUCTION MANUAL Cordless Impact Driver DTD154 Read before use.
-
Page 14: Specifications
SPECIFICATIONS Model: DTD154 Fastening capacities Machine screw 4 mm - 8 mm Standard bolt 5 mm - 16 mm High tensile bolt 5 mm - 14 mm No load speed Hard impact mode 0 - 3,600 min Medium impact mode 0 - 2,100 min Soft impact mode 0 - 1,100 min... - Page 15 Prevent unintentional starting. Ensure the SAFETY WARNINGS switch is in the off-position before connecting to power source and/or battery pack, picking up or carrying the tool. Carrying power tools with General power tool safety warnings your finger on the switch or energising power tools that have the switch on invites accidents. WARNING: Remove any adjusting key or wrench before Read all safety warnings and all...
-
Page 16: Tips For Maintaining Maximum Battery Life
WARNING: DO NOT let comfort or familiarity causing fires, personal injury and damage. It will with product (gained from repeated use) replace also void the Makita warranty for the Makita tool and strict adherence to safety rules for the subject charger. product. MISUSE or failure to follow the safety rules stated... -
Page 17: Functional Description
Indicating the remaining battery FUNCTIONAL capacity DESCRIPTION Only for battery cartridges with "B" at the end of the model number CAUTION: Always be sure that the tool is switched off and the battery cartridge is removed before adjusting or checking function on the tool. Installing or removing battery cartridge CAUTION:... -
Page 18: Overheat Protection
Overheat protection Lighting up the front lamp When the tool/battery is overheated, the tool stops automatically. In this situation, let the battery cool CAUTION: Do not look in the light or see the before turning the tool on again. source of light directly. Overdischarge protection When the battery capacity is not enough, the tool stops automatically. In this case, remove the battery from the tool and charge the battery. -
Page 19: Reversing Switch Action
Reversing switch action CAUTION: Always check the direction of rotation before operation. CAUTION: Use the reversing switch only after the tool comes to a complete stop. Changing the direction of rotation before the tool stops may dam- age the tool. CAUTION: When not operating the tool, always set the reversing switch lever to the neu-... - Page 20 Impact force grade displayed Maximum blows Purpose Example of application on panel Hard 3,800 min (/min) Tightening when force and Tightening underwork mate- speed are desired. rials, tightening long screws, tightening bolts. Medium 2,600 min (/min) Tightening when a good finish- Tightening finishing boards, ing is needed. plaster boards.
-
Page 21: Operation
Procedure 2 OPERATION In addition to Procedure 1, insert the bit-piece into the sleeve with its pointed end facing in. The proper fastening torque may differ depending upon ► 1 . Driver bit 2. Bit-piece 3. Sleeve the kind or size of the screw/bolt, the material of the workpiece to be fastened, etc. The relation between fas- To remove the driver bit, pull the sleeve in the direction tening torque and fastening time is shown in the figures. -
Page 22: Maintenance
These accessories or attachments NOTICE: If you use a spare battery to continue are recommended for use with your Makita tool the operation, rest the tool at least 15 min. specified in this manual. The use of any other accessories or attachments might present a risk of NOTE: Use the proper bit for the head of the screw/ injury to persons. Only use accessory or attachment... - Page 24 Makita Europe N.V. Jan-Baptist Vinkstraat 2, 3070 Kortenberg, Belgium Makita Corporation 3-11-8, Sumiyoshi-cho, Anjo, Aichi 446-8502 Japan 885506-223 www.makita.com 20160216...