Table of Contents
Advertisement
Quick Links
Advertisement
Table of Contents

Related Manuals for HIKVISION DS-K1A802A Series


Summary of Contents for HIKVISION DS-K1A802A Series
- Page 1 DS-K1A802A Series Fingerprint Time Attendance Terminal User Manual...
- Page 2 WITHOUT LIMITATION, MERCHANTABILITY, SATISFACTORY QUALITY, OR FITNESS FOR A PARTICULAR PURPOSE. THE USE OF THE PRODUCT BY YOU IS AT YOUR OWN RISK. IN NO EVENT WILL HIKVISION BE LIABLE TO YOU FOR ANY SPECIAL, CONSEQUENTIAL, INCIDENTAL, OR INDIRECT DAMAGES,...
- Page 3 During the use of device, personal data will be collected, stored and processed. To protect data, the development of Hikvision devices incorporates privacy by design principles. For example, for device with facial recognition features, biometrics data is stored in your device with encryption method;...
- Page 4 DS-K1A802A Series Fingerprint Time Attendance Terminal User Manual Legal Information About this Manual The Manual includes instructions for using and managing the Product. Pictures, charts, images and all other information hereinafter are for description and explanation only. The information contained in the Manual is subject to change, without notice, due to firmware updates or other reasons.
- Page 5 DS-K1A802A Series Fingerprint Time Attendance Terminal User Manual Data Protection During the use of device, personal data will be collected, stored and processed. To protect data, the development of our devices incorporates privacy by design principles. For example, for device with facial recognition features, biometrics data is stored in your device with encryption method;...
- Page 6 DS-K1A802A Series Fingerprint Time Attendance Terminal User Manual Symbol Conventions The symbols that may be found in this document are defined as follows. Symbol Description Indicates a hazardous situation which, if not avoided, will or could Danger result in death or serious injury.
- Page 7 DS-K1A802A Series Fingerprint Time Attendance Terminal User Manual Regulatory Information FCC Information Please take attention that changes or modification not expressly approved by the party responsible for compliance could void the user’s authority to operate the equipment. FCC compliance: This equipment has been tested and found to comply with the limits for a Class B digital device, pursuant to part 15 of the FCC Rules.
- Page 8 DS-K1A802A Series Fingerprint Time Attendance Terminal User Manual EU Conformity Statement This product and - if applicable - the supplied accessories too are marked with "CE" and comply therefore with the applicable harmonized European standards listed under the EMC Directive 2014/30/EU, the RoHS Directive 2011/65/EU 2012/19/EU (WEEE directive): Products marked with this symbol cannot be disposed of as unsorted municipal waste in the European Union.
- Page 9 DS-K1A802A Series Fingerprint Time Attendance Terminal User Manual rayonnée équivalente (p.i.r.e.) ne dépasse pas l'intensité nécessaire à l'établissement d'une communication satisfaisante. This equipment should be installed and operated with a minimum distance 20cm between the radiator and your body. Cet équipement doit être installé et utilisé à une distance minimale de 20 cm entre le radiateur et votre corps.
- Page 10 DS-K1A802A Series Fingerprint Time Attendance Terminal User Manual Safety Instruction These instructions are intended to ensure that user can use the product correctly to avoid danger or property loss. The precaution measure is divided into Dangers and Cautions: Dangers: Neglecting any of the warnings may cause serious injury or death.
- Page 11 Improper use or replacement of the battery may result in hazard of explosion. Replace with the ● same or equivalent type only. Dispose of used batteries according to the instructions provided by the battery manufacturer. You can view the device License via the website: http://opensource.hikvision.com/Home/List? ● id=46.
- Page 12 DS-K1A802A Series Fingerprint Time Attendance Terminal User Manual Available Models The fingerprint time attendance terminal contains the following models: Product Name Model Fingerprint Time Attendance Terminal DS-K1A802AF DS-K1A802AEF DS-K1A802AMF DS-K1A802AF-B DS-K1A802AEF-B DS-K1A802AMF-B Use only power supplies listed in the user instructions:...
-
Page 13: Table Of Contents
DS-K1A802A Series Fingerprint Time Attendance Terminal User Manual Contents Chapter 1 Overview and Key Features ..................1 Chapter 2 Appearance Description ..................... 2 Chapter 3 Installation ......................... 5 3.1 Install Without Gang Box ....................... 5 3.2 Install with Gang Box ......................6 Chapter 4 Activation ........................ - Page 14 DS-K1A802A Series Fingerprint Time Attendance Terminal User Manual 5.7 Time and Attendance Management ..................26 5.7.1 Manage Department (Edit/Search/Reset) ..............26 5.7.2 Shift Management ...................... 27 5.7.3 Manage Holiday (Add/Search/Edit/Delete) ..............31 5.7.4 Shift Schedule ......................32 5.7.5 Export Attendance Report ..................35 5.7.6 Data Transfer .......................
- Page 15 DS-K1A802A Series Fingerprint Time Attendance Terminal User Manual 6.2.6 Configure Access Control Information ................ 56 6.2.7 Customize Person Information ..................56 6.2.8 Configure Additional Information ................57 6.2.9 Import and Export Person Identify Information ............57 6.2.10 Import Person Information ..................58 6.2.11 Export Person Information ..................
- Page 16 DS-K1A802A Series Fingerprint Time Attendance Terminal User Manual 6.8.1 Enable Receiving Events from Devices ................ 80 6.8.2 View Real-Time Events ....................81 6.8.3 Search Historical Events ....................84 6.9 Time and Attendance ......................87 6.9.1 Configure Attendance Parameters ................87 6.9.2 Add Timetable ......................
- Page 17 DS-K1A802A Series Fingerprint Time Attendance Terminal User Manual 8.3 Edit Time ..........................109 8.4 Set System Maintenance ....................109 8.5 Manage User ........................110 8.6 Set Security ........................111 8.7 Configure Network Parameters ..................111 8.8 Configure Advanced Network .................... 111 8.9 Configure Wi-Fi ........................
-
Page 18: Chapter 1 Overview And Key Features
Chapter 1 Overview and Key Features Overview DS-K1A802A Series Fingerprint Time Attendance Terminal is designed with a 2.4-inch LCD display screen. It supports swiping card or scanning fingerprint for attendance, generating the attendance report automatically. Offline operation, wired network (TCP/IP) and wireless network transmission modes are supported as well. -
Page 19: Chapter 2 Appearance Description
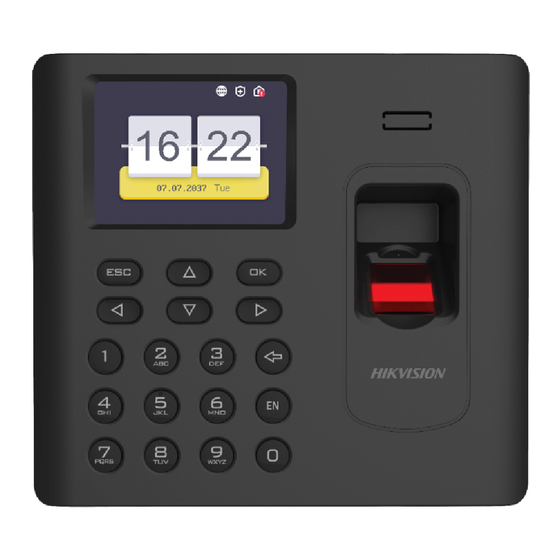
DS-K1A802A Series Fingerprint Time Attendance Terminal User Manual Chapter 2 Appearance Description View the device appearance and the keypad's description. Figure 2-1 Device Appearance Note The pictures here are for reference only. Some models do not support card swiping function. For details, refer to the actual product. - Page 20 DS-K1A802A Series Fingerprint Time Attendance Terminal User Manual Figure 2-2 Keypad Description Table 2-2 Keypad Description Description Exiting Key: Press the button to exit the menu. Note If you enable the attendance status function, the exiting key can be the shortcut key of the attendance status.
- Page 21 DS-K1A802A Series Fingerprint Time Attendance Terminal User Manual Description Key 0 can also represent a space key except you are using the number input method. OK Key: Press OK key to confirm operations. Hold the key for 3 s to enter the login page.
-
Page 22: Chapter 3 Installation
DS-K1A802A Series Fingerprint Time Attendance Terminal User Manual Chapter 3 Installation 3.1 Install Without Gang Box Steps 1. Drill holes on the wall or other places according to the mounting template (supplied) Note The minimum bearing weight of the wall or other places should be three times heavier than ●... -
Page 23: Install With Gang Box
DS-K1A802A Series Fingerprint Time Attendance Terminal User Manual Figure 3-2 Install Screws 4. Align the holes on the device plate with the fixed screws and hang the device on the wall. 3.2 Install with Gang Box Install device on the wall with gang box. - Page 24 DS-K1A802A Series Fingerprint Time Attendance Terminal User Manual Figure 3-3 Mounting Plate 3. Route the device cable through the cable hole of the mounting plate, wire the cables, and insert the cables in the gang box. Figure 3-4 Install Device 4.
- Page 25 DS-K1A802A Series Fingerprint Time Attendance Terminal User Manual Figure 3-5 Secure Device...
-
Page 26: Chapter 4 Activation
DS-K1A802A Series Fingerprint Time Attendance Terminal User Manual Chapter 4 Activation You should activate the device before the first login. After powering on the device, the system will switch to Device Activation page. Activation via the device, SADP tool and the client software are supported. - Page 27 Get the SADP software from the supplied disk or the official website http:// ● www.hikvision.com/en/ , and install the SADP according to the prompts. The device and the PC that runs the SADP tool should be within the same subnet.
-
Page 28: Activate Device Via Client Software
DS-K1A802A Series Fingerprint Time Attendance Terminal User Manual 4.3 Activate Device via Client Software For some devices, you are required to create the password to activate them before they can be added to the software and work properly. Steps Note This function should be supported by the device. -
Page 29: Chapter 5 Local Settings
DS-K1A802A Series Fingerprint Time Attendance Terminal User Manual Chapter 5 Local Settings 5.1 Select Language You can select a language for the device system. After the device activation, you can select a language for the device system. By default, the system language is English. - Page 30 DS-K1A802A Series Fingerprint Time Attendance Terminal User Manual Figure 5-1 Add Administrator 2. Enter the new user's parameters. ID (Employee ID) By default, the ID No. will be increased in sequence. You can edit the ID according to your preference.
- Page 31 DS-K1A802A Series Fingerprint Time Attendance Terminal User Manual Card Set: Swipe card on the card swiping area or enter card No. manually, and select a card property. View Info.: View the user's added card information. Note The card No. is required.
-
Page 32: Local Login
DS-K1A802A Series Fingerprint Time Attendance Terminal User Manual authentication mode first. This mode is applicable to edit single user's authentication mode, which has special permissions. Role Select the user's role as administrator or normal user. Admin: The admin has all permissions to operate the device. -
Page 33: Set Wi-Fi Parameters
DS-K1A802A Series Fingerprint Time Attendance Terminal User Manual Note The device's IP address and the PC's should be in the same network segment. 4. Optional: Enable DHCP. The system will automatically assign IP address for the device. 5. Press ESC and select Yes to save the parameters and return to the previous menu. -
Page 34: Set Ehome Parameters
DS-K1A802A Series Fingerprint Time Attendance Terminal User Manual 5.4.3 Set EHome Parameters Set EHome parameters and the device can upload data via EHome protocol. Before You Start Make sure your device has connect to a network. Steps 1. Move the cursor and select Comm. → EHome . -
Page 35: Change Verification Code
DS-K1A802A Series Fingerprint Time Attendance Terminal User Manual Port No. Set the EHome server's port No. EHome Version Set the EHome version according to your actual needs. If you choose V5.0, you should create an account and EHome key. If you choose other version, you should create an EHome account only. - Page 36 DS-K1A802A Series Fingerprint Time Attendance Terminal User Manual Figure 5-4 New Page 2. Enter the new user's parameters. ID (Employee ID) By default, the ID No. will be increased in sequence. You can edit the ID according to your preference.
- Page 37 DS-K1A802A Series Fingerprint Time Attendance Terminal User Manual Card Set: Swipe card on the card swiping area or enter card No. manually, and select a card property. View Info.: View the user's added card information. Note The card No. is required.
-
Page 38: Manage Person (Search/Edit/Delete)
DS-K1A802A Series Fingerprint Time Attendance Terminal User Manual authentication mode first. This mode is applicable to edit single user's authentication mode, which has special permissions. Role Select the user's role as administrator or normal user. Admin: The admin has all permissions to operate the device. -
Page 39: Attendance Status
DS-K1A802A Series Fingerprint Time Attendance Terminal User Manual 5.6 Attendance Status Set attendance mode and choose attendance status. You can set the attendance status as check in, check out, break out, break in, overtime in, and overtime out according to your actual situation. -
Page 40: Set Manual Attendance
DS-K1A802A Series Fingerprint Time Attendance Terminal User Manual Note The attendance status will be valid within the configured schedule. For example, if set the Up key as check in and the Down key as check out, and set the check in's schedule as Monday 08:00, and check out's schedule as Monday 17:00, the valid person's authentication before 17:00 on Monday will be marked as check in. -
Page 41: Set Manual And Auto Attendance
DS-K1A802A Series Fingerprint Time Attendance Terminal User Manual Note Make sure the attendance status is enabled. By default, it is enabled. 3. Press ESC and save the attendance mode. 4. Move the cursor and select Shortcut Key and define the shortcut key's attendance status. -
Page 42: Disable Attendance Mode
DS-K1A802A Series Fingerprint Time Attendance Terminal User Manual Figure 5-7 Manual and Auto Mode Note Make sure the attendance status is enabled. By default, it is enabled. 3. Press ESC and save the attendance mode. 4. Move the cursor and select Shortcut Key and define the shortcut key's attendance status and schedule. -
Page 43: Time And Attendance Management
DS-K1A802A Series Fingerprint Time Attendance Terminal User Manual Move the cursor and select System → Att. Status to enter the Attendance Status page. Move the cursor and select Attendance Mode and set the attendance mode as Disable. Figure 5-8 Disable Attendance Mode The attendance status function is disabled, and you will not view or configure the attendance status on the initial page. -
Page 44: Shift Management
DS-K1A802A Series Fingerprint Time Attendance Terminal User Manual Figure 5-9 Edit Department Page Note The department name supports numbers, uppercase letters, lowercase letters, and symbols. ● Up to 32 characters are supported in the department name. ● You can configure the shift in the Shift Management. For detailed information, see Shift ●... - Page 45 DS-K1A802A Series Fingerprint Time Attendance Terminal User Manual Normal Shift: It is applicable to the normal attendance situation. Man-Hour Shift: It is applicable to the situation with flexible working hours. Set Attendance Rule for Normal Shift Move the cursor and select Shift → Normal → Rule , and press OK to enter the Rule page.
- Page 46 DS-K1A802A Series Fingerprint Time Attendance Terminal User Manual The early leave threshold duration. Note The available time is from 0 to 1440 min. Set Normal Shift Set the normal shift attendance information, including the shift name and the shift period. You can also reset the normal shift after editing.
- Page 47 DS-K1A802A Series Fingerprint Time Attendance Terminal User Manual Note The shift name supports numbers, uppercase letters, lowercase letters, Chinese characters ● and symbols. Up to 32 characters are allowed in the shift name. ● Up to 4 time periods can be edited.
-
Page 48: Manage Holiday (Add/Search/Edit/Delete)
DS-K1A802A Series Fingerprint Time Attendance Terminal User Manual Note The break time will not be counted into the working hour. ● If the Latest Time (On-Work) is set to 0, the Latest Time function will not be enabled. ● 5. Press ESC and select Yes to save the settings. -
Page 49: Shift Schedule
DS-K1A802A Series Fingerprint Time Attendance Terminal User Manual Delete Holiday Move the cursor and select Holiday → Holiday to enter the holiday list. Select a holiday and select Delete to delete the holiday. 5.7.4 Shift Schedule Combine shift and holiday according to your actual needs. Scheduling shift by department and scheduling shift by individual are supported. - Page 50 DS-K1A802A Series Fingerprint Time Attendance Terminal User Manual Figure 5-15 Edit Shift Schedule by Dept. Page 3. Edit parameters. Dept. Name The department name should be edited in Edit Dept. page. For details, see Manage Department (Edit/Search/Reset). Set Shift Select a shift type and a shift times.
- Page 51 DS-K1A802A Series Fingerprint Time Attendance Terminal User Manual Before You Start Add user before setting schedule shift by individual. For details, see Add Person . ● Set the normal shift or the man-hour shift. For details, see Set Normal Shift and Set Man-Hour ●...
-
Page 52: Export Attendance Report
DS-K1A802A Series Fingerprint Time Attendance Terminal User Manual 5. Press ESC and select Yes to save the settings. 5.7.5 Export Attendance Report Export the attendance record, the attendance report, the abnormal attendance record and the attendance management schedule. Steps 1. Plug in a USB flash drive in the USB interface. -
Page 53: Data Transfer
DS-K1A802A Series Fingerprint Time Attendance Terminal User Manual Note For details about the exported tables descriptions, see Attendance Report Table . The exported table will be saved in the USB flash drive in Excel format. 5.7.6 Data Transfer You can export the attendance parameters (fingerprint and user information) and the attendance data (data after attendance, card swiping data for instance). -
Page 54: Basic Settings
DS-K1A802A Series Fingerprint Time Attendance Terminal User Manual Import Data Move the cursor and select Transfer → Import to enter the Import page. Select Import Attendance Para and pressOK. Enter the Key. The system will gain attendance parameters from the USB flash drive. - Page 55 DS-K1A802A Series Fingerprint Time Attendance Terminal User Manual Figure 5-19 Time Page 2. Edit the parameters. Date The displayed date on the device. Note The available range is from 1970.01.01 to 2037.12.31. Time The displayed time on the device. Select to enable or disable the DST. When the DST is enabled, you can set the DST bias time, the start time and the end time.
-
Page 56: Manage System Data
DS-K1A802A Series Fingerprint Time Attendance Terminal User Manual 5.8.2 Manage System Data Delete the saved event, attendance data, user data, or permission. Steps 1. Move the cursor and select System → Data . 2. Press OK to enter the Data page. - Page 57 DS-K1A802A Series Fingerprint Time Attendance Terminal User Manual Steps 1. Move the cursor and select System → System . 2. Press OK to enter the System page. Figure 5-21 System Page 3. Edit the parameters. Auth Mode (Authentication Mode) The authentication mode can be switched among Card/FP (fingerprint), Card, FP (fingerprint), Card &...
-
Page 58: System Upgrade
DS-K1A802A Series Fingerprint Time Attendance Terminal User Manual Keypad Sound Enable or disable the keypad sound according to your preference. Voice Prompt Enable or disable the voice prompt according to your preference. Voice Volume Set the device voice prompt volume. -
Page 59: Restore Settings
DS-K1A802A Series Fingerprint Time Attendance Terminal User Manual - Local Upgrade: Plug the USB flash drive to the USB interface. Press OK. The system will read the digicap.dav file and upgrading automatically. After the upgrading is completed, the device will reboot automatically. -
Page 60: Log Query
DS-K1A802A Series Fingerprint Time Attendance Terminal User Manual 5.8.6 Log Query You can search the authentication logs via the user's employee ID, name, or card. Steps 1. On the Home page, move the cursor and select Log. Figure 5-23 Log Query Page 2. - Page 61 DS-K1A802A Series Fingerprint Time Attendance Terminal User Manual Figure 5-24 Capacity Page View Device Information Move the cursor and select Info. → Device to enter the Device page. You can view the device name, the serial No., the MAC address, the firmware, and the production date.
-
Page 62: Chapter 6 Client Software Configuration
DS-K1A802A Series Fingerprint Time Attendance Terminal User Manual Chapter 6 Client Software Configuration You can operate the device and manage the data via the client software. Note The introduction of the client software in this document is depending on the V3.1. - Page 63 DS-K1A802A Series Fingerprint Time Attendance Terminal User Manual Enter a descriptive name for the device. Address The IP address of the device is obtained automatically in this adding mode. Port The port number is obtained automatically. User Name By default, the user name is admin.
-
Page 64: Add Device By Ip Address Or Domain Name
DS-K1A802A Series Fingerprint Time Attendance Terminal User Manual Note For the inactive device, you need to create the password for it before you can add the device properly. For detailed steps, refer to Activation . 5. Click Add to open the device adding window. - Page 65 DS-K1A802A Series Fingerprint Time Attendance Terminal User Manual Name Create a descriptive name for the device. For example, you can use a name that can show the location or feature of the device. Address The IP address or domain name of the device.
-
Page 66: Add Devices By Ip Segment
DS-K1A802A Series Fingerprint Time Attendance Terminal User Manual Device Status Click on Operation column to view device status. 6.1.3 Add Devices by IP Segment If the devices share the same port No., user name and password, and their IP addresses are sharing an IP segment. -
Page 67: Add Device By Ehome Account
DS-K1A802A Series Fingerprint Time Attendance Terminal User Manual Note This function should be supported by the device. ● You can log into the device to get the certificate file by web browser. ● 7. Check Synchronize Time to synchronize the device time with the PC running the client after adding the device to the client. -
Page 68: Import Devices In A Batch
DS-K1A802A Series Fingerprint Time Attendance Terminal User Manual Enter the account name registered on EHome protocol. EHome Key Enter the EHome key if you have set it when configuring network center parameter for the device. Note This function should be supported by the device. -
Page 69: Person Management
DS-K1A802A Series Fingerprint Time Attendance Terminal User Manual Enter the device user name. By default, the user name is admin. Password If you set 0 as the adding mode, enter the password. If you set 1 as the adding mode, enter the EHome key. -
Page 70: Configure Basic Information
DS-K1A802A Series Fingerprint Time Attendance Terminal User Manual Delete Hover the mouse on an added organization and click to delete it. Organization Note The lower-level organizations will be deleted as well if you delete an ● organization. Make sure there is no person added under the organization, or the ●... -
Page 71: Collect Fingerprint Via Client
DS-K1A802A Series Fingerprint Time Attendance Terminal User Manual 1. Enter Person module. 2. Select an organization in the organization list to add the person and click Add. Note Enter the person's basic information first. For details about configuring person's basic information, refer to Configure Basic Information . -
Page 72: Collect Fingerprint Via Access Control Device
DS-K1A802A Series Fingerprint Time Attendance Terminal User Manual 3. In the Credential → Fingerprint panel, click +. 4. In the pop-up window, select the collection mode as Local. 5. Select the model of the connected fingerprint recorder. Note If the fingerprint recorder is DS-K1F800-F, you can click Settings to select the COM the fingerprint recorder connects to. -
Page 73: Configure Access Control Information
DS-K1A802A Series Fingerprint Time Attendance Terminal User Manual 7. Confirm to add the person. - Click Add to add the person and close the Add Person window. - Click Add and New to add the person and continue to add other persons . -
Page 74: Configure Additional Information
DS-K1A802A Series Fingerprint Time Attendance Terminal User Manual Steps 1. Enter Person module. 2. Set the fields of custom information. 1) Click Custom Property. 2) Click Add to add a new property. 3) Enter the property name. 4) Click OK. -
Page 75: Import Person Information
DS-K1A802A Series Fingerprint Time Attendance Terminal User Manual 6.2.10 Import Person Information You can enter the information of multiple persons in a predefined template (a CSV file) to import the information to the client in a batch. Steps 1. Enter the Person module. -
Page 76: Get Person Information From Access Control Device
DS-K1A802A Series Fingerprint Time Attendance Terminal User Manual 6.2.12 Get Person Information from Access Control Device If the added access control device has been configured with person information (including person details, fingerprint, and issued card information), you can get the person information from the device and import them to the client for further operations. -
Page 77: Report Card Loss
DS-K1A802A Series Fingerprint Time Attendance Terminal User Manual Steps 1. Enter Person module. 2. Click Batch Issue Cards. All the added persons with no card issued will display. 3. Set the card issuing parameters. For details, refer to Set Card Issuing Parameters . -
Page 78: Configure Schedule And Template
DS-K1A802A Series Fingerprint Time Attendance Terminal User Manual Local Mode: Issue Card by Card Enrollment Station Connect a card enrollment station to the PC running the client. You can place the card on the card enrollment station to get the card number. -
Page 79: Add Template
DS-K1A802A Series Fingerprint Time Attendance Terminal User Manual 2. Click Add on the left panel. 3. Create a name for the holiday. 4. Optional: Enter the descriptions or some notifications of this holiday in the Remark box. 5. Add a holiday period to the holiday list and configure the holiday duration. -
Page 80: Set Access Group To Assign Access Authorization To Persons
DS-K1A802A Series Fingerprint Time Attendance Terminal User Manual All-Day Authorized The access authorization is valid in each day of the week and it has no holiday. All-Day Denied The access authorization is invalid in each day of the week and it has no holiday. - Page 81 DS-K1A802A Series Fingerprint Time Attendance Terminal User Manual Steps For one person, you can add up to 4 access groups to one access control point of one device. ● You can add up to 128 access groups in total. ●...
-
Page 82: Configure Advanced Functions
DS-K1A802A Series Fingerprint Time Attendance Terminal User Manual 6.5 Configure Advanced Functions You can configure the advanced functions of access control to meet some special requirements in different scene. Note For the card related functions(the type of access control card), only the card(s) with access group ●... - Page 83 DS-K1A802A Series Fingerprint Time Attendance Terminal User Manual 5. Optional: Click Copy to, and then select the access control device(s) to copy the parameters in the page to the selected device(s). Configure Parameters for Door After adding the access control device, you can configure its access point (door) parameters.
- Page 84 DS-K1A802A Series Fingerprint Time Attendance Terminal User Manual Note The displayed parameters may vary for different access control devices. There are part of ● parameters listed as follows. Refer to the user manual of the device for more details. Some of the following parameters are not listed in the Basic Information page, click More to ●...
-
Page 85: Configure Card Reader Authentication Mode And Schedule
DS-K1A802A Series Fingerprint Time Attendance Terminal User Manual 6. Optional: Click Copy to, and then select the card reader(s) to copy the parameters in the page to the selected card reader(s). 6.5.2 Configure Card Reader Authentication Mode and Schedule You can set the passing rules for the card reader of the access control device according to your actual needs. - Page 86 DS-K1A802A Series Fingerprint Time Attendance Terminal User Manual Figure 6-1 Select Card Reader Authentication Mode Note PIN refers to the PIN code set to open the door. Refer to Configure Access Control Information . 2) Check the modes in the Available Mode list and they will be added to the selected modes list.
-
Page 87: Configure Device Parameters
DS-K1A802A Series Fingerprint Time Attendance Terminal User Manual Figure 6-2 Set Authentication Modes for Card Readers 6. Optional: Select a configured day and click Copy to Week to copy the same settings to the whole week. 7. Optional: Click Copy to to copy the settings to other card readers. - Page 88 DS-K1A802A Series Fingerprint Time Attendance Terminal User Manual 1. Enter the Access Control module. 2. On the navigation bar on the left, enter Advanced Function → More Parameters . 3. Select an access control device in the device list and enter Network → Uploading Mode .
- Page 89 DS-K1A802A Series Fingerprint Time Attendance Terminal User Manual Set Attendance Status You can set the attendance mode on the device via the client. You can also set the attendance parameters as check in, check out, break out, break in, overtime in, and overtime out on the device according to your actual needs.
- Page 90 DS-K1A802A Series Fingerprint Time Attendance Terminal User Manual 3. Click Attendance Status. 4. Set the attendance mode as Manual. 5. Make sure Attendance Status Required is enabled. Note By default, Attendance Status Required is enabled. 6. Set shortcut key from the drop-down list for the attendance status.
- Page 91 DS-K1A802A Series Fingerprint Time Attendance Terminal User Manual 3) Click anywhere on the page to confirm the settings. The configured time will be displayed in white. 7. Set shortcut key from the drop-down list for the attendance status. 8. Click Save.
-
Page 92: Configure Linkage Actions For Access Control
DS-K1A802A Series Fingerprint Time Attendance Terminal User Manual 9. Click Save. The attendance status will be valid within the configured time duration. Result Enter the device initial page, the current attendance mode will be displayed on the page. If you do not select a status, the authentication will be marked as the configured attendance status according to the configured time. -
Page 93: Configure Device Actions For Access Event
DS-K1A802A Series Fingerprint Time Attendance Terminal User Manual The event types which the selected resource supports will display. 3. Select the event(s) and click Edit Priority to define the priority for the event(s), which can be used to filter events in the Event Center. -
Page 94: Configure Device Actions For Card Swiping
DS-K1A802A Series Fingerprint Time Attendance Terminal User Manual 7. Click Save. 8. Optional: After adding the device linkage, you can do one or more of the following: Edit Linkage Select the configured linkage settings in the device list and you can edit its Settings event source parameters, including event source and linkage target. -
Page 95: Configure Device Actions For Person Id
DS-K1A802A Series Fingerprint Time Attendance Terminal User Manual 6.6.4 Configure Device Actions for Person ID You can set the access control device's linkage actions for the specified person ID. When access control device detects the specified person ID, it can trigger the alarm output, host buzzer, and other actions on the same device. -
Page 96: Control Door Status
DS-K1A802A Series Fingerprint Time Attendance Terminal User Manual 6.7.1 Control Door Status You can control the status for a single door, including opening door, closing door, remaining the door open, and remaining the door closed. Steps 1. Click Monitoring to enter the status monitoring page. -
Page 97: Check Real-Time Access Records
DS-K1A802A Series Fingerprint Time Attendance Terminal User Manual 6.7.2 Check Real-Time Access Records The access records will display in real time, including card swiping records, fingerprint comparison records, etc. You can view the person information and view the picture captured during access. -
Page 98: View Real-Time Events
DS-K1A802A Series Fingerprint Time Attendance Terminal User Manual Figure 6-3 Device Arming Control 3. View the arming status of each device in the Arming Status column. Result The events of armed device(s) are automatically uploaded to the client when the event is triggered. - Page 99 DS-K1A802A Series Fingerprint Time Attendance Terminal User Manual Figure 6-4 View Real-Time Events 2. Set the filter conditions or enter the event key word in the Filter text field to display the required events only. Device Type The type of device that occurred the event.
- Page 100 DS-K1A802A Series Fingerprint Time Attendance Terminal User Manual Figure 6-5 Customize Event Related Items to be Displayed 4. View the event information details. 1) Select an event in the event list. 2) Click Expand in the right-lower corner of the page.
-
Page 101: Search Historical Events
DS-K1A802A Series Fingerprint Time Attendance Terminal User Manual Send Email Select an event and then click Send Email, and the information details of this event will be sent by email. Note You should configure the email parameters first, see Set Email Parameters in the user manual of client software for details. - Page 102 DS-K1A802A Series Fingerprint Time Attendance Terminal User Manual Search by Group: Search the events occurred on the resources in the selected group. Device: Search the events occurred on the selected device. Device Type The type of device that occurred the event.
- Page 103 DS-K1A802A Series Fingerprint Time Attendance Terminal User Manual Figure 6-7 Customize Event Related Items to be Displayed 5. Optional: Handle the event(s). - Handle single event: Select one event that need to be processed, and then click Handle in the event information details page, and enter the processing suggestion.
-
Page 104: Time And Attendance
DS-K1A802A Series Fingerprint Time Attendance Terminal User Manual 6.9 Time and Attendance The Time and Attendance module provides multiple functionalities to track and monitor when employees start and stop work, and full control of employees working hours such as late arrivals, early departures, time taken on breaks and absenteeism. - Page 105 DS-K1A802A Series Fingerprint Time Attendance Terminal User Manual Overtime Level for Workday When you work for certain period after end-work time on workday, you will reach different overtime level: overtime level 1, overtime level 2 and overtime level 3 . You can set different pay rate for three overtime levels, respectively.
- Page 106 DS-K1A802A Series Fingerprint Time Attendance Terminal User Manual Add Regular Holiday You can configure a holiday which will take effect annually on regular days during the effective period, such as New Year's Day, Independence Day, Christmas Day, etc. Steps 1. Enter the Time & Attendance module.
- Page 107 DS-K1A802A Series Fingerprint Time Attendance Terminal User Manual 10. Click OK. The added holiday will display in the holiday list and calendar. If the date is selected as different holidays, it will be recorded as the first-added holiday. 11. Optional: After adding the holiday, perform one of the following operations.
- Page 108 DS-K1A802A Series Fingerprint Time Attendance Terminal User Manual 1) Enter the table name of the third-party database. 2) Set the mapped table fields between the client software and the third-party database. 6. Click Connection Test to test whether database can be connected.
-
Page 109: Add Timetable
DS-K1A802A Series Fingerprint Time Attendance Terminal User Manual Configure Report Display You can configure display contents displayed in the attendance report, such as the company name, logo, date format, time format, and mark. Steps 1. Enter Time & Attendance module. -
Page 110: Add Shift
DS-K1A802A Series Fingerprint Time Attendance Terminal User Manual Set the start-work time and end-work-time. Valid Check-in/out Time Set the time period during which the check-in or check-out is valid. Calculated as Set the duration calculated as the actual work duration. - Page 111 DS-K1A802A Series Fingerprint Time Attendance Terminal User Manual Figure 6-8 Add Shift 6. Click Save. The added shift lists on the left panel of the page. At most 64 shifts can be added. 7. Optional: Assign the shift to organization or person for a quick shift schedule.
-
Page 112: Manage Shift Schedule
DS-K1A802A Series Fingerprint Time Attendance Terminal User Manual 6.9.4 Manage Shift Schedule Shift work is an employment practice designed to make use of all 24 hours of the clock each day of the week. The practice typically sees the day divided into shifts, set periods of time during which different shifts perform their duties. - Page 113 DS-K1A802A Series Fingerprint Time Attendance Terminal User Manual Set Person Schedule You can assign the shift schedule to one or more persons. You can also view and edit the person schedule details. Before You Start Add department and person in Person module. See Person Management for details.
- Page 114 DS-K1A802A Series Fingerprint Time Attendance Terminal User Manual Steps Note The temporary schedule has higher priority than department schedule and person schedule. 1. Click Time & Attendance → Shift Schedule to enter the Shift Schedule Management page. 2. Click Temporary Schedule to enter Temporary Schedule page.
-
Page 115: Manually Correct Check-In/Out Record
DS-K1A802A Series Fingerprint Time Attendance Terminal User Manual In list mode, you can view the shift schedule details about one person or organization, such as shift name, type, effective period and so on. Check the shift schedule(s), and click Delete to delete the selected shift schedule(s). -
Page 116: Add Leave And Business Trip
DS-K1A802A Series Fingerprint Time Attendance Terminal User Manual Note The exported details are saved in CSV format. 6.9.6 Add Leave and Business Trip You can add leave and business trip when the employee want to ask for leave or go on a business trip. -
Page 117: Calculate Attendance Data
DS-K1A802A Series Fingerprint Time Attendance Terminal User Manual 6.9.7 Calculate Attendance Data You need to calculate the attendance data before searching and viewing the overview of the attendance data, employees' detailed attendance data, employees' abnormal attendance data, the employees' overtime working data, and card swiping log. -
Page 118: Attendance Statistics
DS-K1A802A Series Fingerprint Time Attendance Terminal User Manual Note The exported details are saved in CSV format. 6.9.8 Attendance Statistics You can check the original attendance record, generate and export the attendance report based on the calculated attendance data. Get Original Attendance Record You can search the employee's attendance time, attendance status, check point, etc. - Page 119 DS-K1A802A Series Fingerprint Time Attendance Terminal User Manual Generate Instant Report It supports to generate the a series of attendance reports manually to view the employees' attendance results. Before You Start Calculate the attendance data. Note You can calculate the attendance data manually, or set the schedule so that the client can calculate the data automatically every day.
- Page 120 DS-K1A802A Series Fingerprint Time Attendance Terminal User Manual Select the added person(s) whose attendance records will be generated for the report. 5. Optional: Set the schedule to send the report to the email address(es) automatically. 1) Check the Auto-Sending Email to enable this function.
-
Page 121: Chapter 7 Remote Configuration (Web)
DS-K1A802A Series Fingerprint Time Attendance Terminal User Manual Chapter 7 Remote Configuration (Web) Configure device parameters remotely. 7.1 Time Management Manage device's time zone, time synchronization, and DST parameters. Time Zone and Time Synchronization On the Device for Management page, select a device and click →... -
Page 122: Network Center Parameters Settings
DS-K1A802A Series Fingerprint Time Attendance Terminal User Manual NIC Type Select a NIC type from the drop-down list. You can select either Self-adaptive, 10M, or 100M. DHCP If you disable the function, you should manually set the device's IPv4 address, IPv4 subnet mask, IPv4 default gateway, MTU, and port. -
Page 123: Set Access Control Parameters
DS-K1A802A Series Fingerprint Time Attendance Terminal User Manual 7.3 Set Access Control Parameters Steps 1. On the Device for Management page, click → Others → Access Control Parameters to enter the Access Control Parameters tab. 2. Check the checkbox to enable the function. -
Page 124: Security Mode Settings
DS-K1A802A Series Fingerprint Time Attendance Terminal User Manual 7.5 Security Mode Settings Set the security mode for logging in the client software. On the Device for Management page, click → System → Security to enter the Security Mode tab. Select a security mode from the drop-down list, and click Save. -
Page 125: Configure Volume Input Or Output
DS-K1A802A Series Fingerprint Time Attendance Terminal User Manual 7.7 Configure Volume Input or Output Steps 1. On the Device for Management page, click → Image → Audio Input or Output to enter Audio Input or Output tab. 2. Move the block to adjust the device input and output volume. -
Page 126: Chapter 8 Remote Configuration Via Client Software
DS-K1A802A Series Fingerprint Time Attendance Terminal User Manual Chapter 8 Remote Configuration via Client Software Configure device parameters remotely. 8.1 Check Device Information Steps 1. Click Maintenance and Management → Device to enter the device list. 2. Press CTRL and click to enter the remote configuration page. -
Page 127: Manage User
DS-K1A802A Series Fingerprint Time Attendance Terminal User Manual 4. Maintain the device. Reboot The device starts rebooting. Restore Default Settings Restore the device settings to the default ones, excluding the IP address. Restore All Restore the device parameters to the default ones. The device should be activated after restoring. -
Page 128: Set Security
DS-K1A802A Series Fingerprint Time Attendance Terminal User Manual 8.6 Set Security Steps 1. Click Maintenance and Management → Device to enter the device list. 2. Press CTRL and click to enter the remote configuration page. 3. Click System → Security . -
Page 129: Configure Volume Input Or Output
DS-K1A802A Series Fingerprint Time Attendance Terminal User Manual 2. Press CTRL and click to enter the remote configuration page. 3. Click Network → Wi-Fi . 4. Check Enable to enable the Wi-Fi function. 5. Input the hot spot name or you can click Select... to select a network. -
Page 130: Chapter 9 Mobile Client Configuration
Visit https://appstore.hikvision.com to download the application according to your mobile ● phone system. Visit the official website of our company. Then go to Support → Tool → Hikvision App Store to ● download the application according to your mobile phone system. -
Page 131: Set Door Open Duration
DS-K1A802A Series Fingerprint Time Attendance Terminal User Manual Figure 9-2 The Icon Representing Door 2. Control the door status. Remain Open Keep the door open. Open Door Open the door for a configurable time period. When the time period expires, the door will close. -
Page 132: Change Super Password
DS-K1A802A Series Fingerprint Time Attendance Terminal User Manual - On the device list page, if the page is in the list mode, swipe the device name to the left and - On the device list page, if the page is in thumbnail mode, tap the device name or tap - On the Live View page, tap and then tap Settings. -
Page 133: View Access Control Logs
DS-K1A802A Series Fingerprint Time Attendance Terminal User Manual Note For details about how to enter the Live View page, see Start and Stop Live View in the user manual of Hik-Connect mobile client. 2. Tap Change Password to enter the Change Password page. -
Page 134: Appendix A. Tips For Scanning Fingerprint
DS-K1A802A Series Fingerprint Time Attendance Terminal User Manual Appendix A. Tips for Scanning Fingerprint Recommended Finger Forefinger, middle finger or the third finger. Correct Scanning The figure displayed below is the correct way to scan your finger: You should press your finger on the scanner horizontally. The center of your scanned finger should align with the scanner center. - Page 135 DS-K1A802A Series Fingerprint Time Attendance Terminal User Manual Environment The scanner should avoid direct sun light, high temperature, humid conditions and rain. When it is dry, the scanner may not recognize your fingerprint successfully. You can blow your finger and scan again.
-
Page 136: Appendix B. Attendance Capacity
DS-K1A802A Series Fingerprint Time Attendance Terminal User Manual Appendix B. Attendance Capacity View the attendance data capacity, including department, normal shift, man-hour shift, etc. Table B-1 Attendance Capacity Content Maximum Configurable Parameters Department Normal Shift Man-Hour Shift Holiday Holiday Group... -
Page 137: Appendix C. Attendance Record Deleting Rule
DS-K1A802A Series Fingerprint Time Attendance Terminal User Manual Appendix C. Attendance Record Deleting Rule Enable Record Delete Set the percentage of the attendance record over threshold prompt. 1. When the record reaches the threshold, an alarm of the attendance record over limit value will be displayed on device screen. -
Page 138: Appendix D. Attendance Report Table
DS-K1A802A Series Fingerprint Time Attendance Terminal User Manual Appendix D. Attendance Report Table Enter a short description of your concept here (optional). This is the start of your concept. Description of Attendance Report File Name File Name Rule: Device No. + Report Type.xls Device No.: A serial of numbers from 0 to 8. - Page 139 DS-K1A802A Series Fingerprint Time Attendance Terminal User Manual Normal Shift Table Normal Shift Create Time: 2017-04-26 10:12:20 Shift Shift Period 1 Period 2 Period 3 Period 4 Name Start Stop Start Stop Start Stop Start Stop Normal Shift Table: Up to 4 periods can be configured in normal shift configuration. You are able to take attendance according to the configured period.
- Page 140 DS-K1A802A Series Fingerprint Time Attendance Terminal User Manual Card No. Name Departme SW-EW Late Early Total (min) Employee Duration Leave (min) Duration (min) Abnormal Attendance Record Table: Calculate the abnormal attendance according to the attendance records and the shift schedule configuration.
- Page 141 DS-K1A802A Series Fingerprint Time Attendance Terminal User Manual Attendance Summary Table Attendance Summary Table Create Time: 2017-04-26 10:12:20 Employ Card Name Depart Late Late Early Absence Absence Attenda ee ID ment Times Duratio Leave Times Time nce/ n (min) Duratio...
-
Page 142: Appendix E. Communication Matrix And Device Command
Device Command Scan the following QR code to get the device common serial port commands. Note that the command list contains all commonly used serial ports commands for all Hikvision access control and video intercom devices. Figure E-2 Device Command... - Page 143 UD15632B-B...