YAMAHA RX-A3060, RX-A2060 - AV Receiver Easy Setup Guide
- Owner's manual (230 pages) ,
- Firmware update manual (6 pages)
Advertisement
- 1 Introduction
- 2 Accessories used with this document
- 3 Placing speakers
- 4 Connecting speakers/subwoofer
- 5 Connecting external devices
- 6 Establishing a network connection
- 7 Connecting the power cable to an AC wall outlet, and turning on the unit
- 8 Connecting the unit to a wireless network
- 9 Optimizing the speaker settings automatically (YPAO)
- 10 Playing back a BD/DVD
- 11 Basic operations
- 12 Documents / Resources
Introduction
This document explains 7.1-channel system setup, 7.1.2-channel system setup using the front presence speakers, and surround sound playback from a BD/DVD via the unit. In this document, the RX-A3060 is used for illustration purposes. Some parts or components, such as jacks or remote control keys, may vary by specific model. Such differences are indicated as required.
AV SETUP GUIDE
AV SETUP GUIDE is an app that guides you through the process of connecting a TV or playback device, such as a BD/DVD or CD player, and speakers to the AV receiver. Search "AV SETUP GUIDE" on the App Store or Google Play for details.


Accessories used with this document

- Remote control
- Batteries (AAA, R03, UM-4) (x2)
- Power cable The supplied power cable varies depending on the region of purchase.
- YPAO microphone
The following cables (not supplied) are required to build the system described in this document.
- Speaker cables (depending on the number of speakers)
- Audio pin cable (x1)
- HDMI cables (x3)
- Network cable (x1) (when connecting to a router via a network cable)
Placing speakers

Set up the speakers in the room using the diagram as a reference.
 Front speaker (L)
 Front speaker (R)
 Center speaker
  Surround speaker (L)
 Surround speaker (R)
 Surround back speaker (L)
  Surround back speaker (R)
 Front presence speaker (L)*
 Front presence speaker (R)*
 Subwoofer
* For 7.1.2-channel system
Connecting speakers/subwoofer

Before connecting the speakers, remove the unit's power cable from the AC wall outlet and turn off the subwoofer.
- When connecting 6-ohm speakers
Set the unit's speaker impedance to "6 Ω MIN". For details, see "Setting the speaker impedance" in the Owner's Manual. - Precaution for connecting of the speaker cables
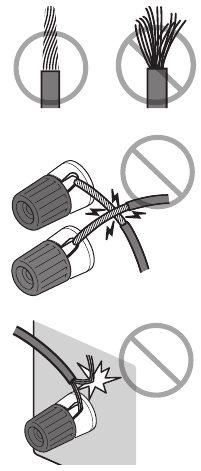
Improper connecting of the speaker cables may cause short circuit and also damage the unit or the speakers.- Twist the bare wires of the speaker cables firmly together.
- Do not let the core wires of the speaker cable touch one another.
- Do not let the core wires of the speaker cable come into contact with the unit's metal parts (rear panel and screws).
If "Check SP Wires" appears on the front display when the unit is turned on, turn off the unit, and then check the speaker cables short circuit.
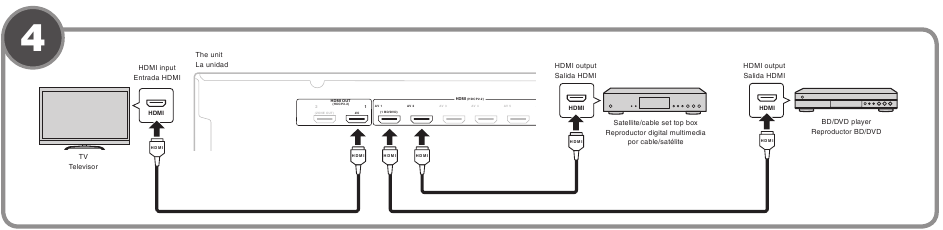
Connecting external devices
Establishing a network connection

Establish wired network connection a , or a wireless network connection b , in accordance with your network environment.
- Wired network connection
- Wireless network connection
Raise the wireless antenna so that it is standing up straight. (Procedures for connecting the unit to a wireless router are described in step 7 .)
Notice
Do not apply excessive force on the antenna. Doing so may damage it.
Connecting the power cable to an AC wall outlet, and turning on the unit

Before connecting the power cable (Brazil and General models only)
Set the switch position of VOLTAGE SELECTOR according to your local voltage.
Voltages are AC 110–120/220–240 V, 50/60 Hz.
- Press
![]() (receiver power) to turn on the unit.
(receiver power) to turn on the unit. - Turn on the TV and switch the TV input to display video from the unit (HDMI OUT jack).

Connecting the unit to a wireless network

- Skip this step and proceed to step 8 when the unit is connected to a router via a network cable ( a in step 5)
- In addition to the wireless connection methods described below, the unit can easily be connected to a wireless network using the MusicCast CONTROLLER app. For more information, see the separate booklet "MusicCast Setup Guide" supplied with the unit.
The Wireless Accessory Configuration (WAC) screen shown in illustration c is displayed on the TV when the unit is turned on for the first time after purchase. It may take several tens of seconds for the screen to be displayed.
Note
If the WAC screen is not displayed, configure wireless network settings from the setup menu. See "Connecting to a network device wirelessly" in the Owner's Manual. The following connection methods are described in this section.
- Follow procedure A when using an iOS device to connect to a wireless network.
- Follow procedure B when connecting to a wireless router (access point) that supports WPS.
- Press ENTER if a wireless connection method other than A or B below will be used, and follow the on-screen instructions.
- Sharing iOS device settings
Wireless connection settings on iOS devices (iPhone/iPad/iPod touch)* can easily be applied to the unit.
* An iOS device running iOS 7 or later is required. Confirm that the iOS device is connected to the wireless router before proceeding with configuration.
- Confirm the unit's network name displayed in the screen as shown in illustration c.
- Select the unit's name from "SET UP NEW AIRPLAY SPEAKER" in the Wi-Fi screen on the iOS device, and tap "Next".
Follow the instructions displayed on the iOS device screen to configure the settings.
- Using WPS push-button configuration
Wireless connection can be configured with one push of the WPS button on the wireless router (access point).
- Press RETURN to cancel WAC when the screen shown in illustration c is displayed on the TV.
- Press and hold the INFO (WPS) key on the unit's front panel for more than 3 seconds.
"Press WPS button on Access Point" will be displayed in the front display. - Push the WPS button on the wireless router.
When setup is complete and a connection has been established, "Completed" will be displayed in the front display.
Note
If "Not connected" is displayed, repeat the process from step 1 or try another connection method.
Optimizing the speaker settings automatically (YPAO)
The Yamaha Parametric room Acoustic Optimizer (YPAO) function detects speaker connections, measures the distances from them to your listening position(s), and then automatically optimizes the speaker settings, such as volume balance and acoustic parameters, to suit your room.
Note the following regarding YPAO measurement
- Test tones are output at high volume and may surprise or frighten small children.
- Test tone volume cannot be adjusted.
- Keep the room as quiet as possible.
- Stay in a corner of the room behind the listening position so that you do not become an obstacle between speakers and the YPAO microphone.
- Do not connect headphones.
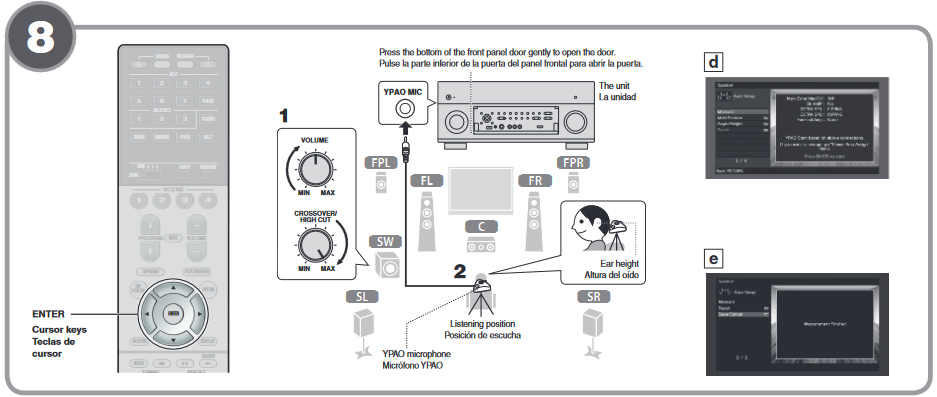
- Turn on the subwoofer and set the volume to half. If the crossover frequency is adjustable, set it to maximum.
- Place the YPAO microphone at your listening position and connect it to the YPAO MIC jack on the front panel.
The screen shown in illustration d appears on the TV.
Note
Place the YPAO microphone at your listening position (same height as your ears). We recommend the use of a tripod as a microphone stand. You can use the tripod screws to stabilize the microphone.
- To start the measurement, use the cursor keys to select "Measure" and press ENTER.
The measurement will start in 10 seconds.
It takes about 3 minutes to measure.
The screen shown in illustration e appears on the TV when the measurement finishes.
Note
If an error message (such as E-1) or warning message (such as W-2) appears, see "Error messages" or "Warning messages" under "Optimizing the speaker settings automatically (YPAO)" in the Owner's Manual.
- Use the cursor keys to select "Save/Cancel" and press ENTER.
- Use the cursor keys to select "SAVE" and press ENTER.
- Use the cursor keys to select "YES" to enable YPAO Volume and press ENTER.
For details on YPAO Volume, refer to the Owner's Manual. - Disconnect the YPAO microphone from the unit.
This completes optimization of the speaker settings.
Playing back a BD/DVD

Now let's play back a BD/DVD. We recommend playing back multichannel audio (5.1-channel or more) to feel surround sound produced by the unit.
- Turn on the BD/DVD player.
- Press AV 1.
"AV 1" is selected as the input source. - Start playback on the BD/DVD player.
- Press STRAIGHT repeatedly to select "STRAIGHT".
Note
When "STRAIGHT" (straight decode) is enabled, each speaker produces each channel audio signal directly (without sound field processing).
- Press VOLUME to adjust the volume.
This completes the basic setup procedure.
Basic operations

- The input source and settings assigned to SCENE keys can be selected with the touch of a button (SCENE function). By default, the input source and sound program settings assigned to each SCENE ENHANCER PURE DIRECT INFO SLEEP key are as follows.
| SCENE key | Input | Sound program |
| 1 | AV 1 | Sci-Fi |
| 2 | AUDIO 1 | STRAIGHT |
| 3 | NET RADIO | 9ch Stereo |
| 4 | TUNER | 9ch Stereo |
- The unit is equipped with a variety of sound programs and surround decoders that allow you to enjoy playback sources in your favorite sound mode.
STRAIGHT: Input sources will be played without any sound field effects.
PURE DIRECT: Input sources will be played using only those functions absolutely vital to playback to minimize noise generated by electronic circuitry. Functions such as the front panel display will be temporarily disabled to achieve Hi-Fi sound quality.
ENHANCER: Compressed music stored on a Bluetooth device or USB storage device will be played with additional depth and breadth.
MOVIE, MUSIC, SUR DECODE: Sound programs suitable for movies and music can be selected using MOVIE or MUSIC, and unprocessed multichannel playback from 2-channel sources is enabled using SUR DECODE.

Documents / Resources
References
Download manual
Here you can download full pdf version of manual, it may contain additional safety instructions, warranty information, FCC rules, etc.
Download YAMAHA RX-A3060, RX-A2060 - AV Receiver Easy Setup Guide
Advertisement
Thank you! Your question has been received!


Need Assistance?
Do you have a question about the RX-A3060 that isn't answered in the manual? Leave your question here.