Table of Contents
Advertisement
Quick Links
Advertisement
Table of Contents

Related Manuals for AccuBANKER D470


Summary of Contents for AccuBANKER D470
- Page 1 User Guide D470 Automatic QuadScan Counterfeit Bill Detector www.AccuBANKER.com...
- Page 2 Thank you for trusting AccuBANKER with your cash handling needs. In order to optimize the performance of your equipment, we encourage you to thoroughly read this user guide prior to use. www.AccuBANKER.com...
-
Page 3: Table Of Contents
Table of Contents Safety Instructions ..................4 1. Introduction ....................6 2. Box Contents ....................6 3. Equipment Overview .................. 7 4. Operation..................... 9 4.1 Basic Operation ..................9 4.2 Suspicious Bill Warning ............... 10 4.3 Bill Positioning ..................11 5. -
Page 4: Safety Instructions
Safety Instructions Warning Do not use this product in areas where it may be exposed to water or other liquids. Unplug this product from the electric outlet before cleaning. Do not use liquid or aerosol cleaners. To clean, use a damp cloth. To reduce the risk of electric shock, do not disassemble this product. - Page 5 Safety Instructions (cont.) Read and understand all of the safety instructions. • Follow all warnings and instructions marked on the unit. • This product is meant to be operated in an indoor environment with • proper ventilation. Do not place near direct sunlight, heat sources, or air conditioners. •...
-
Page 6: Introduction
1. Introduction The D470 incorporates the most modern techniques for the evaluation and detection of counterfeit bills. This detector assesses the security features that are present in each bill in detail and determines if these are genuine or suspicious. The equipment automatically alerts the user both visually and audibly when a suspicious bill is identified. -
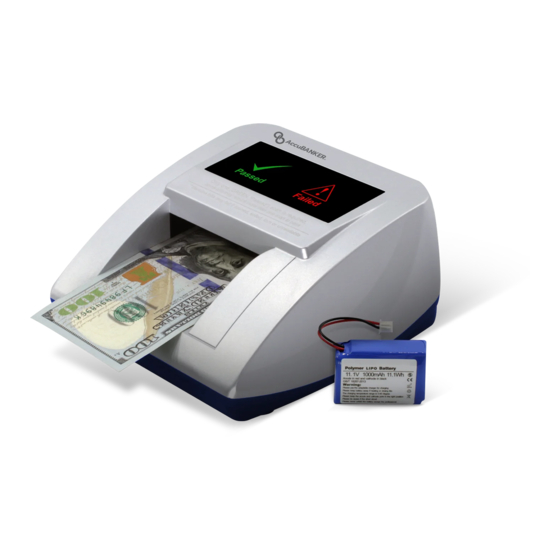
Page 7: Equipment Overview
3. Equipment Overview 1. LED Indicator Display 5. USB Interface Port 2. Feeding Channel 6. Power Adapter Connector 3. SD Card Port 7. On / Off Power Switch 4. Bill Exit Slot 8. Serial Port 4 7 6... - Page 8 3. Equipment Overview (cont.) 9. Green Indicator (Indicates bill accepted) 10. Red Indicator (Indicates suspicious bill) 11. Grips for the AccuStand metal base 12. AccuStand metal base (Optional Accessory / Sold separately) 13. Battery compartment (Battery Optional / Sold separately)
-
Page 9: Operation
4. Operation 4.1 Basic Operation 1. Connect the power cable to the detector and then connect the adapter to the power outlet. When turning on the detector, it will proceed with a self-check routine that lasts 2 seconds. The display will light the green indicator , which means the equipment is ready to check the bills. -
Page 10: Suspicious Bill Warning
4. Operation (cont.) 4.2 Suspicious Bill Warning This equipment checks the Magnetic (MG), Infrared (IR), Watermark (WM), Ultraviolet (UV), and other characteristics of the bills analyzed. If any of these security features do not pass the authentication of the bill, a red indicator will display, and two beep notifications sound. -
Page 11: Bill Positioning
4. Operation (cont.) 4.3 Bill Positioning This equipment has the ability to verify the authenticity of bills in any of four positions. For correct verification, the bill must be introduced into the feeding channel straight and well-aligned to the left edge, as shown in Figures "A"... -
Page 12: Solutions To Operational Problems
5. Solutions to Operational Problems 5.1 Preventive Measures For optimal operation of the detector, take into account the following: 1. Avoid direct exposure to powerful sources of light as well as magnetic interference (ex. microwave, cell phone, or WiFi devices), which will affect the sensors of the detector. -
Page 13: Maintenance
5. Solution to Operational Problems (cont.) 5.2 Maintenance CAUTION: Before performing any cleaning process, turn off the equipment and unplug it. Please note that problems or defects caused by lack of maintenance are not covered under the warranty. a) Cleaning of optical sensors It is important to periodically clean the optical sensors to prevent particles of paper or dust from adhering to them. -
Page 14: Jamming
5. Solution to Operational Problems (cont.) 5.3 Jamming If any bill or other object accidentally jams inside the detector: 1. Turn off the detector immediately. 2. Carefully proceed to remove the bill or object causing the problem. 3. Turn on the detector again and verify it is working at an optimum level. -
Page 15: Ir Sensor Calibration
If the detector is rejecting an unusual amount of bills, the equipment may need to have the sensors calibrated. 1. Use conventional 75g office paper to print and cut the D470 IR Calibration template to perform the calibration. Download the template from www.accubanker.com/pages/support/D470. -
Page 16: Software Updates
6. Software Updates Steps to perform software update: 1. Copy the programming software to a mini SD card. 2. Turn off the detector. 3. Insert the mini SD card into the update port at the back of the unit as the image shown. -
Page 17: Specifications
7. Specifications Temperature 32° - 104°F (0° - 40°C) Humidity 25% - 80% Display Processing Speed 1 bill/second (new bills) Power Source (INPUT) 100 - 240 VAC 60/50 Hz Power Source (OUTPUT) 12VDC / 1.0 A Power Consumption < 5 Watts Battery Type Rechargeable Lithium Battery 11.1V 1.05A (Optional) - Page 18 AccuBANKER 7104 NW 50th St Miami, FL 33166 9AM- 5PM ET Monday through Friday www.AccuBANKER.com Please give us a call at 1-888-993-2228...