Advertisement
Quick Links
Advertisement

Related Manuals for AEG FUSION ADT18


Summary of Contents for AEG FUSION ADT18
- Page 1 ALT58LI401 ADT18 ALT58B A18FPHD142...
- Page 2 mportant! It is essential that you read the instructions in this manual before assembling, operating, and maintaining the product. Subject to technical modifications. WARNING: To prevent personal injury or damage to underground utility equipment, consult local organisations for advice, such as DIAL BEFORE YOU DIG (call 1100 or visit www.1100.com.au).
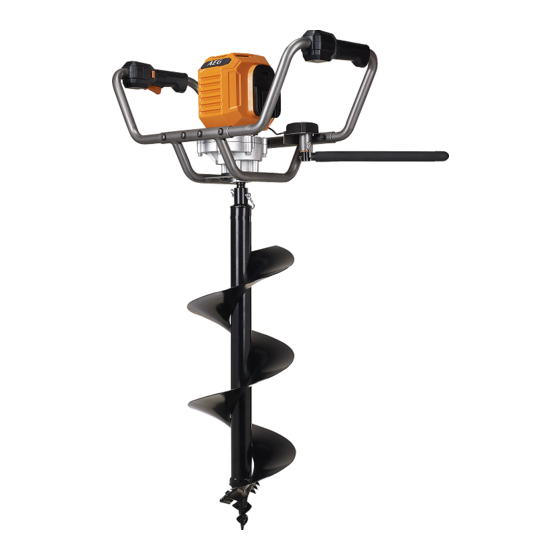
- Page 3 ADT18 x 16...
- Page 4 A18FPHD142 x 16...
-
Page 5: Led Indicator
TRIGGER RELEASE LED INDICATOR TRIGGER SWITCH SPEED SELECTOR HANDLE KICKBACK BAR GEAR BOX QUICK LOCK PIN FORWARD/REVERSE BUTTON AUGER LED INDCATOR DESCRIPTIONS State Description Status LED Solid red The kickback protection has been activated. Release the trigger, and turn on the product again to continue digging. -
Page 6: Starting The Product
START STOP STARTING THE PRODUCT INSTALLING THE BATTERIES INSTALLING THE HANDLE ASSEMBLIES OPERATING THE PRODUCT... - Page 7 USING THE KICKBACK BAR INSTALLING THE KICKBACK BAR INSTALLING THE AUGER CLEANING THE PRODUCT STORING THE PRODUCT...
- Page 8 INSTALLING THE HANDLE ASSEMBLIES x 16 1. Locate the frame bolts, nuts and washers, as well as the spanner and Torx wrench. 2. Facing the LED side of the powerhead, slide in the left-hand handle assembly and align the bolts holes (handle without the trigger switch).
- Page 9 5. Securely tighten the bolts using the Torx wrench and spanner. 6. Connect the signal cable in the right handle assembly to the signal cable from the powerhead. Ensure that the pins are aligned before connecting and securing. 7. Connect the signal cable in the right handle assembly to the signal cable from the powerhead.
- Page 10 INSTALLING THE KICKBACK BAR on t...
- Page 11 INSTALLING THE AUGER NOTE: When attaching the auger, align the holes on the drive shaft and auger. This is most easily completed by laying the product on the ground. click...
- Page 12 INSTALLING THE BATTERIES NOTE: The product requires two battery packs to operate. For best performance use two FORCE battery packs of the same capacity. click...
- Page 13 START STARTING THE PRODUCT STOP...
- Page 14 OPERATING THE PRODUCT NOTE: Always use the product with 2 hands. Keep the product as close to the body as possible to prevent injury and ensure kickback protection can be activated if required. click...
- Page 15 NOTE: The product has 3 different auger speeds — 100/150/200 RPM. The multiple speeds can be beneficial in different scenarios. In rocky soil a slower speed may help in preventing kickback issues. NOTE: Frequently remove dirt and debris from the hole and auger during use to improve digging efficiency.
- Page 16 USING THE KICKBACK BAR STOP NOTE: If the kickback protection is activated, release trigger, allow the kickback bar to go back to its natural position, and then restart the product to continue digging.
- Page 17 CLEANING THE PRODUCT...
- Page 18 NOTE: The auger can be cleaned with water once it has been removed from the powerhead and moved away to a safe distance from the powerhead. NOTE: Do not clean the powerhead with water. Only clean it with a dry cloth or soft brush.
- Page 19 STORING THE PRODUCT...
- Page 20 NOTE: Always store the product in a cool, dry, well ventilated area. acco of e sign Iden acce area by a...
- Page 21 TECHNICAL DATA CORDLESS DIGGING TOOL ADT18/A18FPHD142 Voltage 36V d.c. (2 x 18 V) Speed 3 200+-10% / min Speed 2 150+-10% / min Speed 1 100+-10% / min Weight with battery pack (no auger) 10.5 kg Weight with auger and two battery packs 15.05 kg Auger size 250 mm...
-
Page 22: Work Area Safety
■ If devices are provided for the connection of dust extraction ■ WORK AREA SAFETY and collection facilities, ensure these are connected and ■ Keep work area clean and well lit. Cluttered or dark areas properly used. Use of dust collection can reduce dust-related invite accidents. - Page 23 ■ Under abusive conditions, liquid may be ejected from the ■ Do not modify the product in any way or use parts and tion battery; avoid contact. If contact accidentally occurs, flush accessories, which are not recommended by the manufacturer. with water.
-
Page 24: Maintenance
ADDITIONAL BATTERY SAFETY WARNINGS WARNING! The auger bit is very sharp. To prevent personal injury, exercise extreme caution when cleaning, fitting, or removing WARNING! To reduce the risk of fire, personal injury, and the auger bit. Always wear protective gloves when performing product damage due to a short circuit, never immerse the tool, maintenance on the bit. -
Page 25: Symbols In This Manual
onal Guaranteed sound power level ving ming Waste electrical products should not be disposed fore of with household waste. Please recycle where facilities exist. Check with your local authority or retailer for recycling advice. this tre. SYMBOLS IN THIS MANUAL with erly uent... - Page 27 This manual may feature third party recommendations or displays links to web sites, services, and content owned and operated by third parties. The third party do not form part of this manual and are not under our control. By referencing or displaying the third party, we do not in any way represent that we recommend or endorse the relevant third party, its goods, or its services.
- Page 28 Techtronic Industries Australia Pty Ltd 31 Gilby Road, Mount Waverley, VIC, 3149, Australia Techtronic Industries N.Z. Limited AEG is a registered trade mark used under Unit C, 70 Business Parade South, license from AB Electrolux (publ). Highbrook, Auckland 2013, New Zealand AEG is a registered trademark used under ©...