
Related Manuals for Beko Arcelik BLG15 C7S


Summary of Contents for Beko Arcelik BLG15 C7S
- Page 1 BLG15 C7S SERVICE MANUAL SERVICE MANUAL NO:00 BLG15 C7S CONTROL SYSTEM WASHING MACHINE SERVICE MANUAL Sensitivity: Public...
-
Page 2: Table Of Contents
BLG15 C7S SERVICE MANUAL 1 COVER 2 CONTENTS COVER ..............................2 CONTENTS ............................... 2 COMPONENT OPERATING PRINCIPLES ....................4 3.1.1 Electronic Board Assembly ......................4 Water Inlet Valve ..........................5 Water Level Sensor ..........................5 Washing Motor ............................ 6 3.4.1 Atlas Motor ............................. - Page 3 BLG15 C7S SERVICE MANUAL COMPONENT INSTALLATION/REMOVAL ....................31 Upper Table Installation/Removal ..................... 31 6.1.1 Installation ............................ 31 6.1.2 Removal ............................33 Panel Installation / Removal ......................34 6.2.1 Installation ............................ 34 6.2.2 Installation ............................ 36 Detergent Box Installation / Removal / Installation ................37 Display Board Assembly Installation/Removal ...................
-
Page 4: Component Operating Principles
BLG15 C7S SERVICE MANUAL 3 COMPONENT OPERATING PRINCIPLES 3.1.1 Electronic Board Assembly Electronic board assembly comprises the following: • Power board • Display board • Vector motor board and the extension cable. The power board is designed to drive all Picture 3.1 Power board components find... -
Page 5: Water Inlet Valve
BLG15 C7S SERVICE MANUAL Water Inlet Valve It is used to get adequate water for the machine when necessary. Operating Voltage : 220 / 240VAC 50-60 Hz : 5 – 8 W Nominal Power Flowrate : 10 l/min : T85ºC Operating Voltage : 3400 –... -
Page 6: Washing Motor
BLG15 C7S SERVICE MANUAL The amounts of water to be taken in for the programs are controlled by the water meters. Water level sensor serves the basic functions of deciding to take in water again, control the heater safety level, door opening level or foam level. Also, if there are any error in the water meters or its connections, water is taken in with the water level sensor. -
Page 7: Heater
BLG15 C7S SERVICE MANUAL Brushless motor is used. Motor stator is composed of a 3-phase coil, and there are magnets on the rotor. On the Atlas Motor, the stator coils are energised by the help of an inverter by detecting the rotor position without using a Hall sensor. Communication between the vector board and the C7S display board ensures transmission of commands to the vector board. -
Page 8: Drain Pump
BLG15 C7S SERVICE MANUAL Resistance (25 C) : 4773 ohm (4.2%, Siemens)- 4837 ohm (3.2%, elth) Operating Temperature : -10C...+100C : 16 2 s Thermal time constant Resistance values which are read from the NTC ends by means of multimeter are compared to the below table. These approximate values should be read. -
Page 9: Safety Switch (Door Lock/Solenoid)
BLG15 C7S SERVICE MANUAL Safety Switch (Door lock/Solenoid) Picture 3.11 Safety switch Rated Operating Voltage : 230V 50-60Hz Operating Current : 16 A Working Environment Humidity: Rh 10- 95%Rh : 5°C / 75°C Working Environment Temperature SOLENOID door safety lock was used. When a program is started after the door has been closed, the SOLENOID door will be locked by sending a pulse for once through the main board and it will be prevented from opening while the program is running. - Page 10 BLG15 C7S SERVICE MANUAL Sensitivity: Public...
-
Page 11: Picture 3.12 Cover Unlocking Arm
BLG15 C7S SERVICE MANUAL Picture 3.12 Cover unlocking arm Sensitivity: Public... -
Page 12: Homewhiz Feature And Remote Control Function
BLG15 C7S SERVICE MANUAL HomeWhiz Feature and Remote Control Function HomeWhiz allows you to use your smart device to check your washing machine and get information about its status. With HomeWhiz application you can use your smart device to perform various procedures that can also be performed on the machine. Plus, you can use some features only with the HomeWhiz function. - Page 13 BLG15 C7S SERVICE MANUAL device. Only programme knob will be active in this mode. Other buttons will be inactive. • On the screen you see on the app, select the washing machine and press next. • Proceed reading the on-screen instructions until HomeWhiz asks you about the product you wish to connect to your smart device.
-
Page 14: Setting Up A Washing Machine That Is Connected To Someone Else's Account
BLG15 C7S SERVICE MANUAL 3.9.2 Setting up a washing machine that is connected to someone else's account If the washing machine you want to use was previously introduced to the system with someone else‘s account, you must establish a new connection between your HomeWhiz Application and the appliance. -
Page 15: 3.9.4 Troubleshooting
BLG15 C7S SERVICE MANUAL When the Remote Control is on, you can only manage, turn-off and status follow-up operations through your washing machine. And all functions except child lock can be managed through the application. You can follow whether the Remote Control function is On or Off through the function indicator on the button. - Page 16 BLG15 C7S SERVICE MANUAL The water taken into the machine is intermittent. Details of the algorithm during water intake are given below. Figure 3.5 Steamcure water intake algorithm The Steamcure step that runs after the shirts programme is shown below. Figure 3.6 Steamcure function sample profile Sensitivity: Public...
-
Page 17: Service Function Test
BLG15 C7S SERVICE MANUAL 4 SERVICE FUNCTION TEST WARNING 1: If you encounter a safety problem during the test, go to the step "Display of the Errors Occurred in the Service Mode" no 16. Warning 2 : If there is an active safety error on the washing machine while checking on test mode the error code will be shown on the screen. -
Page 18: Step 2: Bluetooth Test
BLG15 C7S SERVICE MANUAL Step 2: Bluetooth Test Description: This step is not performed in service mode. Condition to pass to the next step: Timeout: If "Start/Pause" button is not pressed within 2*3 = 6 minutes, it goes into "OFF" mode. Switching to next step: It automatically proceeds to the other step. -
Page 19: Step 5: Motor Counter Clockwise Wash Check
BLG15 C7S SERVICE MANUAL Switching to next step: "Start/Pause" button is pressed. NOTE: If you turn the knob to Off position, the machine will switch to "OFF" mode. Step 5: Motor counter clockwise wash check Description: Drum will be rotated counter clockwise at 52 rpm. Warnings to be displayed on the 7S: Refer to the knob position and information table. -
Page 20: Step 8: Drying Module Check Step 1
BLG15 C7S SERVICE MANUAL 2) If there is no NTC error, however there is an error at the Mains Voltage ADC inputs, 140rpm is applied; 3) If there is no problem at both checks above, maximum speed spin (1550-1600rpm) is applied. Warnings to be displayed on the 7S: Refer to the knob position and information table Condition to pass to the next step:... -
Page 21: Step 9: Drying Module Check Step 2
BLG15 C7S SERVICE MANUAL Top plate will be opened and the process cooler will be checked in this way. When the cooler is looked from above, whether the cooler rotor rotates or not can be seen. Drum Input temperature must be below 50 when passing to next step. In order to check the air heaters and NTCs, temperature of the air inside may need to be decreased. -
Page 22: Step 11: Main Wash Valve, And Main Wash Valve Flow Meter Check
BLG15 C7S SERVICE MANUAL On products with an FM, the machine will take in water for 10 seconds. If it reaches 50 pulses within this period, step transition will be allowed. Step transition is not allows during water level measurement. Position to turn the knob to 4 for water level sensor details;... -
Page 23: Step 12: Softener Compartment Check, Detergent Box Siphon Check
BLG15 C7S SERVICE MANUAL Switching to next step: After "Flow meter OK/NOK" is displayed, if "Start/Pause" button is pressed. NOTE: If "ON/OFF" button is pressed for 3 seconds, machine goes into "OFF" mode. Step 12: Softener compartment check, Detergent box siphon check Description: Prewash valve and main wash valve are activated at the same time. -
Page 24: Step 14: Hot Water Valve Check
BLG15 C7S SERVICE MANUAL Step 14: Hot water valve check Description: The valve will be activated if a hot water valve is predefined. On products without an FM, the machine will take in water until the key is pressed. On products with an FM, the machine will take in water for 10 seconds. If it reaches 50 pulses within this period, step transition will be allowed. -
Page 25: Step 16: Bluetooth Connection Check
BLG15 C7S SERVICE MANUAL 4 for water level sensor details; 7 for FM details Warnings to be displayed on the 7S: Refer to the knob position and information table. Condition to pass to the next step: a) If there is water level sensor error, "Water Level Sensor Error" will be shown for 3 seconds without water being taken in and the step of "Display of the Errors occurred in Service Mode"... -
Page 26: Step 17: Pump Check
BLG15 C7S SERVICE MANUAL NOTE: If you turn the knob to Off position, the machine will switch to "OFF" mode. Step 17: Pump check Description: The motor which runs at 52rpm in the previous step will be stopped. Pump is operated. Warnings to be displayed on the 7S: Refer to the knob position and information table. -
Page 27: Step 19: How Many Times Has The Service Mode Been Completed Successfully
BLG15 C7S SERVICE MANUAL Warnings to be displayed on the 7S: Refer to the knob position and information table. Condition to pass to the next step: Timeout: If there is not any error and "Start/Pause" button is not pressed within 2*3 = 6 minutes, it goes into "OFF"... -
Page 28: Equipment/Apparatus To Be Used In Component Installation- Removal
BLG15 C7S SERVICE MANUAL 5 EQUIPMENT/APPARATUS TO BE USED IN COMPONENT INSTALLATION- REMOVAL Shock Absorber Pin Removal Apparatus Shock absorber pin attachment apparatus Picture 5.1 Shock Absorber Pin Removal Apparatus Bushings are adapted prior to attaching the shock absorber. Picture 5.2 Shock absorber is attached on the bracket and drum. -
Page 29: Picture 5.4
BLG15 C7S SERVICE MANUAL Only softener is applied on shock absorber pins. Picture 5.4 Attached on pin. Picture 5.5 Fitting gun is seated on bracket and pin. Picture 5.6 Sensitivity: Public... -
Page 30: Picture 5.7
BLG15 C7S SERVICE MANUAL Fitting gun is squeezed to make the installation. Picture 5.7 Fitting gun is squeezed until the end to make the installation. Picture 5.8 Post-installation check is performed. Picture 5.9 Sensitivity: Public... -
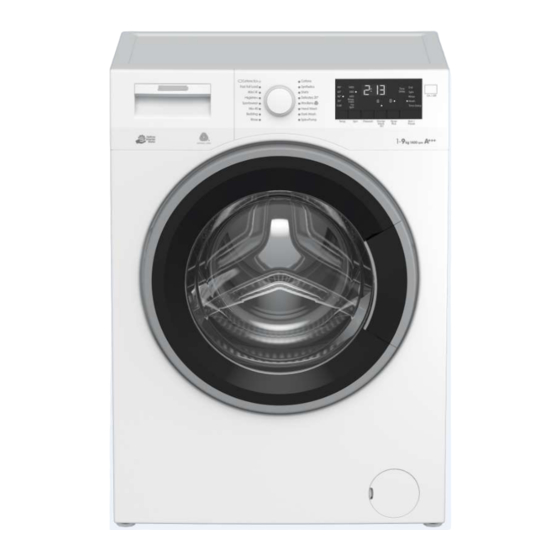
Page 31: Component Installation/Removal
BLG15 C7S SERVICE MANUAL 6 COMPONENT INSTALLATION/REMOVAL Front appearance of machine is given in Picture 6.1. Picture 6.1 General appearance Upper Table Installation/Removal 6.1.1 Installation As shown in Pictures 6.2 and 3, the upper table is pushed toward the front from the back of the machine and the tabs in the upper table are seated to the ducts on the panel. -
Page 32: Picture 6.4 Upper Table Installation - 3
BLG15 C7S SERVICE MANUAL Picture 6.4 Upper table installation - 3 Then, 2 screws (right and left) on the upper table are removed. Picture 6.5 Upper table installation - 4 Picture 6.6 Upper table installation - 5 Sensitivity: Public... -
Page 33: 6.1.2 Removal
BLG15 C7S SERVICE MANUAL 6.1.2 Removal As shown in Picture 6.7, remove the 2 screws on the upper table. Picture 6.7 Upper table removal - 1 Picture 6.8 Upper table removal - 2 As is seen in Picture 6.10, the upper table is pulled backwards and the front structure of the front part of the upper table is made come out from the bottom of the panel. -
Page 34: Panel Installation / Removal
BLG15 C7S SERVICE MANUAL Panel Installation / Removal 6.2.1 Installation Prior to installation of panel assembly, installation of front wall must be completed. (Screws connecting front wall upper part to body are under the panel assembly.) Remove the upper table. Remove the display board sockets. -
Page 35: Picture 6.14 Panel Removal -4
BLG15 C7S SERVICE MANUAL Remove screws connected to the bracket bar shown in Picture 6.14. Picture 6.14 Panel removal -4 Remove tabs shown in Picture 6.15 after installing panel assembly in place on body. Picture 6.15 Panel removal -5 Detach the display board, which is connected to the panel, from the cable sockets and board holder to remove it. -
Page 36: 6.2.2 Installation
BLG15 C7S SERVICE MANUAL 6.2.2 Installation Prior to installation of panel assembly, installation of front wall must be completed. (Screws connecting front wall upper part to body are under the panel assembly.) As shown in Picture 6.18, push the panel assembly down from the top of the front wall, ensuring that the tabs at the lower section of the panel assembly enter the front wall. -
Page 37: Detergent Box Installation / Removal / Installation
BLG15 C7S SERVICE MANUAL Detergent Box Installation / Removal / Installation Picture 6.22 Detergent drawer installation/removal Press the syphon part as shown in Picture 6.23 to remove the detergent drawer. Picture 6.23 Detergent drawer installation/removal As shown in Picture 6.24, attach 3 screws where the drawer panel is installed. -
Page 38: Picture 6.26 Detergent Drawer Installation/Removal
BLG15 C7S SERVICE MANUAL Picture 6.26 Detergent drawer installation/removal Picture 6.27 Detergent drawer installation/removal Picture 6.28 Detergent drawer installation/removal Picture 6.29 Detergent drawer installation/removal Sensitivity: Public... -
Page 39: Picture 6.30 Detergent Drawer Installation/Removal
BLG15 C7S SERVICE MANUAL Be careful about the direction of clamp screw. Picture 6.30 Detergent drawer installation/removal Picture 6.31 Detergent drawer installation/removal Sensitivity: Public... -
Page 40: Display Board Assembly Installation/Removal
BLG15 C7S SERVICE MANUAL Display Board Assembly Installation/Removal Remove the upper table. Remove the panel assembly. Remove the detergent drawer. Remove the board holder from the tabs. Carry out the processes shown in the following pictures respectively. Free the board holder, which is found on the panel and which holds the display board, from... -
Page 41: Power Board Installation/Removal
BLG15 C7S SERVICE MANUAL Picture 6.35 Display board assembly removal/Removal Picture 6.36 Display board assembly removal /Removal Power board installation/removal To install/remove the power board, remove the board holder's screw that is connected to the body. Picture 6.37 Power board installation/removal Sensitivity: Public... -
Page 42: Picture 6.38 Power Board Installation/Removal
BLG15 C7S SERVICE MANUAL To free the power board from the cable assembly, remove the retainers shown in the picture. Picture 6.38 Power board installation/removal Picture 6.39 Power board installation/removal Remove the air vent hose connected to the water level sensor. -
Page 43: Picture 6.41 Power Board Installation/Removal
BLG15 C7S SERVICE MANUAL Remove the water level sensor that is connected to the power board holder. Remove the cable from the socket. Picture 6.41 Power board installation/removal Picture 6.42 Power board installation/removal Remove the cable sockets connected to the power board. Picture 6.43 Power board installation/removal Picture 6.44 Power board installation/removal Sensitivity: Public... -
Page 44: Picture 6.45 Power Board Installation/Removal
BLG15 C7S SERVICE MANUAL Picture 6.45 Power board installation/removal Picture 6.46 Power board installation/removal Picture 6.47 Power board installation/removal Sensitivity: Public... -
Page 45: Door Group Attachment/ Detachment
BLG15 C7S SERVICE MANUAL Door Group Attachment/ Detachment 6.6.1.Attachment The bolts connecting the exterior door and front wall are removed. Picture 6.48 Front Door Disassembly/Assembly Exterior Decorative Handle Cover Picture 6.49 Snaps on the decorative handle are released by using a suitable screwdriver throughout the holes. -
Page 46: Exterior Door
BLG15 C7S SERVICE MANUAL Exterior Door Picture 6.51 First, snap on between exterior door and interior door is released by using an appropriate screwdriver, then the exterior door is removed by turning counter- clockwise. Picture 6.52 Picture 6.53 Sensitivity: Public... -
Page 47: Handle
BLG15 C7S SERVICE MANUAL Handle Picture 6.54 Picture 6.55 In order to remove the handle, Pin is removed by pulling as indicated. Decorative Door The bolts connecting the decorative door and the internal door are removed. Than the snaps are released by using appropriate screwdriver. Sensitivity: Public... - Page 48 BLG15 C7S SERVICE MANUAL Picture 6.56 Picture 6.57 Picture 6.58 Sensitivity: Public...
-
Page 49: Lock Hook
BLG15 C7S SERVICE MANUAL Lock Hook Picture 6.59 It will be removed easily after the hook pin is removed. Sensitivity: Public... -
Page 50: Glass
BLG15 C7S SERVICE MANUAL Glass After the all parts are removed, the glass and the interior door can be separated easily. Picture 6.60 Exterior Door Assembly Picture 6.61 In the contrary to disassembly, there is no need to turn exterior door. Put the exterior door in the same line with the decorative door and push. -
Page 51: Pump Cover Installation/Removal
BLG15 C7S SERVICE MANUAL Picture 6.62 Picture 6.63 Pump cover installation/removal Open the pump cover located on the lower right side of front wall by pushing the tab. Picture 6.64 Pump cover installation/removal Sensitivity: Public... -
Page 52: Front Wall Installation/Removal
BLG15 C7S SERVICE MANUAL Front Wall Installation/Removal 6.8.1 Removal The front door assembly is removed. Body bellow clamp fixing the drum bellow to the front door is removed by using the special bellow clamp pliers. Door lock screws are removed. The lock is removed by pushing in. -
Page 53: Picture 6.67
BLG15 C7S SERVICE MANUAL Picture 6.67 Picture 6.68 Picture 6.69 Sensitivity: Public... -
Page 54: Picture 6:70 Remove The Bellow Wire
BLG15 C7S SERVICE MANUAL Picture 6:70 Remove the bellow wire. Bend it inwards to prevent it from blocking the Front Wall disassembly of the bellow. Door lock screws are removed. The lock is removed by pushing in. Picture 6.71 Picture 6.72 Sensitivity: Public... -
Page 55: Installation
BLG15 C7S SERVICE MANUAL While there is a clearance of 2 cm between the lower right and left side, pull the front wall downwards to complete the removal process. The plastic holder pins must be fixed to the body and secured in their places. -
Page 56: Picture 6.75
BLG15 C7S SERVICE MANUAL Picture 6.75 Fit the 2 screws on the upper section of the front wall to the body. Picture 6.76 Picture 6.77 Fit the bellow to its slot on the front wall and attach the bellow wire in its proper place with a nipper. -
Page 57: Detergent Box Installation/Removal
BLG15 C7S SERVICE MANUAL Detergent Box Installation/Removal 6.10 6.10.1 Removal Detergent box is put in its place in the body prior to front wall installation; connections of inlet hoses such as the drum inlet hose, valve connection and steam generator hose assembly are established. -
Page 58: 6.10.2 Removal
BLG15 C7S SERVICE MANUAL Picture 6.82 6.10.2 Removal In order to remove the detergent box, upper table panel assembly must be removed. After this, 2 screws connecting the panel support bracket to the body are removed and the support bracket is removed from the body. -
Page 59: Dual Valve Installation/Removal
BLG15 C7S SERVICE MANUAL Dual Valve Installation/Removal 6.11 Remove the upper table. Dual valve screws are removed from the body. Dual valve hose clamp is pulled back on the hose. Hose is removed from the end on the valve. ... -
Page 60: Water Level Sensor Installation / Removal
BLG15 C7S SERVICE MANUAL Picture 6.90 Valve Installation / Removal Water Level Sensor Installation / Removal 6.12 You need to remove the upper table to install/remove the water level sensor. Remove the tabs and cables connected to the power board assembly to complete the removal process. -
Page 61: Power Cable Installation/Removal
BLG15 C7S SERVICE MANUAL Power Cable Installation/Removal 6.13 Cable holder screw is removed. Picture 6.93. Power cable is removed with its ends being detached from the interference suppression Picture 6.93 Power Cable Installation/Removal filter. Picture 6.94 Picture 6.94 Power Cable Installation/Removal Sensitivity: Public... -
Page 62: Interference Suppression Filter Installation/Removal
BLG15 C7S SERVICE MANUAL Interference Suppression Filter Installation/Removal 6.14 Remove the upper table. Interference suppression filter cable terminals are removed. 2 screws at the back of the body attaching the terminal assembly to the body are removed. ... -
Page 63: Atlas Vektör Card Disassembly / Assembly
BLG15 C7S SERVICE MANUAL Atlas Vektör card disassembly / assembly 6.16 Input impedance coil is not used in products with atlas motor. Motor card is assembled on the chassis at the lower left corner of the body. Motor card is attached to the body with 2 sheet metal screws and the sockets on the main cable are connected. -
Page 64: Poly V Belt Installation
BLG15 C7S SERVICE MANUAL Picture 6.100 vektör card Poly V Belt Installation 6.17 Seat the drum belt on the motor shaft gear to attach it onto the drum. Picture 6.101 Belt installation - 1 Check if the belt is centered on the drum. -
Page 65: Shock Absorber And Shock Absorber Pin Installation/Removal
BLG15 C7S SERVICE MANUAL Picture 6.104 Belt installation Shock Absorber and Shock Absorber Pin Installation/Removal 6.18 Rear cover is removed. Internal pin is pushed backwards with a tapered pin or punch. The pin which is pushed backwards with a pliers is pulled and removed. Body pin that is exposed is pulled by praying with a flat screwdriver. -
Page 66: 6.18.1 Shock Absorber Installation/Removal
BLG15 C7S SERVICE MANUAL 6.18.1 Shock Absorber Installation/Removal Picture 6.107 Shock Absorber Installation/Removal 1. installation of the shock absorber is realised by securing it to the sub-chassis under the machine with 1 nut and to the drum side with shock absorber pin. Upper Counterweight Installation/Removal 6.19 Remove the upper table. -
Page 67: Lower Counterweight Installation/Removal
BLG15 C7S SERVICE MANUAL Lower Counterweight Installation/Removal 6.20 Front wall is removed. Lower Counterweight Retaining Bolts are removed. (During the installation of upper and lower counterweights, torque value must be 1900 Ncm (-200 tolerance). Picture 6.109 Lower Counterweight Installation/Removal Drain Pump Installation/Removal 6.21 ... -
Page 68: Water Inlet Hose Installation/Removal
BLG15 C7S SERVICE MANUAL Remove wire clamps on pump. Picture 6.111 Drain pump Installation/Removal Water Inlet Hose Installation/Removal 6.22 Remove the upper table. Panel is removed. Front Wall is removed. The clamp attaching the other end of the water inlet hose the drum is removed. ... -
Page 69: Drain Hose Installation/Removal
BLG15 C7S SERVICE MANUAL Drain Hose Installation/Removal 6.23 Remove the upper table. Panel is removed. Front wall is removed. Clamp at the pump inlet of the discharge hose is pulled backwards. Discharge hose is removed from the Pump. ... -
Page 70: List Of Components
BLG15 C7S SERVICE MANUAL 8 LIST OF COMPONENTS SAP should be taken as a basis for the part list. 9 FIGURE AND PICTURE LIST 3.1 P ............................4 ICTURE OWER BOARD 3.2 D ............................4 ICTURE ISPLAY BOARD 3.3 V ............................ - Page 71 BLG15 C7S SERVICE MANUAL 6.30 D .................... 39 ICTURE ETERGENT DRAWER INSTALLATION REMOVAL 6.31 D .................... 39 ICTURE ETERGENT DRAWER INSTALLATION REMOVAL 6.32 D ..................40 ICTURE ISPLAY BOARD ASSEMBLY REMOVAL EMOVAL 6.33 D ..................40 ICTURE ISPLAY BOARD ASSEMBLY REMOVAL EMOVAL 6.34 D ..................
- Page 72 BLG15 C7S SERVICE MANUAL 6.105 S ..........................65 ICTURE HOCK ABSORBER PIN 6.106 ................................. 65 ICTURE 6.107 S ....................66 ICTURE HOCK BSORBER NSTALLATION EMOVAL 6.108 U ..................66 ICTURE PPER OUNTERWEIGHT NSTALLATION EMOVAL 6.109 L ................... 67 ICTURE OWER OUNTERWEIGHT NSTALLATION EMOVAL...