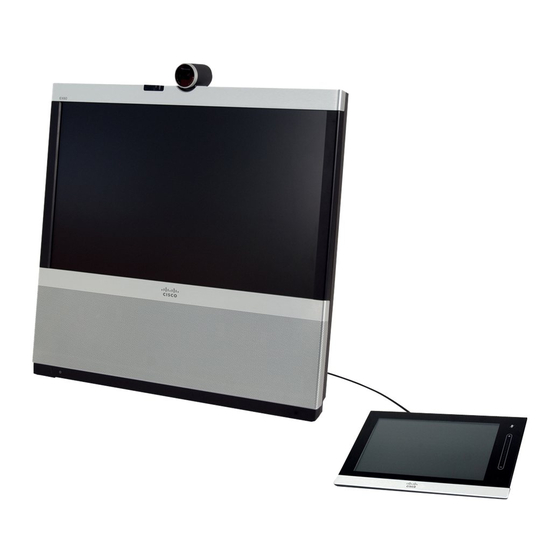
Cisco EX60 User Manual
Telepresence system
Hide thumbs
Also See for EX60:
- Administrator's manual (134 pages) ,
- User manual (75 pages) ,
- Installation manual (6 pages)
Table of Contents
Advertisement
Quick Links
Advertisement
Table of Contents

Related Manuals for Cisco EX60


Summary of Contents for Cisco EX60
- Page 1 All manuals and user guides at all-guides.com Cisco Telepresence System EX60 User guide Software version TC4.0 NOVEMBER 2010 Cisco TelePresence System EX60 User guide EX60, November 2010. D14779.01 www.cisco.com All contents are Copyright © 2010 Cisco Systems, Inc. All rights reserved.
-
Page 2: Table Of Contents
Editing in My contacts ...............17 Receiving calls..................18 Call transfer ....................18 Do not disturb ...................18 Far end camera control ..............18 Sharing presentations ..............18 User guide EX60, November 2010. D14779.01 www.cisco.com All contents are Copyright © 2010 Cisco Systems, Inc. All rights reserved. -
Page 3: Introduction
All manuals and user guides at all-guides.com Cisco Telepresence System EX60 User guide Chapter 1 Introduction www.cisco.com User guide EX60, November 2010. D14779.01 www.cisco.com All contents are Copyright © 2010 Cisco Systems, Inc. All rights reserved. -
Page 4: Disclaimers And Notices
Cisco. www.cisco.com TANDBERG is now part of Cisco. © 2010 Cisco Systems, Inc. User guide EX60, November 2010. D14779.01 www.cisco.com All contents are Copyright © 2010 Cisco Systems, Inc. All rights reserved. -
Page 5: Connecting The Ex60
All manuals and user guides at all-guides.com Cisco Telepresence System EX60 User guide Chapter 2 Connecting the EX60 User guide EX60, November 2010. D14779.01 www.cisco.com All contents are Copyright © 2010 Cisco Systems, Inc. All rights reserved. -
Page 6: Rear Sockets Access
Camera with built-in privacy shutter. one LAN connection only—and need that for your PC—the EX60 has a built in Gigabit ethernet switch that enables you to connect your PC to the EX60 to access the LAN through the EX60. Rear sockets access The Cisco Remove cover to get access to the connector sockets. -
Page 7: Connecting A Pc To The Unit
Mini-jack socket for PC audio. Use as PC screen If you choose to use your EX60 as your PC screen, connect your PC to the sockets on the rear panel as shown above. Your EX60 will then serve as your PC screen outside calls. In a call tap View desktop to see the desktop. -
Page 8: Using The Ex60
All manuals and user guides at all-guides.com Cisco Telepresence System EX60 User guide Chapter 3 Using the EX60 www.cisco.com User guide EX60, November 2010. D14779.01 www.cisco.com All contents are Copyright © 2010 Cisco Systems, Inc. All rights reserved. -
Page 9: Camera Adjustments
The camera can be tilted mechanically in vertical direction. Turn the circumference to activate the privacy shutter. User guide EX60, November 2010. D14779.01 www.cisco.com All contents are Copyright © 2010 Cisco Systems, Inc. All rights reserved. -
Page 10: The Touch Screen Controller-Initial View
Tap the touch pad to wake up the system, if needed. User guide EX60, November 2010. D14779.01 www.cisco.com All contents are Copyright © 2010 Cisco Systems, Inc. All rights reserved. -
Page 11: Initial Settings-Before You Begin
The best view wil be the view that positions your face as high up on the screen as possible without cutting too much off the top of your head. User guide EX60, November 2010. D14779.01 www.cisco.com All contents are Copyright © 2010 Cisco Systems, Inc. All rights reserved. -
Page 12: Calling Someone By Dialing
Tap the green Call button to place the call. Terminate the call by tapping the red Terminate call. User guide EX60, November 2010. D14779.01 www.cisco.com All contents are Copyright © 2010 Cisco Systems, Inc. All rights reserved. -
Page 13: Calling Someone Using Recent Calls
Or you may do nothing—just tap Recent calls sensitive options list, if needed. someone by dialing” on page 15. again to hide the entire Recent calls list. User guide EX60, November 2010. D14779.01 www.cisco.com All contents are Copyright © 2010 Cisco Systems, Inc. All rights reserved. -
Page 14: Calling Someone Using My Contacts
Call the entry now. Edit before calling. Edit the entry itself. Remove the entry. Contract list. User guide EX60, November 2010. D14779.01 www.cisco.com All contents are Copyright © 2010 Cisco Systems, Inc. All rights reserved. -
Page 15: Calling Someone Using The Phone Book
You may expand the list to get the same options as on the previous pages. Tap Call to place the call. User guide EX60, November 2010. D14779.01 www.cisco.com All contents are Copyright © 2010 Cisco Systems, Inc. All rights reserved. -
Page 16: Search The Phone Book, Then Call
The keyboard will now appear. You may expand the list to get the same options as outlined on the previous pages. User guide EX60, November 2010. D14779.01 www.cisco.com All contents are Copyright © 2010 Cisco Systems, Inc. All rights reserved. -
Page 17: Phone Book Matters
Edit if required and tap Save to add the new alerted to confirm. contact to the My contacts list. User guide EX60, November 2010. D14779.01 www.cisco.com All contents are Copyright © 2010 Cisco Systems, Inc. All rights reserved. -
Page 18: Receiving Calls
Pan and zoom the far end camera as needed. If the (Optional feature) other camera cannot be controlled, nothing happens. Press Exit when finished. User guide EX60, November 2010. D14779.01 www.cisco.com All contents are Copyright © 2010 Cisco Systems, Inc. All rights reserved. - Page 19 Chapter 4 The settings—using the Cisco Telepresence touch screen Your EX60 can be configured via the touch screen controller or via its web interface. For full access to all configurable parameters the web interface must be used—the touch screen controller provides access to a limited set of parameters only.
-
Page 20: Setting The Ex60 In Standby
Release the button and the unit will go in shutdown in just a few seconds. To start the system again, press the Power button until the LED illuminates (green light). User guide EX60, November 2010. D14779.01 www.cisco.com All contents are Copyright © 2010 Cisco Systems, Inc. All rights reserved. -
Page 21: Entering The Settings Menus
Select the tab required by tapping on it. Tap Setup. Tap a field to display the corresponding settings. Tap Settings to gain access to the Settings. User guide EX60, November 2010. D14779.01 www.cisco.com All contents are Copyright © 2010 Cisco Systems, Inc. All rights reserved. -
Page 22: Call Settings
H.323. Bandwidth and call rates can be set to 128, 384, 512, 768, 1152, 1920, 2560, 3072, 4000 or 6000 kbps. User guide EX60, November 2010. D14779.01 www.cisco.com All contents are Copyright © 2010 Cisco Systems, Inc. All rights reserved. -
Page 23: Date, Time & Location
• Your preferred date format. • Your preferred time zone. • Whether date and time shall be set automatically or manually. User guide EX60, November 2010. D14779.01 www.cisco.com All contents are Copyright © 2010 Cisco Systems, Inc. All rights reserved. -
Page 24: Ringtone & Sound Settings
Audible tones when tapping keys on or off. • The ringtone volume. • The type of ringtone. Tap a ringtone to hear what it sounds like. User guide EX60, November 2010. D14779.01 www.cisco.com All contents are Copyright © 2010 Cisco Systems, Inc. All rights reserved. -
Page 25: Display Settings
The DVI mode is used when the unit is connected to a PC to serve as a PC monitor. User guide EX60, November 2010. D14779.01 www.cisco.com All contents are Copyright © 2010 Cisco Systems, Inc. All rights reserved. -
Page 26: Camera Control & Settings
Whether Backlight compensation shall be activated or not. Backlight compensation is used to avoid that you appear darker than needed whenever there is much light behind you. User guide EX60, November 2010. D14779.01 www.cisco.com All contents are Copyright © 2010 Cisco Systems, Inc. All rights reserved. -
Page 27: Ip Settings
The use of DHCP or Static IP addresses. If you decide to use Static, make sure you tap Save before leaving the menu. User guide EX60, November 2010. D14779.01 www.cisco.com All contents are Copyright © 2010 Cisco Systems, Inc. All rights reserved. -
Page 28: H.323 Settings
The Gatekeeper address must be specified by you if discovery has been set to manual. • Authentication mode On or Off. If set to On, the EX60 will send Login name and password to the Gatekeeper for authentication. In addition there are: •... -
Page 29: Sip Settings
• Login name and password is required by the VCS. Be sure to: • Tap Save to put settings into effect. User guide EX60, November 2010. D14779.01 www.cisco.com All contents are Copyright © 2010 Cisco Systems, Inc. All rights reserved. -
Page 30: System Information
The System information provides all the system information at a glance. Scroll down to also see status on video inputs (DVI and HDMI). User guide EX60, November 2010. D14779.01 www.cisco.com All contents are Copyright © 2010 Cisco Systems, Inc. All rights reserved. -
Page 31: Call Status
All manuals and user guides at all-guides.com Cisco Telepresence System EX60 User guide Call status The Call status provides all the call status information at a glance. User guide EX60, November 2010. D14779.01 www.cisco.com All contents are Copyright © 2010 Cisco Systems, Inc. All rights reserved. -
Page 32: The Web Interface
All manuals and user guides at all-guides.com Cisco Telepresence System EX60 User guide Chapter 5 The web interface www.cisco.com User guide EX60, November 2010. D14779.01 www.cisco.com All contents are Copyright © 2010 Cisco Systems, Inc. All rights reserved. -
Page 33: Entering The Web Interface
Entering the web interface Key in the IP address of your EX60 in your browser to access its web interface. A detailed description of the options available can be found in the Administrator guide for this product. The Administrator guide is available separately for download. - Page 34 FILES AND SOFTWARE OF THESE SUPPLIERS ARE PROVIDED “AS IS” WITH ALL FAULTS. CISCO AND THE ABOVE-NAMED SUPPLIERS DISCLAIM ALL WARRANTIES, EXPRESSED OR IMPLIED, INCLUDING, WITHOUT LIMITATION, On our web site you will find an overview of the worldwide Cisco THOSE OF MERCHANTABILITY, FITNESS FOR A PARTICULAR PURPOSE AND contacts.