Table of Contents
Advertisement
Quick Links
Advertisement
Table of Contents

Related Manuals for GE HygroTrace


Summary of Contents for GE HygroTrace
- Page 1 Sensing HygroTrace Moisture Transmitter User’s Guide...
- Page 2 Sensing HygroTrace Moisture Transmitter User’s Guide 916-102A3 September 2007 The HygroTrace Moisture Transmitter is a GE Panametrics product. GE Panametrics has joined other GE high-technology sensing businesses under a new name—GE Sensing.
- Page 3 Liability under this warranty is limited to restoring the instrument to normal operation or replacing the instrument, at the sole discretion of GE. Fuses and batteries are specifically excluded from any liability. This warranty is effective from the date of delivery to the original purchaser. If...
- Page 4 1. Notify GE, giving full details of the problem, and provide the model number and serial number of the instrument. If the nature of the problem indicates the need for factory...
-
Page 5: Table Of Contents
Using the HygroTrace ........ -
Page 6: Introduction
This measurement is proportional to the moisture concentration in the sample gas. As a result, the HygroTrace offers the sensitivity and response time needed to effectively measure parts per billion levels of moisture. - Page 7 Tighten any loose fittings. IMPORTANT: Caution must be taken when pressurizing or depressurizing the sample system to prevent damage to the moisture sensor. Figure 1: Sample System Example HygroTrace Moisture Transmitter...
-
Page 8: Insertion Into The Sample System/Process
September 2007 Insertion into the Sample System/Process !CAUTION! If the HygroTrace is being installed directly into the process line, consult the factory for proper installation instructions and precautions before beginning the following procedure. !CAUTION! No maintenance of the sensor can be performed in the field. -
Page 9: Standard Wiring Connections
September 2007 Standard Wiring Connections Note: The HygroTrace is not certified for use in Hazardous (Classified) locations. This procedure is for those units not connected to a computer. The transmitter must be wired using the factory-supplied cable (two meters in length). If an alternate length is required, please contact the factory for assistance. - Page 10 3. Trim any unused leads back to the outer cable jacket in order to remove the bare tinned wire and prevent accidental short circuits. The HygroTrace is now ready for operation. Note: To remove the probe cable, pull back the spring-loaded sleeve and pull the cable out of the connector.
- Page 11 September 2007 Figure 4: Standard Wiring Connections (ref. dwg #702-684) HygroTrace Moisture Transmitter...
-
Page 12: Digital Communications Wiring Connections
Table 2: Cable Lead Connections - with PC Lead Connection Description (+) 24VDC 1 AMP Black (–) 24VDC 1 AMP Orange (+) 4-20mA Output Blue (–) 4-20mA Output White (+) RS485 Green (–) RS485 Cable Braid System Ground HygroTrace Moisture Transmitter... -
Page 13: Powering Up
60 seconds to initialize and begin normal operation. If the sensor has been exposed to ambient conditions of less than 10% RH for less than 72 hours, the HygroTrace will meet its specified accuracy within 24 hours following startup. -
Page 14: Using The Hygrotrace
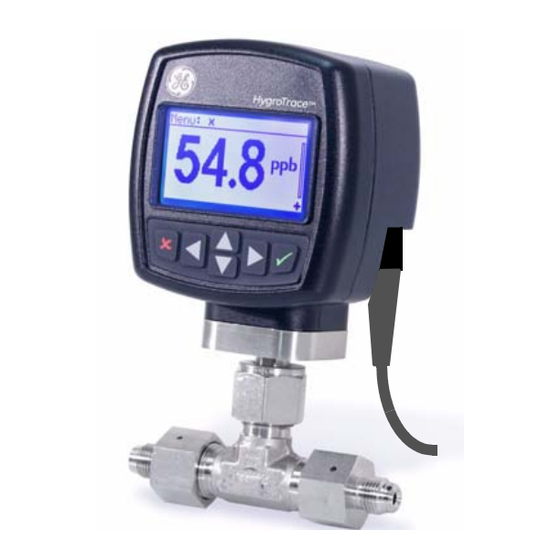
Enter Left Right Down Figure 5: HygroTrace Keypad The HygroTrace has only six keys: four arrow keys, a Cancel key and an Enter key. Use the arrow keys to navigate among menu choices, and to increment/decrement numeric entries. Use the Cancel key to cancel a numeric entry change, or exit a menu. -
Page 15: The Default Display
Unit Symbol - ppb = Parts Per Billion water by volume. • Keypad Lock Indicator - Unlock sequence required to modify • settings. Measurement Progress Bar - HygroTrace takes • ~2 minutes to acquire data and complete the measurement. The progress bar gives a visual indication of the measurement status. -
Page 16: Unlocking The Keypad
Indicator Figure 6: Default Display Unlocking the Keypad After power-on, the HygroTrace keypad is locked. It is necessary to enter the keypad unlock sequence to make any changes to the HygroTrace. Similar to a mobile phone, the HygroTrace will prompt the operator to unlock if any key is pressed. -
Page 17: Entering Numeric Values
Figure 7: Main Menu Entering Numeric Values Since the HygroTrace has no numeric keypad, numeric values are entered using a “combination lock” style of entry: Use the left arrow key and right arrow key to select the digit to change. -
Page 18: Setting Up The Transmitter
September 2007 Setting Up the Transmitter After proper installation, the HygroTrace Transmitter can be set up to accommodate the user’s requirements. Typically, the user may need to configure the analog outputs, trim the analog outputs, and program the digital outputs. Refer to the Menu Map, Figure 9 on page 23, and complete the following steps. -
Page 19: 4-20 Analog Output And Error Reporting
Measurement is valid from 3.8 mA to 20.5 mA. Fault is indicated by ≤3.6 mA or ≥21.0 mA. The HygroTrace has a special operating mode used to dry the sensor (see Sensor Dry Down on page 19). When in Dry Down mode, the unit will report a fixed output of 20.5 mA, the... -
Page 20: Outputs
Span and press Enter. A screen similar to the following appears: Use the arrow keys to change the output value. Press Enter to save (or Cancel to keep the previous value), and return to the Output Menu. HygroTrace Moisture Transmitter... - Page 21 Enter and a screen similar to the following appears. Note: The HygroTrace will attempt to output exactly 4.00 mA. The operator should read the output, in mA, at the DAS or other indicator, and enter that value as follows.
- Page 22 Enter and see a screen similar to the following: Note: The HygroTrace will attempt to output exactly 20.00 mA. The operator should read the output, in mA, at the DAS or other indicator, and enter that value in the following screen.
-
Page 23: User
Cancel. If you select NO or press Cancel, the unit returns to the previous screen and the PPD offset is not cleared. If you select YES, the PPB Offset is cleared and the unit returns to the previous screen. HygroTrace Moisture Transmitter... - Page 24 September 2007 Sensor Dry Down Following factory calibration, the HygroTrace is vacuum packaged to minimize sensor uptake of ambient moisture during shipment and storage. Once the unit is installed in the process or sample system, it is recommended that the user establish a...
-
Page 25: Communications
A screen similar to the following appears. Use the arrow keys to select a new baud rate and press Enter. The number at the top right side of the screen changes. Press Cancel to return to the Comms Menu. HygroTrace Moisture Transmitter... - Page 26 September 2007 Node ID Note: If more than one HygroTrace is on the RS485 network, each unit must have a unique ID. To change the node ID, select Node ID on the Comms Menu, then press Enter and the following screen...
-
Page 27: About
September 2007 About To access HygroTrace copyright and software version information, and instrument data such as unit and sensor serial numbers, the number of sensor hours and the system uptime: Select About on the Main Menu screen and press Enter. The... - Page 28 September 2007 Figure 9: Menu Map HygroTrace Moisture Transmitter...
-
Page 29: Menu Item Descriptions
Erase - Erase the EPROM. 3. Heater Test - Test the heater. a. 50°C to 190°C - Select the temperature for testing. b. OFF - Turn the heater off. c. Resume - Resume normal measurement operation. HygroTrace Moisture Transmitter... - Page 30 Cal Curve - Set a calibration point and edit PPB and ZH values. c. Extrapolation - Set coefficient A and/or B. 5. Reboot - Reboot and return to the initial screen. About - Display Product, Copyright, and Version information. LOCK - Lock the keypad. HygroTrace Moisture Transmitter...
-
Page 31: Specifications
<72 hours @ 25°C and 60% RH Calibrated Uncertainty @ 77°F (25°C): • ±20% of reading or ±5 ppb , whichever is greater Response Time: • Less than 20 min. for 95% of 25 ppb step change HygroTrace Moisture Transmitter... -
Page 32: Electrical
Aluminum construction; black color; powder coated finish • Overall Dimensions (H x W x D): 7.3 in x 4.6 in x 2.5 in (185 mm x 117 mm x 63.5 mm) • Weight: 2.5 lbs (1.13 kg) HygroTrace Moisture Transmitter... -
Page 33: Moisture Sensor
• Each sensor is individually computer-calibrated against known moisture concentrations. Calibration Interval: • Sensor recalibration by GE is recommended every 6 to 12 months depending on the application. Certification • Complies with EMC Directive 89/336/EEC and PED 97/23/EC for DN < 25 •... -
Page 34: Appendix
These menus allow the factory default data, including calibration data and sensor parameters, to be adjusted. Please contact an applications or service engineer at GE Sensing if access to these menus is required. Normal operation of the HygroTrace does not require access to the information contained in these menus. -
Page 35: Service
Update Due to product improvements or software enhancements, it may be necessary to install new software provided by GE Sensing. This is done over the RS485 digital communications link, using a PC application capable of performing an XMODEM file transfer. - Page 36 Dump This function transmits the contents of the EEPROM used for calibration and parameter storage via the RS485 digital link. It is provided to assist GE Sensing service personnel in maintaining the product. To dump the parameter storage, select Dump, press Enter and the following message appears at the top of the screen for a few seconds.
- Page 37 Note: Erase will delete ALL calibration and user settings. The HygroTrace will be incapable of performing accurate measurements until this data is restored. Note: This function is provided to assist GE Sensing service personnel in maintaining the product. To erase the EPROM, select Erase,...
- Page 38 Proceed in the same way to Edit PPB Value and/or ZH Value to change the PPB and/or ZH value for a particular calibration point. Then select the next calibration point and repeat the process. When Edit Cal Curve is complete, press Cancel to return to the Cal Data menu. HygroTrace Moisture Transmitter...
- Page 39 Cancel. If you select NO or press Cancel, the unit returns to the previous screen. If you select YES, a reboot occurs. Note: The HygroTrace returns to power up, proceeds through several initiation displays and returns to normal operation. HygroTrace Moisture Transmitter...
- Page 40 1100 Technology Park Drive Billerica, MA 01821-4111 Web: www.gesensing.com Ireland Sensing House Shannon Free Zone East Shannon, Co. Clare Ireland...