Table of Contents
Advertisement
Quick Links
Advertisement
Table of Contents

Related Manuals for AEG BPS331120M


Summary of Contents for AEG BPS331120M
- Page 1 BPS331120M User Manual Oven USER MANUAL...
-
Page 2: Table Of Contents
13. ENERGY EFFICIENCY..................35 FOR PERFECT RESULTS Thank you for choosing this AEG product. We have created it to give you impeccable performance for many years, with innovative technologies that help make life simpler – features you might not find on ordinary appliances. Please spend a few minutes reading to get the very best from it. - Page 3 ENGLISH responsible for any injuries or damage that are the result of incorrect installation or usage. Always keep the instructions in a safe and accessible location for future reference. 1.1 Children and vulnerable people safety This appliance can be used by children aged from 8 •...
-
Page 4: Safety Instructions
WARNING: Ensure that the appliance is switched off • before replacing the lamp to avoid the possibility of electric shock. Do not use the appliance before installing it in the • built-in structure. Do not use a steam cleaner to clean the appliance. - Page 5 ENGLISH • The shock protection of live and insulated parts must be fastened in Height of the back of 576 mm such a way that it cannot be removed the appliance without tools. • Connect the mains plug to the mains Width of the front of 549 mm socket only at the end of the...
- Page 6 2.4 Care and cleaning • Open the appliance door carefully. The use of ingredients with alcohol can cause a mixture of alcohol and WARNING! air. Risk of injury, fire, or • Do not let sparks or open flames to damage to the appliance.
- Page 7 ENGLISH • Pyrolytic cleaning is a high • Concerning the lamp(s) inside this temperature operation that can product and spare part lamps sold release fumes from cooking residues separately: These lamps are intended and construction materials, as such to withstand extreme physical consumers are strongly advised to: conditions in household appliances, –...
-
Page 8: Product Description
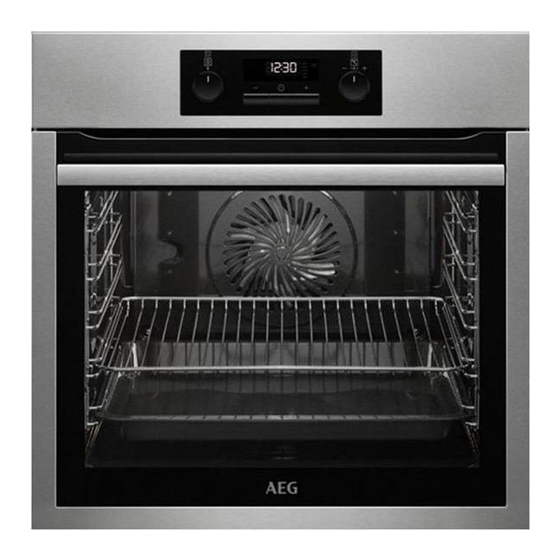
3. PRODUCT DESCRIPTION 3.1 General overview Control panel Knob for the heating functions Power lamp / symbol Display Control knob (for the temperature) Temperature indicator / symbol Heating element Lamp Shelf support, removable Shelf positions 3.2 Accessories For cakes and biscuits. To bake and roast or as a pan to collect fat. -
Page 9: Before First Use
ENGLISH 4.2 Sensor fields / Buttons To set the time. To set a clock function. To set the time. 4.3 Display A. Timer / Temperature B. Heat-up and residual heat indicator C. Food Sensor (selected models only) D. Door lock (selected models only) E. -
Page 10: Daily Use
Preheat the empty oven before the first use. Step 3 Set the maximum temperature for the function: Let the oven operate for 15 min. The oven can emit an odour and smoke during preheating. Make sure that the room is ventilated. -
Page 11: Clock Functions
ENGLISH Heating func‐ Application Heating func‐ Application tion tion This function is designed To turn on the pyrolytic to save energy during cleaning of the oven. cooking. When you use Moist Fan Pyrolysis this function, the temper‐ Baking ature in the cavity may The lamp may turn off differ from the set tem‐... - Page 12 Clock function Application To set a countdown time. This function has no effect on the operation of the oven. Minute Minder Minute Minder - can be set at any time, also if the oven is off. 00:00 If you do not set any other clock function the function Count Up Timer automatically monitors how long the oven works.
- Page 13 ENGLISH 7.4 How to set function: End Time Step 1 Set a heating function. Step 2 - press repeatedly. - starts to flash. Step 3 - press to set the hour. - press to confirm. Step 4 - press to set the minutes. - press to confirm.
-
Page 14: Using The Accessories
Step 1 - press repeatedly. , 00 - flash. Step 2 - press to set the seconds and than the minutes. When the time you set is longer than 60 min, hr flashes. Step 3 Set the hours. Minute Minder - starts automatically after 5 sec. - Page 15 ENGLISH Deep pan: Push the tray between the guide bars of the shelf support. Wire shelf, Deep pan: Push the tray between the guide bars of the shelf support and the wire shelf on the guide bars above. 8.2 Using telescopic runners Make sure you push back the telescopic runners fully in the oven before you close Do not oil the telescopic runners.
-
Page 16: Additional Functions
Wire shelf and deep pan together: Place the wire shelf and the deep pan to‐ gether on the telescopic runner. 9. ADDITIONAL FUNCTIONS 9.1 How to use: Child lock works and you do not change any settings. When the function is on the oven cannot be turned on accidentally. - Page 17 ENGLISH 10.1 Cooking recommendations The temperature and cooking times in the tables are guidelines only. They depend on the recipes and the quality and quantity of the ingredients used. Your oven may bake or roast differently to the oven you had before. The tables below show recommended settings for temperature, cooking time and shelf position for specific types of the food.
- Page 18 10.5 Baking on one shelf level BAKING IN (°C) (min) TINS Flan base - True Fan Cooking 170 - 180 10 - 25 short pastry, preheat the empty oven Flan base - True Fan Cooking 150 - 170 20 - 25...
- Page 19 ENGLISH CAKES / PASTRIES / (°C) (min) BREADS Buttered almond 190 - 210 20 - 30 cake / Sugar cakes Cream puffs / Eclairs 190 - 210 20 - 35 Plaited bread / Bread 170 - 190 30 - 40 crown Fruit flans (made of 35 - 55...
- Page 20 (°C) (min) Baguettes topped with True Fan Cooking 160 - 170 15 - 30 melted cheese Vegetables au gratin, Turbo Grilling 160 - 170 15 - 30 preheat the empty oven Lasagne Conventional Cooking 180 - 200 25 - 40...
- Page 21 ENGLISH BIS‐ CUITS / SMALL (°C) (min) 2 positions 3 positions CAKES / PAS‐ TRIES / ROLLS Puff pastries, 170 - 180 30 - 50 1 / 4 preheat the empty oven Biscuits made of 160 - 170 30 - 60 1 / 4 yeast dough Macaroons...
- Page 22 PORK Use the function: Turbo Grilling. (kg) (°C) (min) Shoulder / Neck / Ham 1 - 1.5 160 - 180 90 - 120 joint Chops / Spare rib 1 - 1.5 170 - 180 60 - 90 Meatloaf 0.75 - 1...
- Page 23 ENGLISH GAME Use the function: Conventional Cooking. (kg) (°C) (min) Saddle / Hare leg, up to 1 30 - 40 preheat the empty oven Venison saddle 1.5 - 2 210 - 220 35 - 40 Haunch of venison 1.5 - 2 180 - 200 60 - 90 POULTRY...
- Page 24 10.10 Crispy baking with: Pizza Function PIZZA PIZZA Preheat the empty oven before cooking. Use the first shelf position. Use the second shelf position. (°C) (min) Tarts 180 - 200 40 - 55 (°C) (min) Spinach flan 160 - 180...
- Page 25 ENGLISH GRILL Use the function: Grill (°C) (min) (min) 1st side 2nd side Roast beef 210 - 230 30 - 40 30 - 40 Beef fillet 20 - 30 20 - 30 Pork loin 210 - 230 30 - 40 30 - 40 Veal loin 210 - 230...
- Page 26 DEFROSTING Use the function: True Fan Cooking. (°C) (min) Lasagne / Cannelloni, fro‐ 160 - 180 40 - 60 Baked cheese 170 - 190 20 - 30 Chicken wings 190 - 210 20 - 30 10.13 Defrost the oven cavity. Put the food in a deep...
- Page 27 ENGLISH Do not use jars with twist-off and bayonet type lids or metal tins. Use the first shelf position. VEGETA‐ (min) (min) Put no more than six one-litre preserve BLES Cooking Continue to jars on the baking tray. time until cook at 100 Fill the jars equally and close with a simmering...
- Page 28 10.16 Moist Fan Baking - recommended accessories Use the dark and non-reflective tins and containers. They have better heat absorption than the light colour and reflective dishes. Ramekins Pizza pan Baking dish Flan base tin Ceramic Dark, non-reflective Dark, non-reflective...
- Page 29 ENGLISH BAKING ON ONE LEVEL. Baking in tins (°C) (min) Fatless sponge cake True Fan Cooking 140 - 150 35 - 50 Fatless sponge cake Conventional Cook‐ 35 - 50 Apple pie, 2 tins Ø20 True Fan Cooking 60 - 90 Apple pie, 2 tins Ø20 Conventional Cook‐...
-
Page 30: Care And Cleaning
GRILL Preheat the empty oven for 5 minutes. Grill with the maximum temperature setting. (min) Toast Grill 1 - 3 Beef steak, turn halfway Grill 24 - 30 through 11. CARE AND CLEANING WARNING! Refer to Safety chapters. 11.1 Notes on cleaning Clean the front of the oven with a soft cloth with warm water and a mild detergent. - Page 31 ENGLISH 11.2 How to remove: Shelf supports Remove the shelf supports to clean the oven. Step 1 Turn off the oven and wait un‐ til it is cold. Step 2 Pull the front of the shelf sup‐ port away from the side wall. Step 3 Pull the rear end of the shelf support away from the side...
- Page 32 Step 3 - press to start the cleaning. Step 4 After cleaning, turn the knob for the heating functions to the off position. During the cleaning the oven lamp is off. The oven door stays locked. When the oven is cold, the door unlocks.
- Page 33 ENGLISH Step 4 Hold the door trim (B) on the top edge of the door at the two sides and push in‐ wards to release the clip seal. Step 5 Pull the door trim to the front to remove it. Step 6 Hold the door glass panels on their top edge one by...
-
Page 34: Troubleshooting
Step 4 Install the glass cover. 12. TROUBLESHOOTING WARNING! Refer to Safety chapters. Error codes 12.1 What to do if... The oven door is In any cases not included in this table closed or the door please contact with an Authorised lock is not broken. -
Page 35: Energy Efficiency
......... Serial number (S.N.) ......... 13. ENERGY EFFICIENCY 13.1 Product Information and Product Information Sheet* Supplier's name Model identification BPS331120M 944187916 Energy Efficiency Index 81.2 Energy efficiency class Energy consumption with a standard load, conven‐ 1.09 kWh/cycle tional mode Energy consumption with a standard load, fan-forced 0.69 kWh/cycle... - Page 36 13.2 Energy saving heating elements automatically turn off earlier in some oven functions. The oven has features which The fan and lamp continue to operate. help you save energy during When you turn off the oven, the display everyday cooking.
- Page 40 www.aeg.com/shop...