Linksys AM300 User Manual
Hide thumbs
Also See for AM300:
- Quick configuration manual (7 pages) ,
- Installation manual (15 pages) ,
- Configuration manual (3 pages)
Table of Contents
Advertisement
Quick Links
Advertisement
Table of Contents

Related Manuals for Linksys AM300


Summary of Contents for Linksys AM300
- Page 1 ADSL Modem User Guide WIRED AM300 Model No.
- Page 2 ADSL Modem Copyright and Trademarks Specifications are subject to change without notice. Linksys is a registered trademark or trademark of Cisco Systems, Inc. and/or its affiliates in the U.S. and certain other countries. Copyright © 2006 Cisco Systems, Inc. All rights reserved.
-
Page 3: Table Of Contents
ADSL Modem Table of Contents Chapter 1: Introduction Welcome What’s in this Guide? Chapter 2: Getting to Know the ADSL Modem The Back Panel The Front Panel Chapter 3: Connecting the ADSL Modem Overview Wall-Mount Option Connecting Using the Ethernet Port Connecting Using the USB Port Chapter 4: Configuring the ADSL Modem Overview... - Page 4 ADSL Modem List of Figures Figure 2-1: Back Panel Figure 2-2: Front Panel Figure 3-1: DSL Connection Figure 3-2: DSL Connection Figure 3-3: Ethernet Connection Figure 3-4: Power Connection Figure 3-5: DSL Connection Figure 3-6: Power Connection Figure 3-7: USB Connection Figure 3-1: Setup Wizard Figure 3-2: DSL Connection Figure 3-3: Power Connection...
- Page 5 ADSL Modem Figure 4-16: Access Control Edit Figure 4-17: Schedule Rule Figure 4-18: Edit Schedule Rule Figure 4-19: MAC Filtering Figure 4-20: URL Blocking Figure 4-21: Intrusion Detection Figure 4-22: VPN Passthrough Figure 4-23: Port Range Forwarding Figure 4-24: Port Triggering Figure 4-25: NAT Mapping Table Figure 4-26: NAT Mapping Table Details Figure 4-27: DMZ...
-
Page 6: Chapter 1: Introduction
Installation is quick and simple. Connect it directly to any PC with an available USB or Ethernet port, and you’re ready to surf the Internet. Or connect it to a Linksys router and share that high-speed Internet access with everyone on your home network. - Page 7 • Appendix F: Regulatory Information This appendix supplies the regulatory information regarding the ADSL Modem. • Appendix G: Contact Information This appendix provides contact information for a variety of Linksys resources, including Technical Support. Chapter 1: Introduction What’s in this Guide?
-
Page 8: Chapter 2: Getting To Know The Adsl Modem
Power The Power port is where you connect the power adapter. With these and many other Linksys products, your networking options are limitless. Go to the Linksys international website at www.linksys.com/international for more information about products that work with the Modem. -
Page 9: The Front Panel
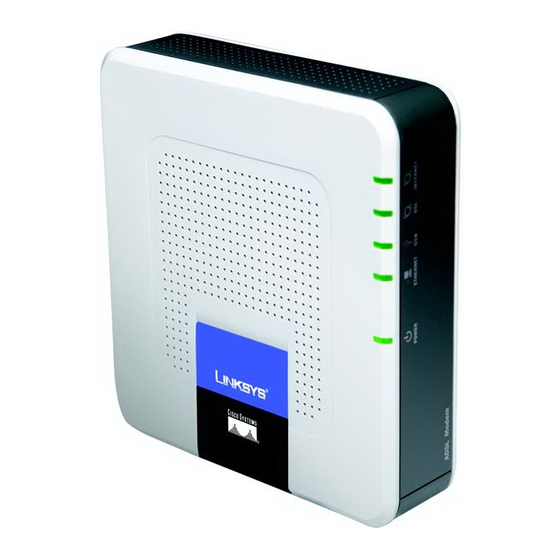
ADSL Modem The Front Panel The Modem's LEDs, where information about network activity is displayed, are located on the front panel. Figure 2-2: Front Panel Power Green. The Power LED lights up when the Modem is powered on. Ethernet Green. The Ethernet LED serves two purposes. If the LED is continuously lit, the Modem is successfully connected to a device through the Ethernet port. -
Page 10: Chapter 3: Connecting The Adsl Modem
ADSL Modem Chapter 3: Connecting the ADSL Modem Overview In this chapter, you will connect the Modem to your DSL line and to a computer in your home or business. It is not necessary to mount your Modem, but may be useful to conserve space. There are 2 slots on the underside of the Modem that can be used for wall mounting. -
Page 11: Connecting Using The Ethernet Port
ADSL Modem Connecting Using the Ethernet Port 1. Connect one end of the provided phone cable to the DSL (RJ-11 phone) port that is on the back of your Modem. Connect the other end of the phone cable to the wall jack with DSL service. NOTE: A small device called a microfilter (not included) may be necessary between each phone and wall jack to prevent interference. -
Page 12: Connecting Using The Usb Port
ADSL Modem Connecting Using the USB Port IMPORTANT: Before connecting the Modem to the USB port, run the Setup Wizard on the CD-ROM and select Install USB Driver. The necessary driver software will be installed on your computer. To launch the Setup Wizard, insert the Setup Wizard CD in to your CD-ROM drive and the Setup Wizard will begin. -
Page 13: Chapter 4: Configuring The Adsl Modem
ADSL Modem Chapter 4: Configuring the ADSL Modem Overview Follow the steps in this chapter and use the Modem’s web-based utility to configure the Modem. This chapter will Have You: Enabled TCP/IP on your computers? describe each web page in the Utility and each page’s key functions. The utility can be accessed via your web computers communicate over the network with browser through use of a computer connected to the Modem. - Page 14 ADSL Modem • Port Triggering. To set up triggered ranges and forwarded ranges for Internet applications, click this tab. • NAT Mapping Table. This table displays the current NAPT address mappings. • DMZ. To allow one local user to be exposed to the Internet for use of special-purpose services, use this screen.
-
Page 15: How To Access The Web-Based Utility
ADSL Modem How to Access the Web-based Utility To access the web-based utility, launch Internet Explorer or Netscape Navigator, and enter the Modem’s default IP address, 192.168.1.1, in the Address field. Then press Enter. A Log In screen appears. Enter admin (the default user name) in the Username field, and enter admin (the default password) in the Password field. -
Page 16: Figure 4-3: Dynamic Ip
ADSL Modem RFC 1483 Bridged Dynamic IP IP Settings. Select Obtain an IP Address Automatically if your ISP says you are connecting through a dynamic IP address. Static IP If you are required to use a permanent (static) IP address to connect to the Internet, then select Use the following IP Address. -
Page 17: Figure 4-6: Rfc 2516 Pppoe
ADSL Modem RFC 2516 PPPoE Some DSL-based ISP’s use PPPoE (Point-to-Point Protocol over Ethernet) to establish Internet connections. If you are connected to the Internet through a DSL line, check with your ISP to see if they use PPPoE. If they do, you will have to enable PPPoE. -
Page 18: Figure 4-8: Bridged Mode Only
ADSL Modem Bridged Mode Only If you are using your Modem as a bridge, which makes the Modem act like a stand-alone modem, select Bridged Mode Only. All NAT and routing settings are disabled in this mode. Optional Settings (required by some ISP’s) •... -
Page 19: Figure 4-9: Optional Settings
ADSL Modem Time Setup • Set Time Zone. Select the appropriate time zone for the Modem’s location. If appropriate, check the Automatically adjust clock for daylight saving changes checkbox. • Configure Time Server (NTP). When the Automatic Time Server Maintenance checkbox is selected, the Current Date and Time are synchronized to the selected Primary Server or Secondary Server (if the Primary is unavailable) over the Internet. -
Page 20: Figure 4-10: Dyndns.org
ADSL Modem DDNS The Modem offers a Dynamic Domain Name System (DDNS) feature. DDNS lets you assign a fixed host and domain name to a dynamic Internet IP address. It is useful when you are hosting your own website, FTP server, or other server behind the Modem. -
Page 21: Figure 4-12: Advanced Routing
ADSL Modem Advanced Routing The Advanced Routing screen allows you to configure the dynamic routing and static routing settings. • Operating Mode. If you want to use Static Routing, select Gateway from the drop-down menu. If you have more than one router in your network and you need to use Dynamic Routing, select Router. from the drop- down menu. -
Page 22: The Security Tab
ADSL Modem The Security Tab Firewall When you click the Security tab, you will see the Firewall screen. You can add Firewall Protection and Filter Multicast. Figure 4-14: Firewall • Firewall Protection. To add Firewall Protection, click Enabled. If you do not want Firewall Protection, click Disabled. -
Page 23: Figure 4-15: Access Control
ADSL Modem Access Control Access Control allows users to define the traffic type permitted or not permitted to WAN port service. This page allows you to define service limitations of client PCs, including IP addresses, service type, and scheduling rule criteria. -
Page 24: Figure 4-17: Schedule Rule
ADSL Modem Schedule Rule To set time periods for filtering or access, click Add Schedule Rule. The Schedule Rule Table displays these scheduling rules. • Name/Comment. Choose a name for the rule (example: NoSurfingAfter10PM) and enter it in the Name field. Enter a definition or comment for the rule (example: Block kids from Web after 10) in the Comment field. -
Page 25: Figure 4-19: Mac Filtering
ADSL Modem MAC Filter This screen allows you to filter by MAC address. To filter by MAC address, enable MAC Address Control, then enter up to 32 MAC addresses or copy the MAC addresses from the DHCP Client List drop down menu. Control •... -
Page 26: Figure 4-21: Intrusion Detection
ADSL Modem Intrusion Detection This screen allows common hacker attacks to be blocked. All of these types of intrusions are blocked by default. If you want to allow the traffic for a service through, check the box for the desired service. Intrusion Detection Features include RIP defect and Discard Ping to WAN. -
Page 27: The Applications And Gaming Tab
ADSL Modem The Applications and Gaming Tab The Applications and Gaming Tab allows you to set up public services on your network, such as web servers, FTP servers, e-mail servers, or other specialized Internet applications. (Specialized Internet applications are any applications that use Internet access to perform functions such as videoconferencing or online gaming. -
Page 28: Figure 4-24: Port Triggering
ADSL Modem Port Triggering Port Triggering is used for special applications that can request a port to be opened on demand. For this feature, the Modem will watch outgoing data for specific port numbers. The Modem will remember the IP address of the computer that sends a transmission requesting data, so that when the requested data returns through the Modem, the data is pulled back to the proper computer by way of IP address and port mapping rules. -
Page 29: Figure 4-27: Dmz
ADSL Modem The DMZ screen allows one local user to be exposed to the Internet for use of a special-purpose service such as Internet gaming and videoconferencing through DMZ hosting. DMZ hosting forwards all the ports for one computer at the same time, which differs from Port Range Forwarding, which can only forward a maximum of 10 ranges of ports. -
Page 30: The Administration Tab
ADSL Modem The Administration Tab Management This section of the Administration tab allows the network’s administrator to manage specific Modem functions for access and security. Local Modem Access. You can change the Modem’s password from here. Enter a new Modem password and then type it again in the Re-enter to confirm field to confirm. -
Page 31: Figure 4-30: Log
ADSL Modem SNMP Trap Trap to. Enter the IP address of the remote host computer that will receive the trap messages. Community. The community name functions as a password for sending trap notifications to the target SNMP program. It is useful to manage multiple devices at the same. Enter the name of the community you’re using. Version. -
Page 32: Figure 4-33: Diagnostic Tests
ADSL Modem Diagnostics The diagnostic tests (Ping and Traceroute) allow you to check the connections of your network components. Ping Test. The Ping test will check the status of a connection. Click the Ping button to open the Ping Test screen. Enter the address of the PC whose connection you wish to test and how many times you wish to test it. -
Page 33: Figure 4-36: Firmware Upgrade
Firmware can be upgraded by clicking the Upgrade button after browsing for the firmware, which you can download from the Linksys website. Do not upgrade your firmware unless you are experiencing problems with the Modem. For more information about upgrading firmware, refer to “Appendix C: Upgrading Firmware”. -
Page 34: The Status Tab
ADSL Modem The Status Tab Modem This screen displays information about your Modem and its Internet connection. Modem Information Modem Information displays the Software Version, ADSL Version, Boot Code Version, and MAC Address. DSL Status The DSL Status will be displayed after connecting to the DSL. They are the DSL Status, DSL Modulation Mode, DSL Path Mode, Downstream Rate, Upstream Rate, Downstream Margin, Upstream Margin, Downstream Line Figure 4-39: Status Attenuation, Upstream Line Attenuation, Downstream Transit Power, Upstream Transit Power, and LOS Errors. -
Page 35: Appendix A: Troubleshooting
Provided are possible solutions to problems that may occur during the installation and operation of the Modem. Read the descriptions below to help you solve your problems. If you can’t find an answer here, check the Linksys international website at www.linksys.com/international. - Page 36 ADSL Modem 7. Toward the bottom of the window, select Use the following DNS server addresses, and enter the Preferred DNS server and Alternative DNS server (provided by your ISP). Contact your ISP or go on its website to find the information. 8.
- Page 37 5. I need to upgrade the firmware. In order to upgrade the firmware with the latest features, you need to go to the Linksys website and download the latest firmware at www.linksys.com. • Follow these steps: 1.
-
Page 38: Frequently Asked Questions
ADSL Modem 7. The Power LED flashes continuously. The Power LED lights up when the device is first powered up. In the meantime, the system will boot up itself and check for proper operation. After finishing the checking procedure, the LED remains steady to show that the system is working fine. - Page 39 Does the Modem support any operating system other than Windows 98SE, Windows Millennium, Windows 2000, or Windows XP? Yes, but Linksys does not, at this time, provide technical support for setup, configuration or troubleshooting of any non-Windows operating systems. The web page hangs; downloads are corrupt, or nothing but junk characters are being displayed on the screen.
-
Page 40: Appendix B: Upgrading Firmware
Administration tab. Follow these instructions:. Firmware Upgrade 1. Click the Browse button to find the firmware upgrade file that you downloaded from the Linksys website and then extracted. 2. Double-click the firmware file you downloaded and extracted. Click the Upgrade button, and follow the instructions there. -
Page 41: Appendix C: Glossary
This glossary contains some basic networking terms you may come across when using this product. For more advanced terms, see the complete Linksys glossary at http://www.linksys.com/glossary. Access Point - A device that allows wireless-equipped computers and other devices to communicate with a wired network. - Page 42 ADSL Modem DMZ (Demilitarized Zone) - Removes the Router's firewall protection from one PC, allowing it to be “seen” from the Internet. DNS (Domain Name Server) - The IP address of your ISP's server, which translates the names of websites into IP addresses.
- Page 43 Passphrase - Used much like a password, a passphrase simplifies the WEP encryption process by automatically generating the WEP encryption keys for Linksys products. Ping (Packet INternet Groper) - An Internet utility used to determine whether a particular IP address is online.
- Page 44 ADSL Modem RJ-45 (Registered Jack-45) - An Ethernet connector that holds up to eight wires. Roaming - The ability to take a wireless device from one access point's range to another without losing the connection. Router - A networking device that connects multiple networks together. Server - Any computer whose function in a network is to provide user access to files, printing, communications, and other services.
- Page 45 ADSL Modem TKIP (Temporal Key Integrity Protocol) - a wireless encryption protocol that provides dynamic encryption keys for each packet transmitted. Topology - The physical layout of a network. TX Rate - Transmission Rate. Upgrade - To replace existing software or firmware with a newer version. Upload - To transmit a file over a network.
-
Page 46: Appendix D: Specifications
ADSL Modem Appendix D: Specifications Standards IEEE 802.3, IEEE 802.3u, G.992.1 (G.dmt), G.992.2 (G.lite), G.922.3, G.992.5, T1.413i2, USB 1.1 Ports Power, Line (ADSL), LAN (1), USB (1) Buttons Reset Cabling Type UDP CAT 5 or better, Phone Cable (RJ-11), USB cable LEDs Power, Ethernet, USB, DSL, Internet Dimensions... -
Page 47: Appendix E: Warranty Information
Your exclusive remedy and Linksys' entire liability under this warranty will be for Linksys at its option to repair or replace the Product or refund Your purchase price less any rebates. This limited warranty extends only to the original purchaser. -
Page 48: Appendix F: Regulatory Information
ADSL Modem Appendix F: Regulatory Information FCC Statement This product has been tested and complies with the specifications for a Class B digital device, pursuant to Part 15 of the FCC Rules. These limits are designed to provide reasonable protection against harmful interference in a residential installation. - Page 49 Equipment (WEEE) This document contains important information for users with regards to the proper disposal and recycling of Linksys products. Consumers are required to comply with this notice for all electronic products bearing the following symbol: Appendix F: Regulatory Information...
- Page 50 ADSL Modem Appendix F: Regulatory Information...
- Page 51 ADSL Modem Appendix F: Regulatory Information...
- Page 52 ADSL Modem Appendix F: Regulatory Information...
- Page 53 ADSL Modem For more information, visit www.linksys.com. Appendix F: Regulatory Information...
-
Page 54: Appendix G: Contact Information
Appendix G: Contact Information Need to contact Linksys? Visit us online for information on the latest products and updates to your existing products at: http://www.linksys.com/international If you experience problems with any Linksys product, you can e-mail us at: In Europe E-mail Address Austria support.at@linksys.com...