Sony Airpeak S1 Help Manual
Hide thumbs
Also See for Airpeak S1:
- Specifications (2 pages) ,
- Integration manual (12 pages) ,
- Startup manual (56 pages)
Table of Contents
Advertisement
Quick Links
Help Guide
Airpeak S1
ARS-S1
This manual explains the basic usage of ARS-S1.
Operating an aircraft in the United States is subject to federal law and regulations. State and local ordinances may also
apply to certain operations. When operating an aircraft, it is the remote pilot/operator's responsibility to always comply
with applicable laws, regulations, and ordinances.
Before first use
About this product
Introduction
Supported mobile devices
Supported cameras and lenses
Package contents
Guide to parts and controls
Parts and controls (Aircraft)
Detection range of the infrared range sensors and stereo cameras
Parts and controls (Remote controller)
Parts and controls (Gimbal (sold separately))
1
Advertisement
Table of Contents

Related Manuals for Sony Airpeak S1


Summary of Contents for Sony Airpeak S1
- Page 1 Help Guide Airpeak S1 ARS-S1 This manual explains the basic usage of ARS-S1. Operating an aircraft in the United States is subject to federal law and regulations. State and local ordinances may also apply to certain operations. When operating an aircraft, it is the remote pilot/operator's responsibility to always comply with applicable laws, regulations, and ordinances.
- Page 2 Using the dedicated apps Using the “Airpeak Base” App Features of the “Airpeak Base” App Using the “Airpeak Flight” App Installing the “Airpeak Flight” App Signing in to the “Airpeak Flight” App Features of the “Airpeak Flight” App Getting ready Preparing the batteries Charging the batteries If you cannot charge the aircraft battery pack...
- Page 3 Setting the flight mode Selecting the wireless channel Controlling the aircraft with two remote controllers (dual operation mode) Selecting the operating mode of the control sticks Adjusting the sensitivity of the control sticks Changing the functions assigned to the custom buttons, lever, or dial on the remote controller Configuring the gimbal settings Checking settings before flights Flight precautions...
- Page 4 Maintaining the devices Checking the status of the devices Calibrating the sensors of the aircraft Calibrating the remote controller Updating the system software Before disposing of this product Precautions General Information Troubleshooting Trademarks and copyrights 5-027-737-11(1) Copyright 2021 Sony Group Corporation...
-
Page 5: System Configuration
Sony is not liable or responsible for any experience, including but not limited to videography, photography, content, income, fees, and/or other compensation associated with or related to the use and/or misuse of the aircraft, its parts, and/or accessories including hardware and software. - Page 6 Screen images and illustrations in this Help Guide (web manual) may vary from the actual product. Design and specifications are subject to change without notice. 5-027-737-11(1) Copyright 2021 Sony Group Corporation...
-
Page 7: Supported Mobile Devices
Help Guide Airpeak S1 ARS-S1 Supported mobile devices Visit the support site for details on mobile devices you can use. https://electronics.sony.com/airpeak/support/compatibility 5-027-737-11(1) Copyright 2021 Sony Group Corporation... - Page 8 Help Guide Airpeak S1 ARS-S1 Supported cameras and lenses Visit the support site for details on camera bodies and lenses you can use. https://electronics.sony.com/airpeak/support/compatibility 5-027-737-11(1) Copyright 2021 Sony Group Corporation...
-
Page 9: Package Contents
Help Guide Airpeak S1 ARS-S1 Package contents Contact the place of purchase or Sony Customer Support if any components are missing. Quantities are indicated in parentheses. Note Please retain the cushionings as they will be used when assembling the aircraft. - Page 10 AC adapter for remote controller (1)/power cord (1) Remote controller (1) Battery pack (2) Aircraft (1) Cables Power cable (aircraft — gimbal) (1) Control cable (aircraft — gimbal) (1)
- Page 11 ® USB Type-C cable (aircraft — gimbal) (1) Micro USB cable (gimbal — camera) (1) (a) Micro USB ® USB Type-C cable (gimbal — camera) (1) ® (b) USB Type-C AC adapter for battery charger (1)/power cord (1) Battery charger (1) Calibration board (1) Landing gear (2) (*1)
- Page 12 Hot shoe adapter (1) Top camera screw (1) Camera plate (1) Micro USB cable (gimbal — computer) (1) Hot shoe extension (1) Hex screw (10) (including two spare screws) Hex wrench (1) Quick-release is preinstalled. 5-027-737-11(1) Copyright 2021 Sony Group Corporation...
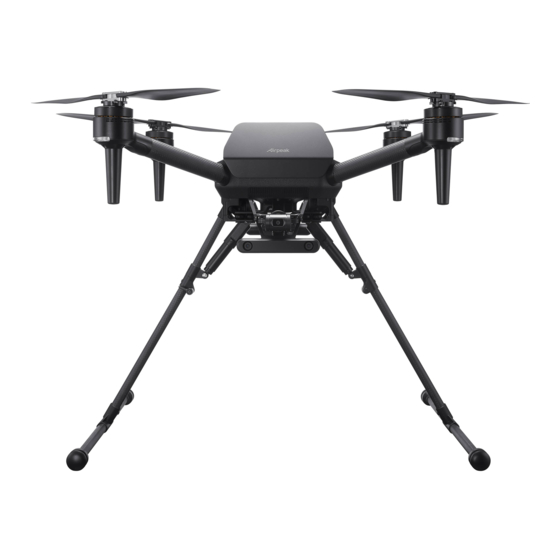
- Page 13 Help Guide Airpeak S1 ARS-S1 Parts and controls (Aircraft) The locations of the parts and controls of the aircraft are shown below. Front Rear...
- Page 14 Upward infrared range sensor Detects objects above and measures the distance to them. Propellers Motors Flight status LEDs (Front LEDs) Light up in red while the aircraft is turned on to indicate the front direction. Antennas (built-in) Frame arms FPV gimbal camera Images from this camera are displayed in the FPV view in the “Airpeak Flight”...
-
Page 15: Status Notifications
LINK button Press to link the aircraft and the remote controller. BATTERY RELEASE levers Power status LED Indicates the status of the aircraft. LED color LED indication Status of the aircraft Green Lit up Turned on Cyan Lit up Receiving system software data. Green, red, and yellow Blinking alternately Updating system software. - Page 16 Related Topic Connecting cables to the aircraft Attaching the damping plate to the aircraft Attaching landing gear Attaching the propellers Setting the flight mode Turning the aircraft on/off Calibrating the sensors of the aircraft 5-027-737-11(1) Copyright 2021 Sony Group Corporation...
-
Page 17: Rear View
Help Guide Airpeak S1 ARS-S1 Detection range of the infrared range sensors and stereo cameras The aircraft is equipped with two infrared range sensors and five stereo cameras. They enable stable flight and hovering by detecting objects around the aircraft and measuring the distance to them. -
Page 18: Front View
(a) 3 m (b) 15° (c) 100 mm Detection range of the stereo cameras The detection range of the stereo cameras is as shown in the illustrations below. Objects in the gray areas in the illustrations are outside the detection range, which means they cannot be detected. Be cautious when you fly the aircraft. Front view (a) 80°... - Page 19 (a) 80° (b) 54 m Related Topic Parts and controls (Aircraft) Calibrating the sensors of the aircraft 5-027-737-11(1) Copyright 2021 Sony Group Corporation...
- Page 20 Help Guide Airpeak S1 ARS-S1 Parts and controls (Remote controller) The locations of the parts and controls of the remote controller are shown below.
-
Page 21: Operation
Status LED Indicates the status of the remote controller. LED color LED indication Status of the remote controller None Turned off Green Lit up Not connected to the aircraft Blue Lit up Connected to the aircraft as the main controller Purple Lit up Connected to the aircraft as the sub controller... - Page 22 Operation Result Press and hold for 5 seconds The remote controller turns off. Press and hold for 2 seconds while the The remote controller enters a standby state. Press and hold for 2 remote controller is turned on seconds once again to wake it up from the standby state. Press and hold for 10 seconds The remote controller is forcibly turned off.
- Page 23 Controlling the aircraft with two remote controllers (dual operation mode) Changing the functions assigned to the custom buttons, lever, or dial on the remote controller Turning the remote controller on/off Parts for flight operations Parts for shooting operations Calibrating the remote controller 5-027-737-11(1) Copyright 2021 Sony Group Corporation...
- Page 24 Help Guide Airpeak S1 ARS-S1 Parts and controls (Gimbal (sold separately)) The locations of the parts and controls of the gimbal (sold separately) are shown below. Pan motor Pan adjustment Tilt top bar Tilt vertical adjustment Tilt front-back adjustment Tilt motor...
- Page 25 Related Topic Mounting the gimbal on the aircraft Mounting a camera on the gimbal Connecting cables between the camera and gimbal Adjusting the balance of the gimbal Adjusting the gimbal parameters Configuring the gimbal settings 5-027-737-11(1) Copyright 2021 Sony Group Corporation...
- Page 26 Help Guide Airpeak S1 ARS-S1 Features of the “Airpeak Base” App “Airpeak Base” is a dedicated web application for managing devices, planning flights, viewing flight logs, and more. It is available from browsers on a computer or iPad. https://base.airpeak.sony.com/ You can also take advantage of the “Airpeak Plus” cloud service for greater convenience. For detailed information on the cloud service, visit the product page.
- Page 27 Click to display the [Logbook] screen. You can check flight logs that record the flight path, speed, meteorological info, etc. of past flights. Related Topic Setting the flight area for a project Setting geofences Setting a flight path (mission) Viewing flight logs Creating a new mission using a flight log 5-027-737-11(1) Copyright 2021 Sony Group Corporation...
- Page 28 Fees, registration, and credit card information may also be required. Related Topic Features of the “Airpeak Flight” App 5-027-737-11(1) Copyright 2021 Sony Group Corporation...
- Page 29 ARS-S1 Signing in to the “Airpeak Flight” App A Sony account and an internet connection are required when setting up the aircraft. Start the “Airpeak Flight” App. The initial setup screen is displayed. Tap [Next] to begin the initial setup process.
-
Page 30: Flight Screen
Help Guide Airpeak S1 ARS-S1 Features of the “Airpeak Flight” App “Airpeak Flight” is an application that allows you to manage the operations and settings of the aircraft, remote controller, and camera (sold separately) in an integrated way. It supports a wide range of operations, from checking the status of the aircraft such as the flight distance and remaining battery power to changing the settings of the camera in the sky. - Page 31 “Airpeak Flight” App is not connected. Related Topic Installing the “Airpeak Flight” App Signing in to the “Airpeak Flight” App Relationship between the remote controller and the flight screen Updating the system software 5-027-737-11(1) Copyright 2021 Sony Group Corporation...
-
Page 32: Charging The Batteries
Help Guide Airpeak S1 ARS-S1 Charging the batteries Before using this product, charge the aircraft battery packs and built-in remote controller battery. Charging the aircraft battery packs Connect the power cord ( ) to the AC adapter for battery charger ( Connect the AC adapter to the power port ( ) of the battery charger. - Page 33 To check the battery level You can check the battery level by pressing the (Power) button on the remote controller once. Related Topic If you cannot charge the aircraft battery pack Loading battery packs in the aircraft 5-027-737-11(1) Copyright 2021 Sony Group Corporation...
- Page 34 Note that if all of the battery level LEDs blink or stay turned off even when the battery pack is charged for a second time, a battery pack or battery charger abnormality may have occurred. Stop using them and contact your Sony dealer.
- Page 35 Help Guide Airpeak S1 ARS-S1 Loading battery packs in the aircraft Load the two battery packs in battery slots 1 and 2 at the rear of the aircraft. Load the battery packs in the aircraft. Insert firmly until the battery packs click and lock into place.
- Page 36 Related Topic Charging the batteries 5-027-737-11(1) Copyright 2021 Sony Group Corporation...
- Page 37 Help Guide Airpeak S1 ARS-S1 Connecting cables to the aircraft Remove the top cushioning ( ) from the outer box and place it on a flat surface. Holding the aircraft securely by the frame arms ( ), place it upside down on the cushioning.
- Page 38 (aircraft — gimbal) ( ) to the USB port ( ® You can also connect the USB Type-C cable (aircraft—gimbal) to the EXT port. Related Topic Attaching the damping plate to the aircraft 5-027-737-11(1) Copyright 2021 Sony Group Corporation...
- Page 39 Help Guide Airpeak S1 ARS-S1 Attaching the damping plate to the aircraft The damping plate (with the quick-release pre-installed), hex wrench, and hex screws are included in the gimbal set (sold separately). Attach the damping plate to the aircraft. Perform the operations described in “Connecting cables to the...
- Page 40 When using tools other than the hex wrench included in the gimbal set (sold separately), be sure to tighten the screws with a torque of 1.5±0.5 Nm. Related Topic Mounting the gimbal on the aircraft 5-027-737-11(1) Copyright 2021 Sony Group Corporation...
- Page 41 Help Guide Airpeak S1 ARS-S1 Attaching landing gear Perform the operations described in “Attaching the damping plate to the aircraft.” Press in the ball detent ( ) and insert the landing gear. Make sure that the ball detent ( ) is fully engaged.
- Page 42 Turn the landing gear levers ( ) until they are positioned in place. When storing the aircraft in the outer box, turn both landing gear levers ( ) below the dotted line as shown below. 5-027-737-11(1) Copyright 2021 Sony Group Corporation...
-
Page 43: Attaching The Propellers
Help Guide Airpeak S1 ARS-S1 Attaching the propellers The aircraft uses two types of propellers: clockwise (CW) and counterclockwise (CCW) propellers, which rotate in different directions. Using the hub color as a guide, attach propellers with hubs of the same color. When attaching/removing the propellers, make sure that the aircraft is turned off and be careful not to get injured by the edges. - Page 44 If you do not hear a clicking sound when attaching the propellers, the propellers may not have been attached properly and pose a risk of crash. Refrain from using the aircraft and contact Sony Customer Support. If the metal part of the propeller attachment point does not move smoothly, the propeller may fall off during flight and pose a risk of crash.
- Page 45 While pressing the BATTERY RELEASE levers ( ), push out the projecting parts on the sides of the battery packs ( ) in the directions of the arrows to remove both battery packs. Press the BATTERY RELEASE levers carefully so that the battery packs do not hit your fingers. Battery packs are still hot immediately after use.
- Page 46 5-027-737-11(1) Copyright 2021 Sony Group Corporation...
- Page 47 Help Guide Airpeak S1 ARS-S1 Mounting the gimbal on the aircraft Make sure the aircraft is off. Confirm that the power status LED ( ) on the aircraft is off. With the marks ( ) on the gimbal and quick-release aligned, attach the gimbal.
- Page 48 Hold the gimbal with both hands when removing it. The gimbal or camera may be scratched or damaged if the gimbal rotates or drops. Be sure to remove the gimbal after use. Leaving it attached to the aircraft may damage the damping rubber of the damping plate. Related Topic Attaching the damping plate to the aircraft 5-027-737-11(1) Copyright 2021 Sony Group Corporation...
- Page 49 Use memory cards with sufficient free space for recording images. Be sure to set the Bluetooth function of the camera to [Off]. If it is set to [On], it may affect the wireless transmission function. 5-027-737-11(1) Copyright 2021 Sony Group Corporation...
- Page 50 Help Guide Airpeak S1 ARS-S1 Mounting a camera on the gimbal The camera plate, hot shoe adapter, and top camera screw are included in the gimbal set (sold separately). Attach the camera plate ( ) to the tripod socket ( ) on the bottom of the camera.
- Page 51 ) on the hot shoe adapter screw. Tighten the lever ( ) on the bottom of the frame to secure the camera. Related Topic Configuring settings on the camera Connecting cables between the camera and gimbal 5-027-737-11(1) Copyright 2021 Sony Group Corporation...
- Page 52 If you adjust the tilt axis of the gimbal, the USB cable may come into contact with the frame of the gimbal. Route the USB cable so that it does not come into contact with the gimbal frame. Related Topic Mounting a camera on the gimbal 5-027-737-11(1) Copyright 2021 Sony Group Corporation...
- Page 53 Help Guide Airpeak S1 ARS-S1 Adjusting the balance of the gimbal Adjust the balances of the tilt ( ), roll ( ), and pan ( ) axes. Preparation Confirm that the camera lens cap is removed. Confirm that the camera and gimbal are connected using the USB cable.
- Page 54 Rotate the gimbal tilt frame ( ) to aim the camera lens upward. Loosen the levers ( ) on both sides and slide the tilt frame ( ) back and forth to adjust the balance. Adjust so that the left and right adjusters are at the same level. After adjusting the balance, firmly tighten the levers ( ) on both sides.
- Page 55 Do not adjust the gimbal balance with the aircraft upside down. Doing so may deteriorate or damage the damping rubber of the damping plate. Related Topic Connecting cables between the camera and gimbal Adjusting the gimbal parameters 5-027-737-11(1) Copyright 2021 Sony Group Corporation...
- Page 56 Help Guide Airpeak S1 ARS-S1 Adjusting the gimbal parameters The gimbal parameters need to be adjusted. Visit the support site for details on adjustment. http://electronics.sony.com/airpeak/p/gblt3/settings 5-027-737-11(1) Copyright 2021 Sony Group Corporation...
- Page 57 Help Guide Airpeak S1 ARS-S1 Attaching a mobile device to the remote controller On the remote controller, mount the mobile device (tablet or smartphone) on which you have installed the “Airpeak Flight” App. Raise the lever ( ) on the back and extend the mobile device holder ( Place the mobile device on the mobile device holder and adjust the holder height.
- Page 58 Raise the smartphone holder ( ) in the middle of the mobile device holder, and then mount the smartphone. Note Mobile devices may fall off unless they are correctly secured with the lever. Related Topic Supported mobile devices 5-027-737-11(1) Copyright 2021 Sony Group Corporation...
- Page 59 You can stop the alarm by performing an operation such as moving the control stick, pressing a button, etc. If you notice any damage to the remote controller antenna, contact Sony Customer Support. It may not be possible to operate the aircraft.
- Page 60 Related Topic Linking the aircraft and remote controller Selecting the wireless channel 5-027-737-11(1) Copyright 2021 Sony Group Corporation...
- Page 61 Help Guide Airpeak S1 ARS-S1 Linking the aircraft and remote controller Follow the on-screen instructions in the “Airpeak Flight” App to link the remote controller and aircraft and set up the aircraft. The aircraft only needs to be set up the first time.
- Page 62 5-027-737-11(1) Copyright 2021 Sony Group Corporation...
- Page 63 Help Guide Airpeak S1 ARS-S1 Setting the flight mode There are three flight modes for manual flight: [Std (Speed)], [Vel (Velocity)], and [Alt (Altitude)]. You can select the desired flight mode easily with the flight mode switch on the remote controller.
- Page 64 Features of the “Airpeak Flight” App Selecting the operating mode of the control sticks Adjusting the sensitivity of the control sticks Parts for flight operations Controlling the aircraft with the remote controller (manual flight) 5-027-737-11(1) Copyright 2021 Sony Group Corporation...
- Page 65 [Auto]: The optimum channel is set automatically. [Manual]: Select the desired channel in the [Channel] menu. You can check the [Received signal level [dBm]] for each channel on the congestion status graph for the radio wave. 5-027-737-11(1) Copyright 2021 Sony Group Corporation...
- Page 66 Help Guide Airpeak S1 ARS-S1 Controlling the aircraft with two remote controllers (dual operation mode) You can link two remote controllers to the aircraft and use them as main and sub controllers (dual operation mode). You can control the aircraft with the main controller and control the camera and gimbal with the sub controller.
- Page 67 When you reset [Operation mode] to [Single] on the main controller, the sub controller becomes disconnected from the aircraft. Related Topic Selecting the operating mode of the control sticks Attaching a mobile device to the remote controller Linking the aircraft and remote controller 5-027-737-11(1) Copyright 2021 Sony Group Corporation...
- Page 68 Help Guide Airpeak S1 ARS-S1 Selecting the operating mode of the control sticks You can select from among two modes for the aircraft operations assigned to the control sticks on the remote controller. In the dual operation mode, you can select the operating mode of the aircraft with the main controller.
- Page 69 Related Topic Parts and controls (Remote controller) Features of the “Airpeak Flight” App Controlling the aircraft with two remote controllers (dual operation mode) Adjusting the sensitivity of the control sticks 5-027-737-11(1) Copyright 2021 Sony Group Corporation...
- Page 70 Help Guide Airpeak S1 ARS-S1 Adjusting the sensitivity of the control sticks You can adjust the sensitivity of the control sticks on the remote controller near the central position. Tap [Start flight] on the “Airpeak Flight” App Home page. The flight screen will be displayed.
- Page 71 5-027-737-11(1) Copyright 2021 Sony Group Corporation...
- Page 72 When the remote controller is not connected to the aircraft, the settings for the single operation mode are displayed. Related Topic Parts and controls (Remote controller) Features of the “Airpeak Flight” App Controlling the aircraft with two remote controllers (dual operation mode) 5-027-737-11(1) Copyright 2021 Sony Group Corporation...
- Page 73 [Deadzone]. Related Topic Parts and controls (Remote controller) Parts and controls (Gimbal (sold separately)) Features of the “Airpeak Flight” App Adjusting the sensitivity of the control sticks 5-027-737-11(1) Copyright 2021 Sony Group Corporation...
- Page 74 Remote controller operation mode: [Remote controller] - [Connection] Remote controller battery: [Remote controller] - [Details] - [Battery details] Battery pack status Aircraft battery packs: [Aircraft] - [Batteries] Aircraft battery pack temperature: [Aircraft] - [Batteries] 5-027-737-11(1) Copyright 2021 Sony Group Corporation...
-
Page 75: Operator's Responsibilities
Do not allow the aircraft to trespass on the private property of others. Unless permitted by separate prior written agreement between you and Sony, Airpeak is not for military use, including but not limited to the following: development of arms or munitions (including manufacturing, installation, and inspection), transportation of explosives or chemical or biological weapons and other harmful items, or activities such as intelligence, surveillance, and reconnaissance. -
Page 76: Flight Environment
Help Guide Airpeak S1 ARS-S1 Flight environment Avoid obstacles such as large trees and power lines. Do not fly over people or near large crowds of people, unless you have received a waiver or your aircraft has a declaration of compliance to conduct such operations under applicable federal regulations. - Page 77 Do not load anything onto the aircraft other than the camera and other accessories as stated in the product information documents or as recommended by Sony. Comply with all laws, regulations or ordinances and obtain any required approval. Operators are responsible for complying with all applicable laws, regulations or ordinances while using the aircraft and remote controller.
- Page 78 To support safe flight, this product displays airspace information provided by AirMap, Inc., or such other third party UTM service provider named by Sony. When you fly the aircraft, be sure to make flight decisions based on the latest and official information.
- Page 79 You can update the airspace database system in the setting menu of the “Airpeak Flight” App ( [Maintenance]). Related Topic Features of the “Airpeak Flight” App Setting the flight area for a project Setting geofences 5-027-737-11(1) Copyright 2021 Sony Group Corporation...
-
Page 80: Preflight Checks
Make sure that you fully understand the flight mode that you have selected, as well as the safety functions and warnings. Make sure that the “Airpeak Flight” App is working properly to assist you in controlling the aircraft. Sony may not be able to provide after-sales services or take responsibility under certain circumstances, such as when flight data recorded by the “Airpeak Flight”... - Page 81 Related Topic Features of the “Airpeak Flight” App Charging the batteries Loading battery packs in the aircraft Attaching the damping plate to the aircraft Attaching the propellers 5-027-737-11(1) Copyright 2021 Sony Group Corporation...
- Page 82 Help Guide Airpeak S1 ARS-S1 Precautions during flights Always operate the aircraft within the visual line of sight of the operator or a visual observer, unless you have received a waiver from the FAA to conduct an operation beyond visual line of sight.
- Page 83 The “Airpeak Flight” App may use cellular data communication and incur usage charges according to the data plan provided by your carrier. For cellular data communication usage charges, contact your carrier. Read the safety tips, warning messages, and disclaimers displayed on the “Airpeak Flight” App screen carefully. 5-027-737-11(1) Copyright 2021 Sony Group Corporation...
- Page 84 If the flight area overlaps with a UTM-regulated zone, advisories will be displayed at the right side of the screen. Modify the flight area if necessary. UTM: Unmanned aircraft system Traffic Management Click on [Save]. Related Topic Setting geofences Setting a flight path (mission) 5-027-737-11(1) Copyright 2021 Sony Group Corporation...
- Page 86 Help Guide Airpeak S1 ARS-S1 Setting geofences Flight restrictions such as flight area or maximum altitude can be defined as geofence zones for each project. Warnings are displayed on the flight screen in the “Airpeak Flight” App when the aircraft approaches the boundary of a geofence zone while in flight.
- Page 87 Note that an internet connection is required to sync geofence zone information between the “Airpeak Base” App and the “Airpeak Flight” App. Related Topic Setting the flight area for a project Setting a flight path (mission) 5-027-737-11(1) Copyright 2021 Sony Group Corporation...
- Page 88 Help Guide Airpeak S1 ARS-S1 Setting a flight path (mission) Create a mission and then set a flight path. Click on [Projects] on the “Airpeak Base” App Home page. Click on the project for which you want to set a flight path.
- Page 89 0°, the tilt axis displays the horizontal direction of the aircraft as 0°, and the roll axis displays the horizontal direction of the aircraft as 0°. Related Topic Setting the flight area for a project Setting geofences Flying the aircraft along a set path (automated flight) 5-027-737-11(1) Copyright 2021 Sony Group Corporation...
- Page 90 Help Guide Airpeak S1 ARS-S1 Viewing flight logs The “Airpeak Base” App allows you to check flight logs uploaded to the cloud from the “Airpeak Flight” App. Click on [Logbook] on the “Airpeak Base” App Home page. Click on the desired flight log in the flight log list.
- Page 91 (Turn off repeat playback) ×1 (Playback speed) Timeline panel (Timeline display) Elapsed time/flight duration Timeline bar: Drag the slider to move the playback point. Related Topic Creating a new mission using a flight log 5-027-737-11(1) Copyright 2021 Sony Group Corporation...
- Page 92 In the dialog, select the project to which you want to add a new mission, and then click on [Convert]. The flight log will be saved as a new mission for the selected project. Related Topic Viewing flight logs Flying the aircraft again along a previous flight path (automated flight) 5-027-737-11(1) Copyright 2021 Sony Group Corporation...
- Page 93 To turn off the power Press and hold the (Power) button ( ) on the aircraft for at least 2 seconds. The aircraft is turned off, and the power status LED ( ) on the aircraft turns off. 5-027-737-11(1) Copyright 2021 Sony Group Corporation...
- Page 94 Press and hold the (Power) button ( ) on the remote controller for at least 5 seconds. The remote controller is turned off, and the status LED ( ) on the remote controller turns off. 5-027-737-11(1) Copyright 2021 Sony Group Corporation...
- Page 95 These parts are used for flight operations such as takeoff, landing, gimbal settings, etc. Camera operations These parts are used for camera operations such as taking videos and photos, settings, etc. Related Topic Parts for flight operations Parts for shooting operations 5-027-737-11(1) Copyright 2021 Sony Group Corporation...
-
Page 96: Remote Controller
Help Guide Airpeak S1 ARS-S1 Parts for flight operations The parts used for flight operations are described below. Remote controller The parts of the remote controller used for flight operations are described below. Control sticks Control the orientation and movement of the aircraft. - Page 97 C1 (Custom 1)/C2 (Custom 2)/C3 (Custom 3)/C4 (Custom 4) buttons Assign the functions for operating the aircraft, camera, and gimbal to these buttons in the setting menu of the “Airpeak Flight” App. Flight screen (“Airpeak Flight” App) The items on the flight screen used for flight operations are shown below. (Back) Tap to go back to the App Home page.
- Page 98 Selecting the operating mode of the control sticks Adjusting the sensitivity of the control sticks Changing the functions assigned to the custom buttons, lever, or dial on the remote controller Parts for shooting operations 5-027-737-11(1) Copyright 2021 Sony Group Corporation...
- Page 100 Tap one of the sub screens. The views in the sub screen and the full screen will switch. To hide the sub screen, tap (FPV) or (Map). Related Topic Parts for flight operations Parts for shooting operations 5-027-737-11(1) Copyright 2021 Sony Group Corporation...
- Page 101 Help Guide Airpeak S1 ARS-S1 Controlling the aircraft with the remote controller (manual flight) There are two flight methods for this aircraft: manual flight, in which the aircraft is controlled with the remote controller, and automated flight, in which the aircraft automatically flies without user operation. This topic describes the operations for manual flight.
- Page 102 Selecting the operating mode of the control sticks Adjusting the sensitivity of the control sticks Operator’s responsibilities Flight environment Preflight checks Precautions during flights Parts for flight operations Landing gear operation Executing an emergency motor stop 5-027-737-11(1) Copyright 2021 Sony Group Corporation...
- Page 103 Help Guide Airpeak S1 ARS-S1 Flying the aircraft along a set path (automated flight) You can automatically fly the aircraft according to a mission (flight path) created using the “Airpeak Base” App. Create projects and missions based on your flight plan with the “Airpeak Base” App.
- Page 104 Selecting the operating mode of the control sticks Adjusting the sensitivity of the control sticks Operator’s responsibilities Flight environment Preflight checks Precautions during flights Setting a flight path (mission) Parts for flight operations Landing gear operation Executing an emergency motor stop 5-027-737-11(1) Copyright 2021 Sony Group Corporation...
- Page 105 Help Guide Airpeak S1 ARS-S1 Flying the aircraft again along a previous flight path (automated flight) By using a flight log stored in the cloud, you can automatically fly the aircraft along a previous flight path. Preparation “Creating a new mission using a flight log”...
- Page 106 Adjusting the sensitivity of the control sticks Operator’s responsibilities Flight environment Preflight checks Precautions during flights Viewing flight logs Creating a new mission using a flight log Parts for flight operations Landing gear operation Executing an emergency motor stop 5-027-737-11(1) Copyright 2021 Sony Group Corporation...
- Page 107 “Airpeak Flight” App ( If an obstacle is detected in front of the aircraft during RTH (Return to Home), the aircraft will ascend 3 meters vertically to avoid the obstacle. Related Topic Parts for flight operations 5-027-737-11(1) Copyright 2021 Sony Group Corporation...
-
Page 108: Landing Gear Operation
(Raise the landing gear) or (Lower the landing gear) on the flight screen of the “Airpeak Flight” App and follow the instructions on the screen. Related Topic Parts and controls (Aircraft) Parts for flight operations 5-027-737-11(1) Copyright 2021 Sony Group Corporation... - Page 109 You can deactivate the emergency motor stop function. On the flight screen of the “Airpeak Flight” App, tap [Aircraft] - [Safety functions] and turn off the [Execute emergency motor stop] switch. Related Topic Parts for flight operations 5-027-737-11(1) Copyright 2021 Sony Group Corporation...
- Page 110 These parts are used for flight operations such as takeoff, landing, gimbal settings, etc. Camera operations These parts are used for camera operations such as taking videos and photos, settings, etc. Related Topic Parts for flight operations Parts for shooting operations 5-027-737-11(1) Copyright 2021 Sony Group Corporation...
-
Page 111: Remote Controller
Help Guide Airpeak S1 ARS-S1 Parts for shooting operations The parts used for shooting operations are described below. Remote controller The parts of the remote controller used for shooting operations are described below. (MOVIE) button Press to start/stop video recording. - Page 112 (Back) Tap to go back to the App Home page. Telemetry (Flight mode indication): Indicates the current position of the flight mode switch on the remote controller and the current flight mode. (Horizontal information indication): Indicates the horizontal speed of the aircraft and the distance from the take-off position.
- Page 113 Tap to display the FPV view in a sub screen. Related Topic Parts and controls (Remote controller) Changing the functions assigned to the custom buttons, lever, or dial on the remote controller Parts for flight operations 5-027-737-11(1) Copyright 2021 Sony Group Corporation...
- Page 114 Click on [Devices] on the “Airpeak Base” App Home page. On the [Devices] screen, click on the device whose information you want to check. Check the usage status, maintenance information, etc. 5-027-737-11(1) Copyright 2021 Sony Group Corporation...
- Page 115 (Settings) in the top right of the screen. Tap [Aircraft] in the displayed setting menu. Tap [Sensors/Radio]. Tap [Compass], [IMU], or [Stereo camera]. Follow the instructions on the screen to complete the calibration. Related Topic Calibrating the remote controller 5-027-737-11(1) Copyright 2021 Sony Group Corporation...
- Page 116 Tap [Remote controller] in the displayed setting menu. Tap [Details]. Tap [Start] for [Calibrate remote controller]. Follow the instructions on the screen to complete the calibration. Related Topic Adjusting the sensitivity of the control sticks Calibrating the sensors of the aircraft 5-027-737-11(1) Copyright 2021 Sony Group Corporation...
-
Page 117: Updating The System Software
Follow the instructions on the screen to complete the update. Hint If a system software update is available, a notification will be displayed on the “Airpeak Flight” App Home page. Related Topic Features of the “Airpeak Flight” App 5-027-737-11(1) Copyright 2021 Sony Group Corporation... - Page 118 Help Guide Airpeak S1 ARS-S1 Before disposing of this product Before disposing of the Airpeak, including the remote controller and/or battery charger, visit https://www.sony.com/ecotrade. Recycling information for all products, including batteries can be found. 5-027-737-11(1) Copyright 2021 Sony Group Corporation...
-
Page 119: General Information
Do not install external devices that exceed the maximum payload. As external devices, use only genuine Sony devices or devices recommended by Sony, and install in the correct position as described in the instruction manual. Devices that shift the aircraft center of gravity pose a risk of crashes. -
Page 120: Battery Charger
Charging the battery pack Before using the battery pack, be sure to charge it with a Sony dedicated battery charger or a Sony device with a battery-charging function (a device capable of charging this battery pack). To charge the battery efficiently, fully charge it in an ambient temperature of 5 °C - 40 °C (41 °F - 104 °F). - Page 121 Related Topic Parts and controls (Aircraft) Parts and controls (Remote controller) Turning the aircraft on/off Turning the remote controller on/off 5-027-737-11(1) Copyright 2021 Sony Group Corporation...
-
Page 122: Troubleshooting
Aircraft: Turn off the power and remove both battery packs. After about 1 minute, reinsert the battery packs and turn the power back on. Check the additional information on our Customer Support Website. https://www.sony.com/electronics/support Related Topic Turning the aircraft on/off Turning the remote controller on/off 5-027-737-11(1) Copyright 2021 Sony Group Corporation... -
Page 123: Trademarks And Copyrights
Bluetooth SIG, Inc. and any use of such marks by Sony Group Corporation and its subsidiaries is under license. The terms HDMI and HDMI High-Definition Multimedia Interface, and the HDMI Logo are trademarks or registered trademarks of HDMI Licensing Administrator, Inc.