
Related Manuals for Philips 46PFL7007


Summary of Contents for Philips 46PFL7007
- Page 1 78881',0%,'19*50 /1:;<1=> -,.%'/,012)301#0)43(/15641.,/1'3##)0 /15/ !!!"#$%&%#'"()*+!,&()*, ?8@A:7887 ?B@A:7887 CC@A:7887 D',01*5635&...
-
Page 2: Table Of Contents
Contents Tour 3 Skype Credit 62 Smart TV 3 Skype settings 62 App gallery 3 Sign out 63 Rental videos 3 Terms of Use 63 Online TV 3 Social networks 3 Games 64 Skype 4 Play a game 64 Smartphones and tablets 4 Two-player games 64 Pause TV and recordings 4 Gaming 4... -
Page 3: Tour
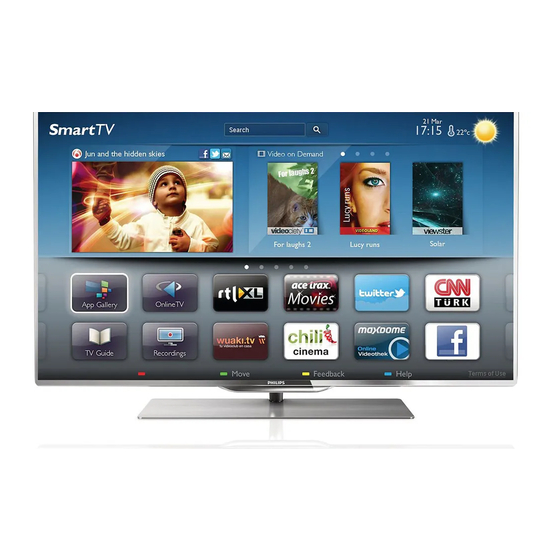
To watch a rental video, you don't need to leave your home. Simply rent the latest movie from your regional online video Connect this Philips Smart LED TV to the Internet and store. discover a new world of television. You can make a wired connection to your router or you can link up wirelessly with Wi-Fi. -
Page 4: Social Networks
To use your smartphone or tablet as a TV remote control or If you select your game console in the Home menu, the TV as your media controller, download the Philips MyRemote app switches to the settings ideal for gaming automatically. -
Page 5: Easylink
The TV uses 3D technology to show both screens. To play a two-player game with two different full screen pictures, you need a pair of 3D glasses for each player. In Help, press List and look up Game console or Two- player games for more information. -
Page 6: Setting Up
Quick Start Guide that came with the TV. In case you lost this improper mounting or any mounting that results in accident or guide, you can download the guide from www.philips.com injury. Use the product type number of the TV to look for the Quick Start Guide to download. -
Page 7: Power Cable
Power cable Insert the power cable into the POWER socket of the TV. Make sure the power cable is securely inserted into the TV. Make sure that the power plug in the wall socket is accessible at all times. When disconnecting the power cable, always pull the plug, never the cable. - Page 8 Step 2 - Press h and select S Setup and press OK. • Microwave ovens, DECT phones or other Wi-Fi 802.11b/g/n Step 3 - Select Connect to network and press OK. devices in your proximity might disturb the wireless network. Step 4 - Select Wireless and press OK.
-
Page 9: Connect Devices
Clear Internet memory With Clear Internet memory you clear all Internet files stored on your TV. You clear your Philips Smart TV registration and parental rating setting, your video store app logins, all Smart TV app favourites, Internet bookmarks and history. Interactive MHEG applications can also save so-called 'cookies', on your TV. - Page 10 HDMI ARC All of the HDMI connections on the TV have ARC (Audio Return Channel). If the device, typically a Home Theatre System (HTS), also has the HDMI ARC connection, connect it to any of the HDMI connections on this TV. With the HDMI ARC connection, you do not need to connect the extra audio cable that sends the sound of the TV picture to the HTS.
- Page 11 Auto subtitle shift HDMI CEC on other brands If you play a DVD or Blu-ray Disc on a Philips disc player that The HDMI CEC functionality has different names on different supports subtitles, the TV can move the subtitles upwards.
- Page 12 Insert a CAM module Switch off the TV before inserting a CAM. Look on the CAM for the correct method of insertion. Incorrect insertion can damage the CAM and the TV. Switch off timer Switch off this automatic timer, if you only use the remote control of the Set-top box.
- Page 13 Use an HDMI cable to connect a Home Theatre System With recent Philips Home Theatre Systems, the audio to (HTS) to the TV. You can connect a Philips Soundbar or an video sync is automatically synchronised and always correct. HTS with a built-in disc player.
- Page 14 Audio Out levelling affects both the Audio Out - Optical and HDMI-ARC sound signals. Blu-ray Disc Player Use an HDMI cable to connect the Blu-ray Disc player to the For best quality, use an HDMI cable to connect the game console to the side of the TV.
- Page 15 The USB Hard Drive is formatted exclusively for this TV, you cannot use the stored recordings on another TV or PC. Do not copy or change recording files on the USB Hard Drive with any PC application. This will corrupt your recordings. When you format another USB Hard Drive, the content on the former will be lost.
- Page 16 In Help, press List and look up USB mouse, to connect a USB mouse. In Help, press List and look up Videos, photos and music, to watch or listen to content from an USB flash drive. USB mouse You can connect a USB mouse (USB-HID type) to navigate Photo camera pages on the Internet.
-
Page 17: Setup Menu
Computer Ideal monitor setting If your computer is added as a Computer type of device in the You can connect your computer to the TV and use the TV as Source menu (list of connections), the TV is set to the ideal a PC monitor. - Page 18 To set a Quick picture settings on a TV activity or a connected device . . . Satellite settings 1 - Press h, select an activity or a connected device (or its connection) and press OK. Languages 2 - Press h agian, select S Setup and press OK. In Help, press List and look up Audio language or 3 - Select Quick picture settings and press OK.
-
Page 19: Safety And Care
The TV monitors the incoming picture quality, the level of • Never place the TV on tall furniture, such as a bookcase, motion in the picture, brighter or darker scenes and the light without anchoring both the furniture and TV to the wall or a conditions in your room. -
Page 20: Switch On
Quick start With Quick start, the TV can start up faster than usual. When you switch the TV on from standby the TV picture already appears after a few seconds, if Quick start is activated. Switch on The TV can remember your daily habit of watching TV. Some time before you usually switch on the TV, Quick start will activate automatically, allowing you to switch on quickly. - Page 21 Top half Bottom half 1 - CH-, Channel - To switch to the previous channel in the channel list, the previous page in Text or the previous chapter on a disc. 2 - CH+, Channel + To switch to the next channel in the channel list, the next Standby page in Text or the next chapter on a disc.
- Page 22 3 - y Spacebar key 4 - Arrow keys 5 - Enter Press Enter to confirm the text you entered. 6 - Backspace Deletes the character in front of the text cursor. Shift 7 - àö! Special character key To type an uppercase character, press and hold the ( Press àö! to open the onscreen keyboard to select a special (Shift) key (2) and type the uppercase character you need.
-
Page 23: Watch Tv
TV or for a remote Channels control that is not paired yet. • The remote control is paired with another TV To pair, hold the Remote control close to the Philips logo Switch channels (about 10cm) and press the Red and Blue key at the same time. - Page 24 For digital broadcast, you can select an available subtitle language temporarily if none of your preferred languages are available. In Help, press List and look up Subtitles for more information. Audio languages For digital broadcast, you can select an available audio language temporarily if none of your preferred languages are available.
- Page 25 To close the channel lists without switching channel, press L Alternatively, if your remote control has a keyboard on the LIST again. back, you can use that keyboard. In Help, press List and look up Remote control keyboard Mark as favourite for more information.
- Page 26 Find the telephone number on the documentation that came with the TV or go to You can search for and reinstall channels and leave all other TV www.philips.com/support. settings untouched. Alternatively, you can do a full new TV installation.
- Page 27 With Channel list copy, you can copy the channels installed on If the country is not correct, you need to start a reinstallation. one TV onto another Philips TV of the same range. With To start the reinstallation, press h, select S Setup and Channel list copy, you avoid the time-consuming channel press OK.
- Page 28 Select Channel installation > Antenna connection > Antenna With the Symbol rate mode set to Manual, you can enter (DVB-T) or Cable (DVB-C) and press OK. Select the DVB here a second symbol rate value you received from your cable setting you want.
- Page 29 If you have a subscription and a CAM - Conditional Access Select Store current channel or Store as new channel. Module for pay TV services, select Free + scrambled. If you did not subscribe to pay TV channels or services, you can You can redo these steps until you found all available analogue select Free channels only.
- Page 30 Freeze page To stop the automatic rotation of subpages, press o OPTIONS and select Freeze page. Dual screen / Full screen To show the TV channel and Text alongside each other, press o OPTIONS and select Dual screen. Select Full screen to switch back to full screen view. Select a Text page T.O.P.
-
Page 31: Tv Guide
Visit the broadcasters Internet website for more information. View programme details To call up the details of the selected programme, press i What you need INFO. Interactive TV is only available on digital TV channels. To enjoy Change day the full benefits of Interactive TV, you need a high-speed (broadband) Internet connection to the TV. -
Page 32: Switch To Devices
If TV guide information comes from the Internet, the TV guide If the TV does not detect the device automatically, select the can also list analogue channels next to the digital channels. In connection where you connected the device and adjust the the TV guide menu, you can view the current channel you are Device type and name. -
Page 33: Subtitles And Languages
Audio language Subtitles and languages Digital TV channels can broadcast audio with several spoken languages for a programme. You can set a preferred primary Subtitles and secondary audio language. If audio in one of these languages is available, the TV will switch to this audio. If none of the preferred audio languages is available, you can Switch subtitles on select another audio language which is available. -
Page 34: Timers And Clock
Timers and clock Picture settings Sleeptimer Picture settings With the sleep timer, you can set the TV to switch to standby In the Picture menu, you can adjust all picture settings automatically after a specified time. individually. To set the sleep timer, press h, select S Setup and press To open the Picture settings, press h, select SSetup and press OK. -
Page 35: Sound Settings
— Picture format: look up and read Picture format with L List. — Screen edges to slightly enlarge the picture to hide Location distorted edges. — Picture shift to move the picture up / down or left / right Location with the cursor keys. -
Page 36: Ambilight Settings
3.10 Sound style Ambilight settings For easy sound adjustment, you can select a preset setting with Sound style. Switch Ambilight on and off While watching a TV channel, press oOPTIONS to open the Options menu and select Sound style. Select a Sound style and press OK. -
Page 37: Universal Access
Select Static. Choose your preferred colour. The Ambilight static colours are fixed (non-dynamic) colours. Ambilight settings More Ambilight settings are available in the Ambilight menu in TV settings. To change the Lounge light colour scheme, press AMBILIGHT To change these settings, press h, select SSetup and press again. - Page 38 If Universal access does not appear in the Options menu, 4 - Press b, repeatedly if necessary, to close the menu. switch on Universal access in Setup. In Help, press List and look up Universal access for more information. Key beep Key beep gives an audio feedback each time you press a key Visually impaired on the remote control.
-
Page 39: Watch Satellite
In this channel list, you can look up all installed satellite TV and radio channels. Next to the list All, which holds all installed channels, you can Watch satellite set up a list of Favourites, view the installed Radio stations separately or discover the newly added channels in New. - Page 40 Add or remove favourites To add or remove favourite channels from the Favourite channel list, open the list and press o OPTIONS, select Add / remove favourites and press OK. Use the arrow keys to select a channel and press OK to add or remove it from the favourites list.
-
Page 41: Satellite Installation
To watch a locked programme you must enter the child lock code. The parental age rating is set for all channels. To install the satellite channels, follow the steps 1 to 5. Set an age rating 1 - Install Press h and select S Setup and press OK. To search for satellites and install satellite channels, press h, Select Satellite settings >... - Page 42 With Channel list copy, you can copy the channels installed on automatically update the list with new channels. You can also one TV onto another Philips TV of the same range. With start a channel update yourself. Channel list copy, you avoid the time-consuming channel search and you can offer a predefined channel list setup.
- Page 43 To add another transponder, select Exit and repeat the steps. Now you can upload the copied channel list onto another If you use a Multiple Dwelling Unit (MDU)for Eutelsat W3 7E Philips TV. (especially for DIGITURK), Manual installation is not available. Upload a channel list...
- Page 44 • Check the connection type in the satellite installation settings. • Reset all satellite settings if you lost track of the settings you changed. In Help, press List and look up Satellite installation for more information. The reception of a satellite channel is poor •...
-
Page 45: What You Need
Also, to watch 3D on this TV, you will need one of these • Red - if there is less than 1 hour of 3D viewing remaining types of Philips 3D Max active glasses. . . • Orange - 1 to 3 hours remaining •... -
Page 46: Watch 3D
Care of the 3D glasses 1 - A, On or off switch • Do not expose the 3D glasses to direct sunlight, heat, fire or 2 - Player 1/2, Player 1 or player 2 selection water. This may result in a product malfunction or fire. 3 - Receiver lens •... -
Page 47: Optimal 3D Viewing
To change the 3D depth, press oOPTIONS and select 3D • Use a clean soft cloth (microfiber or cotton flannel) to clean depth. Select Off (no 3D), Less (less 3D depth), Normal the lenses to avoid scratching them. Never spray cleaner (optimal 3D quality) or More (more 3D depth). -
Page 48: Smart Tv
Read and agree to the terms and conditions to continue. To leave Smart TV, press b. Register - TV Register with Club Philips. Select TV and press OK to watch TV channels. Select Register and press OK. Enter your email address, select Continue and press OK. - Page 49 To view the Apps from another country, press Recommended Apps select a country and press OK. In this window, Philips presents a range of recommended Lock. To lock an App, select the App icon and press Apps for your country, Apps for Online TV or a selection of When you lock an App, you must enter the 4 digit PIN code rental movies from Video stores.
-
Page 50: Videos, Photos And Music
Consult the video store regarding the rental duration of rental To return to the Smart TV start page, press L LIST or b. movies. Add an App to your list Internet traffic In the App gallery, select the App icon and press OK. Streaming or downloading many videos may exceed your Select Add and press OK. - Page 51 If you try to pause or record a programme with a USB Hard Options Drive connected, the TV will ask you to format the USB Hard Press o OPTIONS. - Shuffle Drive. This formatting will delete all current files on the USB Hard Drive.
-
Page 52: Pause Tv
To make a 10-second jump forward or backward in a video, press x or w. DivX®, DivX Certified® and associated logos are trademarks To rewind or go fast forward, press ! or ‹. Press the keys of Rovi Corporation or its subsidiaries and are used under several times to speed up - 2x, 4x, 8x, 16x, 32x. -
Page 53: Recording
You can press w repeatedly until you reach the start of the To change the date of the list, press o OPTIONS and select broadcast buffer or the maximum time span. Select day. In the list, select the day you want and press OK. If the TV guide comes from the Internet, you can select the date Progress bar at the top of the page and press OK. -
Page 54: Myremote App
Delete a recording MyRemote App with other TVs To delete a made recording, select the recording in the list, You can use the MyRemote App on Philips TV models built press o OPTIONS and select Delete recording. from 2009 onwards. - Page 55 Store and look for the Philips MyRemote App. You can check the compatibility of MyRemote with your other Philips products at the online support page of your product at www.philips.com/support. Also ensure your Philips product has been updated with the latest software.
- Page 56 Net TV With the Net TV button in the MyRemote home menu, you Tap the Control button to select the TV (or Philips Blu-ray can open Net TV / Smart TV on your TV. Disc player or Home Theatre System) to control.
- Page 57 What you need To watch TV on your smartphone or tablet with Wi-Fi smart Channel bar screen . . . • you must have digital TV channels installed on your TV Channel bar • the TV must be switched on To switch to a channel further up or down the TV channel list, •...
- Page 58 If you stop Wi-Fi smart screen outside a Quick start time frame, the TV stays in Quick start for 5 minutes to allow you to start Wi-Fi smart screen again without having to switch on the TV itself. In Help, press List and look up Quick start for more information on Quick start.
-
Page 59: Skype
Start Skype on your computer to get a temporary password from Skype. To make a video call on Skype, you need the separately sold Philips PTA317 TV camera with a built-in microphone and a Create a new account good connection to the Internet. -
Page 60: Contacts
Your contacts can see that you are online but you do not wish to be disturbed. They can call you and you will be alerted with sound. No emergency calls - Invisible You will appear to be offline to all of your contacts, but you can No emergency calls - Skype is not a replacement for your still use Skype as usual. -
Page 61: Calling On Skype
On a voice call, you can still switch to a Video call. To switch to Video call, press Camera on. Block a contact A contact can add you to a voice call with more than one participant. You cannot add an extra participant yourself. You can block any Skype user from finding you online. -
Page 62: Skype Credit
To play a voicemail, select the voicemail icon œ in the menu Also, new contact requests will be shown immediately. bar, select the new voicemail in the list and press OK. You can listen to the new voicemail as many times you want. Skype during rental movies and Pause TV However, when you leave the œ... -
Page 63: Sign Out
Select Sign out to quit Skype on your TV. Navigate to the menu bar and select S Settings to open the Settings page. Select Online status and then select the online status you want your contacts to see when you are online and press OK. Terms of Use Read the Terms of Use of Skype at www.skype.com/go/tou Ringtone volume... -
Page 64: Games
What you need To play a two-player game with this TV, you need 2 active 3D glasses - Philips PTA507 or PTA517 (sold separately). Also, the game console must be connected with HDMI. Start a two-player game 1 - Press c Source, select the game console and press OK. -
Page 65: Tv Specifications
1 year. You can also find the power consumption values for this product on the Philips While you are watching TV channels, press to open Eco website for your country at settings. -
Page 66: Reception
- 46PFL7007 : 117 cm / 46 inch - 55PFL7007 : 140 cm / 55 inch • Panel resolution : 1920x1080p Power • 3D : 3D Max Clarity 700, Two-player Full Screen gaming, 3D Depth adjustment, 2D to 3D conversion •... -
Page 67: Connectivity
– PacketVideo - TwonkyManager Weight ±21 kg • Mobile devices – Philips MyRemote - iOS, Android UMv 3104 327 0068.5 - 120926 – Interoperability and performance may vary, depending on the capabilities of the mobile device and the software used. -
Page 68: Tv Software
To obtain the source memory device to upload the software on the TV. Use a USB code, please contact open.source@philips.com memory device with 256MB free space. Make sure that write If you prefer not to use email or if you do not receive a protection is switched off. -
Page 69: Support
To download the Help (user manual) go to www.philips.com/support 11.3 Online help To solve any Philips TV related problem, you can consult our online support. You can select your language and enter your product model number. Go to www.philips.com/support . -
Page 70: Copyrights And Licences
12.5 Copyrights and licences Microsoft Windows Media 12.1 Windows Media is either a registered trademark or trademark HDMI of Microsoft Corporation in the United States and/or other countries. Microsoft PlayReady Content owners use Microsoft PlayReady™ content access technology to protect their intellectual property, including HDMI®... -
Page 71: Index
Index Device icon 32 Digital Text 30 DivX® VOD 52 DMR - Digital Media Renderer 9 DVB 27 3D glasses PTA507, use 45 DVB, settings 28 3D glasses PTA508, use 46 DVI, connect 10 3D glasses, type 45 3D, 2D to 3D 46 3D, cleaning glasses EasyLink 11 3D, health warning 47... - Page 72 Music files, playback 51 Satellite channel, rename 39 MyRemote App, Control 56 Satellite channel, reorder 40 MyRemote App, download 55 Satellite channel, signal 43 MyRemote App, JointSpace 54 Satellite channel, switch 39 MyRemote App, menu 55 Satellite, add 42 MyRemote App, network 54 Satellite, automatic channel update 42 MyRemote App, SimplyShare 56 Satellite, automatic update options 42...
- Page 73 Television on Demand 50 Text 29 Text, dual screen 30 Text, freeze 30 Text, options 30 Text, setup 30 Text, T.O.P. overview 30 TV clock 34 TV guide 31 TV guide, information 31 TV network name 9 TV placement 36 TV stand, loudspeakers 6 Universal access 37 USB flash drive, connect 16...
- Page 74 L"#&(%&+,#;"'-(&,"# !"#$%&'%( ;&(*'( HMHH+NNN+OONP HGNR+GM+OH+IN+S%6,(-(&(+#(X,"#(*/V HQI+[QHHHNG+SK(',;+*"%(*V 7)/#"0+3,'/0+HMIH+NNN+OOMG ;"$*(%8 )$*#'+,-,)$*#'./$ HMIM+GIH+INH+S#(&,"#(*+%(**V HOH+OHH+HQR+SHTIRU1-,#?V <0"&7$"%,;"$*(%8 @/'11$,-,@37A$'5,-,@4'55$"( )01%(,',2$"3$#04'%( HMNN+QQM+HN+MM+SR:1-,#+7K+*(#8*,#/V HMNM+HHH+GPI+SHTHMI+Lbc1Y,#?V HQQ+PNI+GRI+SW"B(*#,+:"X,5V )"(5'* M+IH+MHH+GHHH+HH+HN+S;'//V HII+QGI+[MNH+SW"B(*#,+:"X,5V HMHH+OHI+HGNR =(&4'( 9("+@()*"+GPQM+HGNR G+QQG+IRN+PQ+SE#d&'"e&`&#F+6"5"'V ='&7/(%'( @*04$%'B( M+R+GIN+HGPQ+SE,/&,#(,0++&(',;(,0V I+MMM+MQ+IG+SW"B(*#,+B*,%V GGMMMHMPR+SYZ0&#Z+&(',;V @/0C' GNMO+IIHH+S!(&,"#(*/+^);+1+(::/*+#(&,"#(*V HP+MM+[G+RH+NH QRGR+MQIN @4$"'#$ H[+I+OHH+MIRI+S7/*;_*8,+6Z5`0V HM+ROPG+PHP[+S*"B(*0(-&(*V 6$/&37*(%8 <$8$"*(%8 HIMH+RHI+HN+[P+SHTINU1Y,#?V +SK6(,*(#8V HPHH+GHG+HM+OI+SHTIHU1-,#?V HG+[RG+O[RH <0"#$...