Table of Contents
Advertisement
Advertisement
Table of Contents

Related Manuals for Linksys E9450 APAC


Summary of Contents for Linksys E9450 APAC
- Page 1 USER GUIDE AX5400 DUAL-BAND WiFi 6 ROUTER Model E9450 APAC...
-
Page 2: Table Of Contents
Your router was not successfully set up ..................... 24 Your Internet cable is not plugged in message ................25 Cannot access your router message ....................26 After setup ..............................27 The internet appears to be unavailable ....................27 Specifications ......................29 Linksys E9450 ............................. 29 Environmental ............................... 29... -
Page 3: Product Overview
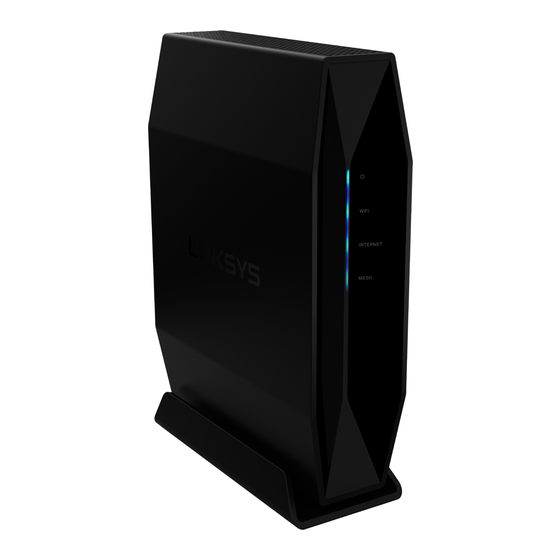
Product Overview Front Power—Blinks blue while router is starting up. Blinks yellow when there is an error. Wi-Fi status—Is solid blue when at least one of the 2.4 GHz and 5 GHz bands is available for connection. Is off when Wi-Fi is turned off in settings. Internet status—Is solid blue when connected to the internet and solid yellow when not connected. -
Page 4: Back
Back Wi-Fi Protected Setup™ (WPS) button (1)—Press to easily configure wireless security on Wi-Fi Protected Setup-enabled network devices. The light under the button will blink while WPS pairing is active. USB 3.0 port (2)—Connect and share a USB drive on your network. Ethernet ports (3)—Connect Ethernet cables (also called network or internet cables) to these Fast Ethernet (10/100/1000) ports and to other wired devices on your network. -
Page 5: Setting Up: Basics
Setting Up: Basics Where to find more help In addition to this user guide, you can find help at Linksys.com/sg/support E9450 (documentation, downloads, FAQs, technical support, live chat, forums) Note—Licenses and notices for third party software used in this product may be viewed on http://support.linksys.com/en-us/license. - Page 6 6. Once you are finished with setup, please be sure to register your router so we can keep you informed security updates, product recalls and other things that will improve your experience.
-
Page 7: Advanced Configuration
If you are using a modem-router (gateway), you might need to enter 192.168.79.1. Note—If none of those options take you to the setup wizard, go to www.linksys.com/support/setupIP for more help. The router will prompt you for a password. If you changed the password during setup, enter the new password. Click LOGIN. If you didn’t change... -
Page 8: Management > Language
Management > Language Select your language—To change language, select one from the drop-down menu. The language of the browser-based utility will change within five seconds. -
Page 9: Device Info
Device Info The Device Info menu features mostly static data about the state of your WiFi network. -
Page 10: General >> Internet Setup
General >> Internet Setup This screen allows you to configure the router’s Internet Profile... -
Page 11: General > Mesh Setup
General > Mesh Setup Use this screen to change router settings mesh or non-mesh WiFi systems. You can view details about child nodes if you are using mesh, or you can turn off mesh and use your E9450 as a traditional router. -
Page 12: Wireless > Radio
Wireless > Radio This screen allows you to configure the router’s physical WiFi interfaces. -
Page 13: Wireless > Ssid
Wireless > SSID Use this screen to configure the router’s virtual interfaces for each physical interface when using as a traditional router. -
Page 14: Wireless > Wps
Wireless > WPS Use this screen when in non-mesh WiFi mode if you want to allow devices to connect with Wi-Fi Protected Setup. Choose an SSID and enable WPS configuration. Enter the PIN for devices that require one to connect. Be sure to click Apply to save your changes. -
Page 15: Wireless > Security
Wireless > Security The router offers the following wireless security options: • Open • WPA2-PSK • WPA/WPA2-PSK • WPA2-PSK/WPA3-SAE • WPA3-SAE (non-mesh mode only) For each SSID, choose authentication type, encryption type and create a passphrase to protect your WiFi from unauthorized access. We strongly recommend not choosing an Open network to which anyone can connect without a passphrase. -
Page 16: Advanced Setup > Lan
Advanced Setup > LAN Use this screen to change LAN IP and DHCP settings. -
Page 17: Advanced Setup > Vpn
Advanced Setup > VPN Use this screen to configure an L2TP (Level 2 Tunnelling protocol) service. -
Page 18: Advanced Setup > Parental Control
Advanced Setup > Parental Control Limit access to the router per device. Using MAC addresses, you can block devices between certain times on specific days. You can also allow or block specific websites (URLs). -
Page 19: Advanced Setup > Dns
Advanced Setup > DNS Use this screen to change the DNS server configurations. -
Page 20: Advanced Setup > External Storage
Advanced Setup > External Storage Use this screen to configure settings for a USB external storage device. -
Page 21: Management > Settings
Management > Settings Create a backup file so you can reload your router settings if you need to later. Upload a backup file to restore customized settings after a factory restore. Restore Default returns all settings to the state they were when you bought the router. -
Page 22: Management > Access Control
Management > Access Control Change administrative username and password to prevent unauthorized access to your router settings. -
Page 23: Management > Firmware Upgrade
Management > Firmware Upgrade Set your router for automatic overnight updates to keep current with features and fixes. You can also choose to update on your time, but you’ll have to download a file and load it on this screen. Upgrading can take several minutes and your router will restart, temporarily disconnecting all devices. -
Page 24: Troubleshooting
The router is in child mode by default and will not function until you run the setup wizard or manually configure it as a parent node. You can find more help from our award-winning customer support at Linksys.com/support/E9450. Your router was not successfully set up... -
Page 25: Your Internet Cable Is Not Plugged In Message
Your Internet cable is not plugged in message If you get a “Your Internet cable is not plugged in” message when trying to set up your router: • Make sure that an ethernet or internet cable (or a cable like the one supplied with your router) is securely connected to the yellow Internet port on the back of the router and to the appropriate port on your modem. -
Page 26: Cannot Access Your Router Message
The wireless network name of the Linksys E-series router, Damaged_Beez2.4 in this example, is shown selected. 3. If you are prompted to enter a network security key, type your password (security key) into the network security key field. -
Page 27: After Setup
The wireless network name of the Linksys E-series router, Damaged_Beez2.4 in this example, is shown selected. 3. Click the wireless network name of your Linksys E-series router (Damaged_Beez2.4 in the example). 4. Type your wireless network password (Security Key) into the Password field. Click OK. - Page 28 To reboot your router using the power cord, do the following: 1. Disconnect the power cord from the router and the modem. 2. Wait 10 seconds and reconnect the power cord to the modem. Make sure it has power. 3. Wait until the modem’s online indicator has stopped blinking (about two minutes). Reconnect the power cord to the router.
-
Page 29: Specifications
Storage Humidity 5% to 90% non-condensing Notes: For regulatory, warranty, and safety information, go to Linksys.com/support/E9450. Specifications are subject to change without notice. Maximum performance derived from IEEE Standard 802.11 specifications. Actual performance can vary, including lower wireless network capacity, data throughput rate, range and coverage. - Page 30 BELKIN, LINKSYS and many product names and logos are trademarks of the Belkin group of companies. Third-party trademarks mentioned are the property of their respective owners. Licenses and notices for third party software used in this product may be viewed here: http://support.linksys.com/en-us/license.