RADEMACHER DuoFern 9494-1 Instruction Manual
Multiple wall controller
Source: rademacher.de

Related Manuals for RADEMACHER DuoFern 9494-1


Summary of Contents for RADEMACHER DuoFern 9494-1
- Page 1 DuoFern Multiple Wall Controller 9494-1 Instruction manual for the electrical connection and for commissioning Item no. 3250 19 74 / Type: 9494 -1 (surface-mounted with battery) VBD 663-2-1 (12.20)
-
Page 2: Dear Customer
Dear Customer, With your purchase of a DuoFern Multiple Wall Controller, you have chosen a quality product manufactured by RADEMACHER. Thank you for the trust you have placed in us. RADEMACHER products have been developed with the greatest possible convenience in mind. Having applied uncompromising quality standards and thorough testing, we are proud to be able to present this innovative product to you. -
Page 3: Table Of Contents
Contents Dear Customer, ..............2 This manual.................5 How to use this manual ..............5 Hazard symbols ..............6 Levels of danger and signal words ..........6 Symbols and depictions used ............7 Glossary - definition ................7 Included in delivery ............8 Front view of the operating unit ........9 Product description ............ - Page 4 Contents 11. Changing the direction of rotation ......29 12. Changing the battery ............. 30 13. Erase all settings, software reset ........31 14. Dismantling ..............31 15. Simplified EU Declaration of Conformity ....32 16. Warranty Terms and Conditions ........33 17.
-
Page 5: This Manual
1. This manual..describes the installation, commissioning and operation of your DuoFern Multiple Wall Controller 9494-1. 1.1 How to use this manual ◆ Before you begin, please read this manual through completely and follow all the safety instructions. ◆ Please also read the instruction manuals of the logged on DuoFern devices as well as of the respective connected appliance. -
Page 6: Hazard Symbols
2. Hazard symbols The following hazard symbols are used in this instruction manual: Danger of fatal electric shock Danger area / dangerous situation 2.1 Levels of danger and signal words DANGER! This hazard will lead to serious injury or death if not avoided. WARNING! WARNING! This hazard may result in serious injury or death if not avoided. -
Page 7: Symbols And Depictions Used
Itemisation ◆ 1) or a) Lists further useful information Please read the respective manual. 2.3 Glossary - definition DuoFern ◆ RADEMACHER radio technology for controlling compatible products. HomePilot® ◆ The HomePilot® is a central controller unit for RADEMACHER radio products. -
Page 8: Included In Delivery
3. Included in delivery a) 1 x Operating unit (50 x 50 mm) with removable cover panel for the label insert b) 1 x Spacer frame c) 1 x Frame d) 1 x Wall bracket e) 1 x Battery (type: CR2450 / Li-Mn) Not illustrated f) 1 x double-sided adhesive strip g) 1 x Label insert, see page 16. -
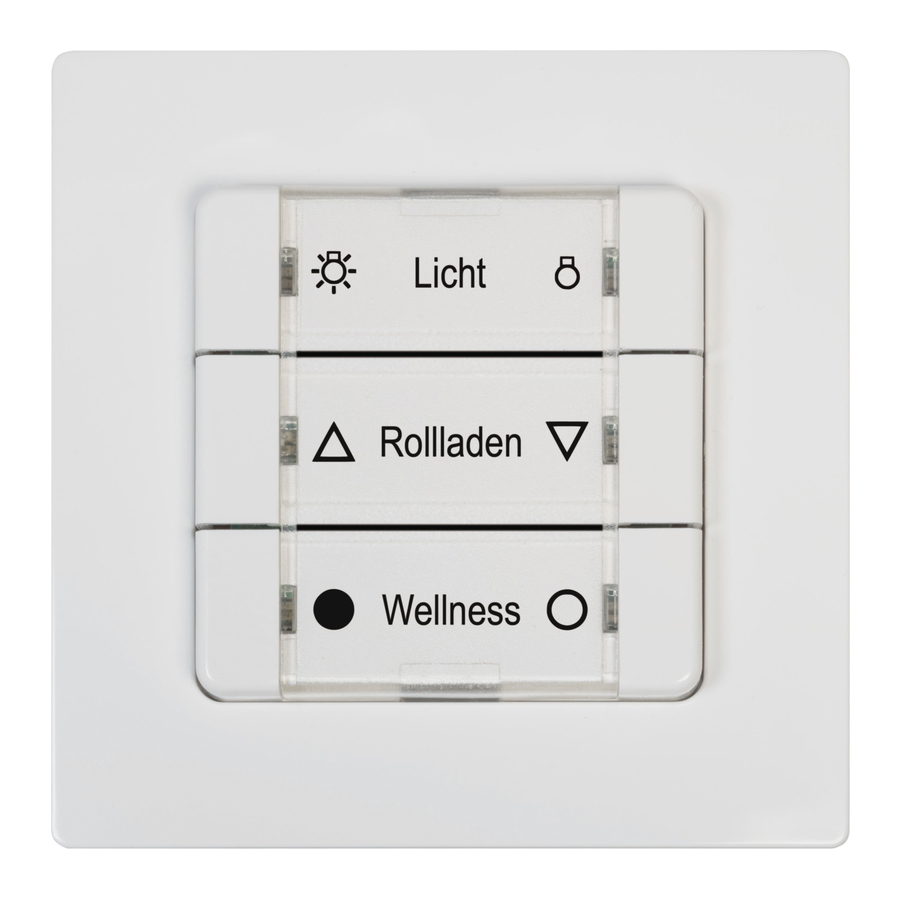
Page 9: Front View Of The Operating Unit
4. Front view of the operating unit LED 1/3/5 LED 2/4/6 Symbol Description T1 to T6 Buttons 1 to 6 LED 1 to LED 6 Each button has a red/green LED... -
Page 10: Product Description
5. Product description Function The DuoFern Multiple Wall Controller serves to log on and control various DuoFern devices. The six operating buttons can be used to transmit the desired commands to the logged on DuoFern devices. Six two-tone LEDs (red/green) provide information on the respective status of the operation. -
Page 11: Button Functions
5.1 Button functions Controller Design Function Activate or deactivate 1 x tap the light or appliance 1 x tap DOWN Control roller shutters / Venetian blinds tap again STOP STOP 1 x tap briefly UP briefly DOWN Roller shutters / Venetian blinds in 1 x long DOWN... -
Page 12: Button Combinations
5.2 Button combinations Activate the log-on mode, Activate the log-off mode, see page 21. see page 23. 1 sec. 1 sec. Clear the DuoFern Activate the jog mode, network, see page 26. see page 27. 5 sec. 1 sec. Activate the reversal of rotation direction mode, Software reset, see page 29. -
Page 13: Technical Specifications
6. Technical specifications General information Nominal voltage: 3 V (DC) Battery type: 1 x CR2450 2 years, with four switching processes per day. * Battery life: * Depending on the number of DuoFern devices logged on. Permissible ambient 0 to 40 °C temperature: Protection class: II (only for use in dry rooms) -
Page 14: Safety Instructions
7. Safety instructions The use of defective equipment can lead to personal injury and damage to property. ◆ Never use defective or damaged equipment. ◆ Check that the DuoFern Multiple Wall Controller is intact. ◆ Consult our customer service department in the event that you discover damage, see page 36. -
Page 15: Improper Use
7.1 Intended use ◆ The installation and operation of the radio systems is only permitted for those systems and devices where a malfunction in the transmitter or receiver would not cause a danger to personnel or property or where this risk is already covered by other safety equipment. -
Page 16: Installation
Templates can be found on our website: here, individual label inserts can be created and printed. www.rademacher.de * Should you have no access to a laser printer, please alternatively use standard printing paper for the label insert. -
Page 17: Selecting The Suitable Installation Location
8.2 Selecting the suitable installation location Avoid installation near disturbing sources Radio systems that transmit on the same frequency can cause interference. ◆ Do not install the DuoFern Multiple Wall Controller in the proximity of powerful radio systems. ◆ In order to ensure optimal operation, the DuoFern Multiple Wall Controller should not be installed on a metallic base or near metal objects. -
Page 18: Installation Of The Duofern Multiple Wall Controller
8.3 Installation of the DuoFern Multiple Wall Controller The DuoFern Multiple Wall Controller 9494-1 is intended for sur- face-mounting. The supplied wall bracket can be screwed in place or stuck to the wall. Select and mark the desired installation position. Pull the protective film from the adhesive strip provided and stick it on the back of the wall bracket. - Page 19 8.3 Installation of the DuoFern Multiple Wall Controller Carefully pull the separating film from the battery compartment. Press the space frame onto the operating unit from the back. Finally, press the operating unit and the frame on to the wall bracket so that the frame lies flush with the wall.
-
Page 20: Commissioning
9. Commissioning Information for logging on DuoFern devices Only DuoFern devices or devices within the same class/category can be allocated to a specific button group. When logging on, the individual DuoFern devices are automatically detected by the DuoFern Multiple Wall Controller, and the available button groups are displayed. -
Page 21: Logging On Duofern Devices
9.1 Logging on DuoFern Devices Switch the desired DuoFern device to the registering mode (please refer to the relevant instruction manual). 1 sec. Activate the registering mode of the Roller shutters DuoFern Multiple Wall Controller. Simultaneously press and hold the Morning Mood buttons 1 and 2 for 1 second. - Page 22 9.1 Logging on DuoFern Devices 5 sec. Press any button Roller shutters and hold for 5 seconds. Morning Mood Wellness Once the channel has been successfully skipped, all LEDs will briefly flash red. You can then assign the next channel if the actuator has more channels available.
-
Page 23: Logging Off Duofern Devices
9.2 Logging off DuoFern devices Switch the desired DuoFern device to the log-off mode (please refer to the relevant instruction manual). Activate the log-off mode on the Roller shutters DuoFern Multiple Wall Controller. Simultaneously press and hold the Morning Mood buttons 5 and 6 for 1 second. -
Page 24: Logging On To The Homepilot
9.3 Logging on to the HomePilot® In combination with the HomePilot®, all 6 buttons of the DuoFern Multiple Wall Controller can be used to individually trigger scenes. To do so, it must first be logged on to the HomePilot®. Open the user interface of the HomePilot® and click left on the button [configuration] and then on [register devices]. - Page 25 9.3 Logging on to the HomePilot® 1 sec. Simultaneously press and hold the Roller shutters buttons 1 and 2 for 1 second to activate the registering mode of the DuoFern Morning Mood Multiple Wall Controller. Wellness Once successfully logged on, the DuoFern Multiple Wall Controller will be displayed in the left table: Click on the device and assign an individual name, if required.
-
Page 26: Clearing Up The Duofern Network
9.4 Clearing up the DuoFern network This function enables you to log off all DuoFern devices from the DuoFern Multiple Wall Controller that are no longer accessible via radio. Not all battery-operated DuoFern devices can be logged off in this way. A software reset must be carried out in order to logout and delete all DuoFern devices, see page 31. -
Page 27: Activating The Jog Mode
10. Activating the jog mode In the jog mode, the DuoFern Multiple Wall Controller can be used, e.g. to control Venetian blinds. 5 sec. Attention! The switching mode only remains active for approx. 5 seconds. Activate the jog mode for one button group 1 sec. -
Page 28: Operation In Jog Mode
10.1 Operation in jog mode Tilting the slats Briefly tapping the operating buttons enables Venetian blinds slats to be conveniently configured. Driving the slats into the end position Press the operating button longer to drive the Venetian blinds into the end position. The drive can be stopped by briefly tapping the button again, see page 11 "Button functions". -
Page 29: Changing The Direction Of Rotation
11. Changing the direction of rotation This function can be used to change the direction of rotation of a connected DuoFern component (e.g. a radio tubular motor) as required. To use this function, only one component may be logged on per button group. If several devices are already logged on, log on the DuoFern component for which you want to change the direction of rotation to one of the free button... -
Page 30: Changing The Battery
12. Changing the battery If the battery has discharged and needs to be changed, all red LEDs will briefly light up when any random button is pressed. Carefully pull the operating unit out of the wall bracket. Carefully press the battery out of the battery compartment using a flat, non-conductive object (e.g. -
Page 31: Erase All Settings, Software Reset
13. Erase all settings, software reset A software reset must be carried out to reset the DuoFern Multiple Wall Controller to the original default condition as when supplied. Press and hold buttons 5 and 6 Roller shutters simultaneously until all LEDs continuously light up red. -
Page 32: Simplified Eu Declaration Of Conformity
15. Simplified EU Declaration of Conformity RADEMACHER Geräte-Elektronik GmbH hereby declares that the DuoFern Multiple Wall Controller 9494-1 complies with the Directive 2014/53/EU (Radio Equipment Directive). The full text of the declaration of conformity is available at the following website:... -
Page 33: Warranty Terms And Conditions
Proof of this must be provided by presenting a copy of the bill. RADEMACHER shall remedy any defects that occur within the warranty period free of charge either by repair or replacement of the affected parts or by supplying a new replacement unit or one to the same value. -
Page 35: Cut Out Label Insert
17. Cut out label insert 30 mm ✂... - Page 36 RADEMACHER Geräte-Elektronik GmbH Buschkamp 7 46414 Rhede (Germany) info@rademacher.de www.rademacher.de Service: * 30 seconds free of charge, subsequently Hotline 01807 933-171* 14 cents / minute from German fixed line Fax +49 2872 933-253 networks and max. 42 cents / minute from service@rademacher.de...