Table of Contents
Advertisement
Quick Links
Advertisement
Table of Contents

Related Manuals for HIKVISION DS-8108LHFHI-K2


Summary of Contents for HIKVISION DS-8108LHFHI-K2
- Page 1 Education Sharing System Quick Start Guide...
-
Page 2: Table Of Contents
Education Sharing System TABLE OF CONTENTS Chapter1 Panels Description ....................6 1.1 Front Panel ........................6 1.2 Rear Panel ........................7 Chapter 2 Installation and Connection .................. 8 2.1 Device Installation ......................8 2.2 Hard Disk Installation ....................8 2.3 Hard Disk Storage Calculation Chart ................10 Chapter 3 Startup and Shutdown.................. - Page 3 INDIRECT DAMAGES, INCLUDING, AMONG OTHERS, DAMAGES FOR LOSS OF BUSINESS PROFITS, BUSINESS INTERRUPTION, OR LOSS OF DATA OR DOCUMENTATION, IN CONNECTION WITH THE USE OF THIS PRODUCT, EVEN IF HIKVISION HAS BEEN ADVISED OF THE POSSIBILITY OF SUCH DAMAGES. REGARDING TO THE PRODUCT WITH INTERNET ACCESS, THE USE OF PRODUCT SHALL BE WHOLLY AT YOUR OWN RISKS.
- Page 4 Education Sharing System Regulatory Information FCC Information Please take attention that changes or modification not expressly approved by the party responsible for compliance could void the user’s authority to operate the equipment. FCC compliance: This equipment has been tested and found to comply with the limits for a Class A digital device, pursuant to part 15 of the FCC Rules.
- Page 5 Applicable Models This manual is applicable to the models listed in the following table. Product Name Model Education Sharing System DS-8108LHFHI-K2 Symbol Conventions The symbols that may be found in this document are defined as follows. Symbol Description Provides additional information to emphasize or supplement important points of the main text.
- Page 6 Education Sharing System Safety Instructions Proper configuration of all passwords and other security settings is the responsibility of the installer and/or end-user. In the use of the product, you must be in strict compliance with the electrical safety regulations of the nation and region.
-
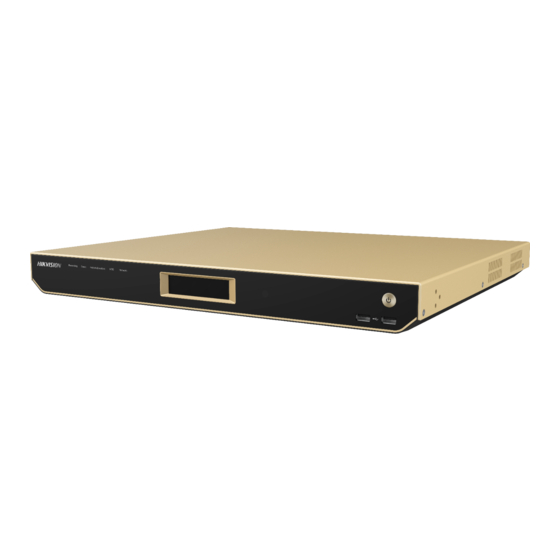
Page 7: Chapter1 Panels Description
Education Sharing System Chapter1 Panels Description 1.1 Front Panel Figure 1-1 Front Panel Table 1-1 Panel Description Name Description Recording ● Green: recording ● Unlit: not recording Direct ● Solid green: live view control normal ● Solid red: automatic live view control is enabled Publish/Download ●... -
Page 8: Rear Panel
Education Sharing System 1.2 Rear Panel Figure 1-2 Rear Panel Table 1-2 Panel Description Name Description Antenna interface SDI IN Video inputs of SDI connector VIDEO IN 1 Video inputs of VGA and HDMI interface LOOP OUT VGA and HDMI loopback interface VIDEO IN 2 Video inputs of VGA and HDMI interface VIDEO OUT... -
Page 9: Chapter 2 Installation And Connection
Education Sharing System Chapter 2 Installation and Connection 2.1 Device Installation During device installation: Keep all liquids away from the device. Use brackets for rack mounting. Ensure ample room for audio and video cables. When routing cables, ensure that the bend radius of the cables are no less than five times than its diameter. - Page 10 Education Sharing System Figure 2-1 Unfasten Screws Step 2 Connect the data cable and hard disk power cable. 1) Connect the data cable with the device motherboard data port. 2) Connect the data cable with the hard disk data port. 3) Connect the hard disk power cable with the hard disk power port.
-
Page 11: Hard Disk Storage Calculation Chart
Education Sharing System 2.3 Hard Disk Storage Calculation Chart The following chart shows an estimation of storage space used based on recording at one channel for an hour at a fixed bit rate. Bit Rate Storage Used 128K 160K 192K 224K 256K 112M... -
Page 12: Chapter 3 Startup And Shutdown
Education Sharing System Chapter 3 Startup and Shutdown Purpose: Proper startup and shutdown procedures are crucial to expanding the life of the device. Follow the steps to start and shut down your device. 3.1 Startup Step 1 Connect the device and a socket with the provided power cord. It is HIGHLY recommended to use an Uninterruptible Power Supply (UPS) in conjunction with the device. -
Page 13: Chapter 4 Basic Configuration
Education Sharing System Chapter 4 Basic Configuration 4.1 Network Connection You shall acknowledge that the use of the product with Internet access might be under network security risks. For avoidance of any network attacks and information leakage, please strengthen your own protection. If the product does not work properly, please contact with your dealer or the nearest service center. -
Page 14: Access Via Web Browser
Education Sharing System Figure 4-2 Connect via a Switch or a Router 4.2 Access via Web Browser Purpose: You can get access to the device via web browser. You may use one of the following listed web browsers: Internet Explorer 6.0, Internet Explorer 7.0, Internet Explorer 8.0, Internet Explorer 9.0, Internet Explorer 10.0, Apple Safari, Mozilla Firefox, and Google Chrome. -
Page 15: Menu Structure
Education Sharing System STRONG PASSWORD RECOMMENDED–We highly recommend you create a strong password of your own choosing (Using a minimum of 8 characters, including at least three of the following categories: upper case letters, lower case letters, numbers, and special characters.) in order to increase the security of your product. -
Page 16: Indoor Speed Dome Connection
Education Sharing System Live View live image. Playback Play the recorded videos. Configuration Configure the parameters including network, camera, recording, etc. 4.4 Indoor Speed Dome Connection Purpose: Before you can get the live view or record the image of classroom, connect the education specified speed dome to the device via analog connector or network. -
Page 17: Automatic Live View Control
4.5 Automatic Live View Control Purpose: Combining with Hikvision education specified speed dome, the education sharing system can automatically display the teacher image, student image, or HDMI/VGA multimedia image in live view control channel according to the speed dome smart detection information. Besides, the... -
Page 18: Enable Auto Live View Control
Education Sharing System Connect Hikvision education specified speed dome and education sharing system via network. For detailed steps, refer to 4.4.2 Connect via Network. In automatic live view control mode, when a smart event occurs to the education specified... -
Page 19: Configure Live View Control Strategy
Education Sharing System Figure 4-9 Live View Control View Step 2 Select View Mode. Movie: You need to set Assistance Mode for movie mode. When one alarm is triggered, it will display in single screen. But if two or more alarms are trigged, it will display as what the Assistance Mode is set, including Single Screen, Dual-Screen, and Picture-in-Picture. -
Page 20: Configure One-Touch Configuration
Education Sharing System Figure 4-10 Live View Control Strategy Step 2 Select a channel for modification. Step 3 Click Modify. Figure 4-11 Strategy Configuration Interface Step 4 Set the parameters, including priority, IP address, port, user name, password, etc. Priority: The priority of the selected channel. The larger the value is, the higher the priority will be. -
Page 21: Live View
Education Sharing System 4.6 Live View Purpose: You can view the live image of connected cameras with manual semi-auto or auto mode, and record the course video. Before you start: Ensure the device has successfully connected to the education specified cameras, and your web browser has installed the latest web component. - Page 22 Education Sharing System Table 4-2 View Mode Description Mode Icon Description Single screen Movie PIP 1, overlay the picture at the lower right corner Picture-in-Picture PIP 1, overlay the picture at the lower left corner Multi-Screen 1, split screen in half Multi-Screen 2, split screen in three blocks with the larger one at left side Multi-Screen 3, split screen in three blocks with the...
-
Page 23: Schedule Settings
Education Sharing System Manual: Manually dispaly the image to the main screen by double-clicking the camera display window at the bottom. You shall use the PTZ control panel to manually track the object. SimiAuto: The speed dome can automatically track object, but you still have to manually switch live view image by double-clicking the camera display window at the bottom. -
Page 24: Publish Courseware
Education Sharing System Figure 4-16 Schedule Settings 4.8 Publish Courseware Purpose: The recorded courses can be automatically published to FTP server. Step 1 Go to Configuration > Recording Settings > Basic Settings. Figure 4-17 Publishing Configuration Step 2 Enter the FTP server address, port, user name, and password. Step 3 Click Set to select the publishing channel(s). -
Page 25: Playback
Education Sharing System Figure 4-18 Set Publishing Channel Step 5 Set Publishing Path. Step 6 Optionally, check Auto Publishing to automatically publish courses. You can set Date Published as Last Course or Custom time for the course that requires to be published to FTP. Step 7 Click Save to save the settings The published course video format is MP4. -
Page 26: Download Courses
Education Sharing System Figure 4-19 Playback Step 2 Select the channel in the left channel list. Step 3 Select a day to play back in the right calendar. The day with mark has record file. Step 4 Click Search. Step 5 You can drag the time bar at the bottom, or click to adjust time. - Page 27 Education Sharing System Step 2 Click Download Course. Step 3 Set the search conditions. You can search course by its related features or by date. Search course by related features. 1) Go to Download by Course. 2) Enter search conditions, including camera, year, course type, etc. 3) Click Search.
- Page 28 Education Sharing System UD11725B-A...