Table of Contents
Advertisement
535 Manual Pipe and Bolt
Threading Machine
WARNING!
Read this Operator's Manual
carefully before using this
tool. Failure to understand
and follow the contents of
this manual may result in
electrical shock, fire and/or
serious personal injury.
1.800.561.8187
Threading Machine
www.
.com
•
Castellano – pág. 33
information@itm.com
Manual
•
Français – 15
Advertisement
Table of Contents

Related Manuals for RIDGID 535


Summary of Contents for RIDGID 535
- Page 1 Threading Machine Manual 535 Manual Pipe and Bolt Threading Machine WARNING! Read this Operator’s Manual carefully before using this tool. Failure to understand and follow the contents of this manual may result in electrical shock, fire and/or serious personal injury.
-
Page 2: Table Of Contents
535 Manual Pipe and Bolt Threading Machine Table of Contents General Safety Information Work Area Safety................................2 Electrical Safety ................................2 Personal Safety ................................2 Tool Use and Care..............................3 Service..................................3 Specific Safety Information Foot Switch Safety..............................3 Machine Safety ................................3 Description, Specifications and Standard Equipment Description..................................4... - Page 3 535 Manual Pipe and Bolt Threading Machine 535 Manual Pipe and Bolt Threading Machine Record Serial Number below and retain product serial number which is located on nameplate. Serial 1.800.561.8187 information@itm.com www. .com...
-
Page 4: General Safety Information
535 Manual Pipe and Bolt Threading Machine • Do not abuse cord. Never use the cord to carry the General Safety Information tools or pull the plug from an outlet. Keep cord WARNING! Read and understand all instructions. Failure away from heat, oil, sharp edges or moving parts. -
Page 5: Tool Use And Care
535 Manual Pipe and Bolt Threading Machine ance at all times. Proper footing and balance enables Foot Switch Safety WARNING better control of the tool in unexpected situations. Using a threading machine without a foot switch increases the risk of serious injury. A foot switch •... -
Page 6: Description, Specifications And Standard Equipment Description
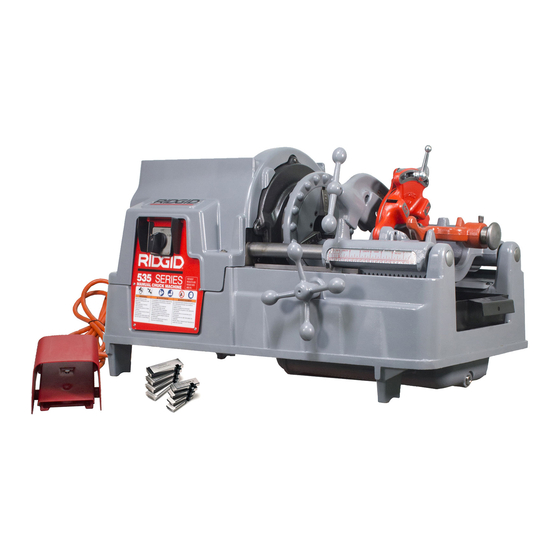
Standard Equipment Reamer......No. 341 - Positive-Locking, Description 5-Flute Cone, Right Hand, The RIDGID Model 535 Threading Machine is an elec- ″ through 2″ tric motor-driven machine which centers and chucks Weight......260 lbs. (Less Die Head & pipe, conduit and rod (bolt stock) and rotates it while... -
Page 7: Machine Assembly
Mounting Machine To Stand Foot Switch Carriage Handwheel 1. The machine is designed to mount on the three uni- Figure 4 – No. 535 Pipe and Bolt Threading Machine versal stands listed below. 2. Clean the speed chuck jaws with a wire brush. -
Page 8: Machine And Work Area Set-Up
Threading Machine. Dull or damaged cutting tools and dies can lead to binding, tool breakage and poor 5. If necessary, fill the reservoir with RIDGID Thread quality threads. Cutting Oil. 10. Clean metal shavings and other debris from the chip 6. -
Page 9: Operation Using Machine-Mounted Tools
535 Manual Pipe and Bolt Threading Machine • Flip the directional switch to FOR (Forward). Press 4. Insert workpieces less than 2 feet long from the front and release the foot switch. Check that the Thread - of the machine. Insert longer pipes through either... -
Page 10: Reaming Pipe With No. 341 Reamer
5. Retract reamer bar and return reamer to UP position. 6. Release foot switch and remove your foot from the housing. Figure 7 – Threading with 535 Manual Threading Machine 6. Quick-Opening 811A Die Head (Figure 8) – When thread is completed, rotate throwout lever to OPEN position, retracting dies. -
Page 11: Removing Pipe From The Threading Machine
OVER or UNDER size Model 531 and 532 Quick-Opening Bolt Die Head mark on size bar. NOTE! Pump Kit not required on all pre-2001 535 machines. Installing Dies in Self-Opening Die Head (Right Hand Only) -
Page 12: Installing Dies In Model 816/817 Die Heads
535 Manual Pipe and Bolt Threading Machine ″), ( ″ and ″) and (1″ through 2″). Bolt threading 7. Insert new dies to mark on side of dies. Numbers 1 through 4 on the dies must match numbers on the requires a separate set of of dies for each bolt size. -
Page 13: Priming Oil Pump
Accessories for Threading By Close-Coupled WARNING Method All 535 Threading Machines made prior to June 1, 1996 Drive Link Assembly (Cat. # 42415 or 16723 should have a tube extension on the oil pump priming port, as well as a top cover access hole, so the pump can depending on carriage) be primed without removing the top cover of the machine. -
Page 14: Die Heads And Dies
535 Manual Pipe and Bolt Threading Machine Die Heads and Dies Pipe Bolt Model Capacity Capacity Dies Opening Operation ″ - 2″ ″ - 2″ 811A NPT Universal Quick R.H. ″ - 2″ ″ - 2″ 815A NPT Universal Self R.H. -
Page 15: Jaw Insert Replacement
535 Manual Pipe and Bolt Threading Machine Service and Repair compressed air if available. Do not operate machine with oil filter screen removed. WARNING NOTE! RIDGID Thread Cutting Oil produces high quality threads and maximizes die life. For information concerning its use and handling, refer to the labels on the oil containers. -
Page 16: Wiring Diagrams
535 Manual Pipe and Bolt Threading Machine Wiring Diagrams 1101 Motor (115V) 2301 Motor (230V) 1101A Motor (115V) Blue Suppressor White White (Blue) Black (Brown) Yellow Green (Green/Yellow) Black 115V IEC Standard 25-60 Hz Foot Switch European Wiring Diagram MARRON... -
Page 17: Lifetime Warranty
No other express warranty applies This FULL LIFETIME WARRANTY is the sole and exclusive warranty for RIDGID ® products. No employee, agent, dealer, or other person is authorized to alter this warranty or make any other war- ranty on behalf of the RIDGE TOOL COMPANY.