
Related Manuals for Philips 9000 Series


Summary of Contents for Philips 9000 Series
- Page 1 9000 series S95XX / S93XX 2.002.5863.1 S95XX,S93XX COVER A6 FC_cHR.indd 1 10-03-16 10:...
- Page 3 20 21...
- Page 4 empty page before TOC...
- Page 5 English 6 Português do Brasil 34...
-
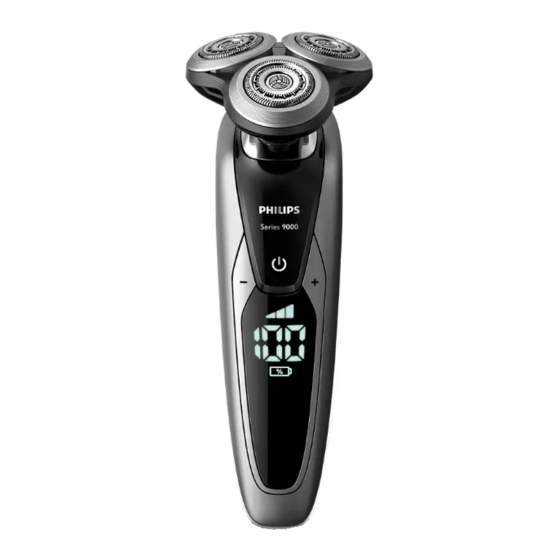
Page 6: General Description (Fig. 1)
English Introduction Congratulations on your purchase and welcome to Philips! To fully benefit from the support that Philips offers, register your product at www.philips.com/welcome. Please read this user manual, as it contains information about the features of this shaver as well as some tips to make shaving easier and more enjoyable. -
Page 7: Important Safety Information
English The accessories supplied may vary for different products. The box shows the accessories that have been supplied with your appliance. Important safety information Read this important information carefully before you use the appliance and its accessories and save it for future reference. The accessories supplied may vary for different products. - Page 8 - If your shaver comes with a cleaning system, always use the original Philips cleaning fluid (cartridge or bottle, depending on the type of cleaning system). - Always place the cleaning system on a stable, level and horizontal surface to prevent leakage.
-
Page 9: Electromagnetic Fields (Emf)
- Do not use the supply unit in or near wall sockets that contain an electric air freshener to prevent irreparable damage to the supply unit. Electromagnetic fields (EMF) - This Philips appliance complies with all applicable standards and regulations regarding exposure to electromagnetic fields. General - This shaver is waterproof. -
Page 10: Battery Fully Charged
English Charging Quick charge: When you connect the shaver to the wall socket, the lights of the battery charge indicator light up one after another repeatedly. When the shaver contains enough energy for one shave, the bottom light of the battery charge indicator starts to flash slowly. -
Page 11: Cleaning Reminder
English Cleaning reminder Clean the shaver after every shave for optimal performance. When you switch off the appliance, the cleaning reminder flashes to remind you to clean the appliance. Travel lock You can lock the appliance when you are going to travel. -
Page 12: Replacement Reminder
English Replacement reminder For maximum shaving performance, we advise you to replace the shaving heads every two years. The appliance is equipped with a replacement reminder which reminds you to replace the shaving heads. The shaving unit symbol lights up white continuously, the arrows flash white and the appliance beeps to indicate that you have to replace the shaving heads. -
Page 13: Charging With The Supply Unit
English battery is almost empty. The battery charge is indicated by the lights of the battery charge indicator on the display. When you connect the shaver to the wall socket, you hear a sound. Charging takes approx. 1 hour. A fully charged shaver has a shaving time of up to 50 minutes. -
Page 14: Using The Appliance
English 5 Place the shaver in the holder (1), tilt the shaver backwards (2) and press down the top cap to connect the shaver (‘click’) (3). Note: The battery symbol starts to flash to indicate that the appliance is charging. When the battery is fully charged, the battery symbol lights up continuously. - Page 15 English - To ensure the best result, we advise you to pre- trim your beard if you have not shaved for 3 days or longer. Dry shaving 1 Switch on the appliance. The display lights up for a few seconds. 2 Move the shaving heads over your skin in circular movements.
-
Page 16: Using The Click-On Attachments
English 3 Rinse the shaving unit under the tap to ensure that the shaving unit glides smoothly over your skin. 4 Switch on the appliance. 5 Move the shaving heads over your skin in circular movements. Note: Rinse the shaving unit regularly to ensure that it continues to glide smoothly over your skin. - Page 17 English 3 Insert the lug of the attachment into the slot in the top of the appliance. Then press down the attachment to attach it to the appliance (‘click’). Using the trimmer attachment You can use the trimmer attachment to groom your sideburns and moustache.
- Page 18 English 2 Slide the comb straight into the guiding grooves on both sides of the beard styler attachment (‘click’). 3 Press the length selector and then push it to the left or right to select the desired hair length setting. 4 Switch on the appliance.
-
Page 19: Cleaning And Maintenance
English Cleaning and maintenance The accessories supplied may vary for different products. The box shows the accessories that have been supplied with your appliance. Cleaning the shaver in the SmartClean system SmartClean system Plus has two phases: the rinsing phase and the drying phase. Preparing the SmartClean system for use Caution: Do not tilt the SmartClean system to prevent leakage. - Page 20 English 5 Place the cleaning cartridge in the SmartClean system. 6 Push the top part of the SmartClean system back down (‘click’). Using the SmartClean system Caution: Always shake excess water off the shaver before you place it in the SmartClean system.
- Page 21 English 3 Place the shaver in the holder (1), tilt the shaver backwards (2) and press down the top cap to connect the shaver ('click') (3). The battery symbol starts to flash, which indicates that the shaver is charging. 4 Press the on/off button on the SmartClean system to start the cleaning program.
- Page 22 English Replacing the cartridge of the SmartClean system Replace the cleaning cartridge when the replacement symbol flashes orange or when you are no longer satisfied with the cleaning result. If you clean the shaver in the SmartClean system once a week, the SmartClean cartridge lasts approximately three months.
-
Page 23: Cleaning The Shaver Under The Tap
English Cleaning the shaver under the tap Clean the shaver after every shave for optimal performance. Caution: Be careful with hot water. Always check if the water is not too hot, to prevent burning your hands. Note: Never dry the shaving unit with a towel or tissue, as this may damage the shaving heads. -
Page 24: Cleaning The Click-On Attachments
English 7 Attach the shaving head holder to the bottom part of the shaving unit (‘click’). Cleaning the click-on attachments Note: Never dry the trimmer or beard styler attachments with a towel or tissue, as this may damage the trimming teeth. Cleaning the trimmer attachment Clean the trimmer attachment every time you have used it. -
Page 25: Replacing The Shaving Heads
Replace damaged shaving heads immediately. Always replace the shaving heads with original Philips shaving heads (see 'Ordering accessories'). Replacement reminder The replacement reminder indicates that the shaving heads need to be replaced.The shaving... - Page 26 English 2 Pull the shaving head holder off the bottom part of the shaving unit. 3 Place the retaining ring holder on the retaining ring (1), turn it anticlockwise (2) and lift it off the shaving head (3). Remove the retaining ring from the retaining ring holder and repeat this process for the other retaining rings.
-
Page 27: Ordering Accessories
Ordering accessories To buy accessories or spare parts, visit www.shop.philips.com/service or go to your Philips dealer. You can also contact the Philips Consumer Care Centre in your country (see the worldwide guarantee leaflet for contact details). The following accessories and spare parts are... - Page 28 We strongly advise you to take your product to an official collection point or a Philips service centre to have a professional remove the rechargeable battery. - Follow your country’s rules for the separate collection of electrical and electronic products and rechargeable batteries.
-
Page 29: Guarantee And Support
4 Remove the rechargeable battery with a screwdriver. Guarantee and support If you need information or support, please visit www.philips.com/support or read the separate worldwide guarantee leaflet. Guarantee restrictions The shaving heads (cutters and guards) are not covered by the terms of the international guarantee because they are subject to wear. - Page 30 English Problem Possible cause Solution The travel lock is Press the on/off button for activated. 3 seconds to deactivate the travel lock. The shaving unit is Clean the shaving heads soiled or damaged thoroughly or replace to such an extent them.
- Page 31 English Problem Possible cause Solution I replaced the You have not reset Reset the appliance by shaving heads, the appliance. pressing the on/off button but the display for approx. 7 seconds (see still shows the 'Replacing the shaving replacement heads'). reminder.
-
Page 32: Smartclean System
English Problem Possible cause Solution Water is leaking During cleaning, This is normal and not from the bottom water may collect dangerous because all of the appliance. between the inner electronics are enclosed in body and the outer a sealed power unit inside shell of the the appliance. - Page 33 English Problem Possible cause Solution You have used Only use the original another cleaning Philips cleaning cartridge. fluid than the original Philips cleaning cartridge. The drain of the Remove the cartridge from cleaning cartridge is the SmartClean system and blocked.
-
Page 34: Descrição Geral (Fig. 1)
Introdução Parabéns pela sua compra e seja bem-vindo à Philips! Para aproveitar todos os benefícios oferecidos pelo suporte da Philips, registre seu produto na página www.philips.com/welcome. Leia este manual do usuário, pois ele contém informações sobre os recursos deste barbeador e algumas dicas para facilitar o barbear e torná-lo... -
Page 35: Informações Importantes De Segurança
Português do Brasil 24 Plugue pequeno 25 Suporte do anel de retenção 26 Estojo Os acessórios fornecidos podem variar para produtos diferentes. A caixa mostra os acessórios que foram fornecidos com seu aparelho. Informações importantes de segurança Leia atentamente estas informações importantes antes de usar o aparelho e seus acessórios. - Page 36 Português do Brasil - Este aparelho pode ser utilizado por crianças de oito anos ou mais e por pessoas com capacidade física, sensorial ou mental reduzida ou com pouca experiência e conhecimento, desde que sejam supervisionadas ou instruídas sobre o uso do aparelho de forma segura e estejam cientes dos riscos envolvidos.
-
Page 37: Campos Eletromagnéticos
à fonte de alimentação. Campos eletromagnéticos - Este aparelho Philips está em conformidade com todos os padrões e regulamentos aplicáveis relacionados à exposição a campos eletromagnéticos. -
Page 38: Informações Gerais
Português do Brasil Informações gerais - Este barbeador é à prova d'água. Ele é adequado para uso na banheira ou no chuveiro e para limpeza em água corrente. Por questões de segurança, o barbeador só pode ser usado sem fio. - Este aparelho é... -
Page 39: Bateria Fraca
Português do Brasil Carregamento Carga rápida: Ao conectar o barbeador à tomada, as luzes do indicador de carga da bateria se acendem uma após a outra repetidamente. Quando o barbeador tiver energia suficiente para um barbear, a luz inferior do indicador de carga começa a piscar lentamente. - Page 40 Português do Brasil Carga restante da bateria A carga restante da bateria é indicada pelas luzes do indicador de carga da bateria que acendem continuamente. Lembrete de limpeza Limpe o barbeador após cada uso para obter o melhor desempenho. Quando você desliga o aparelho, o lembrete de limpeza emite um som para lembrá-lo de limpar o aparelho.
- Page 41 Português do Brasil O símbolo da trava de viagem pisca de maneira intermitente e depois fica aceso continuamente. O aparelho está pronto para ser usado novamente. Nota: Você pode também desativar a trava de viagem ao conectar o aparelho na tomada. Lembrete de substituição Para obter o melhor desempenho do barbeador, recomendamos substituir a unidade de corte a...
-
Page 42: Carregamento Com A Fonte De Alimentação
Português do Brasil Cabeças de corte bloqueadas Se as cabeças de corte estiverem travadas, o ponto de exclamação se acenderá na cor laranja de forma contínua. O lembrete de substituição e o lembrete de limpeza piscam na cor branca alternadamente e você ouve um aviso sonoro. Nesse caso, o motor não funciona porque as cabeças de corte estão sujas ou danificadas. -
Page 43: Utilização Do Aparelho
Português do Brasil Carregando no sistema SmartClean (somente em alguns modelos) 1 Coloque o plugue pequeno na parte traseira do sistema SmartClean. 2 Conecte a fonte de alimentação a uma tomada na parede. 3 Pressione o encaixe superior para poder colocar o barbeador no suporte (haverá... -
Page 44: Como Ligar E Desligar O Aparelho
Português do Brasil Como ligar e desligar o aparelho - Para ligar o aparelho, pressione o botão liga/desliga uma vez. O display acende por alguns segundos. - Para desligar o aparelho, pressione o botão liga/desliga uma vez. O display acende por alguns segundos e exibe a capacidade de carga restante da bateria. - Page 45 Português do Brasil 2 Mova as cabeças de corte sobre a pele em movimentos circulares. Nota: Movimentos circulares produzem resultados melhores do que movimentos retos. 3 Limpe o aparelho após o uso (consulte 'Limpeza e manutenção'). Barbear com a pele molhada Você...
- Page 46 Português do Brasil 5 Mova as cabeças de corte sobre a pele em movimentos circulares. Nota: Lave a unidade de corte regularmente para garantir que ela continue deslizando suavemente pela pele. 6 Seque o rosto. 7 Limpe o aparelho após o uso (consulte 'Limpeza e manutenção').
- Page 47 Português do Brasil 1 Encaixe o acessório no aparelho (até ouvir um "clique"). 2 Ligue o aparelho. O display acende por alguns segundos. 3 Segure o acessório do aparador perpendicular à pele e mova o aparelho para baixo pressionando suavemente. 4 Limpe o acessório após o uso (consulte 'Limpeza e manutenção').
-
Page 48: Limpeza E Manutenção
Português do Brasil 3 Pressione o seletor de altura e empurre-o para a direita ou esquerda para selecionar o ajuste da altura do pelo desejado. 4 Ligue o aparelho. 5 Mova o aparelho para cima ao pressionar suavemente. A parte frontal do pente deve ficar sempre em contato total com a pele. - Page 49 Português do Brasil Limpeza do barbeador no sistema SmartClean O sistema SmartClean Plus tem duas fases: a fase de lavagem e a fase de secagem. Preparação do sistema SmartClean para a utilização Cuidado: Não incline o sistema SmartClean para evitar vazamento. Nota: Segure o sistema SmartClean enquanto você...
- Page 50 Português do Brasil 5 Coloque o cartucho de limpeza no sistema SmartClean. 6 Pressione a parte superior do sistema SmartClean novamente para baixo (até ouvir um "clique"). Utilização do sistema SmartClean Cuidado: Certifique-se de sempre tirar o excesso de água do barbeador antes de colocá-lo no sistema SmartClean.
- Page 51 Português do Brasil 3 Coloque o barbeador no suporte (1), incline o barbeador para trás (2) e pressione a tampa superior para conectar o barbeador (até ouvir um "clique") (3). O símbolo de bateria começa a piscar, o que indica que o barbeador está carregando. 4 Pressione o botão liga/desliga no sistema SmartClean para iniciar o programa de limpeza.
- Page 52 Português do Brasil Nota: Se remover a fonte de alimentação da tomada elétrica durante o programa de limpeza, o programa será interrompido. Substituição do cartucho do sistema SmartClean Substitua o cartucho de limpeza quando o símbolo de substituição piscar na cor laranja ou quando não estiver satisfeito com o resultado da limpeza.
-
Page 53: Limpeza Do Barbeador Com Água Corrente
Português do Brasil 6 Pressione a parte superior do sistema SmartClean novamente para baixo (até ouvir um "clique"). Limpeza do barbeador com água corrente Limpe o barbeador após cada uso para obter o melhor desempenho. Cuidado: Cuidado com água quente. Sempre verifique se a água não está... - Page 54 Português do Brasil 5 Enxágue o suporte da cabeça de corte em água morna corrente. 6 Tire com cuidado o excesso de água e deixe o suporte da cabeça de corte secar. 7 Encaixe o suporte da cabeça de corte na parte inferior da unidade de corte (até...
-
Page 55: Para Guardar O Aparelho
Para obter o melhor desempenho do barbeador, 2yrs recomendamos substituir a unidade de corte a cada dois anos. Substitua as cabeças de corte danificadas imediatamente. Sempre troque as cabeças de corte por cabeças (consulte 'Encomenda de acessórios') de corte originais da Philips. Lembrete de substituição... - Page 56 Português do Brasil O lembrete de substituição indica que as cabeças de corte precisam ser substituídas.O símbolo da unidade de corte fica continuamente aceso, as setas piscam na cor branca e um sinal sonoro é emitido quando você desliga o barbeador. 1 Desligue o aparelho.
-
Page 57: Encomenda De Acessórios
Para comprar acessórios ou peças de substituição, acesse www.shop.philips.com/service ou dirija-se até um revendedor Philips. Você também pode entrar em contato com a Central de Atendimento ao Cliente Philips do seu país (consulte o folheto de garantia mundial para ver as informações de contato). - Page 58 à saúde humana. Para contribuir com a qualidade ambiental e com sua saúde, a Philips receberá pilhas e baterias comercializadas ou fornecidas com seus produtos após seu fim de vida, que serão encaminhadas à...
-
Page 59: Garantia E Suporte
4 Retire a bateria recarregável com uma chave de fenda. Garantia e suporte Caso você precise obter informações ou suporte, visite o site www.philips.com/support ou leia o folheto de garantia mundial à parte. Restrições da garantia As cabeças de corte (cortadores e protetores) não estão cobertas pelos termos da garantia... - Page 60 Português do Brasil perguntas frequentes ou entre em contato com a Central de Atendimento ao Cliente do seu país. Barbeador Problema Possível causa Solução O aparelho não O aparelho ainda Tire o aparelho da tomada funciona quando está conectado à e pressione o botão pressiono o tomada.
- Page 61 Português do Brasil Problema Possível causa Solução Para limpá-las completamente, remova- as uma a uma (consulte 'Substituição') do suporte. Em seguida, separe-as de seu protetor e lave cada conjunto em água corrente. Após limpar, coloque o cortador de volta no protetor correspondente.
-
Page 62: Sistema Smartclean
Português do Brasil Problema Possível causa Solução Um ponto de As cabeças de corte Substitua as cabeças de exclamação, o estão danificadas. corte (consulte lembrete de 'Substituição'). substituição e o lembrete de limpeza aparecem de repente no visor. As cabeças de corte Limpeza da cabeça de estão sujas. - Page 63 Você usou outro Utilize apenas o cartucho líquido de limpeza, de limpeza Philips original. diferente do original Philips para a limpeza de cartucho. O dreno do Remova o cartucho do cartucho de limpeza sistema SmartClean e retire está...
- Page 64 SmartClean. elétrica entre o sistema SmartClean e o barbeador. IMPORTADO POR PHILIPS DO BRASIL LTDA. AV. OTTO SALGADO, 250 - DISTR. INDUSTRAL CLÁUDIO GALVÃO NOGUEIRA VARGINHA - MINAS GERAIS - CEP 37066-440 - CX. POSTAL 311 - CNPJ(MF) 61 086 336/0144-06...
- Page 67 Empty page before back cover...
- Page 68 © 2016 Koninklijke Philips N.V. >75% recycled paper All rights reserved >75% papier recyclé 4222.002.5888.1 (3/2016)