Table of Contents
Advertisement
Quick Links
Advertisement
Table of Contents

Related Manuals for Grizzly G0923

Summary of Contents for Grizzly G0923
- Page 1 (For models manufactured since 05/20) COPYRIGHT © MAY, 2020 BY GRIZZLY INDUSTRIAL, INC. WARNING: NO PORTION OF THIS MANUAL MAY BE REPRODUCED IN ANY SHAPE OR FORM WITHOUT THE WRITTEN APPROVAL OF GRIZZLY INDUSTRIAL, INC. #AI20901 PRINTED IN CHINA V1.05.20...
- Page 2 This manual provides critical safety instructions on the proper setup, operation, maintenance, and service of this machine/tool. Save this document, refer to it often, and use it to instruct other operators. Failure to read, understand and follow the instructions in this manual may result in fire or serious personal injury—including amputation, electrocution, or death.
-
Page 3: Table Of Contents
Table of Contents INTRODUCTION ..........2 SECTION 5: ACCESSORIES ......32 Contact Info............ 2 SECTION 6: MAINTENANCE ......33 Manual Accuracy ........... 2 Schedule ............33 Identification ........... 3 Cleaning & Protecting ........33 Controls & Components ......... 4 Lubrication ........... 33 Display ............ -
Page 4: Introduction
ID label (see below). This information is required for us to provide proper tech support, and it helps us determine if updated documenta- tion is available for your machine. Manufacture Date Serial Number Model G0923 (Mfd. Since 05/20) -
Page 5: Identification
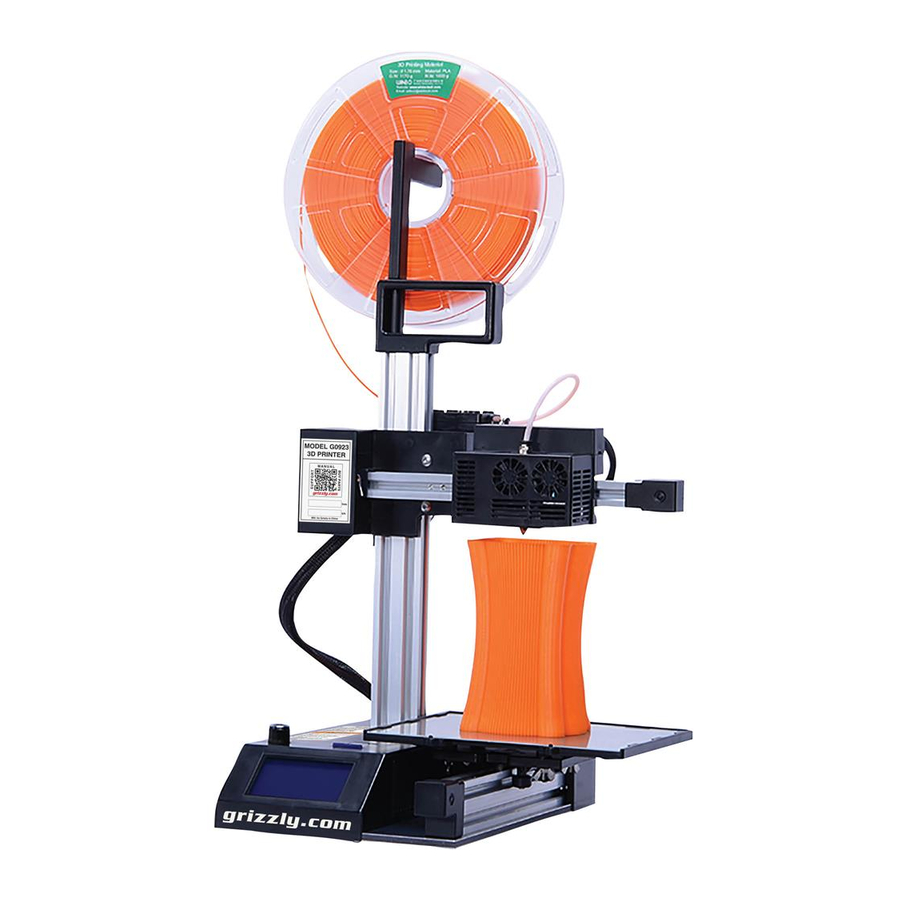
Filament Spool Spool Holder Feeder Print Head SD Card Slot Control Knob Build Display Plate To reduce risk of machine damage and injury, read this entire manual BEFORE using machine. Model G0923 (Mfd. Since 05/20) -
Page 6: Controls & Components
B. SD Card Slot: Printer reads G-code from SD card to print objects. H. Nozzle: Extrudes molten filament at fixed diameter. C. Display: Shows print status and machine menus. Refer to Display on next page for more information. Model G0923 (Mfd. Since 05/20) -
Page 7: Display
Elapsed Time: Shows time since print began. Print Speed Percentage: Shows print speed as a percentage of value set in G-code. Print Progress: Shows approximate progress of print as a progress bar. Status: Displays status of printer. Model G0923 (Mfd. Since 05/20) -
Page 8: Glossary Of Terms
G-code by "slicing" the model into many layers Hot End: The heated portion of the extruder of movement commands. including heat sinks, heating block, and nozzle. STL: A common file type used to create and store 3D models. Model G0923 (Mfd. Since 05/20) -
Page 9: Machine Data Sheet
Frame Size ................................ NEMA 17 Amps ..................................1.5A Speed ................................0 - 600 RPM Type ........................Stepper (Brushless, Permanent Magnet) Power Transfer ................................Belt Step Resolution ............................ 1.8 deg. Per Step Model G0923 (Mfd. Since 05/20) Model G0923 Page 1 of 2... - Page 10 Warranty ................................... 1 Year Serial Number Location ..............................ID Label ISO 9001 Factory ..................................Yes Features: Portable Design w/Handle Plastic Build Plate Digital Display Prints from PC via USB Cable or SD Card Model G0923 (Mfd. Since 05/20) Page 2 of 2 Model G0923...
-
Page 11: Section 1: Safety
Never operate under the influence of drugs or injury or blindness from flying particles. Everyday alcohol, when tired, or when distracted. eyeglasses are NOT approved safety glasses. Model G0923 (Mfd. Since 05/20) - Page 12 Make sure they are properly installed, you experience difficulties performing the intend- undamaged, and working correctly BEFORE ed operation, stop using the machine! Contact our operating machine. Technical Support at (570) 546-9663. -10- Model G0923 (Mfd. Since 05/20)
-
Page 13: Additional Safety For 3D Printers
If normal safety pre- Failure to do so could result in serious per- cautions are overlooked or ignored, serious sonal injury, damage to equipment, or poor personal injury may occur. work results. -11- Model G0923 (Mfd. Since 05/20) -
Page 14: Section 2: Power Supply
-12- Model G0923 (Mfd. Since 05/20) - Page 15 Two-prong outlets do not meet the grounding requirements for this machine. Do not modify or use an adapter on the plug provided—if it will not fit the outlet, have a qualified electrician install the proper outlet with a verified ground. -13- Model G0923 (Mfd. Since 05/20)
-
Page 16: Section 3: Setup
SD Card 8GB ..........1 you are completely satisfied with the machine and K. SD to USB Reader ........1 have resolved any issues between Grizzly or the L. Power Cord ..........1 shipping agent. You MUST have the original pack- aging to file a freight claim. -
Page 17: Site Considerations
R. Set Screw M3-.5 x 3 (Spare Parts) .... 2 needed for the printer. S. Insulated Tubing (Spare Part) ..... 1 12½" 13½" Figure 7. Parts and tools bag. Figure 8. Minimum working clearances. -15- Model G0923 (Mfd. Since 05/20) -
Page 18: Assembly
Connect power adapter to power cord (see Figure 10). Connect power adapter to machine (see The Model G0923 is nearly ready to print right out Figure 10). of the box! Assembly includes attaching the spool hanger and connecting the power cord. -
Page 19: Test Run
If installation files are power, and fix the problem BEFORE operating the lost, they can also be downloaded from the G0923 machine again. The Troubleshooting table in the product page at www.grizzly.com. -
Page 20: Section 4: Operations
Read books/magazines or get formal training before beginning any proj- ects. Regardless of the content in this sec- tion, Grizzly Industrial will not be held liable for accidents caused by lack of training. -18- Model G0923 (Mfd. Since 05/20) -
Page 21: Preparing 3D Models
Most of these are shared via a creative commons license, allowing users to adapt and redistribute models for non-commercial purposes as long as proper credit is given. Figure 11. Grizzly bear model created in TinkerCAD. -19- Model G0923 (Mfd. Since 05/20) -
Page 22: Navigating Slicer Software
Slicer software converts 3D models from their inherent format (typically .STL) into G-code that can be inter- preted by the Model G0923. This conversion is mostly automated, but users have the ability to manipulate the model and change print settings in order to customize the print and maximize quality. - Page 23 Adjusting Print Settings on Page 23 for more detailed information. Select the "Prepare" button (see Figure 14). It will take a few seconds to prepare the file. Prepare Figure 14. Location of prepare button. -21- Model G0923 (Mfd. Since 05/20)
- Page 24 Reset panned by alt-clicking the mouse (usually the Model middle-mouse button) and dragging it. Scrolling the mouse wheel zooms the view in and out. Figure 18. Scale model mode. -22- Model G0923 (Mfd. Since 05/20)
- Page 25 Layer Height/Print Speed: This slider can change the layer height between 0.1, 0.15, and 0.2mm. A smaller layer height results in more layers overall, which increases overall resolution of the printed object but drastically increases the print time. -23- Model G0923 (Mfd. Since 05/20)
-
Page 26: Leveling Build Plate
3D printers and slicer software. Figure 23. Display during leveling. As you learn about 3D printing from other sourc- es, you will find that the custom print setup has the options you need to make successful prints. -24- Model G0923 (Mfd. Since 05/20) - Page 27 — If distance between nozzle and build plate is equal across entire build plate, the level- ing process is complete. — If distance between nozzle and build plate is NOT equal across entire build plate, repeat the leveling process. -25- Model G0923 (Mfd. Since 05/20)
-
Page 28: Preparing Build Plate
Once printing starts, cal print temperature for PLA filament. Always use G-code controls the print temperature based on temperature settings recommended by the fila- print settings in the slicer software. ment manufacturer. -26- Model G0923 (Mfd. Since 05/20) -
Page 29: Printing
Pausing Print During printing, press control dial to open print menu (see Figure 30). Typically, the Model G0923 prints from a .GCODE file stored on an SD card. Print settings such as print speed, fan speed, and nozzle temperature can be changed during printing, and the operation can be paused for an extended period of time and resumed. - Page 30 Z-axis will raise, X and Y axes will home, then printer will stop. Print location is saved Babystep Y: Changes Y-axis position. on SD card as file called "GRIZZLY.G." Printer can be powered off at this time. Babystep Z: Changes Z-axis position.
-
Page 31: Changing Filament
(see Figure 38). Figure 35. Unloading filament status screen. Press tensioner and pull filament from feeder (see Figure 36). Figure 38. Loading filament status screen. Filament Feeder Tensioner Figure 36. Removing filament from feeder. -29- Model G0923 (Mfd. Since 05/20) -
Page 32: Cleaning Build Plate
Although this is unlikely to damage the machine, it should be avoided when possible. Figure 39. Axis select menu. Note: Extruder (E-axis) will not move unless nozzle is preheated. -30- Model G0923 (Mfd. Since 05/20) - Page 33 Select "Auto Home." X, Y, and Z axes will move to machine zero, as determined by axis limit switches. Figure 42. Single axis home menu. Select axis to home. Chosen axis will move to machine zero, as determined by axis limit switch. -31- Model G0923 (Mfd. Since 05/20)
-
Page 34: Section 5: Accessories
Refer to our website or latest catalog for additional recommended accessories. T31840—3D Printer Nozzle for G0923 Replacement nozzle compatible with the Model G0923. Nozzle diameter: 0.4mm. Figure 44. Grizzly PLA filaments. Figure 43. T31840 3D Printer Nozzle for G0923. www.grizzly.com 1-800-523-4777 order online at or call -32-... -
Page 35: Section 6: Maintenance
Cleaning & Protecting For optimum performance from this machine, this maintenance schedule must be strictly followed. Cleaning the Model G0923 is relatively easy. Remove excess filament that has build-up on the Ongoing machine and wipe away dust or residue with a To maintain proper machine operation, if you ever dry cloth. -
Page 36: Section 7: Service
4. Incorrect temperature for type of filament. 4. Adjust temperature and restart preheating process (Page 26). Lower temperature may require slower print speed. 5. In slicer software, reduce print speed. 5. Print speed too fast for type of filament. -34- Model G0923 (Mfd. Since 05/20) - Page 37 2. Cooling fans at fault. 2. Test/repair/replace. and gaps across its 3. Temperature too hot for type of filament. 3. Lower temperature and restart preheating process surface. (Page 26). Lower temperature may require slower print speed. -35- Model G0923 (Mfd. Since 05/20)
- Page 38 1. Feeder tension too high. 1. Remove filament from feeder, clean ground filament or skips. from hobbed gear and Bowden tube, then lower feeder tension. 2. Nozzle clogged. 2. Clean (Page 37) or replace (Page 41) nozzle. -36- Model G0923 (Mfd. Since 05/20)
-
Page 39: Cleaning Nozzle
A clogged nozzle often leads to major printing needle or guitar high E-string are ideal tools for issues. Regularly performing brush and needle this process. cleaning will help keep the Model G0923 printing smoothly for many hours of work. Tools Needed "E-String" or Acupuncture Needle ..... 1 Performing a "cold pull"... - Page 40 Bowden tube (see Figure 48). — If removed end has carbonization and residue on it, repeat Steps 3–6. — If removed end is clean, cold pull process is complete. Figure 48. Removing Bowden tube. -38- Model G0923 (Mfd. Since 05/20)
- Page 41 IMPORTANT: Do not loosen, remove, or Figure 50. Removing Bowden tube. tighten nozzle unless heating block is heated. Heating block and nozzle threads may be damaged if threaded while cold. Figure 52. Removing nozzle from heating block. -39- Model G0923 (Mfd. Since 05/20)
- Page 42 Barrier Tube Block Figure 56. Insulator tube and heat sink Figure 54. Removing heating block from heat 13. Remove insulator tube from heat sink. sink. 14. Remove external debris and filament buildup from heat sink. -40- Model G0923 (Mfd. Since 05/20)
-
Page 43: Replacing Nozzle
22. Attach print head cover to print head and print head cover bottom plate to print head cover. 23. Press down on tube coupler, then insert Bowden tube into print head. 24. Load filament (refer to Changing Filament on Page 29). -41- Model G0923 (Mfd. Since 05/20) - Page 44 (see Figure 59). IMPORTANT: DO NOT loosen, remove, or tighten nozzle unless heating block is heated. Heating block and nozzle threads may be damaged if threaded while cold. Figure 59. Removing nozzle from heating block. -42- Model G0923 (Mfd. Since 05/20)
-
Page 45: Cleaning Feeder & Bowden Tube
Repeat Steps 4–5 until material leaves Bowden tube clean. Blow compressed air into feeder to remove collected filament residue. Connect Bowden tube to print head and feeder by pressing down on tube coupler and inserting Bowden tube. -43- Model G0923 (Mfd. Since 05/20) -
Page 46: Aligning Axis Pulleys
Drive in Axis Rail screws, and (3) button head cap screws from Pulley bottom of base plate (see Figure 64). Figure 65. Drive pulley, belt, and axis rail. Figure 64. Underside of base plate. -44- Model G0923 (Mfd. Since 05/20) -
Page 47: Updating Firmware
Highlight correct printer, then select Upgrade Firmware (see Figure 67). Upgrade Firmware window will open. If essential operating updates are made to the G0923 firmware, the updated firmware will be available at www.grizzly.com on the G0923 prod- uct page. Tools Needed Windows Computer with Grizzly Winware .. -
Page 48: Section 8: Wiring
Technical Support at (570) 546-9663. The photos and diagrams included in this section are best viewed in color. You can view these pages in color at www.grizzly.com. -46- Model G0923 (Mfd. Since 05/20) -
Page 49: Internal Wiring Diagram
Z1 – 12864B3 SS-5GL Z1 motor Board V2.0 WB_PCB.C.02 FAN1 FAN3 FAN2 Board FAN2 VOUT X motor X – WB_D BTN1.0.0 Controller Circuit Board Motherboard FAN1 WB_D 2.0.2 Heater1 READ ELECTRICAL SAFETY -47- Model G0923 (Mfd. Since 05/20) ON PAGE 46! -
Page 50: External Wiring Diagram
HEAD1 Heater Motor Block Print E1 motor Head Base (Top View) Transfer WB_PCB.C.02 Board HEAD1 Heater1 E1 motor Laser Fan 4 FAN1 Fan 2 Fan 3 FAN2 FAN3 READ ELECTRICAL SAFETY -48- Model G0923 (Mfd. Since 05/20) ON PAGE 46! -
Page 51: Wiring Images
Wiring Images Figure 69. Internal wiring. Figure 72. Top of transfer board. Figure 70. Print head cooling fans. Figure 73. Heating cartridge. Figure 71. E- and X-axis motors. READ ELECTRICAL SAFETY -49- Model G0923 (Mfd. Since 05/20) ON PAGE 46! -
Page 52: Section 9: Parts
SECTION 9: PARTS We do our best to stock replacement parts when possible, but we cannot guarantee that all parts shown are available for purchase. Call (800) 523-4777 or visit www.grizzly.com/parts to check for availability. Main 38-1 38-2 BUY PARTS ONLINE AT GRIZZLY.COM! -50- Model G0923 (Mfd. - Page 53 INSULATED SPACER P0923092 POWER CORD 18G 3W 46" 5-15 P0923045 HEAT SINK P0923093 USB CABLE TYPE-A TO TYPE-B P0923046 THERMAL BARRIER TUBE BUY PARTS ONLINE AT GRIZZLY.COM! -51- Model G0923 (Mfd. Since 05/20) Scan QR code to visit our Parts Store.
-
Page 54: Labels & Cosmetics
Safety labels help reduce the risk of serious injury caused by machine hazards. If any label comes off or becomes unreadable, the owner of this machine MUST replace it in the original location before resuming operations. For replacements, contact (800) 523-4777 or www.grizzly.com. BUY PARTS ONLINE AT GRIZZLY.COM! -52- Model G0923 (Mfd. -
Page 55: Warranty & Returns
WARRANTY & RETURNS Grizzly Industrial, Inc. warrants every product it sells for a period of 1 year to the original purchaser from the date of purchase. This warranty does not apply to defects due directly or indirectly to misuse, abuse, negligence, accidents, repairs or alterations or lack of maintenance.