Hitachi HIDIC EH-150 Applications Manual
Devicenet master module(eh-rmd)/ slave controller(eh-iocd)/ discrete i/o slave unit (rdx16d,rdy16tp,rdy16r)
Hide thumbs
Also See for HIDIC EH-150:
- Applications manual (114 pages) ,
- Instruction manual (29 pages) ,
- Applications manual (28 pages)

Related Manuals for Hitachi HIDIC EH-150


Summary of Contents for Hitachi HIDIC EH-150
- Page 1 HITACHI PROGRAMABLE CONTROLLER DeviceNet Master Module(EH-RMD)/ Slave Controller(EH-IOCD)/ Discrete I/O slave unit (RDX16D,RDY16TP,RDY16R) APPLICATION MANUAL NJI-364A(X)
- Page 2 If you have any questions regarding the warranty please contact either your supplier or the local Hitachi Distributor. (Depending on failure part, examination might be impossible.)
-
Page 3: Safety Precautions
Safety Precautions Read this manual and related documents thoroughly before installing, operating, performing preventive maintenance or performing inspection, and be sure to use the unit correctly. Use this product after acquiring adequate knowledge of the unit, all safety information, and all cautionary information. - Page 4 2. About wiring REQUIRED Always perform grounding (FE terminal). If grounding is not performed, there is a risk of electric shocks and malfunctions. CAUTION Connect power supply that meets rating. If a power supply that does not meet rating is connected, fire may be caused. The wiring operation should be performed by a qualified personnel.
- Page 5 4. About preventive maintenance DANGER Do not connect the of the battery in reverse. Also, do not charge, disassemble, heat, place in fire, or short circuit the battery. There is a risk of explosion or fire. PROHIBITED Do not disassemble or modify the unit. These actions may result in fire, malfunction, or malfunction.
- Page 6 Revision History Date of Description of Revision Manual Number Revision 2001/04 NJI-364(X) First edition. Explicit messaging function for EH-RMD was added. [Chapter 5.7, 5.8] Discrete I/O power supply specification is corrected. [Chapter 7.2] 2004/11 NJI-364A(X) Remote mode of EH-RMD was added. [Chapter 2.2, 2.3, 5.1, 10, 11.4] EH-RMDCFG for configuration tool wad added.
-
Page 7: Table Of Contents
Contents Chapter 1 Introduction 1-1 to 1-3 Before Using the Products ......................... 1- 1 Items Packaged with the Module....................... 1- 2 Chapter 2 Features 2-1 to 2-5 Features of DeviceNet ..........................2- 1 Features of EH-RMD/EH-IOCD ....................... 2- 3 IO number of EH-RMD Remote mode...................... 2- 4 Chapter 3 System Configuration 3-1 to 3-6... - Page 8 Chapter 8 Starting Up 8-1 to 8-17 Chapter 9 Slave Mode 9-1 to 9-8 Overview ..............................9- 1 Link System Using EH-RMD........................9- 2 How to Set the Slave Mode ........................9- 4 Chapter 10 Special Internal Outputs 10-1 to 10-4 10.1 Remote Error Flag .............................
-
Page 9: Chapter 1 Introduction 1-1 To
Chapter 1 Introduction Chapter 1 Introduction Before Using the Products This manual provides instructions on how to use the EH series programmable controllers (hereinafter abbreviated as PLC), DeviceNet master module (EH-RMD), DeviceNet slave controller (EH-IOCD), and distributed I/O slave unit (RDX16D, RDY16TP, RDY16R). Please read this manual thoroughly and refer to it during installation and operation as well as during maintenance and inspection. -
Page 10: Items Packaged With The Module
Chapter 1 Introduction Items Packaged with the Module The following items are packaged with the DeviceNet master module (EH-RMD). Please verify that each item is included in the package. Item name Type External appearance Number Remark Note: Use a CPU module of the type DeviceNet master EH-RMD... - Page 11 Chapter 1 Introduction The following items are packaged with the distributed I/O slave unit (RDX16D,RDY16TP, RDY16R). Please verify that each item is included upon opening the package. External appearance Remark Item name Type Number RDX16D, Distributed I/O RDY16TP, slave unit RDY16R Communication Use this connector to...
-
Page 12: Chapter 2 Features 2-1 To
Features of DeviceNet Multi-Vendor Network Since the EH series PLCs conform to the DeviceNet standard, which is an open field network standard, it is possible to connect master/slave devices provided by Hitachi as well as by other companies. EH-150 DeviceNet Inverter... - Page 13 Chapter 2 Features Four Types of I/O Message Communication Protocol It is possible to select the optimal communication mode for a given network configuration according to the features of each device. Please choose the communication method which is appropriate to the good point of each device. But each device may not support a partial communication method.
-
Page 14: Features Of Eh-Rmd/Eh-Iocd
Chapter 2 Features Features of EH-RMD/EH-IOCD The EH-RMD and EH-IOCD modules conform to the DeviceNet standard, release 2.0. This product has been tested by ODVA's authorized Independent Test Lab and found to comply with ODVA Conformance Test Software Version A-13. DeviceNet Features Device type Communication adapter... -
Page 15: Io Number Of Eh-Rmd Remote Mode
Chapter 2 Features I/O Number of EH-RMD(Remote mode) In remote mode, input and output data is treated in a X/Y address. IO number is decided according to IO assignment by Ladder Editor for Windows®. However, IO assignment of remote stations should set up by reading real IO assignment, after configuration from configurator. The assignment rule in remote mode (1) The output data on DeviceNet is assigned "Y16"... - Page 16 Chapter 2 Features The rule of the IO number of remote stations in H series is shown. Data Type Numbering rule In case of EH-RMD Bit data Bit number is 0 to 15, because “Y16” Bit number (00 to 95) in the module and ”X16”...
-
Page 17: Chapter 3 System Configuration 3-1 To
Chapter 3 System Configuration Chapter 3 System Configuration EH-150 System Configuration The EH-150 is a module-type PLC and is configured as shown in Figure 3.1. EH-RMD can be mounted in the communication slot of a basic base unit. The slot position which can be mounted is changed according to the CPU module and base unit. Refer to the EH-150 application manual for details. -
Page 18: Network Configuration
Uses either 3], 4], or 5] to communicate with each device via the Configurator network in case of using “RSNetWorx for DeviceNet” (made by Rockwell Software). In case of EH-RMDCFG (made by Hitachi), it communicates with each device via a CPU module. Communicates with DeviceNet using the serial port. RS-232C interface “1770-KFD”... - Page 19 Chapter 3 System Configuration Device Usage Remark Network A separate connector is necessary if not attached to each device. connector Clamp terminal Used when wiring a cable to a connector. The information of each device must be registered on ...
- Page 20 Chapter 3 System Configuration 3.2.2 Restrictions on Connection Configuration 1] Restrictions on maximum network length The maximum network length refers to the distance between the devices that are farthest apart or the longest of the trunk line distances (between termination resistors). Termination Termination resistor...
- Page 21 Chapter 3 System Configuration (Example) Thick (125 m) Thin (25 m) Thick (70 m) Device Tap Device Tap Device Device Tap (Note) (Note) Thin (2 m) Thin (2 m) Thin (2 m) Thin (6 m) Device Device Device Device Device Device (Note) With a terminal resistor L (thin): 2 m + 2 m + 2 m + 25 m + 6 m...
- Page 22 Chapter 3 System Configuration [4] Restrictions on total drop line length The total drop line length refers to the length obtained by adding up the length of all the drop lines within one network. The following restrictions are applied are on the total drop line length depending on the communication speed: 125 kbps: 156 m max.
-
Page 23: Chapter 4 General/Communication Specifications 4-1 To
Chapter 4 General/Communication Specifications Chapter 4 General/Communication Specifications General Specifications Table 4.1 General Specifications Item Specification +5 V DC (Master module, Slave controller) Power voltage +24 V DC (Distributed I/O slave unit) Communication power 24 V DC (supplied via the communication connector) supply Prepare the communication power supply by the user. -
Page 24: Chapter 5 Master Module Specifications 5-1 To
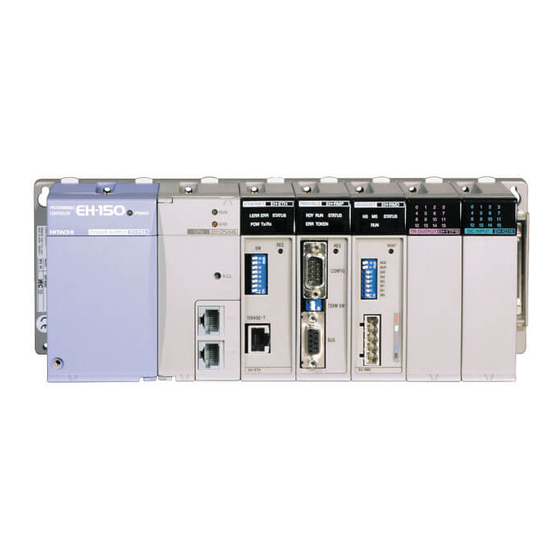
Chapter 5 Master Module Specifications Chapter 5 Master Module Specifications Outlook/Shape Name and function of each part Type EH-RMD Weight Approx. 0.13 kg Dimensions (mm) 5] Lock button 1] LED cover 3] Reset switch 2] DIP switch 4] Communication connector MODE select switch Name Function... -
Page 25: Function Specification
Chapter 5 Master Module Specifications Function Specification Table 5.1 EH-RMD Function Specifications Specification Item LINK mode REMOTE mode No. of installed units 2 modules/basic base 4 modules/basic base No. of slave- connected units 63 units I/O assignment CPU link REMOTE 2 Output data 256 words 1024 points(64 words) IN&OUT... -
Page 26: Led Specification
Chapter 5 Master Module Specifications LED Specification Table 5.4 LED Specification Outlook of LED Symbol Description Color Indicates the status of the network. Green/red DEVICENET EH-RMD Indicates the status of the communication Green/red interface board MS STATUS Indicates the operation mode. Green STATUS Indicates the status of the PLC interface board. - Page 27 Chapter 5 Master Module Specifications (2) RUN Table 5.7 RUN LED Specification Display status Description Action to take RUN status Lit in green Synchronized with the RUN status of the EH-CPU. Flashing in Idle status. Output data will be updated when EH-CPU is green Output data will not be updated.
-
Page 28: Reset Specification
Chapter 5 Master Module Specifications Reset Specification To reset this module, execute either of the following procedures. Table 5.9 Reset procedures Type Explanation Hardware Turn on this system again. Push the reset switch of from of the module. Hardware Only EH-RMD is reset. Operate the reset function from the user program Software Only EH-RMD is reset. - Page 29 Chapter 5 Master Module Specifications 5.6.1 Reset command specification It uses FUN201 command to reset EH-RMD from the rudder program. The specification of the S parameter to use in the FUN201 command is as follows. And for the details of this command, refer to EH-150 application manual (NJI-280*(X)). The details of the S parameter 1] Error code: The result of FUN201 command execution is set.
- Page 30 Chapter 5 Master Module Specifications 5.6.2 Sample program This sample program shows a way of resetting from the user program to this module. So it is not the one to have considered an interlock and so on. Before use, test sufficiently and use safety after the confirmation. In this program, it uses the following internal output.
-
Page 31: Explicit Message Communication (For Link Mode)
Chapter 5 Master Module Specifications Explicit message communication (for LINK mode) EH-CPU can send or receive of the Explicit message to each slave on DeviceNet. This chapter explains in link mode. In the case of remote mode, please refer to Chapter 5.8. 5.7.1 The outline (1) Supporting module... - Page 32 Chapter 5 Master Module Specifications 5.7.2 Message format The format of the Explicit command message is shown. TX flag (Message size) WL100 /WL1100 CONTROL FLAGS RX complete flag WL101 /WL1101 TXid (Reseeved) WL102 /WL1102 MESSAGE DATA (Reserved) Size WL103 /WL1103 Service MAC ID WL104 /WL1104...
- Page 33 Chapter 5 Master Module Specifications Details in each field are shown. Status:(Only for response) Table 5.15 Status Information (Only for response) Code Meaning Ignore Transaction Block ( Block empty) Transaction Completed Successfully Transaction in progress ( Not ready ) (Reserved) Error –...
- Page 34 Chapter 5 Master Module Specifications Service: When sending command, set the service code which is defined by DeviceNet standard. Table 5.16 Service Information (when sending) Service Service Name Get_Attributes_All Set_Attributes_All Get_Attribute_Single Set_Attribute_Single When receiving response, the service code which is defined by DeviceNet standard is set. Table 5.17 Service Information (when receiving) Service Service Name...
- Page 35 Chapter 5 Master Module Specifications 5.7.3 Procedure of the message sending/receiving It uses four flags which are shown in the following when sending/receiving a message between EH-CPU and EH-RMD. TX flag (Message size) RX flag (Message size) RX complete flag TX complete flag Command message Response message...
- Page 36 Chapter 5 Master Module Specifications 5.7.4 Sample program The ladder program which sends and receives Explicit message with HITACHI inverter L100DN is shown. EH-150 DeviceNet Master module MAC ID = 0 Inverter L100DN MAC ID = 1 (1) The sample program operation outline It issues the command of two kinds of the following to the inverter.
- Page 37 Chapter 5 Master Module Specifications ######################################### Initialize routine ######################################### R7E3 WL301 WL100 = 0 Initializing the TX flag <> R0 = 1 1 scan ON after RUN DIF0 WL301 R0 = 0 R7E3 WL300 Initializing the RX flag WL101 = WL300 <>...
- Page 38 Chapter 5 Master Module Specifications ######################################### Setting commands ######################################### DIF10 Setting the size of service data WL103 = H1 Setting the service and MAC ID WL104 = HE01 Command 1 Setting the Class WL105 = H64 Setting the Instance WL106 = H1 Setting the attribute WL107 = H73 WM1 = HB...
- Page 39 Chapter 5 Master Module Specifications ######################################### Transmission Control routine ######################################### DIF12 Incrementing TXid WM0 = WM0 + H100 Setting TXid WL102 = WM0 Command 1 Setting TX message size into WL100 = WM1 the TX flag R100 = 1 Command 2 R100 1s 5 Transmission...
- Page 40 Chapter 5 Master Module Specifications ######################################### Reception Control routine ######################################### R102 DIF14 WL300 (Response data analysis) <> R103= 1 R102 1s 5 Reception time-out R103 Setting RX message size into WL101 = WL300 the RX complete flag R102 = 0 Reception time-out R104 = 1...
-
Page 41: Explicit Message Communication (For Remote Mode)
Chapter 5 Master Module Specifications Explicit message communication (for Remote mode) EH-CPU can send or receive of the Explicit message to each slave on DeviceNet. This chapter explains in remote mode. In the case of link mode, please refer to Chapter 5.7. 5.8.1 The outline (1) Supporting module... - Page 42 Chapter 5 Master Module Specifications 5.8.2 FUN 162 command specification † Item number Name Fun commands-68 Explicit message execution Ladder format Condition code Processing time (µs) Remark R7F4 R7F3 R7F2 R7F1 R7F0 EH-CPU5** FUN 162 (S) Command format Number of steps Condition Steps FUN 162 (S)
- Page 43 Chapter 5 Master Module Specifications 5.8.3 FUN 163 command specification † Item number Name Fun commands-69 Explicit message configuration (DeviceNet) Ladder format Condition code Processing time (µs) Remark R7F4 R7F3 R7F2 R7F1 R7F0 EH-CPU5** FUN 163 (s) Command format Number of steps Condition Steps FUN 163 (s)
- Page 44 Chapter 5 Master Module Specifications Control flag details [0] Send data flag : [0] Send data flag Set 1 by user program to send explicit message. This flag [1] Initializing flag is cleared after communication completed. [1] Initializing flag : Set 1 by user program to initialize the FUN command or to clear timeout.
- Page 45 Chapter 5 Master Module Specifications Receiving area details Size : Size Service data (receiving area from s+4 to s+n) size with Service MACID byte unit Received data 1 Received data 0 *) If the byte size is odd number, the last byte is stored in lower byte.
- Page 46 Chapter 5 Master Module Specifications 5.8.4 Sample program The ladder program which sends and receives Explicit message with HITACHI inverter L100DN is shown. EH-150 DeviceNet Master module MAC ID=0 MAC ID=0 Inverter L100DN Inverter L100DN MAC ID=5 MAC ID=1 The sample program operation outline The following command is sent to the inverter (MAC ID=1).
- Page 47 Chapter 5 Master Module Specifications Explicit command setting for L100DN(MAC ID=1) R7E3 WR200 = 1 WR200:size=1 WR201 = H0E01 WR201:Service&MAC ID WR202 = 100 WR202:Class 1 scan ON WR203 = 1 after RUN WR203:Instance WR204 = 115 WR204:Attribute Explicit command setting for L100DN(MAC ID=5) R7E3 WM200 = 3 WR200:size=1...
-
Page 48: Chapter 6 Slave Controller Specifications 6-1 To
Chapter 6 Slave Controller Specifications Chapter 6 Slave Controller Specifications Outlook/Shape Name and function of each part Type EH-IOCD Weight Approx. 0.16 kg 6] Lock button Dimensions (mm) 1] LED 5] DIP switch 2 2] DIP switch 1 4] Communication connector 3] Reset switch Name... -
Page 49: Function Specification
Chapter 6 Slave Controller Specifications Function Specification Table 6.1 EH-IOCD function Specification Item Specification No. of installed modules 16 modules (use the EH-IOC to install nine or more units.) Support modules See the following table. Output data 256 words (255 bytes : when connecting with the EH-RMD) Input data 256 words (255 bytes : when connecting with the EH-RMD) Internal current... -
Page 50: Settings Of Node Address/Baud Rate
Chapter 6 Slave Controller Specifications Settings of Node Address/Baud Rate The node addresses and baud rate should be set as follows. Table 6.3 Node Address/Baud Rate setting Node address NA16 NA32 Default NA32 NA16 → ON Baud Rate 125 kbps Default 250 kbps 500 kbps... -
Page 51: Led Specification
Chapter 6 Slave Controller Specifications LED Specification Table 6.6 LED Specification Outlook of LED Symbol Description Color Indicates the status of the network. Green/red N S M S STAT U S Indicates the status of the communication Green/red interface board. Indicates the status of the PLC interface STATUS Green/red... - Page 52 Chapter 6 Slave Controller Specifications (2) STATUS Table 6.9 STATUS LED Specification Display status Description Action to take Lit in green Normal operation Internal microcomputer WDT Turn the power supply off and then on again. Lit in red error If the error persists, replace the module. I/O module error Flashing once in The slot number is indicated by...
-
Page 53: Chapter 7 Discrete I/O Slave Unit Specifications 7-1 To
Discrete I/O Slave Unit Specifications Outlook/Shape Name and function of each part 1] Module status display LED (MS) 3] I/O status display 5] Mounting holes x 2 RDX16D HITACHI DISTRIBUTED I/O CONTROLLER 7] Terminal 8] Setting switch block cover DC INPUT(DC10 ∼ 30V) -
Page 54: Function Specification
Chapter 7 Discrete I/O Slave Unit Specifications Function Specification Table 7.1 Discrete I/O function Specification Item RDX16D RDY16R RDY16TP Input/output specification DC input Relay output Transistor output (source type) Number of I/O 16 points/2 common 16 points/2 common 16 points/1 common points/common (8 points/1 common) (8 points/1 common) -
Page 55: Internal Circuit
Chapter 7 Discrete I/O Slave Unit Specifications Internal Circuit RDX16D RDY16R S24V S24V COM0 COM0 COM1 RDY16TP S24V +24V COM0 +24V COM1... -
Page 56: Node Address Setting
Chapter 7 Discrete I/O Slave Unit Specifications Node Address Setting This section describes how to set the node addresses. The node addresses are determined as follows, according to the settings of the rotary switches (see Figure 7.1). Table 7.2 Node Address setting Rotary switch on the left side Rotary switch on the right side Node address... -
Page 57: Communication Connector
Chapter 7 Discrete I/O Slave Unit Specifications Communication Connector Table 7.5 Communication connector terminal arrangement Terminal layout Number Signal Wire color CAN_H White Drain Bare Wire CAN_L Blue Black LED Specification (1) MS/NS Table 7.6 MS/NS LED Specification Lit in Green Flashing in Green Lit in Red Flashing in Red... - Page 58 Chapter 7 Discrete I/O Slave Unit Specifications (2) I/O status display Table 7.7 I/O LED status Unit Description Action Check whether or not the external device LED stays lit. is continually on. Check whether the terminal block has LED does not turn on. come loose, or check whether the external Input devices are functioning.
- Page 59 For information on the EH-RMD and PLCs in general, please contact the Hitachi dealer where you made the purchase. This chapter explains the steps necessary in order to start up the system for the first time, using the flow chart shown below.
- Page 60 Chapter 8 Starting Up S T E P 1 Setup on the PLC side Perform the I/O assignment. Start up the LADDER EDITOR for Windows® and assign the I/O assignment of EH-RMD. I/O assignment of "CPU link" is for EH-RMD link mode, "Remote 2" is for EH-RMD remote mode.. Set the CPU link parameters.(LINK mode only) Click the link No.
- Page 61 Chapter 8 Starting Up 2 Startup of RSLinx S T E P Start up the PC and then RSLinx The power must be supplied to the network and each device; make sure to verify this in advance. From the Start menu of Windows®, click [Programs] → [Rockwell Software] → [RSLinx] → [RSLinx]. 3 Selection of the Driver S T E P Select the driver for the interface module to be used.
- Page 62 Chapter 8 Starting Up The Configure Drivers dialogue box is displayed. From the Available Driver Types pull-down menu, click [DeviceNet Drivers]. Click [Add New]. The DeviceNet Driver Selection dialogue box is displayed. Click “Allen-Bradley 1770-KFD” and then [Select].
- Page 63 Chapter 8 Starting Up Set the serial port and DeviceNet port. The setup dialogue box is displayed. Perform the setting for both ports according to the actual system configuration. Click [OK]. Default is 62. When using already by the other node, set the address which doesn't overlap.
- Page 64 Chapter 8 Starting Up Check the communication with the set driver. Select the set driver and click [Autobrowse] at the upper left corner to search for devices on the current network. Check that the network devices other than the interface module are displayed and finish the search. If the message “Unrecognized Device”...
- Page 65 Register the EDS file of the device to be used to the configurator. Click [Tools], and then [EDS Wizard]. For information on the EDS files for Hitachi made devices, contact Hitachi’s Sales Dept. or download it from the following URL (ODVA Home page).
- Page 66 Chapter 8 Starting Up Click “Register an EDS file(s)” and then [Next]. Select the EDS file to be registered. Enter the path of the file in “Named” and click [Next]. To register via a selected folder, check “Register a directory of EDS files” and enter the path to the folder in “Named,”...
- Page 67 Chapter 8 Starting Up Perform a syntax check of the EDS file. Contact the manufacturer if a syntax error or warning is displayed. Click [Next]. The icon used in the configurator is displayed. In order to change the icon, click the icon and then [Change icon]. Click [Next].
- Page 68 Chapter 8 Starting Up Click [Next]. Click [Finish]. 8-10...
- Page 69 Chapter 8 Starting Up 6 Registration of the device S T E P Off-line registration Select the device to be used from the device list to the left, then double-click or drag and drop it. Display the properties of the device and set the node address. Interface modules are also treated as devices that have one node address, but it is not necessary to register them in this step.
- Page 70 Chapter 8 Starting Up On-line registration Click [Network] → [Online] or the online button. The confirmation dialogue box is displayed; click [OK]. This icon indicates On-line. Click [Network] → [Single Pass Browse] and search for each device connected to the network. It takes approximately 30 seconds to search for all the node addresses.
- Page 71 Chapter 8 Starting Up 7 Creation of a scan list S T E P Register the master as well as all slaves with which the I/O communication is performed. Set the mode to off-line if the on-line mode is set. Right-click or double-click the EH-RMD to display the properties.
- Page 72 Chapter 8 Starting Up Click the Scanlist tag and move the device from Available Devices to Scanlist. Highlight each device moved to Scanlist and click [Edit I/O Parameters]. Set the I/O communication type and I/O data size. Check "Automap on Add" and move the devices to Scanlist in order to automatically map each device to the WL area.
- Page 73 Chapter 8 Starting Up How to calculate the I/O data size Any I/O data size within the following range can be set for the EH-IOCD. Input (byte) Output (byte) Default Allowable setting range 0-255 0-255 Set the size of input/output according to the module actually used. See Section 6.2 for the I/O data size used by each module.
- Page 74 Chapter 8 Starting Up Mapping of output data Display the Output tag, and click each device followed by [AutoMap]. First enter the offset address in Start Byte; then it becomes possible to map the output data to the selected area. (The maximum output size of the EH-RMD is 512 bytes.
- Page 75 Chapter 8 Starting Up 8 Download S T E P Download the configuration data to the EH-RMD. Enable the on-line mode. Right-click the EH-RMD and click [Download to Device]. By clicking [Network] and then [Download to Network], access is made to all the devices on the network. In this case, depending on the device, there is a possibility that a warning or error may be generated;...
-
Page 76: Slave Mode
EH-IOCD PLC2 PO WER E H -1 5 0 HITACHI RXD16D HITACHI RXD16D EH-150 CPU Figure 9.1 System configuration example 1 illustrating the use of the slave mode Figure 9.2 illustrates a system example configured for the purpose of sharing information of each PLC by making each EH-RMD run as master and/or slave. -
Page 77: Link System Using Eh-Rmd
Chapter 9 Slave Mode Link System Using EH-RMD This section describes the differences in how the link area is used in the H series CPU link module and in the EH-RMD. PLC1 PLC2 PLC3 PLC4 link area link area link area link area (Transmission) (Reception) - Page 78 Chapter 9 Slave Mode In the H series CPU link, transmission data output from any PLC is broadcast to the link areas of the other PLCs on the network. Thus, the same data is shared in identical WL areas from any CPU. On the other hand, in the link system using the EH-RMD, the transmission data of each EH-RMD is collected in one master station.
-
Page 79: How To Set The Slave Mode
Chapter 9 Slave Mode How to Set the Slave Mode The setting of the slave mode is performed via the RSNetWorx configuration tool. This section explains the specific setting method for achieving the system configuration introduced in the previous section. It is assumed that the size of the transmission data for each PLC is 32 bytes (16 words) and 128 bytes (64 words) are shared. - Page 80 Chapter 9 Slave Mode 1 Enabling the slave mode S T E P Double-click PLC2 and display [Properties]. Display the [Module] tag and click [Slave Mode].
- Page 81 Chapter 9 Slave Mode Enable the [Enable Slave Mode] option, specify the transmission/reception data sizes, and click [OK]. Map the transmission/reception data in the [Input] and [Output] tags. Select the device and click [AutoMap]. Then click [OK] to finish the setting on the slave station side. Specify the offset from WL0 for Start Byte in the [Output] tag.
- Page 82 Chapter 9 Slave Mode 2 Creating a master station scan list S T E P Double-click PLC1 and display [Properties]. Display the [Scanlist] tag, and move the devices from Available Devices to Scanlist. Click [Edit I/O Parameters] for each of the devices moved to Scanlist and check the I/O data size. It is possible to view the information of each slave set in Step 1.
- Page 83 Chapter 9 Slave Mode Map the transmission/reception data in the [Input] and [Output] tags. Select a device and click [AutoMap]. Then click [OK].
-
Page 84: Special Internal Outputs
Chapter 10 Special Internal Outputs Chapter 10 Special Internal Outputs The various information on EH-RMD and a network are reflected in the special internal outputs. Output area differs in remote mode and link mode. Mode Special Internal Outputs Remote Master1 Error flag WRF080 –... -
Page 85: Link Error Flag
Chapter 10 Special Internal Outputs 10.2 Link Error Flag ― Error code Active node Faulty node Node 1 status Node 0 status Node 3 status Node 2 status Node 5 status Node 4 status Node 59 statu Node 58 status Node 61 status Node 60 status Node 63 status... -
Page 86: Detailed Explanation
Chapter 10 Special Internal Outputs 10.3 Detailed Explanation 10.3.1 Error Code Table 10.1 List of Error Code Action Error code Description No error ― Turn the power on again. Replace the module if Initialization error the error still persists. Link transmission area error Set the link parameters again from the peripheral device. -
Page 87: Precautions For Use
Chapter 11 Precautions for Use Chapter 11 Precautions for Use This chapter lists some precautions that should be aware of when communicating data via the inputs/outputs between the EH-150 CPU module and each of the slaves on DeviceNet. 11.1 Startup Time of Master Module It takes approximately 5 seconds for the EH-150 CPU module to start running from the point when the power is turned on. -
Page 88: Output Specifications At Cpu Stop
IDLE status by the specification of the other vendor’s DeviceNet master. In this case, the DeviceNet master will send the Clear data or Hold data to all slaves. When using an other vendor’s DeviceNet master and Hitachi's slave, please use after sufficiently confirming. 11-2... -
Page 89: Mapping Specifications Of Eh-Iocd
Chapter 11 Precautions for Use 11.3 Mapping Specifications of EH-IOCD If I/O modules are mounted by setting a empty slot on the EH-IOCD, the empty slot is ignored when mapping to the link area. Only the mounted modules are mapped, for each input/output module. The following shows an example: Modules mounted on EH-IOCD See Section 6.2 for the I/O data... -
Page 90: Error Check In Ladder Editor For Windows
Chapter 11 Precautions for Use 11.4 Error check in Ladder Editor for Windows® The error check of a CPU module, or a Link / Remote module can be performed from Ladder Editor for Windows®. The error check of a Link / Remote is reflecting the data of the special internal output. But in case of EH-RMD, the specification of the special internal output differs from the Link / Remote module of H series. -
Page 91: Communication Power Supply
Chapter 12 Communication Power Supply Chapter 12 Communication Power Supply 12.1 Requirements 1. Use 24 V DC as communication power supply. 2. The power must always be supplied via the trunk line. 3. The maximum current at the trunk line is 8A with the thick cable, and 3A with the thin cable. 4. -
Page 92: Layout Of Communication Power Supply
Chapter 12 Communication Power Supply 12.2 Layout of Communication Power Supply Follow the procedure shown below when determining the position and number of communication power supplies to be used. 1. Calculate the power consumption necessary for each device on the network. 2. -
Page 93: Connection Positions Of Communication Power Supply
Chapter 12 Communication Power Supply 12.3 Connection Positions of Communication Power Supply • Single power supply termination connection Power supply tap Termination Termination resistor resistor Device Device Device Device Communication power supply • Single power supply central connection Power supply tap Termination Termination resistor... -
Page 94: Examining Power Supply Connection Positions
Chapter 12 Communication Power Supply 12.4 Examining Power Supply Connection Positions This section provides some suggestions for what can be done if the power consumption exceeds the maximum allowable current value, using the following configuration as an example. (Example 1) If the communication power supply is connected at the end of the network Trunk line (thick cable) Termination Termination... - Page 95 Chapter 12 Communication Power Supply (Example 2) When the total power consumption value varies in each section 150 m (section 1) 150 m (section 2) Trunk line (thick cable) Trunk line (thick cable) Termination Termination resistor resistor Device Device Device Device Device Device...
-
Page 96: Mounting And Wiring
2 mm or more and Class EH-150 D grounding (100 Ω or less). The POWER 12 13 HITACHI appropriate distance for ground cable is within 20 m. Grounding of instrumentation panel and relay panel can be shared. 100 V AC ∼... -
Page 97: Mounting Discrete I/O Slave Units
Chapter 13 Mounting and Wiring 13.3 Mounting Discrete I/O Slave Units (1) In case of fixing with screws Check the dimension of the slave unit to be mounted and make appropriate installation holes on the control board. Then fix the slave unit using M4 screws. (Fix the slave unit at two places, at the upper right and bottom left when viewing from the front.) (2) In case of fixing on the DIN rail Mount the backside of the slave unit onto the DIN 35 mm rail. -
Page 98: How To Prepare Communication Cables
Chapter 13 Mounting and Wiring 13.4 How to Prepare Communication Cables Prepare the communication cables according to the procedure below and attach them to the connector. Peel approximately 40 mm of the coating off the end of the cable. Approx.40mm Loosen and remove the mesh of the shielding. -
Page 99: Precautions When Connecting To The Network
Chapter 13 Mounting and Wiring 13.6 Precautions when Connecting to the Network • A device should be connected to the network through a drop line, by using a branch tap from the trunk line. • When a multidrop connection to a drop line is made, be sure that the connector will not be pulled out by the weight of the cable. -
Page 100: How To Ground The Network
Chapter 13 Mounting and Wiring 13.7 How to Ground the Network DeviceNet uses one-point grounding in order to prevent a ground loop. Connect the drain line of the communication cable to the FG terminal of the communication power supply and provide Class D grounding as shown in the figure below. Dedicated tap for the communication power supply CAN-H... -
Page 101: Maintenance And Inspection
Chapter 14 Maintenance and Inspection Chapter 14 Maintenance and Inspection In order to use the functions of this module in the optimal condition and maintain the normal operation of the system, it is essential to conduct daily and periodical inspections. 14.1 Items for Daily Inspection Verify the following items while the system is running. -
Page 102: Chapter 15 Troubleshooting 15-1 To
Examine the position of the communication power Is the voltage of the communication power supply supply again. normal? Register from the configurator. Is the scan list registered? Replace faulty parts if spare parts are available. Contact Hitachi’s Service Dept . 15-1... - Page 103 Replace faulty parts if spare parts are available. Contact Hitachi’s Service Dept. • No output from WL In this status, both the MS and NS LED of the slave are lit in green Check the output voltage...
- Page 104 IDentity Object 0x01 Volume 1 Release 2.0 Conforme to DeviceNet Specification ID Description Value Limits Volume 2 Release 2.0 Revision Vendor Name Hitachi, Ltd. Max Instance General Device Device Profile Name Communications Adapter Number of Instances Data Attribute Optional attributes list...
- Page 105 Message Router Object 0x02 Connection Object 0x05 ID Description Value Limits Description Value Limits Attributes Attributes Object Not supported Object Not Supported Class DeviceNet Services Parameter options Class DeviceNet Services Parameter options Services Services Not supported Not supported ID Description Value Limits Explicit Message Object list...
- Page 106 Connection Object 0x05 Connection Object 0x05 ID Description Value Limits ID Description Value Limits Attributes Attributes Object Not Supported Object Not Supported Class DeviceNet Services Parameter options Class DeviceNet Services Parameter options Services Services Not supported Not supported Explicit Message Explicit Message Polled Polled...
- Page 107 Connection Object 0x05 Connection Object 0x05 ID Description Set Value Limits ID Description Value Limits Attributes Attributes Object Not Supported Object Not Supported Class DeviceNet Services Parameter options Class DeviceNet Services Parameter options Services Services Not supported Not supported Explicit Message Explicit Message Polled Polled...
- Page 108 Connection Object 0x05 Assembly Object 0x04 ID Description Value Limits ID Description Set Value Limits Attributes Attributes Object Not Supported Object Not Supported Class DeviceNet Services Parameter options Class DeviceNet Services Parameter options Services Services Not supported Not supported Explicit Message Total Instance Id (s) Peer to Peer...
- Page 109 Acknowledge Handler Object 0x2B ID Description Get Set Value Limits Attributes Object Not Supported Class DeviceNet Services Parameter options Services Not supported Instance Static Type Dynamic ID Description Get Set Value Limits Acknowledge Timer Retry Limit COS Producing Connection Instance Attributes Ack List Size Object...
- Page 110 IDentity Object 0x01 Volume 1 Release 2.0 ID Description Value Limits Conforme to DeviceNet Specification Revision Volume 2 Release 2.0 Max Instance Vendor Name Hitachi, Ltd. General Number of Instances Device Device Profile Name Communications Adapter Attributes Optional attributes list Object...
- Page 111 Message Router Object 0x02 Assembly Object 0x04 ID Description Value Limits Description Set Value Limits Attributes Attributes Object Not supported Object Not Supported Class DeviceNet Services Parameter options Class DeviceNet Services Parameter options Services Services Not supported Not supported ID Description Value Limits Instance Id (s) Attributes...
- Page 112 Connection Object 0x05 Connection Object 0x05 ID Description Value Limits ID Description Value Limits Attributes Attributes Object Not Supported Object Not Supported Class DeviceNet Services Parameter options Class DeviceNet Services Parameter options Services Services Not supported Not supported Explicit Message Explicit Message Polled Polled...
- Page 113 Connection Object 0x05 Connection Object 0x05 ID Description Value Limits ID Description Value Limits Attributes Attributes Object Not Supported Object Not Supported Class DeviceNet Services Parameter options Class DeviceNet Services Parameter options Services Services Not supported Not supported Explicit Message Explicit Message Polled Polled...
- Page 114 Connection Object 0x05 Acknowledge Handler Object 0x2B ID Description Value Limits ID Description Set Value Limits Attributes Attributes Object Not Supported Object Not Supported Class DeviceNet Services Parameter options Class DeviceNet Services Parameter options Services Services Not supported Not supported Explicit Message Instance Static...
- Page 115 Volume 1 Release 1.4 IDentity Object 0x01 Conforme to DeviceNet Specification Volume 2 Release 1.4 ID Description Value Limits Attributes Object Not supported Vendor Name Hitachi, Ltd. General Class DeviceNet Services Parameter options Device Device Profile Name Discrete I/O Services Not supported...
- Page 116 Message Router Object 0x02 Connection Object 0x05 ID Description Value Limits ID Description Value Limits Attributes Attributes Object Not supported Object Not Supported Class DeviceNet Services Parameter options Class DeviceNet Services Parameter options Services Services Not supported Not supported ID Description Value Limits Explicit Message Attributes...
- Page 117 Connection Object 0x05 ID Description Value Limits Attributes Object Not Supported Class DeviceNet Services Parameter options Services Not supported Explicit Message Polled Predefined Bit Strobed Connections Change of State Cyclic ID Description Value Limits State Instance type Transport Class trigger Produced connection ID Consumed connection ID Initial comm.