Cisco ISA 3000 Product Documentation
Industrial security
Hide thumbs
Also See for ISA 3000:
- Connecting instructions (12 pages) ,
- Quick start manual (12 pages) ,
- Manual (6 pages)
Table of Contents
Advertisement
Quick Links
I
! R
MPORTANT
EAD
B
EFORE
Product Documentation and Compliance Informa-
tion for the Cisco ISA 3000 Industrial Security
Appliance
Cisco Information
•
Related Documentation
•
Installing the ISA 3000
•
Hazardous Locations Standards and Marking Strings
•
EMC Information
•
Cisco Systems, Inc.
www.cisco.com
A
S
LL THE
AFETY
I
NSTALLING THE
I
NFORMATION
H
ARDWARE
Advertisement
Table of Contents

Related Manuals for Cisco ISA 3000


Summary of Contents for Cisco ISA 3000
- Page 1 MPORTANT LL THE AFETY NFORMATION EFORE NSTALLING THE ARDWARE Product Documentation and Compliance Informa- tion for the Cisco ISA 3000 Industrial Security Appliance Cisco Information • Related Documentation • Installing the ISA 3000 • Hazardous Locations Standards and Marking Strings •...
-
Page 2: Related Documentation
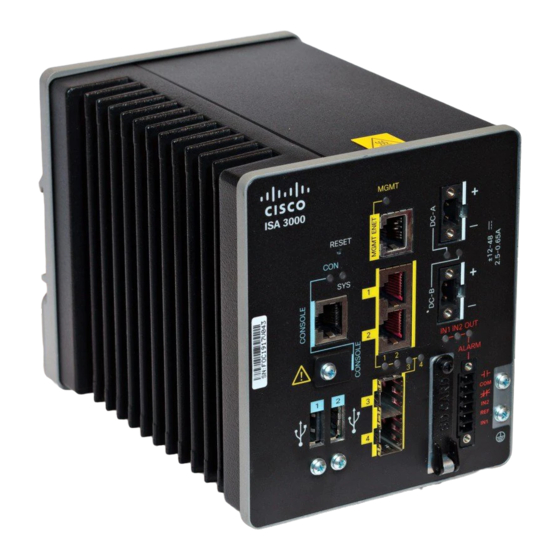
Items Shipped with your Cisco ISA 3000 Unpack the box and verify that all items listed on the invoice were shipped with the Cisco ISA 3000. The following items are shipped with your device: This document, Part Number 78-100733-01 •... -
Page 3: Equipment That You Supply
Only trained and qualified personnel should be allowed to install, replace, or service this equipment. Warning Statement 1030 Ultimate disposal of this product should be handled according to all national laws and regulations. Warning Statement 1040 Product Documentation and Compliance Information for the Cisco ISA 3000 Industrial Security Appliance 78-100733-01B0... - Page 4 - DC Input Voltage: Maximum Operating Range: 9.6VDC to 60VDC; Nominal: 12VDC to 48VDC The maximum ambient operating temperature range is –40 to 140°F (–40 to 60°C). Note Product Documentation and Compliance Information for the Cisco ISA 3000 Industrial Security Appliance 78-100733-01B0...
- Page 5 Insert the ground wire into the ring terminal lug, and using a crimping tool, crimp the terminal to the wire. Step 4 Slide the ground screw through the terminal. Product Documentation and Compliance Information for the Cisco ISA 3000 Industrial Security Appliance 78-100733-01B0...
-
Page 6: Connecting Dc Power
The graphic to the right shows the proper ground connection points. Step 6 Use a ratcheting torque screwdriver to tighten the ground screw and ring terminal to the ISA 3000 front panel to 3.5 in-lb (0.4 N-m). The torque should not exceed 3.5 in-lb (0.4 N-m). - Page 7 Step 5 Remove the two captive screws that attach the power connector to the ISA 3000, and remove the connector. Step 6 On the power connector, insert the exposed part of the positive wire into the connection labeled “+”...
- Page 8 To attach the power connectors: Step 1 Insert the power connector into the receptacle on the ISA 3000 front panel. Step 2 Use a ratcheting torque flathead screwdriver to tighten the captive screws on both sides of the power connector to 2 in-lb (0.23 N-m).
-
Page 9: Connecting To The Usb Ports
Note - a connection (to the USB ports) can only be made in a non-hazardous environment - the USB port covers must be reinstalled before the ISA 3000 can be deployed in a hazardous environment For more information about connecting to the USB port, see the Cisco ISA 3000 Hardware Installation Guide on Cisco.com. -
Page 10: Emc Information
Dies ist ein Produkt der Klasse A. Bei der Verwendung dieses Produkts im Haus- oder Wohnungsbereich kann es zu Funkstörungen kommen. In diesem Fall muss der Benutzer u. U. angemessene Maßnahmen ergreifen. Product Documentation and Compliance Information for the Cisco ISA 3000 Industrial Security Appliance 78-100733-01B0... - Page 11 This page intentionally left blank. Product Documentation and Compliance Information for the Cisco ISA 3000 Industrial Security Appliance 78-100733-01B0...
- Page 12 Note Cisco and the Cisco logo are trademarks or registered trademarks of Cisco and/or its affiliates in the U.S. and other countries. To view a list of Cisco trademarks, go to this URL: www.cisco.com/go/trademarks. Third-party trademarks mentioned are the property of their respective owners. The use of the word partner does not imply a partnership relationship between Cisco and any other company.