D-Link DWR-720/PW User Manual
Wcdma/3g wifi fixed flla phone
Hide thumbs
Also See for DWR-720/PW:
- User manual (18 pages) ,
- User manual (19 pages) ,
- Basic user setup manual (2 pages)
Table of Contents
Advertisement
Advertisement
Table of Contents

Related Manuals for D-Link DWR-720/PW


Summary of Contents for D-Link DWR-720/PW
- Page 1 User Manual WCDMA / 3G WIFI Fixed FLLA Phone DWR-720/PW Version 1.00 ǀ2018/09...
-
Page 2: Preface
Preface D-Link reserves the right to revise this publication and to make changes in the content hereof without obligation to notify any person or organization of such revisions or changes. Trademarks D-Link and the D-Link logo are trademarks or registered trademarks of D-Link Corporation or its subsidiaries in the United States or other countries. -
Page 3: Table Of Contents
Table of Contents Preface ........................2 3.4 Operations during a call ................16 Trademarks ......................2 3.5 Terminate call ....................17 1. Basic Overview ....................5 3.6 Make Emergency call ................... 17 1.1 Package Contents ..................5 3.7 Make International long-distance call ............17 1.2 System Requirements ................... - Page 4 10.4 Date & time ....................39 10.11 Phone Info ....................46 10.5 Wireless & network ................... 39 11. FM Radio......................47 Wi-Fi tethering (Wi-Fi hotspot): ..............41 12. Browser ......................48 Mobile Networks (APN) ................43 13. Wi-Fi ........................ 50 10.6 Quick number ....................
-
Page 5: Basic Overview
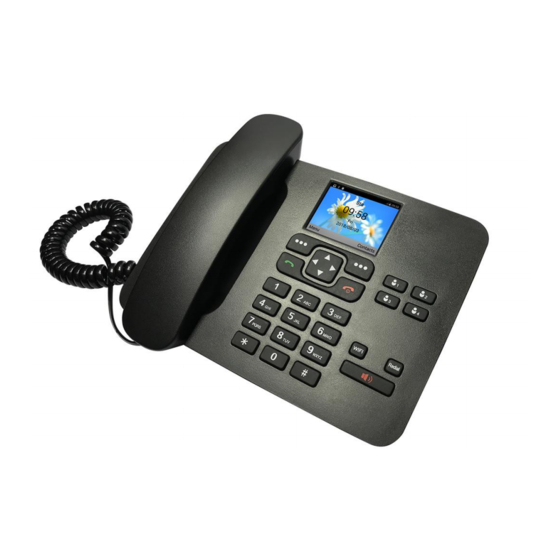
1. Basic Overview 1.1 Package Contents D-Link DWR-720PW WCDMA / 3G WI-FI Fixed FLLA Phone Battery Handset Cord Handset Receiver Antenna Power Supply Note: Using a power supply with a different voltage rating than the one included with the DWR-720PW will cause damage and void the warranty for this product. -
Page 6: Safety And Maintenance
1.3 Safety and Maintenance 1.3.1 Using the Phone Please observe the following points: Before use, please read the instruction manual carefully. Do not power on the phone when the use of a cellular phone is prohibited as it may cause interruptions or danger. ... -
Page 7: Using The Battery
1.3.2 Using the Battery Please observe the following points: Before use, please read instructions for use as well as label on the surface of the battery. Please charge the battery in a cool and well-ventilated room as high temperatures may lead to overheating. ... -
Page 8: Using The Battery Charger
Do not put the battery in an open fire as this could lead to an explosion. Do not put the battery in water to avoid short circuit inside, resulting in battery overheat, smoking, distortion, damage or even explosion. ... -
Page 9: Instructions Before Use
2. Instructions before Use Before using the phone, make sure the USB jack, power adapter or battery is correctly connected and the SIM card has been inserted correctly. Follow the instructions below on how to install the phone: Back to Table of Contents... - Page 10 Back to Table of Contents...
-
Page 11: Power On
2.1 Power ON The device can work on single battery mode, single charger mode or both battery and charger mode. Press and hold [Red Power Key] button until boot screen appears If there is a prompt for Type PIN code, please enter your SIM PIN code and press [Unlock] key. ... -
Page 12: Pin Code
Set up SIM card lock: Set SIM PIN lock to on or off, or modify SIM PIN. Note that the SIM PIN number is issued by your network provider and is shown on your Complete SIM card. If a SIM PIN is set, it will be indicated with a tick. -
Page 13: Microsd Card Format & Specification
2.6 microSD Card format & specification Installation Step 1: Slide the clip to the right carefully. You will hear a small click and the clip will now be loose. Step 2: Flip open the clip by softly lifting it to the right and place the microSD Card down flat into the groove with the pins facing down to the right. - Page 14 The DWR-720PW is compatible with the following file types: Video File types: .3gp, .mp4, Audio File types: .aac, .flac, .m4a, .mid, .mp3, .ogg, .wav, File name Extensions: .gif, .jpg, .png, .bmp Back to Table of Contents...
-
Page 15: Basic Functions
3. Basic Functions 3.1 Direct dial Making a phone call: In Home Screen, press the numerical key to enter the phone number then pick up the handset to dial or press the [Green Dial key] to initiate the call on hands free loudspeaker. ... -
Page 16: Operations During A Call
3.2 Quick dial from dialled list In Home Screen, press the [Green Dial key] to enter [Outcall number] list. Scroll down to the previous number you have dialled or received a call from. Press the [Green Dial key] again to initiate the call. 3.3 Receive a call ... -
Page 17: Terminate Call
3.5 Terminate call When there is an incoming call, press the [Red Power key] to reject the call. During the call, press the [Red Power key] to terminate current call. Or hang up the handset to end the current call. ... -
Page 18: Hardware Overview
4. Hardware Overview 4.1 Front Back to Table of Contents... -
Page 19: Back
4.2 Back Back to Table of Contents... -
Page 20: Key Descriptions
4.3 Key Descriptions Back to Table of Contents... - Page 21 Left Soft Key Press to go into the Menu from Home screen; Select/Ok in submenus Direction Keys Up Key Used to scroll through the menu; Shortcut to File Manager Down Key Used to scroll through the menu, Shortcut to Settings Left Key Used to scroll through the menu;...
-
Page 22: Status Icons
4.4 Status Icons Icons on the screen: Signal strength indicator 3G Network Service available 2G Network Service available No Network Service available Network Roaming AC adapter Plugged in and Powered Battery Life Indicator Handset is picked up New Message Received Missed Call icon Hot Spot Enabled Icon Back to Table of Contents... - Page 23 Wi-Fi Network available Icon Wireless Network Connected Icon Alarm has been set Music enabled icon Bluetooth enabled icon FM Radio enabled icon Hands Free icon Message Received icon USB connected icon SD Card icon SD Card format error icon Back to Table of Contents...
-
Page 24: Menu Icons
4.5 Menu Icons Contacts Tool Box Wi-Fi Settings File Manager Call log FM Radio Music Calendar Browser Back to Table of Contents... -
Page 25: Contacts
5. Contacts In the home screen, select [Menu] [Contacts] [OK] Note: When referring to [OK], it is generally the left soft key located above the green dial key Press the left soft key [OK] to access the Options Press the right soft key [Delete] to clear errors made during entry New: Add New Contacts. - Page 26 Once you have a contact saved, you will be presented with more options -Call: Press to dial the selected contact -Search: You can search for the contact by name or number -Send message: Press to send SMS to the selected contact -New: Add a new contact -Detail: View all details of the selected contact -Delete: To delete an existing contact, select the contacts to delete (shown with tick) and select [OK]...
-
Page 27: Sms
6. SMS In the home screen, select [Menu] [SMS] [OK] Note: When referring to [OK], it is generally the left soft key located above the green dial key You will be presented with the following options: -Write message: Here you can insert the contact number as well as write a message to a person -Inbox: Here you can see all received message -Outbox: Here you can see pending messages not yet sent -Drafts: Here you can see all incomplete messages not sent... - Page 28 To view received messages -From the SMS menu, select [Inbox] -To read, select [Into the message details]. You may then call, forward, delete, reply and save contact -To delete, select [Delete the selected Message] -To delete all messages, select [Delete all Message] Messages not sent or pending are located in the Outbox -From the SMS menu, select [Outbox] -To view, select [Into the message details].
-
Page 29: Call Log
7. Call log In the home screen, select [Menu] [Call log] [OK] Note: When referring to [OK], it is generally the left soft key located above the green dial key Here you can view the following -All: List of call history -Missed call: List of all calls missed -Outcall number: List of all calls dialled out -Received calls: List of calls received... -
Page 30: Calendar
8. Calendar In the home screen, select [Menu] [Calendar] [OK] Note: When referring to [OK], it is generally the left soft key located above the green dial key Press [OK] to view the following options -To the current date: You will be taken to today’s date -To the specified date: You can choose this to go to a specific date To select a specific date -Select [To the specified date] ... -
Page 31: Tool Box
9. Tool box In the home screen, select [Menu] [Tool box] [OK] Note: When referring to [OK], it is generally the left soft key located above the green dial key Here you can access your Calculator and Alarm Functions Press [OK] ... - Page 32 To add a new alarm or edit an alarm, Press [OK] [Add] [OK] or [Edit] [OK] -Here you can set the time of the alarm. Press [Select] on the selected field and set the time by pressing the up or down key.
-
Page 33: Settings
10. Settings In the home screen, select [Menu] [Settings] [OK] Note: When referring to [OK], it is generally the left soft key located above the green dial key Here you can view the following options: -Display: Configuration settings for Brightness, Display Dim, Font size, Interface style -Sound: Configuration settings for Volumes, Ringtones, Notification Sounds -Language: You can set your phone language display to English, Español, Português -Call settings: Configuration settings for Voice Call, Fixed Dialling Numbers, Minute reminder, Delay dial, Call... -
Page 34: Display
10.1 Display Under the Display setting, you have the option to: -Brightness: You can adjust the light intensity for the background light that illuminates the screen. Use the left or right key to adjust the brightness level from dim to bright -Display Dim: If no key is pressed with a set period, the background light will dim automatically. -
Page 35: Sound
To Enable: 1. Select Display Dim and set the time in which you wish for the display to dim, and press the left soft key to confirm. 2. A pop-up message will be displayed. Confirm by selecting [OK] and the left soft key to confirm 3. -
Page 36: Language
10.3 Language You can set your phone language display to English, Español, Português 10.4 Call settings Under the Call settings, you have the option to: -Voice Call: You can set Voicemail, Call forwarding, Call barring, Additional settings -Fixed Dialling Numbers (FDN): Numbers can be added to the FDN list, and when activated, FDN restricts outgoing calls to only those numbers listed, or to numbers with certain prefixes -Minute reminder: Enable/Disable reminder at 50s of every minute -Delay dial: Delay dial is the time or delay that occurs from the time a number has been dialled until the... - Page 37 1. Always forward: This setting redirects all incoming calls to another phone number. Press [OK] to enter a phone number and enable this function. Once complete, press down and select [Enable] to save or [Cancel] to exit. To disable this function, press [OK] and select [Disable] to save.
- Page 38 3. Change barring password: You can change/set a pin on this feature prevent tampering. You will be prompted for the password, press down and select [OK] to save. You will be required to enter and confirm a new password, press down and select [OK] to save. At any stage you can select [Cancel] to exit.
-
Page 39: Date & Time
10.4 Date & time Under the Date & time settings, you have the option to: -Automatic date & time: By default, this option is enabled. The date & time is set to network-provided time -Automatic time zone: Enable to automatically update the time zone set by the service provider -Set date/time/time zone: These options will be greyed out if Automatic date &... - Page 40 How to connect to a wireless network -Once Wi-Fi has been turned on, you will see a list of available wireless networks in your area -To connect to a wireless network, scroll up or down and highlight the name of the network you want to connect to, select [OK] ...
-
Page 41: Wi-Fi Tethering (Wi-Fi Hotspot)
Wi-Fi optimization: Enable this feature to minimize battery usage when Wi-Fi is on. You can also view your wireless information such as MAC address / IPv4 address Tethering & portable hotspot settings USB tethering: One-on-One internet connection between the device and your laptop or computer. First you will need to connect a device to the phone using a USB cable (using the phone’s USB power jack as the connection point). - Page 42 -The phone comes pre-set with default Network SSID and Password for the Wi-Fi hotspot. You can modify these settings by scrolling with the [Up/Down] Key to the field which needs to be reconfigured -Wireless password must have at least 8 characters -You can view the Password set by marking the [Show password] function -It will also make setting a Password easier if you mark the [Show password] function before configuring the password.
-
Page 43: Mobile Networks (Apn)
Mobile Networks (APN) Here you will find the settings for Mobile network connection. You can set up data account to access internet service. The required Network Settings for your phone has been preloaded. For Telkom users, the default APN settings has been preloaded for you. Should the desired Network Settings not reflect here, you can manually enter it here: Steps to Follow: Press [Mobile networks][Access Point Names][New APN]. -
Page 44: Quick Number
10.6 Quick number You can set the M1 – M4 quick dial keys (located on the face of the phone) by: To Edit, select the M# and press [OK]. Input the number and select [Save][Save]. If you have the number saved in your Contacts, press [Save][From contact]Choose the number[OK][Save][Save]. To delete, select the M# and press [OK]Clear all numbers[Save][Save]. -
Page 45: Bluetooth
10.9 Bluetooth The phone can pair to other Bluetooth supported devices for file transfer, speaker, or headset etc. Available Options: -Set Bluetooth On or Off -Set Visibility On or Off -Scan for available Bluetooth devices in area How to pair with another device -[Menu][Settings][Bluetooth][OK][On][OK] -Select the device which you wish to pair with by scrolling through the Available devices list with [Up/Down] ... -
Page 46: Phone Info
10.10 Factory Data Reset Use this function if you wish to restore the phone back to factory settings. All personal information, data stored will be erased and you cannot reverse this action. To do this navigate [Menu][Settings][Factory data reset][Erase everything][OK] The phone will now proceed to erase and restore the phone back to factory settings, during this process the phone will reboot a few times. -
Page 47: Fm Radio
11. FM Radio In the home screen, select [Menu] [FM Radio] [OK] Note: When referring to [OK], it is generally the left soft key located above the green dial key The radio will now be activated -Search: Search for available radio stations in your area, the stations will be listed in the Channel list -Channel list: List of searched radio stations available in your area -Add to Favourite: Add or remove the radio station from favourite (shown with a star) -Exit: Close the Radio function (If you press Back, the radio will continue to operate in the background) -
Page 48: Browser
12. Browser In the home screen, select [Menu] [Browser] [OK] Note: When referring to [OK], it is generally the left soft key located above the green dial key On the home page, you will see the Site Navigation Screen where you can set frequently visit pages To set this, highlight the icon which you wish to change, and select [Option][Add] Change the Label name and Url Address accordingly, and select [OK] when you are done. - Page 49 To save a webpage to bookmarks: [Options][Save to bookmarks] -You can save the current webpage to your Bookmarks How to Navigate, Click and Enter Text: -You can navigate the screen by using the directional keys. This will scroll the page up, down, left or right. -To type text into a textbox, press the M1 quick dial key to bring up the mouse cursor.
-
Page 50: Wi-Fi
13. Wi-Fi In the home screen, select [Menu] [Wi-Fi] [OK] Note: When referring to [OK], it is generally the left soft key located above the green dial key Wi-Fi settings To see available networks, you will need to turn Wi-Fi on. To do this, press [OK] [Enable]. To turn off the Wi-Fi, press [OK] ... - Page 51 -You can enable [Show advanced options] if you have settings for Proxy or IPv4 settings -Once successfully connected, the selected wireless network will show Connected and a wireless icon will be displayed on the top bar -If your router supports WPS function, you can use [OK] [WPS Push Button] function to connect -To disconnect from the wireless network, you can either turn off the Wi-Fi or [Forget network] -If your wireless network is hidden, you will need to use the [Add network] function Advanced settings...
-
Page 52: File Manager
14. File Manager In the home screen, select [Menu] [File Manager] [OK] Note: When referring to [OK], it is generally the left soft key located above the green dial key If you have inserted a microSD card, and it is detected by the phone, you will see SD card. Press [OK] to see: - Open: Select to view the files/folders on the microSD Card - Search: Used to search for files on the microSD Card... - Page 53 Copy: Copy an item will duplicate the item to move into another location Paste: Place either the cut or copy file into the selected location/folder Delete: Remove the selected item from the microSD card Rename: Used to give new name to the selected item Share: Share the file over Bluetooth Sort: You can sort the file display by, Type, Name (A - Z), Size (Big - Small), Time (New - Old) If the microSD card is not recognised by the phone, a (Empty Folder) label will be shown, to fix this:...
-
Page 54: Music
15. Music Important Note: In order to completely turn OFF the Music Player, you must navigate to the Music feature and use [Quit] under the player to close the Music Player. By pressing [Quit] under the Library or the [Red Hang Up Key] will only minimize the Music Player to the background. -
Page 55: Frequently Asked Questions
16. Frequently Asked Questions If any problems are encountered while using the phone, please refer to below FAQs. If the problems still exit, please contact the Network Operator. Q. Who can I contact for technical support regarding SIM, Airtime, SMS, Voicemail etc? A. - Page 56 Q. “Insert SIM card" appears on the screen. A. Make sure the SIM card is correctly installed. Check if the SIM card works properly in another device where possible. SIM card may be defective or faulty. Please contact you Network Provider for a SIM swop if faulty. Q.
- Page 57 Q. My phone screen keeps returning to the Home Page by itself A. Check that the Return to Home Page feature is not enabled. If you don’t want this feature, disable it. Q. I can’t play my music/video file from the File Manager A.
- Page 58 Q. Cannot add entries into phonebook A. Phonebook is full. Please delete some un-used entries. Q. Cannot charge. A. There are three possibilities: • Charger of your phone does not work properly. You will need to contact your Operator or Supplier •...
-
Page 59: Technical Specifications
Technical Specifications UMTS/HSPA+(WCDMA) Band Support Structure 850/1900MHz Size: 227 x 157 x 70mm / 0.4 kg GSM Quad-Bands Power adapter 850/900/1800/1900MHz Power adapter: DC 5V / 500mA Battery: 3.7V / 800mA Package Content 240x320 dots, 2.4 inch colour screen with backlight function Phone Unit x 1pc ...