
Related Manuals for Cambium Networks cnPilot r190V


Summary of Contents for Cambium Networks cnPilot r190V
- Page 1 USER GUIDE cnPilot Home & Small Business Wireless Router System Release V4.4.1 For cnPilot r190V/r190W/R200/R200P/R201/ R201P/R201W models...
- Page 2 Accuracy While reasonable efforts have been made to assure the accuracy of this document, Cambium Networks assumes no liability resulting from any inaccuracies or omissions in this document, or from use of the information obtained herein. Cambium reserves the right to make changes to any products described...
-
Page 3: Table Of Contents
Contents About This User Guide ......................3 Contacting Cambium Networks ....................4 Purpose............................5 Cross references ........................5 Feedback ............................ 5 Declaration of Conformity ....................... 6 Part 15 FCC Rules ........................6 Class B Digital Device or Peripheral ..................6 GNU GPL Information ....................... - Page 4 Contents Security ............................99 Application ........................... 102 Storage ............................104 Administration ..........................107 Management ......................... 107 Firmware Upgrade ........................ 114 Provision ..........................114 SNMP ............................. 117 TR-069 ............................ 118 Scheduled Tasks ........................132 Diagnosis ..........................133 Operating Mode ........................136 System Log..........................
-
Page 5: About This User Guide
About This User Guide Thank you for choosing Cambium cnPilot Home & Small Business Wi-Fi Router with ATA(optional) and PoE(optional). This manual provides basic information about how to install and deploy the cnPilot Home Routers. For remote configuration and deployment, an Internet connection is required. -
Page 6: Contacting Cambium Networks
Chapter 1: Product Description Declaration of Conformity Contacting Cambium Networks Support website: https://www.cambiumnetworks.com/support Main website: https://www.cambiumnetworks.com Sales enquiries: solutions@cambiumnetworks.com Support enquiries: support@cambiumnetworks.com Repair enquiries rma@cambiumnetworks.com Telephone number list: https://www.cambiumnetworks.com/contact Address: Cambium Networks Limited, Linhay Business Park, Eastern Road, Ashburton, Devon, UK,... -
Page 7: Purpose
Chapter 1: Product Description Declaration of Conformity Purpose Cambium disclaims all liability whatsoever, implied or express, for any risk of damage, loss or reduction in system performance arising directly or indirectly out of the failure of the customer, or anyone acting on the customer's behalf, to abide by the instructions, system parameters, or recommendations made in this document. -
Page 8: Declaration Of Conformity
Chapter 1: Product Description Declaration of Conformity Declaration of Conformity Part 15 FCC Rules This device complies with Part 15 of the FCC Rules. Operation is subject to the following two conditions: • This device may not cause harmful interference, and •... -
Page 9: Conventions, Warnings, Cautions, And Notes
Conventions, warnings, cautions, and notes Conventions, warnings, cautions, and notes The following describes how conventions, warnings, cautions, and notes are used in this document and in all documents of the Cambium Networks document set. Conventions The following convention is used throughout this User Guide:... -
Page 10: Chapter 1: Product Description
Chapter 1: Product Description Conventions, warnings, cautions, and notes Chapter 1: Product Description This chapter covers: • cnPilot Home Router Specifications • LED Indicators and Interfaces(r190V/r190W/R200/R200P) • LED Indicators and Interfaces (R201/R201P/R201W) • Hardware Installation Page... -
Page 11: Cnpilot Home Router Specifications
Chapter 1: Product Description cnPilot Home Router Specifications cnPilot Home Router Specifications Table 1 Specifications at-a-glance cnPilot R200/r190V/ Port / Interface cnPilot R200P cnPilot R201 cnPilot R201P cnPilot R201W r190W 1xFE in RJ45 1xGE in RJ45 4xFE in RJ45 (R200 and r190W) 4xGE in RJ45 3xFE in RJ45 (r190V) -
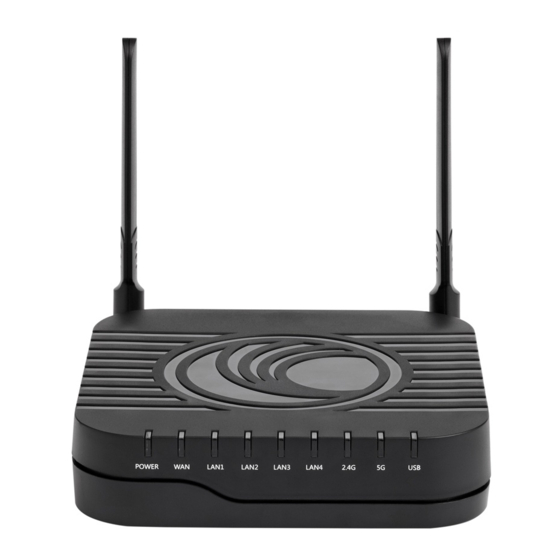
Page 12: Led Indicators And Interfaces (R190V/R190W/R200/R200P)
On (Green) The router is powered on and running normally POWER The router is powered off On (Green) Wireless access point is ready WLAN Blinking (Green) Blinks while wireless traffic goes through Table 3 cnPilot r190V/r190W LED Indicators Front Panel Page... - Page 13 Chapter 1: Product Description LED Indicators and Interfaces (r190V/r190W/R200/R200P) Status Explanation Power is On/Device is ready. Blinking on 10Hz Power Firmware Upgrade. Blinking on 1Hz No IP Address for both PPPoE or DHCP mode. Link is Up. WAN/LAN Blinking Blinks while transmitting data. Disconnected Unregistered Registered...
- Page 14 Chapter 1: Product Description LED Indicators and Interfaces (r190V/r190W/R200/R200P) Table 4 cnPilot Home Routers r190V/r190W/R200/R200P Interfaces Rear Panel Interface Description POWER Connector for a power adapter Phone1/2 ATA Analog phone connector USB interface Connector for accessing the Internet LAN (1/2/3/4) Connectors for local networked devices Page...
-
Page 15: Led Indicators And Interfaces (R201/R201P/R201W)
Chapter 1: Product Description LED Indicators and Interfaces (R201/R201P/R201W) LED Indicators and Interfaces (R201/R201P/R201W) Table 5 cnPilot Router R201/R201P/R201W LED Indicators Status Explanation On (Green) Connected Disconnected On (Green) Wireless access point is ready 2.4G/5G Blinking (Green) The port is passing data On (Green) The port is connected at 100 Mbps The port is disconnected... -
Page 16: Hardware Installation
Chapter 1: Product Description Hardware Installation Hardware Installation Before configuring your router, please see the procedure below for instructions on connecting the cnPilot Home Router in your network. Procedure 1 Configuring the Router 1. Connect analog phone to ATA Port with an RJ11 cable. 2. -
Page 17: Chapter 2: Basic Settings
Chapter 2: Basic Settings Hardware Installation Chapter 2: Basic Settings This chapter covers: • Web Management Interface • Accessing and Configuring cnPilot Home Router via cnMaestro • Configuring via Voice Commands Web Management Interface cnPilot Home Routers feature a web browser-based interface that may be used to configure and manage the device. - Page 18 Chapter 2: Basic Settings Hardware Installation The ISP allows the home user to access the EZ UI through a wireless client connected to the cnPilot Home Router. Using the EZ UI, the user can easily change the basic device configurations such as Wi-Fi names, Wi-Fi passwords and parental control.
- Page 19 Chapter 2: Basic Settings Hardware Installation Figure 1 Login Prompt – LAN Port For administrator mode operation, please type admin/admin on Username/Password and click Login to begin configuration. For user mode operation, please type user/user on Username/Password and click Login to begin configuration. Note If you are unable to access the web configuration, please see Chapter 4:...
- Page 20 Chapter 2: Basic Settings Hardware Installation Note If you fail to access to the web configuration, see Chapter 4: Troubleshooting Guide for more information. The web management interface automatically logs out the user after 5 minutes of inactivity. Parental Control cnPilot Home Routers provide parental control feature for home users.
-
Page 21: Accessing And Configuring Cnpilot Home Router Via Cnmaestro
Chapter 2: Basic Settings Hardware Installation Parental control feature can be applied only to a specific WiFiName/SSID while the other SSIDs can be free from any such restrictions. Once the device is setup for Parental control service, any DNS request from its clients will be forwarded to the external DNS servers configured for filtering/restricting the content. -
Page 22: Configuring Via Voice Commands
Chapter 2: Basic Settings Hardware Installation Allow the IP Addresses of the devices in the Firewall Server using an ACL. Also, enable the protocols like HTTP/HTTPS and SSL. This is required as the device communicates with the cnMaestro Server using web sockets and for security reasons SSL certificates are exchanged between the device and the cnMaestro Serve By default, the cnMaestro Server URL will be configured in the devices for... - Page 23 Chapter 2: Basic Settings Hardware Installation 1. Pick up phone and press “****” to start IVR 2. Choose “1”. 3. Prompt "Please enter password”, user needs to input password and press “#” key, if user wants to configure Network. 4. The different options are described below. The unit reports “Operation Successful”...
- Page 24 Chapter 2: Basic Settings Hardware Installation 1. Pick up phone and press “****” to start IVR 2. Choose “2”, and cnPilot Home Router reports current WAN Port IP Address 3. Input the new WAN port IP address and press “#” key: 2.
- Page 25 Chapter 2: Basic Settings Hardware Installation 1. Pick up phone and press “****” to start IVR 2. Choose “5”, and cnPilot Home Router reports current DNS 3. Input the new DNS and press # key: 4. Use “*” to replace “.”, user can input 192*168*20*1 to set the 5.
- Page 26 Chapter 2: Basic Settings Hardware Installation 1. Pick up phone and press “****” to start IVR 2. Choose “5”, and cnPilot Home Router reports “WAN Port Login” 3. Prompt "Please enter password", the method of inputting password is same as operation 1. WAN Port Login 4.
- Page 27 Chapter 2: Basic Settings Hardware Installation Note 1. While using Voice menu, press * (star) to return to main menu. 2. If any changes made in the IP assignment mode, the router must be rebooted for the settings to take effect. 3.
- Page 28 Chapter 2: Basic Settings • Both ATA and the other VoIP device (i.e., another ATA or other SIP products) are on the same LAN using private or public IP addresses, or • Both ATA and the other VoIP device (i.e., another ATA or other SIP products) can be connected through a router using a public or private IP addresses.
-
Page 29: Chapter 3: Advanced Configuration
Chapter 3: Advanced Configuration Chapter 3: Advanced Configuration This chapter guides users to execute advanced (full) configuration through admin mode operation. This chapter covers: • Two-Level Management • Setting the Time Zone • Status • Configuring an Internet Connection • Network •... -
Page 30: Two-Level Management
Chapter 3: Advanced Configuration Two-Level Management Two-Level Management This section explains how to setup a password for an administrator or user and how to adjust basic and advanced settings. cnPilot Home Router supports two-level management: administrator and user. For administrator mode operation, please type “admin/admin”... -
Page 31: Setting The Time Zone
Chapter 3: Advanced Configuration Setting the Time Zone Setting the Time Zone Table 8 Setting time zone Field Name Description Enable NTP (Network Time Protocol) to automatically retrieve time NTP Enable and date settings for the device When NTP Enable is set to “Disable”, manually configure the time Current Time and date via the Current Time parameter Press... -
Page 32: Status
Chapter 3: Advanced Configuration Status Status Table 9 Status > Basic Page Page... - Page 33 Chapter 3: Advanced Configuration Status Page...
- Page 34 Chapter 3: Advanced Configuration Status Page...
- Page 35 Chapter 3: Advanced Configuration Status Page...
- Page 36 Chapter 3: Advanced Configuration Status Description This webpage shows the status information about the Product, Network, and System including Product Information, SIP Account Status, FXS Port Status, Network Status. and Wireless Info. Page...
-
Page 37: Configuring An Internet Connection
Chapter 3: Advanced Configuration Configuring an Internet Connection Configuring an Internet Connection From the Network > WAN page, WAN connections may be inserted or deleted. For more information on Internet Connection setting, see Table 10 below. Table 10 Configuring an internet connection Field Name Description Connect Name... - Page 38 Chapter 3: Advanced Configuration Configuring an Internet Connection VLAN ID Note Multiple WAN connections may be created with the same VLAN ID DNS Mode Select DNS mode, options are Auto and Manual: 1. When DNS mode is Auto, the device under LAN port will automatically obtains the preferred DNS and alternate DNS.
-
Page 39: Network
Chapter 3: Advanced Configuration Network Network You can configure the WAN port, LAN port, DDNS, Multi WAN, DMZ, MAC Clone, Port Forward and other parameters in this section of the web management interface. This page allows you to set WAN configuration with different modes. Use the Connection Type drop down list to choose one WAN mode and then the corresponding page will be displayed. - Page 40 Chapter 3: Advanced Configuration Network VLAN ID VLAN ID For example: 1_TR069_R_VID_2 (First Interface, Service is TR069, NAT Mode, VLAN ID is 2) 2_INTERNET_B_VID (Second Interface, Service is INTERNET, Bridge Mode, VLAN is disabled) Overview Multi WAN is used to implement the distribution of different kinds of services, and device’s Multi WAN supports the distribution of data services, voice services and management services.
- Page 41 Chapter 3: Advanced Configuration Network Figure 4 Multi WAN network Static IP This configuration may be utilized when a user receives a fixed public IP address or a public subnet, namely multiple public IP addresses from the Internet providers. In most cases, a Cable service provider will offer a fixed public IP, while a DSL service provider will offer a public subnet.
- Page 42 Chapter 3: Advanced Configuration Network Primary DNS Address The primary DNS of Internet port Secondary DNS Address The secondary DNS of Internet port DHCP The DHCP feature allows the cnPilot Home Router to obtain an IP address automatically from a DHCP server.
- Page 43 Chapter 3: Advanced Configuration Network PPPoE PPPoE stands for Point-to-Point Protocol over Ethernet. It relies on two widely accepted standards: PPP and Ethernet. It connects users through an Ethernet to the Internet with a common broadband medium, such as a single DSL line, wireless device or cable modem. All the users over the Ethernet can share a common connection.
- Page 44 Chapter 3: Advanced Configuration Network If it is left empty, the service name is auto detected. Operation Mode Select the mode of operation, options are Keep Alive, On Demand and Manual: • When the mode is Keep Alive, the user sets the 'keep alive redial period' values range from 0 to 3600s, the default setting is 5 minutes;...
- Page 45 Chapter 3: Advanced Configuration Network Bridge Mode Bridge Mode under Multi WAN is different with traditional bridge setting. Bridge mode employs no IP addressing and the device operates as a bridge between the WAN port and the LAN port. Route Connection has to be built to give IP address to local service on device.
- Page 46 Chapter 3: Advanced Configuration Network DHCP packet from the WAN interface to the LAN interface. Local DHCP service will not allocate IP to clients of LAN port. Local Service Gateway will not forward DHCP packets between LAN and WAN, it also blocks DHCP packets from the WAN port.
- Page 47 Chapter 3: Advanced Configuration Network Table 16 Q-in-Q Field Name Description Page...
- Page 48 Chapter 3: Advanced Configuration Network VLAN Mode Enable VLAN Mode. SVLAN(Q-in-Q) Enable Q-in-Q feature. SVLAN ID Enter a value for SVLAN ID (1-4094). Note Please ensure that Hardware NAT Enable option is disabled in the LAN page for R201/R201P/R201W models. The Hardware NAT Enable option is available only for R201 models.
- Page 49 Chapter 3: Advanced Configuration Network MAC Clone Some ISPs will require you to register your MAC address. If you do not wish to re-register your MAC address, you can have the router clone the MAC address that is registered with your ISP. To use the Clone Address button, the computer accessing the web management interface will have the MAC address automatically entered in the Clone WAN MAC field.
- Page 50 Chapter 3: Advanced Configuration Network Fast Bridge Setting Step 1 Login to the web management interface of the cnPilot Home Router. Navigate to Page Administration->Operating Mode. Set Operating mode to Basic Mode. Click Save. Step 2 Open Network->WAN, change NAT Enable to Disable. Click Save and then Reboot. The device is now operating in Bridge mode.
-
Page 51: Ipv6 Address Configuration
Chapter 3: Advanced Configuration Network IPv6 Address configuration The cnPilot Home Router devices support IPv6 addressing starting from firmware version 4.3. This section covers: • Introduction • Enabling IPv6 • Configuring IPv6 • Viewing WAN port status • IPv6 DHCP configuration for LAN/WLAN clients •... - Page 52 Chapter 3: Advanced Configuration Network • Statefull DHCPv6 Table 18 IPv6 Modes Mode Description Stateless In Stateless DHCPv6 mode, the cnPilot Home Router listen for ICMPv6 Router Advertisements messages which are periodically sent out by the routers on the local link or requested by the node using a Router Advertisements solicitation message.
- Page 53 Chapter 3: Advanced Configuration Network Configuring IPv6 Configuring Statefull IPv6 1. Navigate to Network > WAN page. The following window is displayed: Table 20 Configuring Statefull IPv6 Field Name Description IP Protocol Version Enable IPv4 and IPv6 option. WAN IP Mode Set it to DHCP.
- Page 54 Chapter 3: Advanced Configuration Network Configuring Stateless IPv6 Table 21 Configuring Stateless IPv6 Field Name Description IP Protocol Version Enable IPv4 and IPv6 option. WAN IP Mode Set it to DHCP. NAT Enable Select Enable. DHCPv6 Address Set it to stateless mode. Settings Prefix Delegation Select Enable.
- Page 55 Chapter 3: Advanced Configuration Network Viewing WAN port status To view the status of WAN port: 1. Navigate to Status page. IPv6 DHCP configuration for LAN/WLAN clients Wired and wireless clients connected to cnPilot Home Routers can obtain their IPv6 addresses based on how the LAN side DHCPv6 parameters are configured.
-
Page 56: Lan
Chapter 3: Advanced Configuration Network LAN Port Using the LAN ports the user can plug computers and other devices that need an Internet connection. Page... - Page 57 Chapter 3: Advanced Configuration Network Table 22 LAN port Field Name Description Enter the IP address of the router on the local area network. All the IP IP Address addresses of the computers which are in the router’s LAN must be in the same network segment with this address, and the default gateway of the computers must be this IP address.
- Page 58 Chapter 3: Advanced Configuration Network DNS Mode Select DNS mode, options are Auto and Manual. Primary DNS Enter the preferred DNS address. Secondary DNS Enter the secondary DNS address. Client Lease Time This option defines how long the address will be assigned to the computer within the network.
- Page 59 Chapter 3: Advanced Configuration Network DHCP Server The router has a built-in DHCP server that assigns private IP address to each local client. DHCP stands for Dynamic Host Configuration Protocol. The router, by factory default acts a DHCP server for your network so it automatically dispatches related IP settings to any local user configured as a DHCP client.
- Page 60 Chapter 3: Advanced Configuration Network Table 24 DHCP server, DNS and Client Lease Time Field Name Description Specify the Primary DNS address provided by your ISP. If your ISP Primary DNS does not provide it, the router will automatically apply default DNS Server IP address: 202.96.134.33 to this field.
- Page 61 Chapter 3: Advanced Configuration Network The cnPilot Home Router supports VPN connections with PPTP-based VPN servers. Table 25 VPN Field Name Description Enable/Disable VPN. If the VPN is enabled, user can select PPTP and VPN Enable L2TP mode VPN. Initial Service IP Enter VPN server IP address.
- Page 62 Chapter 3: Advanced Configuration Network Field Name Description DMZ Enable Enable/Disable DMZ. DMZ Host IP Address Enter the private IP address of the DMZ host. Port Forward Table 27 Port Forward Field Name Description Page...
- Page 63 Chapter 3: Advanced Configuration Network Comment Sets the name of a port mapping rule or comment IP Address The IP address of devices under the LAN port. Port Range Set the port range for the devices under the LAN port. (1-65535) Protocol You can select TCP, UDP, TCP &...
- Page 64 Chapter 3: Advanced Configuration Network Advance Table 29 Advance Field Name Description Most Nat connections The largest value which the cnPilot Home Router can provide Mss Mode Choose Mss Mode as Manual or Auto. Mss Value Set the value of TCP AntiDos-p You can choose to enable or prohibit IP conflict detection...
- Page 65 Chapter 3: Advanced Configuration Network Port Setting Table 30 Port setting Field Name Description Auto-negotiation, options are Auto, 100M full, 100M half-duplex, WAN Port speed Nego 10M half and full. LAN1~LAN4 Port Speed Auto-negotiation, options are Auto, 100M full, 100M half, 10M half Nego and 10M full.
- Page 66 Chapter 3: Advanced Configuration Network Table 31 QoS Field Name Description QoS Enable Enable/Disable QoS function Upstream Set the upstream bandwidth Downstream Set the downstream bandwidth Delete Selected Check the items you want to delete, click the Delete option Click Add to add a new rule. Note From system release 4.2 or later, the QoS bandwidth can be configured for Upstream and Downstream...
- Page 67 Chapter 3: Advanced Configuration Network Routing Table 32 Routing Field Name Description Destination Destination address Indicates whether single host or a network is being specified. If Net, then one Host/Net more option appears where user has to configure the subnet. Gateway Gateway IP address Interface...
-
Page 68: Wireless
Chapter 3: Advanced Configuration Wireless Wireless Note Starting from 4.4 release, any changes in the Wireless/Radio configuration performed on the cnPilot Home Routers can be applied on the fly and does not require a reboot. However, for all other configuration sections a reboot is required to make new configuration changes effective. - Page 69 SSID or a combination of special characters. It will appear in the wireless network access list. cnPilot r190V/r190W/R200/R200P Routers support 4 SSIDs on each Multiple SSID1~SSID3 radio. After the item is checked, the SSID is no longer displayed in the...
- Page 70 Chapter 3: Advanced Configuration Wireless Enabled: Devices on the WLAN are able to transmit to each other without requiring an additional contention-based request to transfer (i.e. devices are able to transmit to another device on the network Reverse Direction Grant during TXOP) (RDG) Disabled: Devices on the WLAN must make a request for transmit...
- Page 71 Chapter 3: Advanced Configuration Wireless Wireless Security Table 34 Wireless security Field Name Description Select the SSID for which security parameters need to be configured. SSID Choice Select an appropriate encryption mode to improve the security and privacy of your wireless data packets. Security Mode Each encryption mode will bring out different web page and ask you to offer additional configuration.
- Page 72 Chapter 3: Advanced Configuration Wireless User can configure the corresponding parameters. Here are some common encryption methods: OPENWEP:A handshake way of WEP encryption, encryption via the WEP key: Table 35 Wi-Fi Security Setting Field Name Description Security Mode This is used to select one of the 4 WEP keys, key settings on the clients should be the same with this when connecting.
- Page 73 Chapter 3: Advanced Configuration Wireless Table 37 WPAPSKWPA2PSK Field Name Description The home gateway is used to select the wireless security encryption WPA Algorithms algorithm options are TKIP, AES, TKIP / AES. 11N mode does not support TKIP algorithms. Pass Phrase Set WPA-PSK/WPA2-PSK security code Key Renewal Interval Set the key scheduled update cycle, default is 3600s...
- Page 74 Chapter 3: Advanced Configuration Wireless Example: Prohibit the device whose wireless network card MAC address is 00:1F: D0: 62: BA: FF’s to access the wireless network, and allow other computers to access the network. Implementation: As shown, the Policy is Reject, add 00:1F: D0: 62: BA: FF to the MAC, click Save and reboot the device settings to take effect.
- Page 75 Chapter 3: Advanced Configuration Wireless Table 39 WMM Description WMM (Wi-Fi Multi-Media) is the QoS certificate of Wi-Fi Alliance (WFA). This provides you to configure the parameters of wireless multimedia; WMM allows wireless communication to define a priority according to the home gateway type. To make WMM effective, the wireless clients must also support WMM.
- Page 76 Chapter 3: Advanced Configuration Wireless Table 40 WDS Description WDS stands for Wireless Distribution System, enabling WDS access points to be interconnected to expand a wireless network. WPS (Wi-Fi Protected Setup) provides easy procedure to make network connection between wireless station and wireless access point with the encryption of WPA and WPA2. It is the simplest way to build connection between wireless network clients and wireless access point.
- Page 77 Chapter 3: Advanced Configuration Wireless Table 41 WPS Field Name Description WPS Setting Enable/Disable WPS function Display the current status of WPS, including current state, SSSID name, WPS Summary authentication methods, encryption type and the PIN code of this AP. Generate Generate a new PIN code •...
- Page 78 Chapter 3: Advanced Configuration Wireless • PIN:Enter the PIN code of the wireless device which accesses to this WPS Mode LAN in the following option, and press apply. Then cnPilot Home Router r190V/r190W/R200/R200P begins to send signals, turn on the PIN accessing method on the clients, and then it can access the wireless AP automatically.
- Page 79 Chapter 3: Advanced Configuration Wireless Advanced Table 43 Advanced Field Name Description BG Protection Select G protection mode, options are on, off and automatic. Mode The interval of sending a wireless beacon frame, within this range, it will Beacon Interval send a beacon frame for the information of the surrounding radio network.
- Page 80 Define the transmission power of the current AP, the greater it is, the TX Power stronger the signal is. Default is enable, cnPilot r190V/r190W/R200/R200P Routers system is not Short Preamble compatible with traditional IEEE802.11, the operation rate can be 1,2Mpbs Enable/Disable short slot.
-
Page 81: Wds
Chapter 3: Advanced Configuration Wireless WDS. See WPS. Station Info Station Info. Advanced Advanced. Page... -
Page 82: Sip
Chapter 3: Advanced Configuration cnPilot Home Routers have 2 FXS ports to make SIP (Session Initiation Protocol) calls for the supported models. Before registering, the device user should have a SIP account configured by the system administrator or provider. See the section below for more information. SIP Settings Table 44 SIP settings Field Name... - Page 83 Chapter 3: Advanced Configuration Max Auth The maximum number of retransmissions Mark All AVT Voice packet marking to enable this item will see the mark on the voice message when the call environment changed (such as press a key during Packets the call) RFC 2543 Call...
- Page 84 Chapter 3: Advanced Configuration Dial Plan Parameters and Settings Table 45 Parameters and settings Field Name Description Dial Plan Enable/Disable dial plan. Line Set the line. Digit Map Enter the sequence used to match input number The syntactic, please refer to the following Dial Plan Syntactic Action Choose the dial plan mode from Deny and Dial Out.
- Page 85 Chapter 3: Advanced Configuration Adding one Dial Plan Table 46 Adding one dial plan Description Step 1. Enable Dial Plan Step 2. Click Add button, and the configuration table Step 3. Fill in the value of parameters. Step 4. Press OK button to end configuration. Dial Plan Syntactic Table 47 Dial Plan String...
- Page 86 Chapter 3: Advanced Configuration <dialed:substituted> Replace dialed with substituted. For example: <8:1650>123456:input is “85551212”, output is“16505551212” Make outside dial tone after dialing “x”, stop until dialing character “y” For example: “9,1xxxxxxxxxx”:the device reports dial tone after inputting “9”, stops tone until inputting “1” “9,8,010x”: make outside dial tone after inputting “9”, stop tone until inputting “0”...
- Page 87 Chapter 3: Advanced Configuration Blacklist In this page, user can upload or download blacklist file, and can add or delete or edit blacklist one by one. Table 48 Blacklist Description Click to select the blacklist file and click to upload it to cnPilot Home Router;...
- Page 88 Chapter 3: Advanced Configuration Call Log To view the call log information such as redial list (incoming call), answered call and missed call. Table 49 Call log Redial List Page...
- Page 89 Chapter 3: Advanced Configuration Answered Calls Missed Calls VoIP QoS Table 50 VoIP QoS Field Name Description SIP /RTP QoS The default value is 0, you can set a range of values is 0~63 Page...
-
Page 90: Fxs1
Chapter 3: Advanced Configuration FXS1 FXS1 SIP Account Basic Set the basic information provided by your VOIP Service Provider, such as Phone Number, Account, password, SIP Proxy and others. Table 51 SIP Account – Basic Field Name Description Line Enable Enable/Disable the line. - Page 91 Chapter 3: Advanced Configuration FXS1 Display Name The number will be displayed on LCD Phone Number Enter telephone number provided by SIP Proxy Account Enter SIP account provided by SIP Proxy Password Enter SIP password provided by SIP Proxy Audio Configuration Table 52 Audio configuration Field Name Description...
- Page 92 Chapter 3: Advanced Configuration FXS1 Silence Support Enable/Disable silence support. Echo Cancel Enable/Disable echo cancel. By default, it is enabled. Auto Gain Control Enable/Disable auto gain. T.38 Enable Enable/Disable T.38 T.38 Redundancy Enable/Disable T.38 Redundancy T.38 CNG Detect Enable Enable/Disable T.38 CNG Detect gpmd attribute Enable Enable/Disable gpmd attribute.
- Page 93 Chapter 3: Advanced Configuration FXS1 Enable/Disable DND (do not disturb). If enable, any phone call cannot arrive at the device; default is disable. Enter the speed dial phone numbers. Speed Dial Dial *74 to active speed dial function. Then press the speed dial numbers, for example, press 2, phone dials 075526099365 directly.
- Page 94 Chapter 3: Advanced Configuration FXS1 RFC2833 User can use the default setting. Payload(>=96) Register Refresh The interval between two normal Register messages. You can use the Interval default setting. RTP Port Set the port to send RTP. The device will select one idle port for RTP if you set “0”; otherwise use the value which user sets.
- Page 95 Chapter 3: Advanced Configuration FXS1 Request-URI User Enable/Disable the user request URI check. Check Only Recv request Enable/Disable the only receive request from server. from server Server Address The IP address of SIP server. SIP Received Enable/Disable SIP Received Detection, if enable, use it to confirm the Detection public network address of the device.
- Page 96 Chapter 3: Advanced Configuration FXS1 Regional Table 56 Regional Field Name Description Tone Type Choose tone type as UK, China, US, Hong Kong and so on. A sample Tone Type for UK is shown below: Note: Currently, selecting a particular country does not load the correct Ringing parameters as per standard.
- Page 97 The Max value of home gateway’s jitter delay, home gateway is an Max Jitter Delay adaptive jitter mechanism. How long cnPilot r190V/r190W/R200/R200P Routers will ring when there Ringing Time is an incoming call. Select regional ring waveform, options are Sinusoid and Trapezoid, the Ring Waveform default Sinusoid.
- Page 98 Chapter 3: Advanced Configuration FXS1 Field Description Name All Forward Enable/Disable forward all calls Features Busy Forward Enable/Disable busy forward. No Answer Forward Enable/Disable no answer forward. All Forward Set the target phone number for all forward. Call The device will forward all calls to the phone number Forward immediately when there is an incoming call.
- Page 99 Chapter 3: Advanced Configuration FXS1 Miscellaneous Table 58 Miscellaneous Field Name Description Codec Loop Set off-hook loop current, default is 26 Current Impedance Set impedance matching, default is US PBX, Korea,Taiwan(600). Matching Enable/Disable displaying caller ID; If enable, caller ID is displayed when CID service there is an incoming call or it won’t be displayed.
-
Page 100: Fxs2
Chapter 3: Advanced Configuration FXS2 FXS2 The settings of FXS2 are the same as FXS1. See FXS1 on page 88. Page... -
Page 101: Security
Chapter 3: Advanced Configuration Security Security Filtering Setting Table 59 Filtering setting Field Name Description Filtering Enable/Disable filter function Default Policy Choose to drop or accept filtered MAC addresses Mac address Add the Mac address filtering Dest IP address Destination IP address Source IP address Source IP address Protocol... - Page 102 Chapter 3: Advanced Configuration Security Content Filtering Table 60 Content filtering Page...
- Page 103 Chapter 3: Advanced Configuration Security Field Name Description Filtering Enable/Disable content Filtering Default Policy The default policy is to accept or to prohibit filtering rules Current Webs URL List the URL filtering rules that already existed (blacklist) Filters Delete/Cancel You can choose to delete or cancel the existing filter rules Add a URL Filter Add URL filtering rules Add/Cancel...
-
Page 104: Application
Chapter 3: Advanced Configuration Application Application UPnP UPnP (Universal Plug and Play) supports zero-configuration networking, and can automatically discover a variety of networked devices. When UPnP is enabled, the connected device is allowed to access the network, obtain an IP address, and convey performance information. If the network has a DHCP and DNS server, the connected device can automatically obtain DHCP and DNS services. - Page 105 Chapter 3: Advanced Configuration Application Field Name Description IGMP Proxy enable Enable/Disable IGMP function. Page...
-
Page 106: Storage
Chapter 3: Advanced Configuration Storage Storage Disk Management This page is used to manage the USB storage device. Table 63 Disk Management Field Name Description Adding files to the USB storage device Delete Remove the USB storage device file Remove Disk Transfer files within a USB storage device Format Format the USB storage device... - Page 107 Chapter 3: Advanced Configuration Storage FTP Setting Table 64 FTP Setting Field Name Description FTP Server Enable/Disable FTP server FTP Server Name Set the FTP server name Anonymous Login If or not support anonymous login FTP Port Set FTP server port number Max.
- Page 108 Chapter 3: Advanced Configuration Storage Smb Setting Table 65 Smb setting Field Name Description SAMBA Server Enable/Disable SAMBA server Workgroup Enter the working group NetBIOS Name Network basic input/output system name Add a shared file Edit Edit a shared file Delete a shared file Add a shared file Edit...
-
Page 109: Administration
Chapter 3: Advanced Configuration Administration Administration The user can manage the device in these webpages; you can configure the Time/Date, password, web access, system log and associated configuration TR069. Management Save config file Table 66 Save Config File Field Name Description Config file upload and Upload: click on browse, select file in the local, press the upload button... - Page 110 Chapter 3: Advanced Configuration Administration Administrator settings Table 67 Administrator settings Page...
- Page 111 Chapter 3: Advanced Configuration Administration Field Name Description User type Choose the user type from admin user and normal user and basic user. New User Name You can modify the user name, set up a new user name New Password Input the new password Confirm Password Input the new password again...
- Page 112 Chapter 3: Advanced Configuration Administration Set the Web Idle timeout time. The webpage can be logged out after Web Idle timeout Web Idle Timeout without any operation. Allowed Remote Set the IP from which a user can login the device remotely. IP(IP1,IP2,...) Enable/Disable telnet.
- Page 113 Chapter 3: Advanced Configuration Administration NTP settings Table 68 NTP settings Field Name Description NTP Enable Enable/Disable NTP Option 42 Enable/Disable DHCP option 42. This option specifies a list of the NTP servers available to the client by IP address. Current Time Display current time NTP Settings...
- Page 114 Chapter 3: Advanced Configuration Administration Daylight Saving Time Table 69 Daylight Saving Time Procedure Step 1. Enable Daylight Savings Time. Step 2. Set value of offset for Daylight Savings Time Step 3: Set starting Month/Week/Day/Hour in Start Month/Start Day of Week Last in Month/Start Day of Week/Start Hour of Day, analogously set stopping Month/Week/Day/Hour in Stop Month/Stop Day of Week Last in Month/Stop Day of Week/Stop Hour of Day.
- Page 115 Chapter 3: Advanced Configuration Administration Remote Syslog Enable Enable/Disable remote syslog function. Remote Syslog server Add a remote server IP address. Syslog Enable Enable/Disable syslog function Syslog Level Select the system log, there is INFO and Debug two grades, the Debug INFO can provide more information.
-
Page 116: Firmware Upgrade
Chapter 3: Advanced Configuration Administration Firmware Upgrade Table 73 Firmware upgrade Description 1. Choose upgrade file type from Image File and Dial Rule 2. Press “Browse” button to browse the file 3. Press to start upgrading Provision Provisioning allows cnPilot Home Router to auto-upgrade and auto-configure devices which support TFTP, HTTP and HTTPs . - Page 117 Set the periodic time for resync, default is 3600s. Delay(rec) Forced Resync If it’s time to resync, but cnPilot r190V/r190W/R200/R200P Router is Delay(sec) busy now, in this case, cnPilot r190V/r190W/R200/R200P Router will wait for a period time, the longest is “Forced Resync Delay”, default is 14400s, when the time over, cnPilot r190V/r190W/R200/R200P Router will be forced to resync.
- Page 118 Field Name Description Upgrade Enable Enable firmware upgrade via provision or not. Upgrade Error Retry If the last upgrade fails, cnPilot r190V/r190W/R200/R200P Routers will Delay(sec) try upgrading again after “Upgrade Error Retry Delay” period, default is 3600s. Upgrade Rule URL of upgrade file...
-
Page 119: Snmp
Chapter 3: Advanced Configuration Administration SNMP Table 76 SNMP Field Name Description SNMP Service Enable or Disable the SNMP service Trap Server Address Enter the trap server address for sending SNMP traps String value that is used as a password to request information via Read Community Name SNMP from the device Write Community Name... -
Page 120: Tr-069
Chapter 3: Advanced Configuration Administration TR-069 TR-069 provides the possibility of auto configuration of internet access devices and reduces the cost of management. TR-069 (short for Technical Report 069) is a DSL Forum technical specification entitled CPE WAN Management Protocol (CWMP). It defines an application layer protocol for remote management of end-user devices. - Page 121 Chapter 3: Advanced Configuration Administration Periodic Inform Enable Enable the function of periodic inform or not. By default, it is Enabled Periodic Inform Periodic notification interval with the unit in seconds. The default value Interval is 43200s Connect Request parameters User Name The username used to connect the TR069 server to the DUT.
- Page 122 Chapter 3: Advanced Configuration Administration {"ConnectionRequestUsername", }, {"ConnectionRequestPassword", }, {"UpgradesManaged", }, {"UDPConnectionRequestAddress", }, {"UDPConnectionRequestAddressNotificationLimit", }, {"STUNEnable", }, {"STUNServerAddress", }, {"STUNServerPort", }, {"STUNUsername", }, {"STUNPassword", }, {"STUNMaximumKeepAlivePeriod", }, {"STUNMinimumKeepAlivePeriod", }, {"NATDetected", }, {"", }, {"UPnP", }, {"Device", }, {"UPnPIGD", }, {"", }, {"", }, {"IPPingDiagnostics", }, {"DiagnosticsState", },...
- Page 123 Chapter 3: Advanced Configuration Administration {"DiagnosticsState", }, {"Interface", }, {"DownloadURL", }, {"DSCP", }, {"EthernetPriority", }, {"ROMTime", }, {"BOMTime", }, {"EOMTime", }, {"TestBytesReceived", }, {"TotalBytesReceived", }, {"TCPOpenRequestTime", }, {"TCPOpenResponseTime", }, {"", }, {"UploadDiagnostics", }, {"DiagnosticsState", }, {"Interface", }, {"UploadURL", }, {"DSCP", }, {"EthernetPriority", }, {"TestFileLength", }, {"ROMTime", },...
- Page 124 Chapter 3: Advanced Configuration Administration {"1", }, {"Enable", }, {"RemoteAccessCapable", }, {"X_WebPort", }, {"X_WebIdleTimeout", }, {"X_WebAllowRemoteIP", }, {"Username", }, {"Password", }, {"", }, {"", }, {"", }, {"Layer3Forwarding", }, {"DefaultConnectionService", }, {"ForwardNumberOfEntries", }, {"Forwarding", }, {"1", }, {"Enable", }, {"Status", }, {"Type", }, {"DestIPAddress", }, {"DestSubnetMask", },...
- Page 125 Chapter 3: Advanced Configuration Administration {"LANUSBInterfaceNumberOfEntries", }, {"LANWLANConfigurationNumberOfEntries", }, {"LANHostConfigManagement", }, {"DHCPServerConfigurable", }, {"DHCPServerEnable", }, {"DHCPRelay", }, {"MinAddress", }, {"MaxAddress", }, {"ReservedAddresses", }, {"SubnetMask", }, {"DNSServers", }, {"DomainName", }, {"IPRouters", }, {"DHCPLeaseTime", }, {"IPInterfaceNumberOfEntries", }, {"IPInterface", }, {"1", }, {"Enable", }, {"IPInterfaceIPAddress", }, {"IPInterfaceSubnetMask", }, {"IPInterfaceAddressingType", },...
- Page 126 Chapter 3: Advanced Configuration Administration {"BSSID", }, {"MaxBitRate", }, {"Channel", }, {"AutoChannelEnable", }, {"SSID", }, {"BeaconType", }, {"MACAddressControlEnabled", }, {"Standard", }, {"WEPKeyIndex", }, {"KeyPassphrase", }, {"WEPEncryptionLevel", }, {"BasicEncryptionModes", }, {"BasicAuthenticationMode", }, {"WPAEncryptionModes", }, {"WPAAuthenticationMode", }, {"IEEE11iEncryptionModes", }, {"IEEE11iAuthenticationMode", }, {"PossibleChannels", }, {"ChannelsInUse", }, {"BasicDataTransmitRates", }, {"OperationalDataTransmitRates", },...
- Page 127 Chapter 3: Advanced Configuration Administration {"1", }, {"WEPKey", }, {"", }, {"", }, {"", }, {"", }, {"Hosts", }, {"HostNumberOfEntries", }, {"Host", }, {"1", }, {"IPAddress", }, {"AddressSource", }, {"LeaseTimeRemaining", }, {"MACAddress", }, {"HostName", }, {"InterfaceType", }, {"Active", }, {"", }, {"", }, {"", }, {"", },...
- Page 128 Chapter 3: Advanced Configuration Administration {"TotalPacketsReceived", }, {"", }, {"WANConnectionDevice", }, {"1", }, {"WANIPConnectionNumberOfEntries", }, {"WANPPPConnectionNumberOfEntries", }, {"WANIPConnection", }, {"1", }, {"Enable", }, {"ConnectionStatus", }, {"PossibleConnectionTypes", }, {"ConnectionType", }, {"Name", }, {"Uptime", }, {"LastConnectionError", }, {"RSIPAvailable", }, {"NATEnabled", }, {"AddressingType", }, {"ExternalIPAddress", }, {"SubnetMask", }, {"DefaultGateway", },...
- Page 129 Chapter 3: Advanced Configuration Administration {"", }, {"", }, {"Stats", }, {"EthernetBytesSent", }, {"EthernetBytesReceived", }, {"EthernetPacketsSent", }, {"EthernetPacketsReceived", }, {"", }, {"", }, {"", }, {"WANPPPConnection", }, {"1", }, {"Enable", }, {"ConnectionStatus", }, {"PossibleConnectionTypes", }, {"ConnectionType", }, {"Name", }, {"Uptime", }, {"LastConnectionError", }, {"RSIPAvailable", }, {"NATEnabled", },...
- Page 130 Chapter 3: Advanced Configuration Administration {"RemoteHost", }, {"ExternalPort", }, {"InternalPort", }, {"PortMappingProtocol", }, {"InternalClient", }, {"PortMappingDescription", }, {"", }, {"", }, {"Stats", }, {"EthernetBytesSent", }, {"EthernetBytesReceived", }, {"EthernetPacketsSent", }, {"EthernetPacketsReceived", }, {"", }, {"", }, {"", }, {"", }, {"", }, {"", }, {"", }, /*TR104 for VOIP setting*/...
- Page 131 Chapter 3: Advanced Configuration Administration {"PSTNSoftSwitchOver", }, {"FaxT38", }, {"FaxPassThrough", }, {"ModemPassThrough", }, {"ToneGeneration", }, {"RingGeneration", }, {"NumberingPlan", }, {"ButtonMap", }, {"VoicePortTests", }, {"SIP", }, {"Role", }, {"Extensions", }, {"Transports", }, {"URISchemes", }, {"EventSubscription", }, {"ResponseMap", }, {"", }, {"Codecs", }, {"1", }, {"EntryID", }, {"Codec", },...
- Page 132 Chapter 3: Advanced Configuration Administration {"ProxyServer", }, {"ProxyServerPort", }, {"ProxyServerTransport", }, {"RegistrarServer", }, {"RegistrarServerPort", }, {"RegistrarServerTransport", }, {"UserAgentDomain", }, {"UserAgentPort", }, {"UserAgentTransport", }, {"OutboundProxy", }, {"OutboundProxyPort", }, {"Organization", }, {"RegistrationPeriod", }, {"RegisterExpires", }, {"UseCodecPriorityInSDPResponse", }, {"", }, {"RTP", }, {"LocalPortMin", }, {"LocalPortMax", }, {"DSCPMark", }, {"TelephoneEventPayloadType", },...
- Page 133 Chapter 3: Advanced Configuration Administration {"ReceiveSilenceSuppression", }, {"TransmitPacketizationPeriod", }, {"List", }, {"1", }, {"EntryID", }, {"Codec", }, {"BitRate", }, {"PacketizationPeriod", }, {"SilenceSuppression", }, {"Enable", }, {"Priority", }, {"", }, {"", }, {"", }, {"Session", }, {"1", }, {"SessionStartTime", }, {"SessionDuration", }, {"FarEndIPAddress", }, {"FarEndUDPPort", }, {"LocalUDPPort", },...
-
Page 134: Scheduled Tasks
Chapter 3: Advanced Configuration Administration {"OutgoingCallsConnected", }, {"OutgoingCallsFailed", }, {"CallsDropped", }, {"TotalCallTime", }, {"", }, {"", }, {"", }, {"", }, {"", }, {"", }, {"", }, {"", }, {"", },}; Firmware Upgrade Under is firmware upgrading operation on FreeACS. 1. -
Page 135: Diagnosis
Chapter 3: Advanced Configuration Administration Table 78 Scheduled Tasks Field Name Description Scheduled Wi-Fi Select the Wi-Fi and click Edit to set the timings. Scheduled Reboot Set values for Scheduled Reboot, Scheduled Mode, and Time. Scheduled PPPoE Set values for Scheduled PPPoE, Scheduled Mode, and Time. Diagnosis In this page, user can do packet trace, ping test and traceroute test to diagnose the device’s connection status. - Page 136 Chapter 3: Advanced Configuration Administration Table 79 Diagnosis Description 1. Packet Trace Users can use the packet trace feature to intercept packets which traverse the device. Click the Start button to start home gateway tracking and keep refreshing the page until the message trace shows to stop, click the Save button to save captured packets.
- Page 137 Chapter 3: Advanced Configuration Administration 2. Ping Test Enter the destination IP or host name, and then click Apply, device will perform ping test. 3. Traceroute Test Enter the destination IP or host name, and then click Apply, device will perform traceroute test.
-
Page 138: Operating Mode
Chapter 3: Advanced Configuration Administration Operating Mode Table 80 Operating mode Description Choose the Operation Mode as Basic Mode or Advanced Mode(Default). In Basic mode, multi WAN configuration is not allowed and the device can be configured either as a simple NAT or Bridge device. System Log Table 81 System log Description... -
Page 139: Logout
Chapter 3: Advanced Configuration Administration Logout Table 82 Logout Description Press the logout button to logout, and then the login window will appear. Reboot Press the button to reboot cnPilot Home Routers. Page... -
Page 140: Chapter 4: Troubleshooting Guide
Chapter 4: Troubleshooting Guide This chapter covers: • Configuring PC to get IP Address automatically • Cannot connect to the Web GUI • Forgotten Password • cnMaestro On-boarding troubleshooting Configuring PC to get IP Address automatically Please refer the Quick Start Guide to configure your PC to get IP Address automatically. - Page 141 Error Status Cause Resolution • Failed to The cloud URL is not Ensure that the correct cnMaestro URL Resolve URL being resolved by the is configured. device. • If the URL is correct, check the DNS settings and Internet connectivity. •...
- Page 142 cnMaestro Account ID is the Cambium ID or Account Name chosen while creating the company account which indicates that the device belongs to that account. cnMaestro Account ID will be blank when the device is not claimed and will be populated when the device is claimed in the cnMaestro server.
-
Page 143: Appendix: Third Party Software
Appendix: Third Party Software The software may contain one or more items of Third-Party Software supplied by other third-party suppliers. The terms of this Agreement govern your use of any Third-Party Software license is included, in which case your use of the unless a separate third-party software license is included, in which case your use of the third-party software will then be governed by the separate third-party license. -
Page 144: Appendix: Part Numbers
Appendix: Part Numbers Manufacturer: Cambium Networks Inc. Address: 3800 Golf Road #360, Rolling Meadows, IL 60008 USA. Importers: Address: Adapter Caution: Adapter shall be installed near the equipment and shall be easily accessible. The following tables provides accessories details for cnPilot Home Routers:... - Page 145 XA- PS12V1XA -AN router with built-in ATA HW Hereby, Cambium Networks Inc. agrees that this device is in compliance with the essential requirements and other relevant provisions of Directive 2014/53/EU. A copy of the declaration of conformity can be obtained with this user manual.
- Page 146 This product is not restricted in the EU. Operation Temperature Range: -5°C ~ +45°C Frequency Range: 2.4 GHz: 2412MHz-2472MHz 5 GHz: 5180-5825 MHz Max power: 20dBm This equipment should be installed and operated with minimum distance 20cm between the radiator. Page...
-
Page 147: Glossary
Glossary Glossary Term Definition Advanced Technology Attachment Address Resolution Protocol defined in RFC 826 to allow a network element to correlate a Protocol host IP address to the Ethernet address of the host. See http://www.faqs.org/rfcs/rfc826.html. Bridge Network element that uses the physical address (not the logical address) of another to pass data. - Page 148 Glossary Term Definition HTTP Hypertext Transfer Protocol, used to make the Internet resources available on the World Wide Web. Defined in RFC 2068. See http://www.faqs.org/rfcs/rfc2068.html. HTTPS Hypertext Transfer Protocol Secure (HTTPS) Internet Control Message Protocols defined in RFC 792, used to identify ICMP Internet Protocol (IP)-level problems and to allow IP links to be tested.
- Page 149 Glossary Term Definition NetBIOS Protocol defined in RFC 1001 and RFC 1002 to support an applications programming interface in TCP/IP. This interface allows a computer to transmit and receive data with another host computer on the network. RFC 1001 defines the concepts and methods. RFC 1002 defines the detailed specifications.
- Page 150 Glossary Term Definition Static IP Address Assignment of Internet Protocol address that can be changed only manually. Thus static IP address assignment requires more Assignment configuration time and consumes more of the available IP addresses than DHCP address assignment does. RFC 2050 provides guidelines for the static allocation of IP addresses.
- Page 151 Glossary Term Definition WPA2-PSK Wi-Fi Protected Access 2 - Pre-Shared Key, and also called WPA or WPA2 Personal, it is a method of securing your network using WPA2 with the use of the optional Pre-Shared Key (PSK) authentication, which was designed for home users without an enterprise authentication server.