Table of Contents
Advertisement
Quick Links
Download this manual
See also:
Operating Manual
Advertisement
Table of Contents

Related Manuals for Philips Strand Lighting


Summary of Contents for Philips Strand Lighting
- Page 1 For OS Version 1.04 and Up...
-
Page 2: Philips Strand Lighting Offices
Lighting no asume responsabilidad por errores o omisiones que puedan aparecer. Cualquier comentario, sugerencia o corrección con respecto a este manual, favor de dirijirlo a la oficina de Philips Strand Lighting más cercana. Der Inhalt dieses Handbuches ist nur für Informationszwecke gedacht, Aenderungen sind vorbehalten. Philips Strand Lighting uebernimmt keine Verantwortung für Fehler oder Irrtuemer, die in diesem Handbuch auftreten. -
Page 3: Important Information
Philips Strand Lighting Limited Two-Year Warranty Philips Strand Lighting offers a two-year limited warranty of its luminaires against defects in materials or workmanship from the date of delivery. A copy of Philips Strand Lighting two-year limited warranty containing specific terms and conditions can be obtained by contacting your local Philips Strand Lighting office. -
Page 4: Table Of Contents
500ML Lighting Control Console QuickStart Guide TABLE OF CONTENTS Philips Strand Lighting Offices ......................Inside Front Cover IMPORTANT INFORMATION Warnings and Notices................................. 1 Additional Resources for DMX512............................ 1 Philips Strand Lighting Limited Two-Year Warranty......................1 Open Source Software ................................ 1... - Page 5 500ML Lighting Control Console QuickStart Guide About Groups..................................24 Creating a Group................................24 Updating Groups................................24 Selecting and Deselecting Groups ............................ 25 Working with Values................................. 25 What is the Programmer? ..............................25 Fixture Attribute Values ..............................26 Emptying the Programmers "Content" ..........................26 Assigning Values to Fixture Attributes ..........................
-
Page 6: Preface
(as described above), please contact your Authorized Strand Lighting Dealer for assistance. Note: Monitors, cables and other accessories are not included and are sold separately. For available accessories, please contact you local Authorized Strand Lighting Dealer. A list of Authorized Dealers is located on the Strand Lighting web site at www.strandlighting.com. -
Page 7: Console Overview Control Features
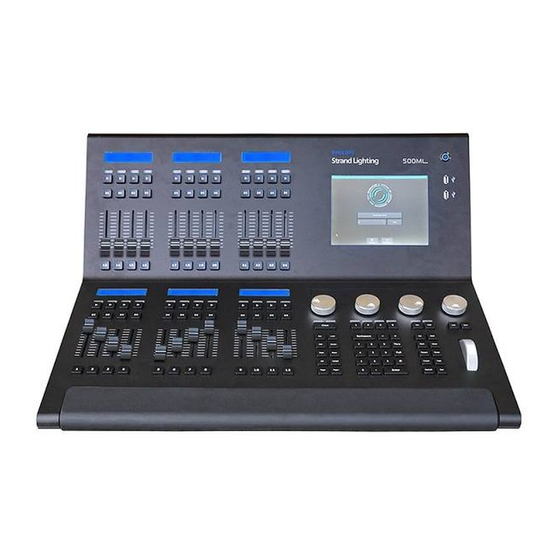
500ML Lighting Control Console QuickStart Guide CONSOLE OVERVIEW 1. Control Features Figure 1 is a quick overview of the 500ML Lighting Control Console controls. 8-Inch Color TFT Display On / Off Button Status Displays Fader Play / Pause / USB 2.0 Ports Reverse Buttons Faders Bump Buttons... -
Page 8: 8-Inch Tft Touchscreen
500ML Lighting Control Console QuickStart Guide 8-Inch TFT Touchscreen The 8-inch TFT touchscreen is one of the key elements used for user interaction with the console. It provides an easy- to-use and understand graphical user interface. Command / Programming Keys The 500ML Lighting Control Console command and programming keys correspond with the touchscreen interface. -
Page 9: Rear Panel - External Connections
500ML Lighting Control Console QuickStart Guide 2. Rear Panel - External Connections Figure 1 is a quick overview of the 500ML Lighting Control Console rear panel connections. Desk Lamp Connection (3-Pin XLR, 5VDC) Desk Lamp D C 5V operatio n 1= Shield/GN D 2= Negativ e 3= Positiv e... -
Page 10: Basics
System Library The System Library gets replaced with every Software Update. It contains around 6700 Fixtures and is maintained by Strand Lighting. It is not editable by the user. User Library The User Library is fully editable by the user and is not replaced or deleted during software updates. It is stored on the flash-disk of the console and its fixture types are available to all existing or new shows. -
Page 11: Opening Screens And Dialogs
500ML Lighting Control Console QuickStart Guide Figure 4: Programmer Window Opening Screens and Dialogs The 500ML console provides easy and logical ways to open the context sensitive screens. As an example, pressing [SETUP] will show the Setup Screen, which is used for general configuration of the console, such as adding Fixtures to the Show or setting the IP Address of the Network Interface. -
Page 12: External Monitor
500ML Lighting Control Console QuickStart Guide Action Source Target [RECORD] [PRESET] [5] [PRESET] [5] [COPY] [PRESET] [5] [PRESET] [8] [MOVE] [PRESET] [5] [PRESET] [8] [ASSIGN] [CUELIST] [2] [GO] or [PAUSE / BACK] Table 1: Command Line Syntax Commands interacting with a visual object (such as a Pool Item or a Faders Pause/Back Button) will be executed automatically once they are syntactically correct. -
Page 13: Operation
500ML Lighting Control Console QuickStart Guide OPERATION 1. To Begin Using the Console Unpack Console and Accessories Before you can use the console, unpack it and its accessories from the shipping carton. For a complete list of included items, refer to "Included Items"... -
Page 14: Working With Shows
500ML Lighting Control Console QuickStart Guide 2. Working with Shows Show files contain all of your show related settings like fixture schedule and patching, input settings, groups, presets, cues, master assignments, etc. Multiple shows may reside on the console and the amount of shows is only limited by hard disk memory. -
Page 15: Loading An Existing Show
500ML Lighting Control Console QuickStart Guide Showfile Name Field Figure 9: Touchscreen Keyboard & Showfile Name Field Loading an Existing Show To be able to open a show, you first need to close any open shows. Do this by pressing [SETUP] and hitting the Close Show button on the Setup Toolbar. - Page 16 500ML Lighting Control Console QuickStart Guide A list of shows will appear. Select the show or shows you would like to import and hit the Import button on the touchscreen display. Figure 11: Select Show to Import A confirmation screen will appear with a brief summary of the show or shows to be imported as displayed in Figure 12.
-
Page 17: Saving Show Files
500ML Lighting Control Console QuickStart Guide After the loading process begins, the Import Status box will now display the import process. After the process finished, click on the Close button. Figure 13: Import Show(s) from USB - Import Status of Selected Shows - Completed Saving Show Files We recommend to save your show frequently to insure information is not lost in case of a power loss, interruption, etc. - Page 18 500ML Lighting Control Console QuickStart Guide The next screen will display a list of shows in the console’s memory. Select the show or shows you would like to export (copy) to the USB key. Then, hit the Export button on the touchscreen display to export them to the USB key. Figure 16: Select Show(s) to Export Screen - Exporting Shows to USB Key A confirmation screen will appear confirming your selection(s) to be exported as shown in Figure...
-
Page 19: Closing A Show
500ML Lighting Control Console QuickStart Guide When the process finished successfully, click on the Close button as indicated in Figure Figure 18: Export Show(s) to USB Screen - Export Completed Closing a Show To load a show (as described in "Loading an Existing Show"... -
Page 20: Programming Fixture Setup
500ML Lighting Control Console QuickStart Guide PROGRAMMING 1. Fixture Setup Adding Fixtures to a Show In order to add and patch fixtures, please press the [Setup] key on the consoles front panel. A menu will appear on the touchscreen display, presenting you several options. Choose Add Fixtures in the Setup Menu screen (Figure 20). - Page 21 • You may search for fixtures using the search field shown in the top part of the screen. In order to complete the examples shown in this guide, search for "vari 3000" and select the Philips Vari-Lite VL3000 Spot from the list. To clear your search, click the Reset Filter button.
-
Page 22: Patching Fixtures
500ML Lighting Control Console QuickStart Guide • Set User Numbers - Starting DMX Address for the fixtures. • Default Fixture Settings - You can select Invert Pan, Invert Tilt or React to Master (react to Grandmaster). In this example 12 fixtures will be added, with User Number starting at 501. After setting these parameters, click Next. -
Page 23: Working With Fixtures
500ML Lighting Control Console QuickStart Guide 2. Working with Fixtures Selecting Fixtures Before you can start altering any values or programming, you need to select the fixtures you would like to work with. There are four different ways to select your fixtures. Selection Order The order in which you select fixtures determines how sub-selection and fanning are applied to them. -
Page 24: Selecting / Deselecting Fixtures Using Fixture Pool Window
500ML Lighting Control Console QuickStart Guide The keypad does also have special functions for extended fixture sub-selection which can be applied on your current selection. Refer to "Fixture Sub-Selection" for more information. Selecting / Deselecting Fixtures Using Fixture Pool Window Press and hold the [OPEN] key and press the [FIXTURE] button. -
Page 25: Selecting Fixture X Out Of Y
500ML Lighting Control Console QuickStart Guide Selecting Fixture X out of Y The console offers a built in modulo sub-selection function that allows the selection of every Xth fixture out of Y. The syntax is uses [.] [.] for the "out of" portion of the command. In the following example, we are going to select every first fixture out of every three fixtures: 1) To select fixtures 501 to 512: 2) Type [1][.] [.] [3] [ENTER] on the keypad. -
Page 26: Working With Groups
500ML Lighting Control Console QuickStart Guide 3. Working with Groups About Groups Groups are meant as a programming aid and are a quick way to access specific groups of fixtures. As opposed to the theatrical term "Group" they do not store any values. They only store information about fixture selection and selection order. -
Page 27: Selecting And Deselecting Groups
500ML Lighting Control Console QuickStart Guide If you did not select an option from the Record Toolbar, a dialog window will open (Figure 32) asking you what you wish to do. Select the desired action by click the appropriate button on the screen. Figure 32: Merge or Replace Group Inquiry Window Selecting and Deselecting Groups Press and hold the [OPEN] key and then press the [GROUP] button. -
Page 28: Fixture Attribute Values
500ML Lighting Control Console QuickStart Guide Fixture Attribute Values Without Values Figure 34 shows how the programmer appears when fixtures are selected without values assigned in the programmer. They are still outputting values set by cuelists or their default values set in the library. Figure 34: Programmer Without Values With Values Figure 34... -
Page 29: Assigning Values To Fixture Attributes
500ML Lighting Control Console QuickStart Guide The LEDs above the [CLEAR] and the [I], [F], [C] and [B] buttons indicate the current state of the values: LED Color State Green Fixtures are selected (Only applies to [CLEAR] key) Yellow There are values in the programmer and the corresponding attribute group There are modified (touched) values in the programmer and the corresponding attribute group that may be recorded Figure 37: Clear and IFCB Buttons... -
Page 30: Altering Parameters Using Encoders
500ML Lighting Control Console QuickStart Guide Altering Parameters Using Encoders To change fixture parameters, select either a fixture or group of fixtures (see "Selecting Fixtures" on page 21). Select the parameter group of the parameter to be changed - [I], [F], [C], or [B]. Repeatedly press the [I], [F], [C], or [B] button until the toolbar indicates the desired parameters. -
Page 31: Altering Color Values Using Swatch Book
500ML Lighting Control Console QuickStart Guide Altering Color Values Using Swatch Book Another option to set colors is via the internal color swatch book. To open up the Swatch Book, press the Swatch Book button found in the programmer window. Remember, to open the programmer just press either of the Attribute Keys [I], [F], [C] or [B]. -
Page 32: Altering Color Values Using Color Picker
500ML Lighting Control Console QuickStart Guide Altering Color Values Using Color Picker To open up the color picker, press the Color Picker button found in the programmer window as indicated in Figure The center triangle sets the Saturation and brightness, whereas the outer circle sets the colors Hue. As opposed to other consoles, the 500ML does not store HSB color information in Cues, hence cues will cross fade in RGB or CMY color space. -
Page 33: Storing A Preset
500ML Lighting Control Console QuickStart Guide This is a very powerful feature that allows you to make global changes to the show very simply and quickly, rather than having to re-program every cue individually. Presets allow intensity, focus (position attributes), color, and beam parameters to be recorded to be easily accessible during programming and live operation. -
Page 34: Recalling A Preset As A Reference
500ML Lighting Control Console QuickStart Guide A window will appear asking you what to do. Select the appropriate option. Figure 44: Merge or Replace Preset Window - Options Recalling a Preset as a Reference If you select presets this way, they will be recorded into cues as a reference, rather than the value. Press and hold the [OPEN] key and press the [PRESET] button. -
Page 35: Storing A Cuelist To A Master
500ML Lighting Control Console QuickStart Guide Storing a Cuelist to a Master After setting up a look, press the [Rec] key followed by the either a master’s Play [] or Pause / Back Key [❚ ❚]. If you store a cuelist that way, it will be stored in the next available slot in the Cuelist Pool and will be automatically assigned to a master. -
Page 36: Storing Cues In Cuelists Using Cuelist Pool Window
500ML Lighting Control Console QuickStart Guide Storing Cues in Cuelists Using Cuelist Pool Window Once you created a look and wish to store it as a cue, press and hold the [REC] key and simultaneously press the [CUELIST] key. The Cuelist Pool window (Figure 47) will open. -
Page 37: Changing Cue Names And Timings
500ML Lighting Control Console QuickStart Guide Cuelist View Window - Top Row Buttons Figure 49: Cuelist View Window - Top Row Buttons As shown in Figure 49, the buttons shown are: • Edit Cuelist - used to open the Edit Cuelist Window of the selected cuelist in the cuelist view. •... -
Page 38: Working With Masters
500ML Lighting Control Console QuickStart Guide Alternatively, you may use the Cuelist Pool window to select the cuelist by pressing the [CUELIST] key while holding down the [EDIT] key. Select the cuelist you would like to edit or just press [EDIT] and select the appropriate cuelist on the external monitor. -
Page 39: Assigning Fixtures To Masters (Creating An Inhibitive Master)
500ML Lighting Control Console QuickStart Guide To assign a fader to act as the Grandmaster, press the [ASSIGN] key, followed by the [GO], or [PAUSE/BACK] key of the fader that should act as the Grandmaster. The Assign Master Fader window (Figure 51) will open, asking you what to assign to this master. -
Page 40: Assigning A Speedmaster
500ML Lighting Control Console QuickStart Guide Assigning a Speedmaster Press the [ASSIGN] key, followed by the [GO], or [PAUSE/BACK] key of the fader that should act as the Speedmaster. A window will open, asking you what to assign to this master. Select one of the three different Speedmasters. -
Page 41: Working With Fader
500ML Lighting Control Console QuickStart Guide Many Fader and Button options allow for customization by using drop down boxes as shown in Figure 54. These drop down menus allow users to specify individual options like the flash value or multiplications of timings (for Speedmasters). -
Page 42: Changing Fader Pages
500ML Lighting Control Console QuickStart Guide Changing Fader Pages Fader Pages may be changed at any time by pressing the [NEXT PAGE], or [LAST PAGE] buttons on the front panel of the console or from within the Fader Page Directory window by selecting the page you would like to change to and pressing the Goto Page button as indicated in Figure Figure 56: Fader Page Directory - Goto Page Button... -
Page 43: Artnet Setup
500ML Lighting Control Console QuickStart Guide ArtNet Setup To enable ArtNet Output, tick the Enable ArtNet checkbox as shown in Figure 58. To configure each Universe, select it from the List and press the [SET] key. A new screen allowing to enable or disable the ArtNet Output, as well as to configure the ArtNet Universe for this Universe will be shown. -
Page 44: Maintenance
500ML Lighting Control Console QuickStart Guide MAINTENANCE 1. Importing and Exporting Fixture Libraries Exporting Fixture Libraries Connect USB key to console. From the Welcome Screen hit the Settings button as illustrated in Figure 60. Should a show be open and running, open the Setup Dialog by striking the [SETUP] key on the console’s front panel instead. Once the Setup Menu is shown, switch to the USB tab and hit the Library Export button. - Page 45 500ML Lighting Control Console QuickStart Guide The Export Library window (Figure 62) will appear to allow you to specify which or all Libraries to be exported. After making your selection, click on Export button to copy the selected Libraries onto the USB Key. Figure 62: Export Library Window A confirmation window will be shown with a brief summary of the Library or Libraries that will be exported.
-
Page 46: Importing Fixture Libraries
500ML Lighting Control Console QuickStart Guide When the process has successfully finished, click on the Close button. Importing Fixture Libraries Connect USB key to console with the library fixture file loaded. From the Welcome Screen hit the Settings button as illustrated in Figure 64. - Page 47 500ML Lighting Control Console QuickStart Guide You will now be presented with a screen (Figure 65) allowing to specify how the library should be imported. After setting the desired options, hit the Import button on the touchscreen display.y. Figure 65: Import Fixture Library Window A screen asking for confirmation will be shown with a brief summary of the Library or Libraries to be imported.
-
Page 48: Updating Console Software
In order to update the software on the console, make sure you have downloaded the appropriate software from the Strand Lighting website. Copy the downloaded file (with the file extension .swu) to the "\strandml\software_update" folder on the USB key supplied with the console. - Page 49 500ML Lighting Control Console QuickStart Guide Connect the USB key into one of the console’s USB Ports (refer to Figure 1 on page 5 Figure 2 on page 7) and navigate to the Setup Menu by pressing [SETUP] and selecting the USB Tab. Click on USB Update in the Maintenance section.
- Page 50 500ML Lighting Control Console QuickStart Guide A wizard will lead you through a few steps as shown in Figure 71 Figure Figure 71: Software Update Window - Software Update Confirmation Figure 72: Software Update Window - Perform Update Confirmation MAINTENANCE...
-
Page 51: Updating Console Software Via Internet Connection
500ML Lighting Control Console QuickStart Guide Once the process is completed, you will be prompted to reboot the console. Click the Reboot Now! button as shown Figure Figure 73: Software Update Window - Reboot Now Updating Console Software via Internet Connection CAUTION: Before updating the console software, make sure you have made backups of all important show and library files! In order to update the software on the console using an Internet connection, make sure the console network interface... - Page 52 500ML Lighting Control Console QuickStart Guide The Console will present you with a list of available software updates found on the Internet. Select the appropriate file and click on Download as shown in Figure Figure 75: Select Software Update Window - Downloading Online Software Note: You must reboot / restart the console in order for the new software to take effect.
-
Page 53: Calibrating Touchscreens
500ML Lighting Control Console QuickStart Guide Figure 77: Software Update Window - Preform Update Once the process is completed, you will be prompted to reboot the console. Click the Reboot Now! button as shown Figure Figure 78: Software Update Window - Reboot Now 3. -
Page 54: Calibrating External Console Touchscreen
500ML Lighting Control Console QuickStart Guide Figure 79: Setup Menu Window - Calibrate Internal Touchscreen Calibrating External Console Touchscreen If an external touchscreen was purchased and is connected to the console, it may be necessary - from time to time - to recalibrate the external touchscreen. -
Page 55: General Hotkeys
500ML Lighting Control Console QuickStart Guide HOTKEYS 1. General Hotkeys [SHIFT] + [OFF] = Release all Cuelists, clear Programmer and reset all Fader values back to 100% [OFF] + [CUELIST] = Release all Cuelists [SHIFT] + Preset PoolItem = Copy Preset contents for all selected fixtures to programmer instead of linking to preset Pressing the [BACKSPACE] Button for longer will clear the complete command line.