Table of Contents
Advertisement
Quick Links
Advertisement
Table of Contents

Related Manuals for Philips 250ML


Summary of Contents for Philips 250ML
- Page 1 For Console Software Version 1.1.x & Up...
-
Page 2: Philips Strand Lighting Offices
Website: www.strandlighting.com The material in this manual is for information purposes only and is subject to change without notice. Philips Strand Lighting assumes no responsibility for any errors or omissions which may appear in this manual. For comments and suggestions regarding corrections and/or updates to this manual, please contact your nearest Philips Strand Lighting office. -
Page 3: Important Information
Philips Strand Lighting Limited Two-Year Warranty Philips Strand Lighting offers a two-year limited warranty of its products against defects in materials or workmanship from the date of delivery. A copy of Philips Strand Lighting two-year limited warranty containing specific terms and conditions can be obtained by contacting your local Philips Strand Lighting office. -
Page 4: Table Of Contents
Operation Guide TABLE OF CONTENTS Philips Strand Lighting Offices ............................1 IMPORTANT INFORMATION Warnings and Notices................................. 2 Additional Resources for DMX512............................ 2 Philips Strand Lighting Limited Two-Year Warranty......................2 TABLE OF CONTENTS PREFACE About this Guide..................................5 Included Items..................................... 5 OVERVIEW Basic Console Layout ................................. - Page 5 250ML Lighting Control Consoles Operation Guide Recording a Submaster ................................30 Submaster Pages ................................30 Submaster Options................................31 Record (Minus Subs) Submaster .............................. 34 Recording a Playback ................................35 Record Playback Options..............................36 Recording an Effect .................................. 37 Record Effect Options ..............................38 Cue/Submaster Preview................................
-
Page 6: Preface
Keep this manual with the console for possible future reference. You can use the QR code (to the right) on any QR code enabled smartphone to connect directly to the 250ML Control Console product page and download the product manual or other product data. -
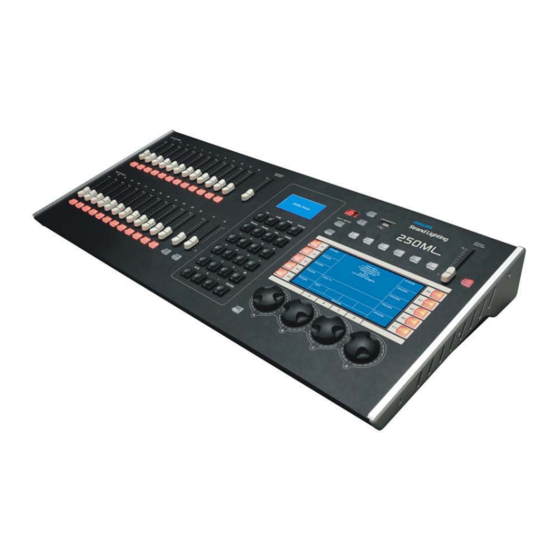
Page 7: Overview
J. Programming Buttons E. Main Console LCD Color Display K. A / B Playback Controls (with Go and Load buttons) F. Grand Master L. 24 Bump Buttons 250ML Console - Rear Panel Connections MIDI In/Thru Power Switch Power Input Ethernet Port (RJ45) -
Page 8: Console Features And Connections
Power into console from universal (AC to DC) power supply. Refer to the QuickStart guide supplied with console on how to connect power using provided power supply. The power supply shipped with your 250ML Control Console is an auto-ranging, universal voltage supply. It operates between 90 to 240 VAC. - Page 9 250ML Lighting Control Consoles Operation Guide A and B Master • - master inhibitive sliders for A and B playbacks. A is at 100% at the top end of its travel while the B is at 100% at the bottom end of its travel. This allows the execution of dipless crossfades by moving both sliders in the same direction.
-
Page 10: Text Conventions
250ML Lighting Control Consoles Operation Guide Main Console LCD Display • - primary programming display. This 7-inch color display will display the Command Line, recording commands, all configuration information, 10 softkey labels and 4 encoder's informa- tion. Shift • - used to gain access to the Setup environment as well as access to additional advanced commands. -
Page 11: Console Setup Main Menu
Operation Guide CONSOLE SETUP 1. Main Menu Holding down the [SHIFT] + [UNTAG] for 3 seconds will launch into the Setup portion of the 250ML Console. Figure 3: Main Menu The following options are available for the 250ML Control Console: Setup (S1 - Setup): Setup allows the user to adjust the console to work the way that's most comfortable for the user. -
Page 12: Lock/Unlock
This feature allows the console to communicate with other consoles using the MIDI interface. MIDI In and Thru are available. Just connect a standard MIDI cable from a third party console to the 250ML console's MIDI In port. If you need to communicate to a third console, a MIDI cable can be connected from the 250ML console's MIDI Thru port to another third party console. -
Page 13: Playback Setup
250ML Lighting Control Consoles Operation Guide Table 1: MIDI Messages - Available Notes Notes DMX Channel Notes DMX Channel Notes DMX Channel Notes DMX Channel Note 0 C-2 Channel 1 Note 32 G#0 Channel 33 Note 64 E3 Channel 65... -
Page 14: Dmx In Setup
Once DMX In is enabled and a DMX512 cable has been connected from the DMX512 Out port on the external console to the DMX In port of the 250ML console, the external console will control the first 96 channels in a 1 to 1 fashion. - Page 15 250ML Lighting Control Consoles Operation Guide Press S2- Patch to go into the Patch menu. Figure 11: Patch Menu Patch...
-
Page 16: Patching Conventions
250ML Lighting Control Consoles Operation Guide Patching Conventions Use Encoder D to roll the selector up/down to DMX Patch (the active option will be in a white background) and click on Encoder D to select DMX Patch. The monitor will now display the patch screen to show what the current channel assignments are. -
Page 17: Patch Screen
250ML Lighting Control Consoles Operation Guide Patch Screen The Patch screen is the point of information for all DMX output assignments. Pressing [F3 – Patch] will open the patch screen on the VGA monitor. From the Patch Screen, [+] and [–] will page the patch screen to view all DMX outputs from 1 to 1024 and their patch assignment. -
Page 18: Range Patching
Control Console has everything you need to get started with intelligent fixture control. Note: There is a limit of 30 intelligent fixtures and 40 parameter capacity on the 250ML Control Console. From the Setup menu (hold [SHIFT] + [UNTAG] for 3 seconds), press (S2 - Patch) and roll Encoder D clockwise to move the cursor (white background) down to "Assign Fixture"... -
Page 19: Patch/Unpatch Fixture To Dmx Address
250ML Lighting Control Consoles Operation Guide Fixtures are added from the 250ML Fixture Library via a USB key. The fixture library can be downloaded from www.strandlighting.com in the Support section. Select (S8 - Open) USB Library. Figure 17: Patching Intelligent Fixtures - Fixture Library The manufacturers shall appear on the S keys. - Page 20 250ML Lighting Control Consoles Operation Guide You will see the Patch menu but the newly assigned intelligent fixture shall be available on the appropriate softkey. In this case, (S1). Select (S1). Figure 20: Patch Menu - Patching Fixtures Screen Select (S6 - Add).
-
Page 21: Fixture Pages
250ML Lighting Control Consoles Operation Guide When patched, you'll see the new patch information on the VGA monitor as shown in Figure 22. Figure 22: VGA Monitor Patch Screen The grey bar shows the range of DMX channels that are being used for fixture 1. In the example above, it is nine addresses. - Page 22 250ML Lighting Control Consoles Operation Guide From the Patch menu, roll Encoder D to highlight Pan/Tilt Options and press down on Encoder D to select. Figure 25: Patch Menu - Pan/Tilt Options Select the fixture to adjust (S1 in the example's case) then use the appropriate encoders to change the setting.
-
Page 23: Operation
Operation Guide OPERATION Once the 250ML control console is properly connected to power and DMX512 control network, the user can immediately begin programming as the console will be initially setup for 250 conventional dimmer channels with a default patch of 1 to 1. If this matches your installation then begin programming as outlined in this guide. If it does not match your installation then proceed to this manual's section on Patch to get the console setup correctly to match your installation. -
Page 24: Console 7-Inch Display Attributes
250ML Lighting Control Consoles Operation Guide 2. Console 7-Inch Display Attributes Figure 27 depicts the console’s 7-inch display and its attributes. Hard Item keys Softkeys and Labels C. Main Screen Area D. Command Line Encoders and Labels Figure 27: 7-Inch Console Display Attributes Note: The softkeys are empty and the Command Line indicates that the console is ready to accept commands. -
Page 25: Intensity On Encoder
250ML Lighting Control Consoles Operation Guide Note: Channel levels that are in red have been manually adjusted. Channel Channel Level Figure 28: Channels & Channel Levels Channels that are in a Red Box with White Text are currently selected. This gives you the ability to apply a new value without reentering the Channel numbers. -
Page 26: Cue Options
S9-Record as State Cue The 250ML Console is a Move Fade console. This means that when accessing cues, the console will only change the output based on what is actually stored as instructions in the cue. Any channels or fixtures that have no data in the cue (are not given an instruction to go to a level or value) will not be affected. - Page 27 250ML Lighting Control Consoles Operation Guide Simply put, if a channel or fixture is not told to do anything in a cue, then running the cue will not affect those channels or fixtures. This means that if you run cues out of order, you could find your lighting state not reflecting what you expect it to see.
-
Page 28: Record (Minus Subs) Cue
250ML Lighting Control Consoles Operation Guide • Encoder D: allows the adjustment of fade down time. Adjusting the encoder clockwise will add time in seconds. Adjusting the encoder counterclockwise will reduce time in seconds. Holding the shift key while rotating shall adjust in 1/10th of a second. -
Page 29: Cue List
250ML Lighting Control Consoles Operation Guide cue's background color will change to yellow and the next cue's background color will be cyan. That indicates that the cue is complete and the next cue is loaded. Figure 35: Cue Running Graphic The desk is now ready to transition to the second cue by crossfading the faders from top to bottom. -
Page 30: Cue List Options
250ML Lighting Control Consoles Operation Guide Cue List Options S1 - Edit Time: This option allows the ability to edit times on the selected cue. Figure 38: Cue List Options - Edit Time • This screen allows the editing of attribute family timing, follow, fade up and fade down time. -
Page 31: Recording A Submaster
250ML Lighting Control Consoles Operation Guide Note: The destination cue number must be available before the move procedure can be accomplished. Figure 40: Move Command - Move Cue 9. Recording a Submaster Once the channels levels are at the desired levels, the first step is to place the desk into Record Mode. -
Page 32: Submaster Options
250ML Lighting Control Consoles Operation Guide The next step after RECORD is pressed is to select a submaster by pressing its bump button. The selected submaster's bump button will flash red to indicate that the active live channels are in the process of being stored into the selected submaster. - Page 33 250ML Lighting Control Consoles Operation Guide S5 - Type: This selection refers to the different mode in which the submaster can be stored. • Normal - this submaster shall function as a standard pile-on submaster. This is often referred to as HTP or Highest Takes Precedence.
- Page 34 250ML Lighting Control Consoles Operation Guide S7 - Del Page Sub: This setting, as shown in Figure 45, allows the ability to delete all stored submasters from the current page. WARNING! Once executed, this command cannot be reversed. Figure 45: Delete All Subpages (Del Page Sub) Screen S8 - Del Sub: This setting allows the ability to delete the selected submaster.
-
Page 35: Record (Minus Subs) Submaster
250ML Lighting Control Consoles Operation Guide • Rotate Encoder D to identify the first letter for the label (Shift will allow for Upper Case letters) and press down on Encoder D to Select the highlighted letter. Repeat as necessary to add all letters to the label. -
Page 36: Recording A Playback
250ML Lighting Control Consoles Operation Guide Record (Minus Subs) can be activated by holding down the SHIFT key while pressing Record. This shall be referred to as SHIFT + RECORD. Figure 49: Record Minus Subs Screen From here, press the submaster bump button in which you want to record the console's output and then ENTER to confirm (or you can press and hold the bump button for 3 seconds). -
Page 37: Record Playback Options
250ML Lighting Control Consoles Operation Guide • See "Submaster Options" on page 31 to go through all options available. • To continue recording a Playback, as indicated in Figure 51, press (S5 - Type) twice to change the Type setting to Playback. -
Page 38: Recording An Effect
This topic shall go over basic effect recording. Effects allow constant movement of light in either a step based environment or in an effect engine based environment. The 250ML Control Console gives you the ability to do step based effects for intensity and engine based effects for automated luminaires. -
Page 39: Record Effect Options
250ML Lighting Control Consoles Operation Guide • Once the submaster is recorded, the submaster's bump button will be lit in purple and the channel's levels will still be active in red. Press [CLR] [CLR] to release and now the submaster shall function correctly. -
Page 40: Cue/Submaster Preview
250ML Lighting Control Consoles Operation Guide WARNING! Once executed, this command cannot be reversed. S10 - Name: This option allows the ability to label the cue. Pressing (S10 - Name) shall bring up the naming screen for labeling. Encoder A - C-Step U/D (Current Step): Notice that the Current Step indicator in the screen is one number higher than the total steps and there is an asterisk. -
Page 41: Submaster List
250ML Lighting Control Consoles Operation Guide 14. Submaster List The Submaster List is the point of information for all settings regarding data stored in faders. Remember that a fader can be a submaster, playback or effect and all of its info can be seen and edited from the Submaster List. -
Page 42: Editing A Submaster Effect
250ML Lighting Control Consoles Operation Guide S1 - Edit Time This will allow the editing of all parameters of the sub that was selected as well as editing the item in Preview. Figure 58: Sub List Preview Screen • (S1 - Bump): changes how the bump button functions. Options are Off, Flash, Solo, Latch, Flash+Solo, and Go/ Run. -
Page 43: Edit A Submaster Playback
250ML Lighting Control Consoles Operation Guide Here is a description of the S keys and their functions. Figure 60: Editing a Submaster Effect • (S1 - Edit Time): This will allow the editing of all parameters of the submaster effect that was selected as well as editing the item in Preview. -
Page 44: Fx List
250ML Lighting Control Consoles Operation Guide 15. FX List The effects list is the point of information for all effects that are actively running based on fader output. Pressing [F1 – FX] will open the FX List on the color screen. -
Page 45: Home
250ML Lighting Control Consoles Operation Guide Once a moving light is properly patched, fixtures can be accessed by pressing the FIXTURE button. The patched fixtures shall appear on the S keys. By selecting a fixture, the appropriate S key shall flash. -
Page 46: Paging The Fixture Display
250ML Lighting Control Consoles Operation Guide When recorded, this value will be stored in the fader or the cue. Figure 67: Fixture Display - Patched Fixture Attributes The fixture area display shall show all fixtures that are patched. Figure 67 shows 3 fixtures, each with 7 attributes. -
Page 47: Recording A Palette
250ML Lighting Control Consoles Operation Guide • If the data in a palette gets changed or updated, then all of the faders and cues are automatically updated. Recording a Palette The process of recording a palette allows the storage of position, color and beam information into an easily accessible state. -
Page 48: Accessing Fixtures Using Channel Numbers
250ML Lighting Control Consoles Operation Guide Figure 70: Applying a Palette Once the palette has been applied and all output is correct, the fixture can be stored into a fader or cue. Accessing Fixtures using Channel Numbers All fixtures shall display a 900 series number as the softkeys label on the color screen. This is a channel alias and shall allow access of the fixture from the numerical keypad. -
Page 49: S9-Show List
Effects allow constant movement of light in either a step based environment or in an effect engine based environment. The 250ML Control Console gives you the ability to do step based affects for intensity and engine based effects for automated luminaires. -
Page 50: Archive
250ML Lighting Control Consoles Operation Guide Start by pressing the FIXTURE button and then selecting the appropriate S keys for the fixtures that you want the effect to apply to. Then press the EFFECT button to present the effect's options on the color screen. -
Page 51: Clear Memory / Subs
250ML Lighting Control Consoles Operation Guide Create a folder location to store the showfile using Encoder D to highlight the letter and press down on Encoder D to select. The file folder must be created using the following rules. Folder Naming Rules •... -
Page 52: Default Setup
Password: Default Setup This maintenance action shall default all of the setup options for the 250ML Control Console. Figure 78: Setup Menu - Resetting to Default Setup WARNING! This action is password protected for the safety of the show data. This action is not recoverable, nor 168168 reversible. -
Page 53: Effects Tutorial
Effects allow constant movement of light in either a step based environment or in an effect engine based environment. The 250ML Control Console gives you the ability to do step based affects for intensity and engine based effects for automated luminaires. - Page 54 250ML Lighting Control Consoles Operation Guide Finish by clearing out the adjusted channels as follows: Repeat level adjustment as follows: Store the second step to Submaster 1 as follows: Figure 84: Record Step Chase Since the info in Submaster 1 has already been designated as an effect, that step doesn't need to be repeated. However Total Step will display as 01 and Current Step as 02.
-
Page 55: Maintenance
Password: 2. Update Software This shall allow the user to update the operational software of the 250ML Control Console. Please download the latest version of the 250ML software from www.strandlighting.com. Insert the USB key with the software into the USB port on the top of the console. -
Page 56: Update Vga Screen
3. Update VGA Screen This shall allow the user to update the video output software of the 250ML Control Console. Please download the latest version of the 250ML software from www.strandlighting.com. Insert the USB key with the software into the USB port on the top of the console. -
Page 57: Test Mode
250ML Lighting Control Consoles Operation Guide 4. Test Mode This shall allow the user to test the functionality of the hardware. Once the test mode is running, all buttons shall light up and activating all hardware items (buttons and sliders) shall provide on screen feedback to the onboard color screen for confirmation of functionality. -
Page 58: Product Information
250ML Lighting Control Consoles Operation Guide PRODUCT INFORMATION 1. Specification Model: Strand Lighting 250ML Control Console On-Board LCD: 60x128 dot, TFT LCD with contrast adjustment Inputs/Outputs: DMX IN: DMX512A (RDM) XLR5M Port DMX OUT: 2 Each DMX512A (RDM) XLR5F Ports... -
Page 59: Console Capacities
250ML Lighting Control Consoles Operation Guide 2. Console Capacities The following capacities are available on your 250ML control console. • 250 Conventional Dimmer Channels • 30 Multiple Parameter Fixtures with a maximum of 40 parameters for each fixture • 999 Cues •...