NETGEAR ReadyNAS 2120 Hardware Manual
Readynas os 6 rack-mount
Hide thumbs
Also See for ReadyNAS 2120:
- Hardware manual (43 pages) ,
- Manual (54 pages) ,
- Quick start (2 pages)
Table of Contents
Advertisement
Quick Links
Advertisement
Table of Contents

Related Manuals for NETGEAR ReadyNAS 2120


Summary of Contents for NETGEAR ReadyNAS 2120
- Page 1 ReadyNAS OS 6 Rack-Mount Hardware Manual Model ReadyNAS 2120 ReadyNAS 2120 v2 ReadyNAS 2304 ReadyNAS 3130 ReadyNAS 3138 ReadyNAS 3220 ReadyNAS 3312 ReadyNAS 4220 ReadyNAS 4312 ReadyNAS 4360 June 2017 202-11272-09 350 E. Plumeria Drive San Jose, CA 95134...
-
Page 2: Readynas
For the current EU Declaration of Conformity, visit http://kb.netgear.com/app/answers/detail/a_id/11621. Compliance For regulatory compliance information, visit http://www.netgear.com/about/regulatory. See the regulatory compliance document before connecting the power supply. Trademarks NETGEAR, Inc., NETGEAR, and the NETGEAR Logo are trademarks of NETGEAR, Inc. Any non-NETGEAR trademarks are used for reference purposes only. -
Page 3: Table Of Contents
Contents Chapter 1 Getting Started Additional Documentation..................9 Setup Location.......................9 Supported Operating Systems................9 Supported Browsers....................10 Diskless Storage System..................10 Chapter 2 ReadyNAS 2120 and 2120 v2 Front Panel......................12 Rear Panel......................13 Status Information....................13 Power On and Shut Down..................14 Power On......................14 Preferred Shutdown..................15 Forced Shutdown....................15 Power State.....................15... - Page 4 ReadyNAS OS 6 Chapter 5 ReadyNAS 3138 Front Panel......................35 Rear Panelrear panel...................36 Status Information....................37 Power On and Shut Down..................38 Power On......................38 Preferred Shutdown..................38 Forced Shutdown....................39 Power State.....................39 Boot Menu......................39 Rack Mounting.....................41 Chapter 6 ReadyNAS 3220 and 4220 Front Panel......................43 ReadyNAS 3220 Rear Panel................44 ReadyNAS 4220 Rear Panel................45 Status Information....................45 Boot Menu......................47...
- Page 5 Replace a 2.5-Inch Disk..................85 Chapter 10 Maintenance Access the Inside of the Storage System............89 Access the Inside of the Storage System on a ReadyNAS 2120, 3130 or 3138........................89 Access the Inside of the Storage System on a ReadyNAS 3220, 3312, 4220, 4312, or 4360....................90...
- Page 6 ReadyNAS OS 6 Physical dimensions (h x w x d):..............105 Physical weight:.....................105 Power consumption:..................106 Electrical:.......................106 Environmental requirements:................106 Certifications:....................106 ReadyNAS 3220 Technical Specifications............106 General:......................106 Physical dimensions (h x w x d):..............107 Physical weight:.....................107 Power consumption:..................107 Electrical:.......................107 Environmental requirements:................107 Certifications:....................107 ReadyNAS 3312 Technical Specifications............107 General:......................107 Physical dimensions (h x w x d):..............108 Physical weight:.....................108...
-
Page 7: Readynas
ReadyNAS OS 6 Electrostatic Discharge Precautions..............115 Rack-Mount Precautions..................115... -
Page 8: Getting Started
Getting Started ® Congratulations on your purchase of a NETGEAR ReadyNAS storage system. This manual describes the physical features of the ReadyNAS OS 6 rack-mount storage system. This chapter contains the following sections: • Additional Documentation • Setup Location •... -
Page 9: Additional Documentation
ReadyNAS OS 6 Additional Documentation For detailed information about configuring, managing, and using your ReadyNAS storage system, see the ReadyNAS OS 6 Software Manual, which is available at http://support.netgear.com/product/ReadyNAS-OS6. For additional product support information, visit http://support.netgear.com/product/ReadyNAS-OS6. Setup Location Your ReadyNAS storage system is intended for installation in a restricted access location (dedicated equipment rooms, service closets, and the like) only. -
Page 10: Supported Browsers
Use only supported SATA hard disk drives (HDDs) or solid-state drives (SSDs) in your ReadyNAS storage system. If you use disks that are not supported, NETGEAR technical support will not provide assistance. For a list of supported disks, see the NETGEAR Hardware Compatibility List at http://www.netgear.com/readynas-hcl. -
Page 11: Readynas
ReadyNAS 2120 and 2120 v2 This chapter describes the physical features of the ReadyNAS 2120 and the 2120 v2 storage systems. It includes the following sections: • Front Panel on page 12 • Rear Panel on page 13 • Status Information on page 13 •... -
Page 12: Front Panel
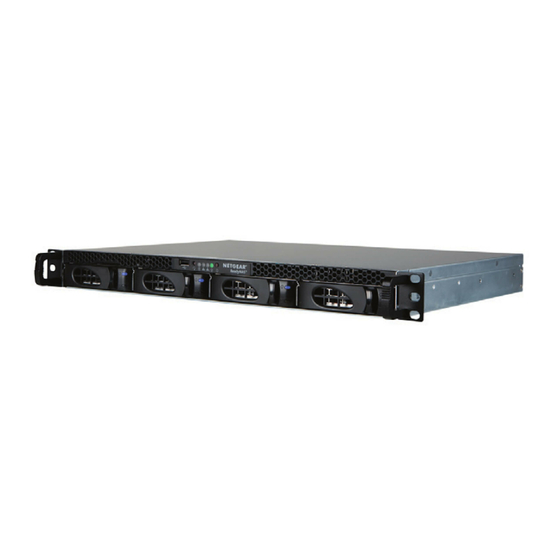
ReadyNAS OS 6 Front Panel The following figure shows the front panel of the ReadyNAS 2120 and 2120 v2 storage systems. Figure 1. Front panel Drive bays Control panel Mounting bracket Fault LED Disk Activity LED Disk tray (For more information, see Disk Tray on page 71.) -
Page 13: Rear Panelrear Panel
USB 3.0 ports LAN ports with LED status indicators Status Information You can obtain information about the status of your ReadyNAS 2120 or 2120 v2 storage system by reviewing the LEDs listed in the following table. Table 1. Status information... -
Page 14: Power On And Shut Down
Power On To power on the system: Connect the system to a power supply. Move the Power switch to the On position. The Power switch is located on the back panel of the system. ReadyNAS 2120 and 2120 v2... -
Page 15: Preferred Shutdown
If the system was powered off at the time of the power failure, the system remains off when the power supply is restored. Boot Menu Use the boot menu to restart or troubleshoot your ReadyNAS storage system.Your storage system provides the following boot modes: ReadyNAS 2120 and 2120 v2... - Page 16 • Memory test. Performs a memory test. The pass or fail result is reported using the storage system's LEDs. Contact a NETGEAR technical support representative to interpret memory test results. • Test disk. Performs an offline full disk test. This process can take four hours or more, depending on the size of your disks.
-
Page 17: Rack Mounting
The system boots in the selected boot mode. Rack Mounting You can rack-mount the ReadyNAS 2120 and 2120 v2 storage systems using the included rack-mount ears. Alternatively, you can use the optional sliding rail kit, order number RRAIL04-10000S. For instructions, see the 1U Rail Installation Guide, which is available at http://support.netgear.com/product/ReadyNAS-OS6. -
Page 18: Chapter 3 Readynas
ReadyNAS 2304 This chapter describes the physical features of the ReadyNAS 2304 storage system. It includes the following sections: • Front Panel on page 19 • Rear Panel on page 20 • Status Information on page 21 • Power On and Shut Down on page 22 •... -
Page 19: Front Panel
ReadyNAS OS 6 Front Panel The following figure shows the front panel of the ReadyNAS 2304. Figure 4. Front panel Drive bays with disk status LEDs Control panel The following figure shows the control panel in more detail. Figure 5. Control panel USB 3.0 port Reset button Health LED... -
Page 20: Rear Panel
ReadyNAS OS 6 Figure 6. Drive bay Disk tray handle Disk Present LED Disk tray release latch Disk Activity or Fault LED WARNING: No matter how many hard drives are installed in your system, ensure that all drive trays remain in the drive bays to maintain proper airflow. Rear Panel The following figure shows the rear panel of the ReadyNAS 2304 storage system. -
Page 21: Status Information
• Red. The system needs attention. Use the local admin page to determine the problem. For more information, see the ReadyNAS OS 6.5 Software Manual, which is available at http://support.netgear.com/product/ReadyNAS-OS6. • Off. The system is healthy. LAN LED (control panel) The LAN LED indicates these states: •... -
Page 22: Power On And Shut Down
ReadyNAS OS 6 Table 2. Status indicators (Continued) Indicator Description Disk LEDs (disk trays) The top LED indicates disk status, as follows: • Green. A disk is present and in use. • Off. No disk is present, or not in use. The bottom LED indicates disk activity as follows: •... -
Page 23: Power On
For information about how to gracefully shut down your system using the ReadyNAS local admin page, see the ReadyNAS OS 6.5 Software Manual, which is available at http://support.netgear.com/product/ReadyNAS-OS6. To gracefully shut down your system using the Power button: Press the Power button on the front panel of the system. -
Page 24: Boot Menu
• Tech support. Boots into a low-level diagnostic mode. Use the tech support boot mode only when a NETGEAR technical support representative instructs you to do so. • Volume read only. Mounts a volume as read-only. Use this option when you are attempting to rescue data off a disk during a disaster recovery. -
Page 25: Rack Mounting
Rack Mounting You can rack-mount the ReadyNAS 2304 using the included rack-mount ears. Alternatively, you can use the optional sliding rail kit, order number RRAIL04-10000S. For instructions see the 1U Rail Installation Guide, which is available at http://support.netgear.com/product/ReadyNAS-OS6. ReadyNAS 2304... -
Page 26: Chapter 4 Readynas
ReadyNAS 3130 This chapter describes the physical features of the ReadyNAS 3130 storage system. It includes the following sections: • Front Panel on page 27 • Rear Panel on page 28 • Status Information on page 29 • Power On and Shut Down on page 30 •... -
Page 27: Front Panel
ReadyNAS OS 6 Front Panel The following figure shows the front panel of the ReadyNAS 3130 storage system. Figure 8. Front panel Drive bays with disk status LEDs Control panel The following figure shows the control panel in more detail. Figure 9. -
Page 28: Rear Panel
The following figure shows the rear panel of the ReadyNAS 3130 storage system. Figure 11. Rear panel Power cable socket Reserved for NETGEAR support Unit Identifier (UID) button Unit Identifier (UID) LED Four 1-gigabit LAN ports with LED status indicators Two eSATA ports Two USB 3.0 ports... -
Page 29: Status Information
• Red. The system needs attention. Use the local admin page to determine the problem. For more information, see the ReadyNAS OS 6.5 Software Manual, which is available at http://support.netgear.com/product/ReadyNAS-OS6. • Off. The system is healthy. LAN LED (control panel) The LAN LED indicates these states: •... -
Page 30: Power On And Shut Down
ReadyNAS OS 6 Table 3. Status indicators (Continued) Indicator Description UI LED (rear panel) The UI (Unit Identifier) LED indicates these states: • Blue. Software or manual identification is on. • Off. Identification is not requested by software or manually when the UI button is pressed. -
Page 31: Forced Shutdown
For information about how to gracefully shut down your system using the ReadyNAS local admin page, see the ReadyNAS OS 6.5 Software Manual, which is available at http://support.netgear.com/product/ReadyNAS-OS6. To gracefully shut down your system using the Power button: Press the Power button on the front panel of the system. - Page 32 • Tech support. Boots into a low-level diagnostic mode. Use the tech support boot mode only when a NETGEAR technical support representative instructs you to do so. • Volume read only. Mounts a volume as read-only. Use this option when you are attempting to rescue data off a disk during a disaster recovery.
-
Page 33: Rack Mounting
Rack Mounting You can rack-mount the ReadyNAS 3130 using the included rack-mount ears. Alternatively, you can use the optional sliding rail kit, order number RRAIL04-10000S. For instructions, see the 1U Rail Installation Guide, which is available at http://support.netgear.com/product/ReadyNAS-OS6. ReadyNAS 3130... - Page 34 ReadyNAS 3138 This chapter describes the physical features of the ReadyNAS 3138 storage system. It includes the following sections: • Front Panel on page 35 • Rear Panel on page 36 • Status Information on page 37 • Power On and Shut Down on page 38 •...
-
Page 35: Front Panel
ReadyNAS OS 6 Front Panel The following figure shows the front panel of the ReadyNAS 3138. Figure 12. Front panel Drive bays with disk status LEDs Control panel The following figure shows the control panel in more detail. Figure 13. Control panel USB 2.0 port Reset button Health LED... - Page 36 The following figure shows the rear panel of the ReadyNAS 3138 storage system. Figure 15. Rear panel Power cable socket Reserved for NETGEAR support Unit Identifier (UID) button Unit Identifier (UID) LED Four 1-gigabit LAN ports with LED status indicators Two eSATA ports Two USB 3.0 ports...
-
Page 37: Status Information
• Red. The system needs attention. Use the local admin page to determine the problem. For more information, see the ReadyNAS OS 6.5 Software Manual, which is available at http://support.netgear.com/product/ReadyNAS-OS6. • Off. The system is healthy. LAN LED (control panel) The LAN LED indicates these states: •... -
Page 38: Power On And Shut Down
ReadyNAS OS 6 Table 4. Status indicators (Continued) Indicator Description UI LED (rear panel) The UI (Unit Identifier) LED indicates these states: • Blue. Software or manual identification is on. • Off. Identification is not requested by software or manually when the UI button is pressed. -
Page 39: Forced Shutdown
For information about how to gracefully shut down your system using the ReadyNAS local admin page, see the ReadyNAS OS 6.5 Software Manual, which is available at http://support.netgear.com/product/ReadyNAS-OS6. To gracefully shut down your system using the Power button: Press the Power button on the front panel of the system. - Page 40 • Tech support. Boots into a low-level diagnostic mode. Use the tech support boot mode only when a NETGEAR technical support representative instructs you to do so. • Volume read only. Mounts a volume as read-only. Use this option when you are attempting to rescue data off a disk during a disaster recovery.
-
Page 41: Rack Mounting
Rack Mounting You can rack-mount the ReadyNAS 3138 using the included rack-mount ears. Alternatively, you can use the optional sliding rail kit, order number RRAIL04-10000S. For instructions see the 1U Rail Installation Guide, which is available at http://support.netgear.com/product/ReadyNAS-OS6. ReadyNAS 3138... - Page 42 ReadyNAS 3220 and 4220 This chapter describes the physical features of the ReadyNAS 3220 and ReadyNAS 4220 storage systems. It includes the following sections: • Front Panel on page 43 • ReadyNAS 3220 Rear Panel on page 44 • ReadyNAS 4220 Rear Panel on page 45 •...
-
Page 43: Front Panel
ReadyNAS OS 6 Front Panel The following figure shows the front panel of the ReadyNAS 3220 and 4220 storage systems. Figure 16. Front panel Drive bays with disk status LEDs Control panel The following figure shows the control panel in more detail. Figure 17. -
Page 44: Readynas 3220 Rear Panel
ReadyNAS OS 6 LAN LEDs Disk Drive Power LED Disk Drive Activity LED USB 2.0 ports Each drive bay features a latch that releases the pop-out tray handle, as shown in the following figure. Figure 18. Disk tray handle and release latch Disk tray handle Disk tray release latch WARNING:... -
Page 45: Readynas 4220 Rear Panel
ReadyNAS OS 6 1-gigabit LAN ports with LED status indicators Console port USB 3.0 ports ReadyNAS 4220 Rear Panel The following figure shows the rear panel of the ReadyNAS 4220 storage system. Figure 20. Rear panel Power supplies Power Supply LEDs Unit Identifier (UID) LED eSATA ports 1-gigabit LAN ports with LED status indicators... - Page 46 • Red. The system needs attention. Use the local admin page to determine the problem. For more information, see the ReadyNAS OS 6.5 Software Manual, which is available at http://support.netgear.com/product/ReadyNAS-OS6. • Off. The system is healthy. LAN LEDs (control panel) The LAN LEDs indicate these states: •...
-
Page 47: Boot Menu
Internet protocol settings and the administrator password, to defaults. • Tech support. Boots into a low-level diagnostic mode. Use the tech support boot mode only when a NETGEAR technical support representative instructs you to do so. ReadyNAS 3220 and 4220... - Page 48 • Memory test. Performs a memory test. The pass or fail result is reported using the storage system's LEDs. Contact a NETGEAR technical support representative to interpret memory test results. • Test disk. Performs an offline full disk test. This process can take four hours or more, depending on the size of your disks.
-
Page 49: Rack-Mount Setup
ReadyNAS OS 6 • Solid: • Blinking: • Off: Press and hold the Reset button to confirm your boot menu selection. The system boots in the selected boot mode. Rack-Mount Setup Use the rack-mount hardware included with your ReadyNAS 3220 or 4220 storage system to install it in a rack. - Page 50 ReadyNAS OS 6 To install the system into a rack: Extend the rail assembly by pulling it outward. Press the release tab and separate the inner rail from the outer assembly. Use the provided mounting screws to mount the inner rails to the system chassis, as follows: Fasten the backs of the outer rails to the rack with screws.
- Page 51 ReadyNAS OS 6 Extend the ball shuttle to the very front. Align the rails and push the chassis in. Secure the handles to the outer rails with screws. The rack-mount installation is complete. ReadyNAS 3220 and 4220...
-
Page 52: Chapter 7 Readynas 3312 And
ReadyNAS 3312 and 4312 This chapter describes the physical features of the ReadyNAS 3312 and ReadyNAS 4312 (model 4312X and model 4312S) storage systems. It includes the following sections: • Front Panel on page 53 • ReadyNAS 3312 Rear Panel on page 54 •... -
Page 53: Front Panel
ReadyNAS OS 6 Front Panel The following figure shows the front panel of the ReadNAS 3312 and 4312 storage systems. Figure 21. Front panel Drive bays with disk status LEDs. The number next to each drive bay indicates the number of the disk drive in the system. -
Page 54: Readynas 3312 Rear Panel
ReadyNAS OS 6 Health LED Power LED 10GbE LED GbE LED Disk Drive Power LED Disk Drive Activity and Fault LED Each drive bay features a latch that releases the pop-out tray handle, as shown in the following figure. Figure 23. Disk tray handle and release latch Disk tray handle Disk tray release latch WARNING:... -
Page 55: Readynas 4312X Rear Panel
ReadyNAS OS 6 Power supplies Power Supply LEDs 1 Gigabit Ethernet LAN ports with LED status indicators USB 3.0 ports Unit Identifier (UID) LED eSATA ports ReadyNAS 4312X Rear Panel The following figure shows the rear panel of the ReadyNAS 4312X storage system. Figure 25. -
Page 56: Readynas 4312S Rear Panel
ReadyNAS OS 6 ReadyNAS 4312S Rear Panel The following figure shows the rear panel of the ReadyNAS 4312S storage system. Figure 26. Rear panel Power System Alarm Mute button Power System LED Power supplies Power Supply LEDs 1 Gigabit Ethernet LAN ports with LED status indicators USB 3.0 ports Unit Identifier (UID) LED eSATA ports... - Page 57 The Health LED indicates these states: • Solid red. The system needs attention. Use the local admin page to determine the problem. For more information, see the ReadyNAS OS 6.5 Software Manual, which is available at support.netgear.com/product/ReadyNAS-OS6. • Off. The system is healthy. •...
-
Page 58: Status Information Rear Panel
ReadyNAS OS 6 Status Information Rear Panel You can obtain information about the status of your system by reviewing the rear panel indicators that are listed in the following table. Table 7. Rear panel status indicators Indicator Description Power System LED A single LED status indicator is built into the rear panel to the left of the power supplies. - Page 59 ReadyNAS OS 6 Table 7. Rear panel status indicators (Continued) Indicator Description 1G Ethernet LAN port LEDs Two LED status indicators are built into each 1G Ethernet port. The left LED is green and indicates the link and activity. The right LED is a bicolor LED that can light amber or green and that indicates the port speed.
-
Page 60: Boot Menu
• Memory test. Performs a memory test. The pass or fail result is reported using the storage system’s LEDs. Contact a NETGEAR technical support representative to interpret memory test results. • Test disk. Performs an offline full disk test. This process can take four hours or more, depending on the size of your disks. - Page 61 ReadyNAS OS 6 Press and release the Reset button to scroll through the boot menu modes. The storage system shows the boot mode options using the Power LED, Health LED, and the Disk Drive Activity and Fault LEDs (A&F LEDs) for disks 1 through 7 (for information about LEDs and disk numbering, Front Panel on page 53), as described in the following table: Boot Mode...
-
Page 62: Rack-Mount Setup
ReadyNAS OS 6 Rack-Mount Setup Use the rack-mount hardware included with your ReadyNAS 3312, 4312X, or 4312S storage system to install it in a rack. Read Rack-Mount Precautions on page 115. Note A system with installed drives can weigh more than 80 pounds. To avoid injury or damage to the equipment, perform the rack-mount installation with appropriate assistance. -
Page 63: Chapter 8 Readynas
ReadyNAS OS 6 Fasten the backs of the outer rails to the rack with screws. Press the release to extend the rails. Hang the hooks of the rails in the rack holes, and fasten the rails to the rack. Attach the chassis to the rack, as follows: Extend the ball shuttle to the very front. -
Page 64: Chapter 8 Readynas 4360
ReadyNAS 4360 This chapter describes the physical features of the ReadyNAS 4360 storage system. It includes the following sections: • Front Panel • Rear Panel • Boot Menu • Rack-Mount Setup... -
Page 65: Front Panel
ReadyNAS OS 6 Front Panel The following figure shows the front panel of the ReadyNAS 4360 storage system. Figure 27. Front panel Drive bank 1 failure light (LED 1) Drive bank 2 failure light (LED 2) Drive bank 3 failure light (LED 3) The drives are organized into three groups. -
Page 66: Rear Panel
ReadyNAS OS 6 System reset switch USB port Rear Panel The following figure shows the rear panel of the ReadyNAS 4360 storage system. Figure 29. Rear panel 1 Gbps LAN ports USB 3.0 ports 10 Gbps LAN ports (RR4360S: optical SFP+; RR4360X: copper 10GBASE-10) Power supply bay Power supply including fans Power supply including fans... -
Page 67: Boot Menu
• Memory test. Performs a memory test. The pass or fail result is reported using the storage system’s LEDs. Contact a NETGEAR technical support representative to interpret memory test results. • Test disk. Performs an offline full disk test. This process can take four hours or more, depending on the size of your disks. - Page 68 ReadyNAS OS 6 Press and release the Reset button to scroll through the boot menu modes. Boot Mode Status Indicators LED 1 LED 2 LED 3 Boot menu Normal Factory default OS reinstall Tech support Volume read only Memory test Test disk Legend: Solid:...
-
Page 69: Rack-Mount Setup
ReadyNAS OS 6 Rack-Mount Setup Use the rack-mount hardware included with your ReadyNAS 4360 storage system to install it in a rack. Read Rack-Mount Precautions on page 115. Note A system with installed drives can weigh more than 80 pounds. To avoid injury or damage to the equipment, perform the rack-mount installation with appropriate assistance. -
Page 70: Chapter 9 Disks
This chapter describes how to reformat, add, and replace disks in your ReadyNAS OS 6 storage system. For information about configuring disks on your storage system, see the ReadyNAS OS 6 Software Manual, which is available at http://support.netgear.com/product/ReadyNAS-OS6. This chapter includes the following topics: •... -
Page 71: Disk Tray
ReadyNAS OS 6 Disk Tray The following figure shows the features of the disk tray used on all ReadyNAS storage systems except the RR4360 storage system. Figure 30. Disk tray Disk tray handle Disk tray release latch Fault LED Disk Activity LED Disk screw holes (for 3.5-inch disk) Disk screw holes (for 2.5-inch disk) Removable plastic air blocker... -
Page 72: Supported Disks
Use only supported SATA hard disk drives (HDDs) or solid-state drives (SSDs) in your ReadyNAS storage system. If you use disks that are not supported, NETGEAR Technical Support will not provide assistance. For a list of supported disks, see the NETGEAR Hardware Compatibility List at http://www.netgear.com/readynas-hcl. -
Page 73: Migrate A Volume
ReadyNAS OS 6 The following instructions describe how to reformat previously formatted disks in a ReadyNAS OS 6 system. This procedure assumes that the system does not contain any other disks. To reformat previously formatted disks with a diskless ReadyNAS OS 6 system: Gracefully shut down the storage system. -
Page 74: Add A Disk
ReadyNAS OS 6 Add a Disk You can add a 3.5-inch hard disk drive, 2.5-inch hard disk drive, or a 2.5-inch solid-state drive to an empty disk bay. If you want to add a previously formatted disk to your storage system, see the instructions in Previously Formatted Disks on page 72. - Page 75 ReadyNAS OS 6 Remove the plastic air blocker from the disk tray. Place the new 3.5-inch HDD in the disk tray. Disks...
- Page 76 ReadyNAS OS 6 Secure the HDD in the tray using the screws that came with your storage system. Make sure that the hard disk connectors face the interior of the disk tray when you assemble the disk. Slide the disk tray back into the drive bay of the system. Press the disk tray handle until it latches closed.
- Page 77 If you are adding the disk to a system that uses Flex-RAID, the disk becomes available for use. You use the local admin page to manually configure the new disk. For more information about X-RAID, Flex-RAID, and using the local admin page, see the ReadyNAS OS 6 Software Manual, which is available at http://support.netgear.com/product/ReadyNAS-OS6. Disks...
-
Page 78: Add A 2.5-Inch Disk
ReadyNAS OS 6 Add a 2.5-Inch Disk To add a 2.5-inch hard disk drive (HDD) or 2.5-inch solid-state drive (SSD): Determine whether you must shut down your system: • If you are adding disks to a diskless system, gracefully shut down the system. For information about how to gracefully shut down your system, see the Preferred Shutdown section of the chapter that describes your system. - Page 79 ReadyNAS OS 6 Remove the plastic air blocker from the disk tray. Place the new 2.5-inch HDD or SSD in the disk tray. Disks...
- Page 80 ReadyNAS OS 6 Secure the drive in the tray using the screws that came with your storage system. Make sure that the hard disk connectors face the interior of the disk tray when you assemble the disk. Slide the disk tray back into the drive bay of the system. Press the disk tray handle until it latches closed.
-
Page 81: Replace A Disk
For information about RAID configurations, setting up email alerts, and using the local admin page, see the ReadyNAS OS 6 Software Manual, which is available at http://support.netgear.com/product/ReadyNAS-OS6. ReadyNAS supports hot-swap drive bays, so you do not need to power down your storage system when replacing a disk. -
Page 82: Replace A 3.5-Inch Disk
ReadyNAS OS 6 WARNING: Replace one disk at a time. Wait for the volume to resynchronize your data before replacing another disk. If you attempt to replace more than one disk at a time, the system crashes. Replace a 3.5-Inch Disk To replace a 3.5-inch hard disk drive (HDD): Press the disk tray release latch. - Page 83 ReadyNAS OS 6 Secure the HDD in the tray using the screws. Make sure that the hard disk connectors face the interior of the disk tray when you assemble the disk. Slide the disk tray back into the drive bay of the system. Press the disk tray handle until it latches closed.
- Page 84 You can continue to use your storage system, although access is slower until the volume resynchronization finishes. For more information about RAID configurations, see the ReadyNAS OS 6 Software Manual, which is available at http://support.netgear.com/product/ReadyNAS-OS6. Disks...
-
Page 85: Replace A 2.5-Inch Disk
ReadyNAS OS 6 Replace a 2.5-Inch Disk To replace a 2.5-inch hard disk drive (HDD) or 2.5-inch solid-state drive (SSD): Press the disk tray release latch. The disk tray handle pops out. Pull out the disk tray. Remove the screws and the old 2.5-inch HDD or SSD from the tray. Place the new 2.5-inch HDD or SSD in the disk tray. - Page 86 ReadyNAS OS 6 Secure the drive in the tray using the screws. Make sure that the hard disk connectors face the interior of the disk tray when you assemble the disk. Slide the disk tray back into the drive bay of the system. Press the disk tray handle until it latches closed.
- Page 87 You can continue to use your storage system, although access is slower until the volume resynchronization finishes. For more information about RAID configurations, see the ReadyNAS OS 6 Software Manual, which is available at http://support.netgear.com/product/ReadyNAS-OS6. Disks...
- Page 88 Maintenance This chapter describes how to perform maintenance activities like replacing a fan or on-board battery. It includes the following topics: • Access the Inside of the Storage System • Replace a Fan • Replace the On-Board Battery...
-
Page 89: Access The Inside Of The Storage System
Access the Inside of the Storage System on a ReadyNAS 2120, 3130 or 3138 To access the inside of a ReadyNAS 2120, 3130, or 3138 storage system: If your system is mounted in a rack, grasp the two handles on either side and pull the system straight out until it locks. -
Page 90: Access The Inside Of The Storage System On A Readynas 3220, 3312, 4220 4312, Or 4360
ReadyNAS OS 6 Slide the top cover back. Lift the top cover from the chassis. You can now access the inside of the system. Access the Inside of the Storage System on a ReadyNAS 3220, 3312, 4220, 4312, or 4360 To access the inside of a ReadyNAS 3220, 3312, 4220, 4312, or 4360 storage system: If your system is mounted in a rack, grasp the two handles on either side and pull the system straight out until it locks. - Page 91 ReadyNAS OS 6 On a ReadyNAS 3220 or 4220 system, remove the four screws holding the top cover in place. Maintenance...
- Page 92 ReadyNAS OS 6 • On a ReadyNAS 3312 or 4312 system, press the two release buttons on the top of the cover. • On a ReadyNAS 4360 system, press the two release buttons on the sides of the chassis. Maintenance...
-
Page 93: Replace A Fan
ReadyNAS OS 6 Slide the top cover back. Lift the top cover from the chassis. You can now access the inside of the system. Replace a Fan If a fan fails, the remaining fans ramp up to full speed, the Error LED on the control panel lights, and an email alert is sent to the system administrator. -
Page 94: Replace A Fan On A Readynas 2120, 3130 Or 3138
ReadyNAS OS 6 Replace a Fan on a ReadyNAS 2120, 3130 or 3138 To replace a fan on a ReadyNAS 2120, 3130 or 3138 storage system: Remove the chassis cover. For more information, see Access the Inside of the Storage System on page 89. - Page 95 ReadyNAS OS 6 Remove the four pegs that hold the fan in the housing. Insert the four pegs into holes in the replacement fan. Insert the replacement fan into the housing. Make sure that the grooves in the pegs fit into the housing and hold the fan in place. Connect the replacement fan's power connections.
-
Page 96: Replace A Fan On A Readynas 3220, 3312, 4220, Or 4312
ReadyNAS OS 6 Replace a Fan on a ReadyNAS 3220, 3312, 4220, or 4312 To replace a fan on a ReadyNAS 3220, 3312, 4220, or 4312 storage system: Remove the chassis cover. For more information, see Access the Inside of the Storage System on page 89. -
Page 97: Replace The On-Board Battery
If the system power is on, the hot-plug feature causes the fan to start immediately. Replace the On-Board Battery Replace the battery only with the same or an equivalent type recommended by NETGEAR. Dispose of used batteries according to the manufacturer's instructions. -
Page 98: Replace The On-Board Battery On A Readynas 2120, 3130 Or 3138
ReadyNAS OS 6 Replace the On-Board Battery on a ReadyNAS 2120, 3130 or 3138 To replace the battery of a ReadyNAS 2120, 3130 or 3138 storage system: Open the system and locate the battery holder. Remove the old battery. Install the new battery. -
Page 99: Replace The On-Board Battery On A Readynas 3220, 3312, 4220, 4312, Or
ReadyNAS OS 6 Replace the On-Board Battery on a ReadyNAS 3220, 3312, 4220, 4312, or 4360 To replace the battery of a ReadyNAS 3220, 3312, 4220, 4312, or 4360 storage system: Open the system and locate the battery holder. The following figure shows the location of the battery holder for the ReadyNAS 3302 and 4220 systems. The battery holder in the ReadyNAS 3312, 4312, and 4360 systems is located toward the front left corner of the enclosure. - Page 100 Defaults and Technical Specifications This appendix includes the following sections: • Factory Default Settings • ReadyNAS 2120 and 2120 v2 Technical Specifications • ReadyNAS 2304 Technical Specifications • ReadyNAS 3130 Technical Specifications • ReadyNAS 3138 Technical Specifications • ReadyNAS 3220 Technical Specifications •...
-
Page 101: Factory Default Settings
Ethernet port AutoSense 10/100/1000BASE-T, RJ-45 LAN IP address DHCP acquired ReadyNAS 2120 and 2120 v2 Technical Specifications The ReadyNAS 2120 and 2120 v2 storage systems meet the following technical specifications: General: • Marvell Armada XP 1.2 GHz (ReadyNAS 2120) •... -
Page 102: Physical Dimensions (H X W X D)
ReadyNAS OS 6 • Two eSATA ports • One USB 2.0 port (front) • Two USB 3.0 ports (back) • Two LAN ports Physical dimensions (h x w x d): 43.5 x 430 x 308 mm (1.7 x 16.9 x 12.1 in.) Physical weight: 3.5 kg (8.89 lb) without disks Power consumption:... -
Page 103: Readynas 2304 Technical Specifications
ReadyNAS OS 6 ReadyNAS 2304 Technical Specifications The ReadyNAS 2304 storage system meets the following technical specifications: General: • Intel Celeron J3355 Dual Core 2.0 GHz • 2 GB DDR3L memory • Four-bay storage • Two Gigabit LAN ports • Three USB 3.0 ports (one on the front and two on the back) •... -
Page 104: Certifications
ReadyNAS OS 6 • Storage humidity: 5 to 95% relative humidity (noncondensing) • Three software-controlled 40 mm chassis cooling fans Certifications: FCC Class B, CE Class B, RoHS, VCCI Class B ReadyNAS 3130 Technical Specifications The ReadyNAS 3130 storage system meets the following technical specifications: General: ™... -
Page 105: Electrical
ReadyNAS OS 6 Electrical: • Internal 180W server-rated AC power supply • Input: 100-240 VAC, 3-1.5A, 50/60 Hz Environmental requirements: • Operating temperature: 0 to 40°C (32° to 104°F) • Operating humidity: 20 to 80% relative humidity (noncondensing) • Storage temperature: -20 to 70°C (-4 to 158°F) •... -
Page 106: Power Consumption
ReadyNAS OS 6 Power consumption: • BTU at full power supply utilization: 73W • In operation: 55W • Power off (Wake On LAN): 1.5W • Power off: 0.28W (230 VAC) 0.17W (115 VAC) Electrical: • Internal 180W server-rated AC power supply •... -
Page 107: Physical Dimensions (H X W X D)
ReadyNAS OS 6 Physical dimensions (h x w x d): 707 mm x 445 mm x 88 mm (27.8 in. x 17.5 in. x 3.4 in.) Physical weight: 11.96 kg (26.36 lb) without disks Power consumption: • In operation: 92W •... -
Page 108: Physical Dimensions (H X W X D)
ReadyNAS OS 6 • Two eSATA ports • Two USB 3.0 ports • Four Gigabit LAN ports Physical dimensions (h x w x d): 88 x 481 x 698 mm (3.4 x 18.94 x 27.48 in.) Physical weight: 14.43 kg (31.81 lb) without disks Power consumption: •... -
Page 109: General
ReadyNAS OS 6 General: • Intel Xeon E3-1225 v2, 95W, 3.2 GHz, 8 MB cache • 4 GB memory • Twelve-bay storage • Two eSATA ports • Two USB 2.0 ports (front) • Two USB 3.0 ports (back) • Four Gigabit LAN ports Physical dimensions (h x w x d): 707 mm x 445 mm x 88 mm (27.8 in. -
Page 110: Readynas 4312 Technical Specifications
ReadyNAS OS 6 ReadyNAS 4312 Technical Specifications The ReadyNAS 4312 storage system meets the following technical specifications: General: ™ • Intel Xeon processor, E3-1245 v5, 3.5 GHz (3.9 GHz maximum), 8 MB cache • 16 GB ECC DDR4 memory • Twelve-bay storage •... -
Page 111: Certifications
ReadyNAS OS 6 • Storage humidity: 5 to 95% relative humidity (noncondensing) • Three software-controlled 80 x 80 mm chassis cooling fans Certifications: FCC Class A, CE Class A, RoHS, VCCI Class A, CCC, MIC, BIS ReadyNAS 4360S and 4360X Technical Specifications The RR4360S and RR4360X storage systems meet the following technical specifications: General: ™... -
Page 112: Safety Warnings
Note Replacing the battery with an incorrect type creates a danger of explosion. Replace the battery the same or an equivalent type recommended by NETGEAR only. Dispose of used batteries according to the manufacturer's instructions. Installing the on-board battery upside down, which reverses its polarities, creates a risk of explosion. - Page 113 ReadyNAS OS 6 Connect the storage systems and their associated LAN connections only to equipment within the same building. Slide-mounted or rail-mounted equipment is not to be used as a shelf or a work space. Defaults and Technical Specifications...
-
Page 114: Electrical Safety Precautions
ReadyNAS OS 6 Electrical Safety Precautions Follow basic electrical safety precautions to protect yourself from harm and the ReadyNAS from damage: • Be aware of the locations of the Power switch on the chassis and the room's emergency power-off switch, disconnection switch, or electrical outlet. If an electrical accident occurs, you can then quickly remove power from the system. -
Page 115: Electrostatic Discharge Precautions
ReadyNAS OS 6 Note Installing the on-board battery upside down, which reverses its polarities, creates a risk of explosion. Take care to install the battery correctly. • Only trained service technicians can replace the self-resetting PTC (positive temperature coefficient) fuses on the main board, using only new fuses that are the same as or equivalent to the ones being replaced. - Page 116 ReadyNAS OS 6 • Install the heaviest components on the bottom of the rack first, and then work up. • Use a regulating uninterruptible power supply (UPS) to protect the ReadyNAS from power surges and voltage spikes and to keep your system operating in case of a power failure. •...