
Related Manuals for Hitachi AW 150


Summary of Contents for Hitachi AW 150
-
Page 1: High Pressure Washer
High Pressure Washer AW 150 Do not use the appliance without reading the handling instruction. Handling instructions... - Page 2 &...
- Page 4 ¡ ™ ¢ ∞ £ ¶ §...
- Page 5 Gun holder Nozzle Tighten Washer protrusion Protrusion Hose end 14 to 15 mm Insert it past this point 20 mm or less Spray Accumulated water Gun support protrusion Low-pressure Insert directly Washer long hole High-pressure Switch Press fi rmly Nozzle tip Trigger Screw supplied Pressure adjuster...
- Page 6 Using accessories and attachments other than those 5. Store the washer in a safe place when not in use. specifi ed in the instruction manual or in Hitachi catalogs Store the washer in a dry, high location or protected with may result in accidents or injuries and must be avoided at a lock out of the reach of children.
-
Page 7: Specifications
5. Grip the handle fi rmly when carrying the washer. immediately and contact Hitachi authorized service 6. Do not use any accumulated water other than clean centers to request inspections or repairs. -
Page 8: Standard Accessories
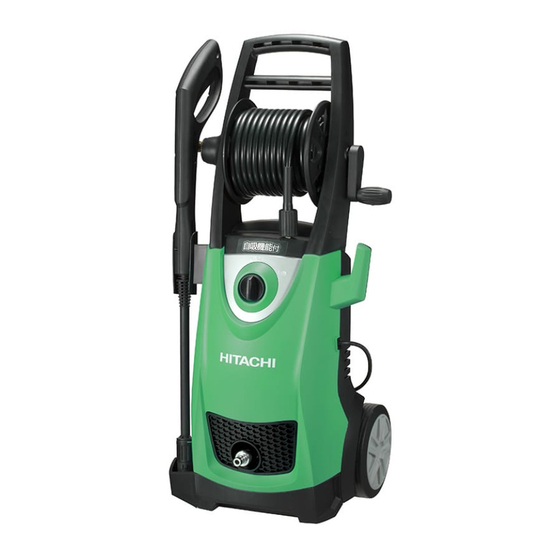
STANDARD ACCESSORIES (1) Trigger gun ..............1 (2) High-pressure hose (10 m) ..........1 (3) Variable nozzle (with pressure adjuster) ......1 (4) Turbo nozzle ...............1 (5) Detergent bottle (stored inside the unit) ......1 (6) One-touch joint (black) (For use with the strainer hose) ........1 (7) Water feed connector ..........1 (8) Nozzle cleaner pin ............1 (9) Gun holder ..............1... -
Page 9: Optional Accessories (Sold Separately)
OPTIONAL ACCESSORIES (sold separately) Items shown in are sold separately. Contact Hitachi authorized service centers for replacements if the standard accessories become damaged or broken. Variable nozzle (With pressure adjuster) Trigger gun [Standard accessory] [Standard accessory] Turbo nozzle High-pressure extension hose... -
Page 10: Prior To Operation
1. Check to make sure the switch is at the “OFF” APPLICATIONS position (Fig. 5) Plugging the washer into the power socket with the ○ Cleans screen doors, window glass, fl oors, walls, etc. switch set at “ON” will cause the washer to immediately ○... - Page 11 The detergent will not be sprayed if the “High Pressure” USING DIFFERENT NOZZLES setting on variable nozzles (with pressure adjustors) or turbo nozzles are used. Variable nozzle (with pressure adjustor) (Fig. 11) 3 Set the adjustor to “Low Pressure” when using variable The variable nozzle (with pressure adjustor) can be used nozzles (with pressure adjustors.) to alternation between “Jet”...
- Page 12 1. Attaching the strainer to the suction hose (Fig. 15) ○ Set the switch to “OFF” without fail when temporarily (1) Pass the suction hose through the hose band supplied suspending operations. and then gently moisten the inside of the suction hose Failure to observe this may result in the motor with water.
-
Page 13: Maintenance And Inspection
6. Replacing supply cord If the replacement of the supply cord is necessary, it has The washer is equipped with the following safety mechanisms to be done by a Hitachi Authorized Service Center to to ensure safe usage. avoid a safety hazard. -
Page 14: Troubleshooting
TROUBLESHOOTING Use the inspections in the table below if the tool does not operate normally. If this does not remedy the problem, consult your dealer or the Hitachi Authorized Service Center. Symptom Possible cause Remedy The motor won’t operate The power plug is not plugged into the power Plug the power cord into the power socket. - Page 15 In case of complaint, please send the Power Tool, undismantled, with the GUARANTEE CERTIFICATE found at the end of this Handling instruction, to a Hitachi Authorized Service Center. NOTE Due to HITACHI’s continuing program of research and...
- Page 17 English GUARANTEE CERTIFICATE 1 Model No. 2 Serial No. 3 Date of Purchase 4 Customer Name and Address 5 Dealer Name and Address (Please stamp dealer name and address)
- Page 20 Shinagawa Intercity Tower A, 15-1, Konan 2-chome, Minato-ku, Tokyo, Japan Code No. C99205211 Printed in China...