GE 2-9451 Manual
Hide thumbs
Also See for 2-9451:
- User manual (52 pages) ,
- User manual (31 pages) ,
- User manual (50 pages)
Table of Contents
Advertisement
Available languages
Available languages
T
ABLE OF
T
C
ABLE OF
ONTENTS
..................................................................................................... 4
I
....................................................................................................... 7
C
V
................................................................................................ 15
H
....................................................................................................... 15
............................................................................................... 16
B
........................................................................................................... 18
........................................................................................................... 19
............................................................................................................ 20
........................................................................................................... 20
.......................................................................................................... 21
C
ONTENTS
............................................................................................. 1
.............................................................................................. 5
............................................................................................. 5
......................................................................... 6
............................................................................................ 6
.................................................................................. 7
.......................................................................... 9
P
HONE
............................................................................... 13
..................................................................................... 14
........................................................................................ 14
........................................................................................... 14
....................................................................................... 15
................................................................................. 16
................................................................................... 16
........................................................................... 16
................................................................................... 17
............................................................................. 17
................................................................................... 17
........................................................................... 17
................................................................................... 18
U
ETWEEN
........................................................................................... 19
............................................................................ 20
....................................................................... 20
.......................................................................................... 20
............................................................... 11
................................................................ 15
,
......... 18
1
Advertisement
Chapters
Table of Contents

Related Manuals for GE 2-9451


Summary of Contents for GE 2-9451
-
Page 1: Table Of Contents
ABLE OF ONTENTS ..................... 1 ABLE OF ONTENTS ..................... 4 NTRODUCTION ....................5 EFORE EGIN ..................... 5 ARTS HECKLIST ................. 6 ODULAR EQUIREMENTS .................... 6 ETTING TARTED ....................... 7 NSTALLATION .................. 7 ESKTOP NSTALLATION ................9 OUNT NSTALLATION ............... 11 ETTING TATION DDRESS... - Page 2 ..............21 EVIEWING THE EDIAL UFFER ................21 UTOMATIC EDIAL ............. 21 ECEIVE A IGNAL ..............22 EDIAL IS ANCELLED ...................... 22 RANSFER ..........22 RANSFERRING A ALL TO NOTHER TATION ..........23 ECEIVING A RANSFER FROM NOTHER TATION ......................24 RIVACY ..............
- Page 3 ....................35 PECIAL EATURES ................. 35 DJUSTING THE INGERS ............35 DJUSTING THE ONTRAST OF THE ISPLAY ................36 ETTING THE RIORITY ..............36 ROGRAMMING THE AUSE URATION ..............36 ROGRAMMING THE LASH URATION ............37 ROGRAMMING THE XTENSION UMBER .................
-
Page 4: Introduction
NTRODUCTION Your Four-Line Business Phone with Intercom is a full-featured phone ideally suited for home or office use. It is designed to receive up to 4 incoming telephone lines and to serve up to 16 station users. In an installed system, your phone provides such features as: 32 memory locations, busy redial, hold, conference call, intercom, call transfer, LCD display, and speakerphone capabilities. -
Page 5: Before You Begin
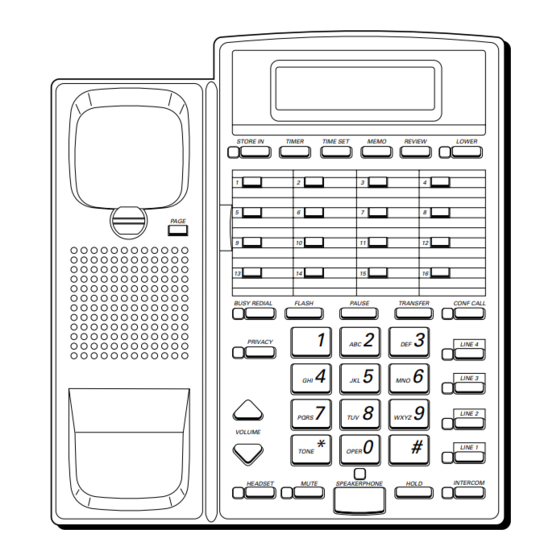
EFORE EGIN ARTS HECKLIST Make sure your package includes the following items: STORE IN TIMER TIME SET MEMO REVIEW LOWER PAGE BUSY REDIAL FLASH PAUSE TRANSFER CONF CALL PRIVACY LINE 4 LINE 3 LINE 2 PQRS WXYZ VOLUME LINE 1 TONE OPER HEADSET... -
Page 6: Modular Jack Requirements
VERY IMPORTANT: In order to have full system operation of your phone (i.e. intercom, transfer, page, etc.), lines 1 and 2 must be connected and common to all phones connected to the system. Only other 2-9451 or 2-9450 models are compatible for full system operation. Also, the telephone lines must be connected before AC power is connected. -
Page 7: Nstallation
NSTALLATION IMPORTANT: It is imperative you follow these steps in sequence for proper installation of the phone. Telephone line cords must be connected before AC power connection is made. The phone may not install properly, otherwise. Also, without AC power or the battery installed, pulse dialing and the flash function will not operate. - Page 8 • Two single RJ11 wall jacks. Connect the other end of the line cord to a 2-line adapter (not provided). Then connect the adapter to the wall jacks with two short tele- phone line cords (also not provided). If you want to connect LINE 3 and 4, use STORE IN TIMER TIME SET...
-
Page 9: Wall Mount Installation
OUNT NSTALLATION STORE IN 1. Turn the handset hook 180º until it clicks into place. PAGE 2. Connect one end of the telephone line cord to the jack on the back of the phone labeled LINE 1,2. For full 4-line use, connect a line cord to the LINE 3,4 jack. - Page 10 4. For the handset, connect one end of the STORE IN TIMER TIME SET MEMO REVIEW LOWER coiled handset cord to the jack on the PAGE side of the base unit. Take the other end BUSY REDIAL FLASH PAUSE TRANSFER CONF CALL PRIVACY LINE 4...
-
Page 11: Setting U P Your Station Address
TATION DDRESS Your phone has the ability to be set up as either a 2-9451 (the default), or a 2- 9450. If you have an existing 2-9450 system, this phone can be set to be fully compatible with your system. See “Changing the Phone to a 2-9450 Model. ”... - Page 12 3. Push the index cover lock to the left Memory and lift up the acrylic memory index index card cover. Remove the memory index card. Memory Index index In pencil, write all the user’s names cover cover lock next to the respective stations on the memory index card.
-
Page 13: Hanging The To A
HANGING THE HONE 2-9450 M TO A ODEL This phone can also be set up to be compatible with an existing 2-9450 system. STORE IN TIMER TIME SET MEMO REVIEW LOWER 1. Press PROGRAM, which is under the acrylic memory index cover PAGE and memory index card. -
Page 14: System Verification
YSTEM ERIFICATION The following procedures should be used to test the system’s configuration and identify possible line connection errors. The phone must be connected to the AC power outlet, lines 1 and 2 must be connected to the LINE 1,2 jack, and the phone must be programmed with a station address number. -
Page 15: Clock Setup
LOCK ETUP ROGRAMMING THE ORMAT The clock is capable of being set to a 12- or 24-hour format. The default is 12-hour mode. 1. Press PROGRAM. 2. Press TIME SET. 3. Press 0 for 12-hour mode, or 1 for 24-hour mode. 4. -
Page 16: Basic Operation
ASIC PERATION Your phone provides the convenience of accessing 4 separate telephone lines, each obtained from the telephone company and each having its own phone number. This is generally applicable to small offices. It provides for 16 telephones (or stations) to share multiple lines. Each station is interconnected to all others by an intercom. -
Page 17: Using The Headset
SING THE EADSET 1. Press the HEADSET button. The HEADSET indicator blinks. 2. Press the line you want. 3. Wait for a dial tone. 4. Dial a phone number. 5. Press HEADSET to turn it off. NOTE: If the headset is not connected, an error tone is heard when the HEADSET button is pressed. -
Page 18: Using The Headset
SING THE EADSET 1. When the phone rings, the corresponding line’s indicator flashes rapidly. 2. Press the line button. If the headset mode is not on, you must first press HEADSET. The HEADSET indicator blinks. 3. When you are finished, press the HEADSET. NOTE: Whether you are making or receiving a call, the caller will be disconnected if you press another line without putting the call on hold first. -
Page 19: Mute
Use the MUTE button to interrupt a phone conversation to talk privately with someone else in the room. A conversation can be muted with speakerphone, handset, or headset use. 1. Press MUTE to activate the mute feature. The mute indicator will come on. -
Page 20: Hold
LACING A ALL ON 1. Press HOLD. The indicator for the line on hold flashes green. 2. Hang up or press another line button. The phone emits a beep every 30 seconds as a reminder. At the other stations, the indicator will blink red but no beep will be heard. NOTE: If you put a call on HOLD while in PRIVACY mode, no one but you can access the line on hold. -
Page 21: Redial
EDIAL 1. Pick up the handset, or press SPEAKERPHONE or HEADSET. 2. The line is automatically selected. (For headset, press the line you want.) 3. Wait for a dial tone. 4. Press REDIAL. NOTE: The redial function will not operate if the number to be redialed contains more than 30 digits. -
Page 22: Busy Redial Is Cancelled When
EDIAL IS ANCELLED • You press BUSY REDIAL again. • A call comes in on the same line between redial attempts. • You pick up the handset or press SPEAKERPHONE. • Ten attempts have been made and the line is still busy. NOTE: Auto busy redial is factory set to a 30 second interval between call attempts. -
Page 23: Receiving A Transfer From Another Station
• If the party at the other station doesn’t pick up the transferred call, and you wish to attempt to transfer to another station, press the line you want and repeat the transfer process. • If the station number you pressed is not valid, you will hear an error tone and the transfer cancels. -
Page 24: Privacy
RIVACY While in use, a line can be secured so that no one else can listen to the conversation. This feature only applies to 2-9450/ 2-9451 phones, however. Other phones which are not compatible with these models can still access the line. -
Page 25: Speakerphone , Handset , And Headset Volume
2. While holding the up or down button, the ringer volume will sound the current setting. Release when you’ve reached the desired volume level. Tapping either button, while the phone is ringing, will allow you to adjust the volume one step at a time. The phone will store the setting once the button is released. -
Page 26: Intercom
To disconnect one of the parties Simply press the line of the person you want to continue talking to, and the other party will be automatically disconnected. To disconnect both parties Simply hang up the handset, or press SPEAKERPHONE or HEADSET. NOTE: By pressing HOLD first, you may then disconnect from each party individually. -
Page 27: Overriding A Station Using D O Not Disturb
NOTE: You will hear an error tone if the station address is not valid or not connected to the system. If the station you want to reach is busy, the display will show BUSY and the party will hear a pending tone, alerting him of the intercom. -
Page 28: Paging A Group
AGING A ROUP 1. Lift the handset. 2. Press LOWER. 3. Press PAGE. 4. Press the one digit (1-9) number for the group you want to page. Press 0 to page all stations. 5. Listen for the beep. The other stations in the specified group will automatically activate their speakphones and receive your page. -
Page 29: Emory
EMORY Each of the 16 memory buttons has the capability of storing 2 separate telephone numbers (up to 30 digits each). Each memory button accesses an upper and a lower memory location. The LOWER button accesses those numbers stored in the lower memory locations. TORING A UMBER 1. -
Page 30: Changing A Stored Number
HANGING A TORED UMBER If you want to change the stored number, simply enter the new number over the old number using the previous memory storing procedure. To erase a stored number, press STORE IN twice, then the memory location you want to erase. -
Page 31: Storing The Last Number Dialed
TORING THE UMBER IALED You can quickly and easily store into memory the last number dialed by pressing the redial button. Follow steps #1-7 of “Storing a Number, ” but press REDIAL instead of entering the number through the keypad. TORING A AUSE Use the PAUSE button to insert a pause when a delay is needed in the... -
Page 32: Dialing A Stored Number
IALING A TORED UMBER 1. Pick up the handset, press SPEAKERPHONE, or press HEADSET. 2. Press the line you want. 3. Wait for a dial tone. 4. Press the memory button of the person you want to call. If the number is stored in lower memory, press the LOWER button first. -
Page 33: Eviewing A Number
EVIEWING A UMBER TORED IN A EMORY OCATION 1. Press REVIEW. 2. Press the memory location you want to review. The display shows the number stored in that location. NOTE: If the memory location contains a chain dial number, the display shows the number of the memory location only. -
Page 34: Data Port
This phone is equipped with a DATA PORT jack for you to connect an auxiliary phone device, such as a fax machine, computer modem, answering machine, or even a cordless phone. on the back of the phone controls the Data Port DATA PORT switch function by enabling you to choose the line that the DATA PORT uses, either line 1, line 2, line 3, or line 4. - Page 35 PECIAL EATURES DJUSTING THE INGERS The ringers for all 4 of the lines can be set independent of one another. 1. Press STORE IN. 2. Press the desired line button. 3. Press 0-4 for different ringer sounds (0 disables). 4. Press # to confirm. NOTE: The line indicators will still continue to flash for incoming calls even with the ringer disabled.
- Page 36 ETTING THE RIORITY A priority line allows you to select one of the 4 lines to have precedence over the other 3 lines. 1. Press STORE IN. 2. Press LOWER. 3. Press any line button to enter Priority Line mode. 4.
- Page 37 ROGRAMMING THE XTENSION UMBER The line 3 and line 4 extension numbers are used for some of the advanced functions utilized by the system. 1. Press PROGRAM. 2. Press the line you want to set. 3. Enter the 4-digit extension number (0-9 for each digit). 4.
- Page 38 DJUSTING ISTURB The length of time before the Do Not Disturb feature is cancelled can be adjusted from 1 to 9 hours, or unlimited. 1. Press STORE IN. 2. Press PRIVACY. 3. Press the keypad digit (1-9) for the desired length of time, or 0 for unlimited.
- Page 39 ETTING NTERCOM The intercom function requires picking up the handset or pressing INTERCOM when you receive an intercom call. For “hands-free” opera- tion, the phone can be set to automatically answer in the speakerphone mode when being intercommed. TIP: You can use this feature for room monitoring. 1.
- Page 40 ROUBLESHOOTING UIDE In case of difficulty, please check the following Troubleshooting Guide before seeking service. Problem Solution No dial tone • Check installation: –– Are the telephone line cords connected to the phone and the wall jack? Are they damaged? •...
- Page 41 Problem Solution Incoming voice too low • Check setting of volume control. or none at all. Indicator and tone • This is normal as power is fluctuating as phone dials. feedback flutter when dialing in pulse mode Memory dialing • Did you program the memory location keys correctly? doesn’t work •...
- Page 42 EPLACING THE ATTERY Your Four-Line Business Phone with Intercom has been designed to accept a 9-volt battery for backup power. In the event you experience a power outage, you will still be able to use the phone. 1. Carefully turn over the phone. On the bottom is the battery compartment door.
-
Page 43: Eneral P Roduct C Are
ENERAL RODUCT To keep your telephone working and looking good, follow these guidelines: • Avoid putting the phone near heating appliances and devices that generate electrical noise (for example, motors or fluorescent lamps). • DO NOT expose to direct sunlight or moisture. •... - Page 44 ERVICE The FCC requires this product to be serviced only by the manufacturer or its authorized service agents. In accordance with FCC requirements, changes or modifications not expressly approved by ATLINKS USA, Inc. could void the user’s authority to operate this product. For instructions on how to obtain service, refer to the warranty included in this guide or call Consumer Information at 1-800-448-0329.
- Page 45 NDEX Adjusting Do Not Disturb 37 General Product Care 43 Adjusting the Automatic Busy Redial Time Interval 38 Adjusting the Contrast of the Headset 15 Display 35 Hold 20 Adjusting the Ringers 35 Adjusting the Wait for Busy Tone Detect 38 Automatic Busy Redial 21 Installation 7 Intercom 26...
- Page 46 NDEX Receiving Incoming Calls 17 Timer 18 Redial 21 TONE Button 20 Replacing the Battery 42 Transfer 22 Troubleshooting Guide 40 Service 44 Setting Auto Intercom 39 Volume 24 Setting the Priority Line 36 Setting Up Your Station Address 11 Special Features 35 Wall Mount Installation 9 System Verification 14...
- Page 47 IMITED ARRANTY What your warranty covers: • Defects in materials or workmanship. For how long after your purchase: • One year, from date of purchase. (The warranty period for rental units begins with the first rental or 45 days from date of shipment to the rental firm, whichever comes first.) What we will do: •...
- Page 48 ATLINKS USA, Inc. 10330 North Meridian Street Indianapolis, IN 46290 Model 29451 © 2001 ATLINKS USA, Inc. 15339430 (Rev. 3 E/S) Trademark(s) ® Registered 01-43 Marca(s) Registrada(s) Printed in China...
- Page 49 ABLE DE ONTENIDO ......................4 NTRODUCCIÓN ....................5 NTES DE OMENZAR ....................5 ISTA DE ARTES .............. 6 EQUERIMIENTOS PARA ENCHUFE MODULAR ....................6 OMENZAR ......................7 NSTALACIÓN ..............7 NSTALACIÓN SOBRE SUPERFICIE PLANA ................9 NSTALACIÓN SOBRE ARED ............ 11 ARA PROGRAMAR LA DIRECCIÓN DE SU ESTACIÓN 2-9450 ..........
- Page 50 ..22 A CANCELACIÓN DE REDISCADO DE NÚMERO OCUPADO SE LLEVA A CABO CUANDO ....................22 RANSFERENCIA ..........22 RANSFERENCIA DE UNA LLAMADA A OTRA ESTACIÓN ..........23 ARA RECIBIR UNA LLAMADA DESDE OTRA ESTACIÓN ......................23 RIVACÍA ............24 ARA OFRECER PRIVACÍA A UNA LLAMADA ......................
- Page 51 ............37 ROGRAMACIÓN PARA LOCALIZAR UN GRUPO ) ........ 37 ROGRAMACIÓN DE LA MODALIDAD DE DISCADO ULSO ............. 37 JUSTE DE LA FUNCIÓN DE OLESTAR ....38 JUSTE DEL TIEMPO DE INTERVALO PARA REDISCAR UN NÚMERO OCUPADO ......38 JUSTE DEL TIEMPO DE ESPERA PARA DETECTAR TONO DE OCUPADO ............
-
Page 52: Introducción
NTRODUCCIÓN Su Teléfono de Negocios de 4 líneas con Interfono es un aparato con todas las funciones,ideal para uso en su hogar u oficina. Está diseñado para recibir hasta 4 líneas entrantes y para servir hasta 16 usuarios de estaciones. En un sistema instalado, su teléfono es capaz de ofrecerle funciones como: 32 localizaciones de memoria, rediscado de número ocupado, espera, llamada de conferencia, interfono, transferencia de llamadas, visor y capacidad para funciones de altavoz. -
Page 53: Antes De Comenzar
NTES DE COMENZAR ISTA DE PARTES Asegúrese de que su paquete contiene los siguientes artículos: STORE IN TIMER TIME SET MEMO REVIEW LOWER PAGE BUSY REDIAL FLASH PAUSE TRANSFER CONF CALL PRIVACY LINE 4 LINE 3 LINE 2 PQRS WXYZ VOLUME LINE 1 TONE... -
Page 54: Requerimientos Para Enchufe Modular
(interfono, transferencia, localizador, etc., las líneas 1 y 2 deben estar conectadas y ser comunes para todos los aparatos conectados al sistema. Unicamente los modelos 2-9450 y 2-9451 son compatibles para la operación del sistema completo. También, las líneas telefónicas deben ser conectadas antes de que se conecte el cable de corriente AC. -
Page 55: Instalación
NSTALACIÓN IMPORTANTE: Es imperativo que usted siga los siguientes pasos en secuencia para asegurar la instalación adecuada del teléfono. Los cables de las líneas telefónicas deben ser conectados antes de que se conecte el cable de corriente AC. De otra manera, la instalación puede no llevarse a cabo adecuadamente. También, sin el cable de corriente o la batería instalada, el discado en modalidad de pulso y las funciones especiales de centelleo no podrán operar. - Page 56 • Dos contactos de pared sencillos RJ11. Conecte el otro extremo del cable al adaptador de 2 líneas (no incluído). Después conecte el adaptador a los contactos de pared con dos cables cortos de línea telefónica (tampoco incluidos). Si usted quiere conectar la línea 3 y 4, STORE IN TIMER TIME SET...
-
Page 57: Instalación Sobre Pared
NSTALACIÓN SOBRE ARED 1. Gire el gancho del auricular 180º hasta que entre un su sitio con un STORE IN chasquido. 2. Conecte un extremo del cable PAGE telefónico al enchufe marcado “LINE 1,2” en la parte posterior del teléfono. Para el uso de todas las 4 líneas, conecte el cable telefónico en el enchufe marcado “LINE 3,4. - Page 58 4. Para el auricular, conecte un extremo del cable espiral del auricular en el contacto STORE IN TIMER TIME SET MEMO REVIEW LOWER al costado de la base del aparato. Tome PAGE el otro extremo del cable y conéctelo en BUSY REDIAL FLASH PAUSE...
-
Page 59: Para Programar La Dirección De Su Estación
(interfono, transferencia, localizador, etc., las líneas 1 y 2 deben estar conectadas y ser comunes para todos los aparatos conectados al sistema. Unicamente los modelos 2-9450 y 2-9451 son compatibles para la operación del sistema completo. También, las líneas telefónicas deben ser conectadas antes de que se conecte el cable de corriente AC. - Page 60 3. Oprima el seguro de la cubierta del Tarjeta del índice hacia la izquierda y levante la índice de memoria Cubierta cubierta de acrílico del índice de la del índice memoria. Quite la tarjeta del índice de de memoria Seguro de la memoria.
-
Page 61: Para Cambiar El Teléfono A Un Modelo 2-9450
Si los cables de las líneas telefónicas están conectados adecuadamente y la dirección de la estación es NOTA : Si usted programa el 2-9451 válida, usted escuchará un tono como 2-9450, la función de de confirmación. Esto significa Localizador de Grupo no estará... -
Page 62: Verificación Del Sistema
ERIFICACIÓN DEL SISTEMA Los siguientes procedimientos deben ser usados para probar la configuración del sistema e identificar posibles errores de conección de líneas. El teléfono debe ser conectado a un contacto de corriente AC, las líneas 1 y 2 deben ser conectadas al contacto marcado “LINE 1,2, ” y el teléfono debe estar programado con un número de dirección de estación. -
Page 63: Programación Del Reloj
ROGRAMACIÓN DEL RELOJ ARA PROGRAMAR EL FORMATO DE HORAS El reloj tiene la capacidad de ser programado en un formato de 12 o de 24 horas. El formato pre-programado es el de 12 horas. 1. Oprima “PROGRAM. ” 2. Oprima “TIME SET. ” 3. -
Page 64: Operación Básica
PERACIÓN BÁSICA Su teléfono le brinda la conveniencia de poder tener acceso a 4 líneas telefónicas separadas, cada una obtenida a partir de su compañía telefónica, y cada una con su propio número telefónico. Esto generalmente se aplica a compañías pequeñas. Esta función le ofrece 16 teléfonos (o estaciones) para compartir múltiples líneas. -
Page 65: Uso De Los Audífonos
SO DE LOS AUDÍFONOS 1. Oprima el botón del audífonos (“HEADSET”). El indicador de audífonos parpadeará. 2. Escoja la línea que usted quiere usar. 3. Espere al tono de marcar. 4. Marque el número telefónico. 5. Oprima el botón de audífonos (“HEADSET”) para apagar esta función. NOTA : Si los audífonos no están conectados, un tono de error se escuchará... -
Page 66: Uso De Los Audífonos
SO DE LOS AUDÍFONOS 1. Cuando el teléfono timbra, el indicador de la línea correspondiente parpadea rapidamente. 2. Oprima el botón para seleccionar la línea. Si la función de los audífonos no está encendida, usted debe primero oprimir el botón de audífonos (“HEADSET”). -
Page 67: Enmudecedor
NMUDECEDOR El botón enmudecedor le permite interrumpir una llamada telefónica y hablar en privado con otra persona en el cuarto. Una conversación puede ser enmudecida mientras se usa la función de altavoz, auricular o audífonos. 1. Oprima el botón “MUTE” para activar la función enmudecedora. El indicador del enmudecedor se iluminará. -
Page 68: Para Levantar Una Llamada En Espera
El teléfono emite un tono cada 30 segundos como recordatorio. En las otras estaciones, el indicador parpadeará en rojo, pero no se escuchará el tono recordatorio. NOTA : Si usted pone una llamada en espera, mientras está en modalidad de privacía (“PRIVACY”), nadie excepto usted puede tener acceso a la línea en espera. -
Page 69: Rediscado
EDISCADO 1. Levante el auricular, u oprima “SPEAKERPHONE” o “HEADSET. ” 2. La línea es seleccionada automaticamente (Si va a usar los audífonos, oprima la línea que quiera). 3. Espera al tono de marcar. 4. Oprima “REDIAL. ” NOTA : La función de rediscado no operará si el número que debe ser rediscado contiene más de 30 dígitos. -
Page 70: L A Cancelación De Rediscado De Número Ocupado Se Lleva Acabo Cuando
A CANCELACIÓN DE REDISCADO DE NÚMERO OCUPADO SE LLEVA A CABO CUANDO • Usted oprime “BUSY REDIAL ” nuevamente • Una llamada entra en la misma línea entre intentos de rediscado • Usted levanta el auricular u oprime “SPEAKERPHONE” • Se han hecho diez intentos y la línea continúa ocupada. NOTA : La función de rediscado automático de número ocupado está... -
Page 71: Para Recibir Una Llamada Desde Otra Estación
Mientras está en uso, la línea puede ser asegurada para que nadie más pueda escuchar la conversación. Esta función, sin embargo, se encuentra unicamente en los modelos de teléfonos 2-9450/ 2-9451. Otros teléfonos que no son compatibles con estos modelos pueden tener acceso a la línea. -
Page 72: Para Ofrecer Privacía A Una Llamada
ARA OFRECER PRIVACÍA A UNA LLAMADA En cualquier momento durante la conversación, usted puede utilizar la función de privacía para asegurar la línea. 1. Mientras está en la línea, oprima el botón “PRIVACY. ” El indicador se iluminará. 2. Para cancelar, oprima el botón “PRIVACY” nuevamente o cuelgue. NOTA : Si usted pone una llamada en espera mientras está... -
Page 73: Volumen Del Altavoz , Auricular Y Audífonos
OLUMEN DEL ALTAVOZ AURICULAR Y AUDÍFONOS • Mientras se está ocupando el teléfono, oprima “VOLUME” y los botones para aumentar o disminuir al nivel deseado. El teléfono almacenará ese programa una vez que el botón sea liberado. NOTA : El volumen del auricular y audífonos regresará al nivel programado de fábrica una vez que usted cuelgue el teléfono. -
Page 74: Interfono
NTERFONO NTERFONO DE UN TOQUE Usted puede comunicarse a otra estación a través del interfono simplemente oprimiendo el número de la estación (teclas de memoria 1-16). El auricular debe estar colgado y ni la función de altavoz ni la función de audífonos deben estar operando para que esta modalidad opere adecuadamente. -
Page 75: Ara Anular Una Estación Usando La Función De
ARA ANULAR UNA ESTACIÓN USANDO LA FUNCIÓN DE OLESTAR 1. Oprima “INTERCOM. ” 2. Oprima la localización de la memoria de la estación que usted quiere alcanzar. Si la estación está en modalidad de No Molestar (DND), el visor indicará DND y el indicador de “PRIVACY” parpadeará. 3. -
Page 76: Para Activar O Desactivar El Localizador ( Vocear )
2. Oprima “LOWER. ” 3. Oprima el botón localizador (“PAGE”). 4. Oprima el número de 1 dígito (1-9) para el grupo que usted quiera vocear. 5. Espere a escuchar el tono. Las otras estaciones activarán sus altavoces automaticamente y recibirán su mensaje. 6. -
Page 77: Para Almacenar Un Número
ARA ALMACENAR UN NÚMERO 1. Oprima el botón para almacenar (“STORE IN”). El indicador “STORE” se encenderá. 2. Inscriba el número telefónico que usted quiera almacenar, usando las teclas de dígitos. Los números que usted inscriba aparecerán en el visor. 3. -
Page 78: Para Almacenar Una Cadena De Números
ARA ALMACENAR UNA CADENA DE NÚMEROS Usted puede asociar una secuencia de discado de números telefónicos en diferentes localizaciones de la memoria, simplemente combinándolos en una misma localización de la memoria, o tener otra localización de la memoria almacenada en una de las localizaciones que será asociada. Por ejemplo Localización de Memoria Número telefónico de compañía de... -
Page 79: Para Almacenar Una Pausa
número discado, oprimiendo el botón de rediscado. Siga los pasos #1-7 de “Para almacenar un número” , pero oprima “REDIAL ” en lugar de inscribir el número con los dígitos del teclado. ARA ALMACENAR UNA PAUSA Use el botón de pausa (“PAUSE”) para introducir una pausa cuando un retraso es necesario en la secuencia de discado (por ejemplo, cuando usted debe marcar 9 para obtener línea al exterior o cuando usted debe inscribir códigos de acceso a su línea de información bancaria). -
Page 80: Discado En Cadena
2. Oprima la línea que desee. 3. Espere al tono de marcar. 4. Oprima el botón de memoria de la persona que usted quiere llamar. Si el número está almacenado en la localización de memoria baja, oprima el botón “LOWER” primero. El número es discado automaticamente. ISCADO EN CADENA Este proceso le permite marcar una sucesión de números almacenados en diferentes localizaciones de la memoria. -
Page 81: Para Revisar Un Número Almacenado En Una Localización De Memoria
ARA REVISAR UN NÚMERO ALMACENADO EN UNA LOCALIZACIÓN DE MEMORIA 1. Oprima “REVIEW. ” 2. Oprima la localización de memoria que usted quiera revisar. El visor muestra el número almacenado en esa localización. NOTA: Si la localización de memoria contiene una secuencia en cadena, el visor muestar unicamente el número de la localización en la memoria. -
Page 82: Puerto De Información (Data Port)
(DATA PORT) UERTO DE INFORMACIÓN Este teléfono está equipado con un contacto de Puerto de Información para que usted pueda conectar un aditamento auxiliar para el teléfono, como máquina de fax, modem para computadora, contestador, o incluso un teléfono inalámbrico. El selector de Puerto de Información en la parte posterior del teléfono controla la función del Puerto de Información permitiéndole que usted escoja la línea que el Puerto de Información use, ya sea la línea 1, línea 2,... -
Page 83: Funciones Especiales
UNCIONES ESPECIALES JUSTE DE LOS TIMBRES Los timbres en las 4 líneas pueden ser programados independientemente de los otros. 1. Oprima “STORE IN. ” 2. Oprima el botón de la línea deseada. 3. Oprima 0-4 para sonidos diferentes del timbre (0 desactivados). 4. -
Page 84: Programación De La Duración De La Pausa
4. Oprima el botón de la línea que usted quiere que tenga prioridad. 5. Oprima # para confirmar. NOTA : Para cambiar la línea prioritaria, repita el mismo procedimiento pero escoja una línea diferente en el paso 4. ROGRAMACIÓN DE LA DURACIÓN DE LA PAUSA 1. -
Page 85: Programación Para Localizar Un Grupo
ROGRAMACIÓN PARA LOCALIZAR UN GRUPO A su estación se le puede asignar una función de un grupo total de 9 funciones para vocear. Cada estación en un grupo para ser voceado, debe ser programada como sigue: 1. Oprima “PROGRAM. ” 2. -
Page 86: Ajuste Del Tiempo De Intervalo Para Rediscar Un Número Ocupado
JUSTE DEL TIEMPO DE INTERVALO PARA REDISCAR UN NÚMERO OCUPADO La programación de fábrica para el tiempo de intervalo entre intentos de llamadas es de 30 segundos, pero puede ser ajustado en incrementos de 10 segundos desde 0 a 90 segundos. 1. -
Page 87: Programación Del Interfono Automático
ROGRAMACIÓN DEL INTERFONO AUTOMÁTICO La función del interfono requiere que usted levante el auricular u oprima “INTERCOM” cuando usted recibe una llamada por el interfono. Para operar con las manos libres, el teléfono puede ser programado a contestar automaticamente en la modalidad de altavoz cuando recibe una señal del interfono. -
Page 88: Guía Para Solución De
UÍA PARA SOLUCIÓN DE PROBLEMAS En caso de dificultad por favor verifique esta Guía para Solución de Problemas antes de hacer arreglos para la reparación. Problema Solución No hay tono de marcar • Cheque la instalación: –– Están los cables de las líneas telefónicas conectados al teléfono y en el contacto de pared? ¿Están dañados? •... - Page 89 Problem Solution La voz de la otra persona • Cheque el nivel del volumen se escucha muy bajo o no se escucha. El indicador y tono mariposean • Esto es normal porque la corriente de poder fluctúa cuando disca en modalidad de disco rotatorio Discado desde la memoria •...
-
Page 90: Para Reemplazar La Batería
ARA REEMPLAZAR LA BATERÍA Su Teléfono de 4 Líneas con Interfono ha sido diseñado para aceptar una batería de 9V como respaldo de poder. En el caso de que usted experimentase un corte de corriente, usted podrá seguir utilizando su teléfono. 1. -
Page 91: Cuidado General Del Producto
UIDADO GENERAL DEL PRODUCTO Para mantener su teléfono funcionando bien y con buena apariencia, observe las siguientes pautas: • Evite poner el teléfono cerca de calentadores (calefactores) de ambiente y dispositivos que generen interferencia eléctrica ejemplo, motores o lámparas fluorescentes). •... -
Page 92: Cómo Obtener Servicios De Mantenimiento
ÓMO OBTENER SERVICIOS DE MANTENIMIENTO La FCC requiere que este producto sea sometido a servicios de mantenimiento solamente por el fabricante o por sus agentes de servicio autorizados. De acuerdo con los requerimientos de la FCC, los cambios o las modificaciones que no hayan sido expresamente aprobadas por ATLINKS USA, Inc. -
Page 93: Index
NDEX Ajuste de la función de no molestar 37 Información especial del Ajuste de los timbres 35 almacenamiento de memoria 31 Ajuste del contraste del visor 35 Instalación 7 Ajuste del tiempo de espera para Instalación de la línea prioritaria 35 detectar tono de 38 Instalación sobre Pared 9 Ajuste del tiempo de intervalo para... - Page 94 Para almacenar una cadena de Programming the pulse/tone mode 37 números 30 Puerto de información(Data Port) 34 Para almacenar una pausa 31 Para anular una estación usando la función de no molestar 27 Rediscado 21 Para cambiar el teléfono a un modelo Rediscado automático de número 2-9450 13 ocupado 21...
-
Page 95: Garantía Limitada
ARANTÍA LIMITADA Lo que cubre su garantía: • Defectos de materiales o de trabajo. Por cuánto tiempo después de la compra: • Un año, a partir de la fecha de compra. (El periodo de garantía para unidades arrendadas se inicia con la primera renta o 45 días de la fecha del embarque a la firma de arrendamiento, lo que ocurra primero). - Page 96 ATLINKS USA, Inc. 10330 North Meridian Street Modelo 29451 Indianapolis, IN 46290 15339430 (Rev. 3 E/S) © 2001 ATLINKS USA, Inc. 01-43 Trademark(s) ® Registered Impreso en China Marca(s) Registrada(s)