Table of Contents
Advertisement
Available languages
Available languages
BM 1619929H13 9-04
IMPORTANT:
Read Before Using
11318EVS
Call Toll Free
for Consumer Information
& Service Locations
1-877-BOSCH99 (1-877-267-2499) www.boschtools.com
For English
See page 2
9/22/04
2:19 PM
IMPORTANT :
Lire avant usage
Operating/Safety Instructions
Consignes de fonctionnement/sécurité
Instrucciones de funcionamiento y seguridad
Pour renseignement des
consommateurs et centres
de service, appelez au
numéro gratuit :
Parlez-vous français?
Voir page 10
Page 1
Leer antes de usar
IMPORTANTE:
Llame gratis para
obtener información
para el consumidor y
ubicaciones de servicio
¿Habla español?
Ver página 18
Advertisement
Table of Contents

Related Manuals for Bosch 11318EVS


Summary of Contents for Bosch 11318EVS
- Page 1 BM 1619929H13 9-04 9/22/04 IMPORTANT: Read Before Using Operating/Safety Instructions Consignes de fonctionnement/sécurité Instrucciones de funcionamiento y seguridad 11318EVS Call Toll Free for Consumer Information & Service Locations 1-877-BOSCH99 (1-877-267-2499) www.boschtools.com For English See page 2 2:19 PM Page 1...
-
Page 2: Power Tool Safety Rules
BM 1619929H13 9-04 9/22/04 Read and understand all instructions. Failure to follow all instructions WARNING listed below, may result in electric shock, fire and/or serious personal injury. Work Area Keep your work area clean and well lit. Cluttered benches and dark areas invite accidents. - Page 3 BM 1619929H13 9-04 9/22/04 Tool Use and Care Use clamps or other practical way to secure and support the workpiece to a stable platform. Holding the work by hand or against your body is unstable and may lead to loss of control. Do not force tool.
- Page 4 BM 1619929H13 9-04 9/22/04 operate this tool with one hand. This tool develops intense percussive forces during operation and you may lose control if attempting one hand operation. Position yourself to avoid being caught between the tool or side handle and walls or posts.
- Page 5 BM 1619929H13 9-04 9/22/04 IMPORTANT: Some of the following symbols may be used on your tool. Please study them and learn their meaning. Proper interpretation of these symbols will allow you to operate the tool better and safer. Symbol Name Volts Amperes Hertz...
-
Page 6: Functional Description And Specifications
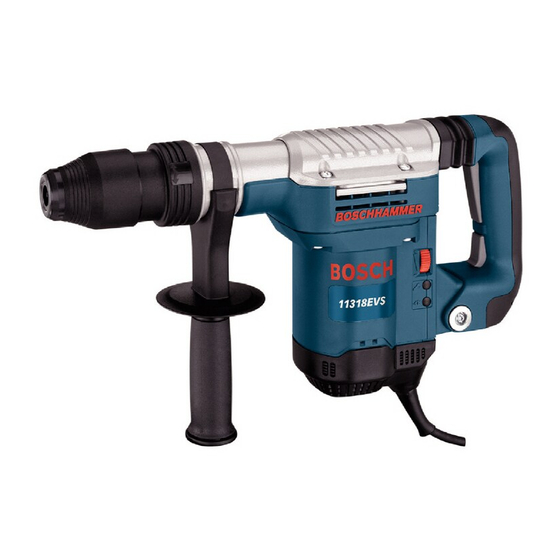
NOTE: For tool specifications refer to the nameplate on your tool. 2:19 PM Page 6 Demolition Hammer FIG. 1 VARIO-LOCK SELECTOR RING VARIABLE SPEED DIAL SERVICE REMINDER LIGHT POWER INDICATOR LIGHT 11318EVS SDS Max TRIGGER SWITCH TRIGGER RELEASE SWITCH AUXILIARY HANDLE... -
Page 7: Operating Instructions
BM 1619929H13 9-04 9/22/04 TRIGGER "ON-OFF" SWITCH To turn the tool “ON” squeeze and hold the trigger switch. To turn the tool “OFF”, release the trigger switch, which is spring loaded and will return to the “OFF” position automatically. Your tool is also equipped with a "Lock-ON" feature which allows continuous operation without holding the trigger. -
Page 8: Maintenance
BM 1619929H13 9-04 9/22/04 AUXILIARY HANDLE The tool must be supported with the auxiliary handle, which can be swiveled 360˚. To reposition and/or swivel the handle, loosen the hand grip, move the handle to the desired position along the barrel and securely retighten the hand grip. - Page 9 BM 1619929H13 9-04 9/22/04 Cleaning To avoid accidents always WARNING disconnect the tool from the power supply before cleaning or performing any maintenance. The tool may be cleaned most effectively with compressed dry air. Always wear safety goggles when cleaning tools with compressed air. Ventilation openings and switch levers must If an extension cord is WARNING...
-
Page 10: Règles De Sécurité Générales
BM 1619929H13 9-04 9/22/04 Vous devez lire et comprendre toutes les instructions. Le non-respect, même AVERTISSEMENT partiel, des instructions ci-après entraîne un risque de choc életrique, d'incendie et/ou de blessures graves. Aire de travail Veillez à ce que l'aire de travail soit propre et bien éclairée. - Page 11 BM 1619929H13 9-04 9/22/04 Utilisation et entretien des outils Immobilisez le matériau sur une surface stable au moyen de brides ou de toute autre façon adéquate. Le fait de tenir la pièce avec la main ou contre votre corps offre une stabilité insuffisante et peut amener un dérapage de l'outil.
- Page 12 BM 1619929H13 9-04 9/22/04 risquez d’en perdre le contrôle si vous le maniez d’une seule main. Placez-vous de manière à éviter d'être pris entre l'outil ou la poignée latérale et les murs ou les montants. Si l’embout vient à brider ou à se coincer dans l’ouvrage, la réaction de l’outil risque de vous écraser la main ou la jambe.
- Page 13 BM 1619929H13 9-04 IMPORTANT : Certains des symboles suivants peuvent être utilisés sur votre outil. Veuillez les étudier et apprendre leur signification. Une interprétation appropriée de ces symboles vous permettra d'utiliser l'outil de façon plus efficace et plus sûre. Symbole Volts Ampères Hertz...
-
Page 14: Description Fonctionnelle Et Spécifications
REMARQUE : Pour spécifications de l'outil, reportez-vous à la plaque signalétique de votre outil. 2:19 PM Page 14 Marteau de démolition FIG. 1 « VARIO-LOCK » MOLETTE DE VARIATION DE VITESSE INDICATEUR D’ENTRETIEN TÉMOIN DE MISE SOUS TENSION 11318EVS SDS Maxi. -14- INTERRUPTEUR À GÂCHETTE INTERRUPTEUR DE DÉGAGEMENT DE GÂCHETTE POIGNÉE... -
Page 15: Consignes De Fonctionnement
BM 1619929H13 9-04 9/22/04 GACHETTE DE COMMANDE Pour mettre l’outil en marche, serrez la gâchette de commande. Pour l’arrêter, relâchez tout simplement la gâchette. L’interrupteur, qui est à ressort, retournera automatiquement à la position d’arrêt. Votre outil est également équipé d'un dispositif de blocage ce qui permet le fonctionnement continu sans devoir tenir la gâchette. -
Page 16: Entretien
BM 1619929H13 9-04 9/22/04 POIGNÉE AUXILIAIRE La poignée auxiliaire, qui pivote sur 360°, doit être utilisée pour supporter l’outil. Pour repositionner et/ou faire pivoter la poignée, desserrez la manette, déplacez la poignée à la position désiré le long du cylindre, puis resserrez fermenment la manette. TÉMOIN DE MISE SOUS TENSION Quand vous branchez l’outil sur une alimentation électrique, le témoin de mise sous tension s’allume... - Page 17 BM 1619929H13 9-04 9/22/04 Nettoyage Pour éviter les accidents, AVERTISSEMENT il faut toujours débrancher l’outil avant de le nettoyer ou de l’entretenir. Le meilleur moyen de nettoyer l’outil est d’utiliser de l’air comprimé sec. Il faut toujours porter des lunettes de protection quand on utilise de l’air comprimé.
- Page 18 BM 1619929H13 9-04 9/22/04 Normas de seguridad para herramientas mecánicas Lea y entienda todas las instrucciones. El incumplimiento de todas las instrucciones ADVERTENCIA indicadas a continuación puede dar lugar a sacudidas eléctricas, incendios y/o lesiones personales graves. Area de trabajo Mantenga el área de trabajo limpia y bien iluminada.
- Page 19 BM 1619929H13 9-04 9/22/04 Utilice equipo de seguridad. Use siempre protección de los ojos. Se debe utilizar una máscara antipolvo, zapatos de seguridad antideslizantes, casco o protección de los oídos según lo requieran condiciones. Utilización y cuidado de las herramientas Utilice abrazaderas u otro modo práctico de fijar y soportar la pieza de trabajo a una plataforma estable.
- Page 20 BM 1619929H13 9-04 9/22/04 Use guantes con almohadillado grueso y limite el tiempo de exposición tomando frecuentes períodos de descanso. La vibración causada por la acción de martillo puede ser perjudicial para las manos y los brazos. No utilice brocas ni accesorios desafilados o dañados. Las brocas o accesorios desafilados o dañados pueden atascarse frecuentemente en la pieza de trabajo, causando una reacción de par motor.
- Page 21 BM 1619929H13 9-04 IMPORTANTE: Es posible que algunos de los símbolos siguientes se usen en su herramienta. Por favor, estúdielos y aprenda su significado. La interpretación adecuada de estos símbolos le permitirá utilizar la herramienta mejor y con más seguridad. Símbolo Nombre Volt...
-
Page 22: Descripción Funcional Y Especificaciones
2:19 PM Page 22 Martillo de demolición FIG. 1 ANILLA SELECTORA DE FIJACION VARIABLE DIAL DE VELOCIDAD VARIABLE LUZ RECORDATORIA DE SERVICIO LUZ INDICADORA DE ALIMENTACIÓN 11318EVS SDS Max -22- INTERRUPTOR GATILLO INTERRUPTOR DE LIBERACION DEL GATILLO MANGO AUXILIAR... -
Page 23: Instrucciones De Funcionamiento
BM 1619929H13 9-04 9/22/04 Instrucciones de funcionamiento INTERRUPTOR GATILLO “ON/OFF” (DE ENCENDIDO Y APAGADO) Para encender la herramienta (posición “ON”), apriete el interruptor gatillo. Para apagar la herramienta (posición “OFF”), suelte el interruptor gatillo que está accionado por resorte y volverá a la posición “OFF” automáticamente. -
Page 24: Mantenimiento
BM 1619929H13 9-04 9/22/04 ajustar, tire de la anilla selectora hacia adelante y sujétela firmemente, y luego gire tanto el accesorio como la anilla selectora hasta la posición deseada. Suelte la anilla selectora y gire el accesorio ligeramente hasta que éste quede fijo en su sitio. MANGO AUXILIAR La herramienta se debe sujetar con el mango auxiliar, el cual se puede girar 360°. - Page 25 BM 1619929H13 9-04 9/22/04 Limpieza Para evitar ADVERTENCIA desconecte siempre la herra- mienta de la fuente de energía antes de la limpieza o de la realización de cualquier mantenimiento. La herramienta se puede limpiar más eficazmente con aire comprimido seco. Use gafas de seguridad siempre que limpie herramientas con aire comprimido.
- Page 26 BM 1619929H13 9-04 9/22/04 2:19 PM Page 26 Notes: -26-...
- Page 27 BM 1619929H13 9-04 9/22/04 2:19 PM Page 27 Notes: -27-...
- Page 28 BM 1619929H13 9-04 9/22/04 LIMITED WARRANTY OF BOSCH PORTABLE AND BENCHTOP POWER TOOLS Robert Bosch Tool Corporation (“Seller”) warrants to the original purchaser only, that all BOSCH portable and benchtop power tools will be free from defects in material or workmanship for a period of one year from date of purchase. SELLER’S SOLE OBLIGATION AND YOUR EXCLUSIVE REMEDY under this Limited Warranty and, to the extent permitted by law, any warranty or condition implied by law, shall be the repair or replacement of parts, without charge, which are defective in material or workmanship and which have not been misused, carelessly handled, or misrepaired by persons other than Seller or Authorized Service Station.