Table of Contents
Advertisement
Quick Links
Advertisement
Table of Contents

Related Manuals for Siemens HK9K9V850M


Summary of Contents for Siemens HK9K9V850M
- Page 1 Free standing cooker HK9K9V850M [en]Instruction manual...
-
Page 3: Table Of Contents
Oven ........7 www.siemens-home.bsh-group.com and in the online shop www.siemens-home.bsh-group.com/eshops... -
Page 4: Intended Use
Intended use Children must not play with, on, or around the 8Intended use appliance. Children must not clean the appliance or carry out general maintenance R ead these instructions carefully. Only then unless they are at least 15 years old and are I n t e n d e d u s e will you be able to operate your appliance being supervised. -
Page 5: Important Safety Information
Important safety information Warning – Risk of burns! (Important safety The appliance becomes very hot. Never ■ information touch the interior surfaces of the cooking compartment or the heating elements. Always allow the appliance to cool down. G eneral information I m p o r t a n t s a f e t y i n f o r m a t i o n Keep children at a safe distance. - Page 6 Important safety information Warning – Risk of tipping! Warning – Hazard due to magnetism! Permanent magnets are used in the control panel or in the control elements. They may affect electronic implants, e.g. heart pacemakers or insulin pumps. Wearers of electronic implants must stay at least 10 cm away from the control panel.
-
Page 7: Causes Of Damage
Causes of damage Never place hot pots or pans on the control panel, ]Causes of damage ■ the display area or the surround. This may cause damage. Damage can occur if hard or pointed objects fall on H ob ■ C a u s e s o f d a m a g e the hob. -
Page 8: Installation And Connection
Installation and connection Splatter guard 5Installation and connection Open the packaging of the splatter guard and remove the protective film. M easures to be noted during transport Position the holes and place the splatter guard in I n s t a l l a t i o n a n d c o n n e c t i o n them. -
Page 9: Electrical Connection
Installation and connection Adjacent units Notes The mains plug fits the socket. Any adjacent units must not be made of flammable ■ The cable cross section is adequate. materials. The fronts of any adjacent units must be heat- ■ The earthing system is properly installed. resistant up to at least 90 °C. -
Page 10: Environmental Protection
Environmental protection Connecting the appliance to 3 phases 7Environmental protection For connection to 380-415 V with 3 phases + neutral (3N~), the phase connection must be changed. Y our new appliance is particularly energy-efficient. E n v i r o n m e n t a l p r o t e c t i o n Here you can find tips on how to save even more Use a 5 x 2,5 mm cable. -
Page 11: Getting To Know Your Appliance
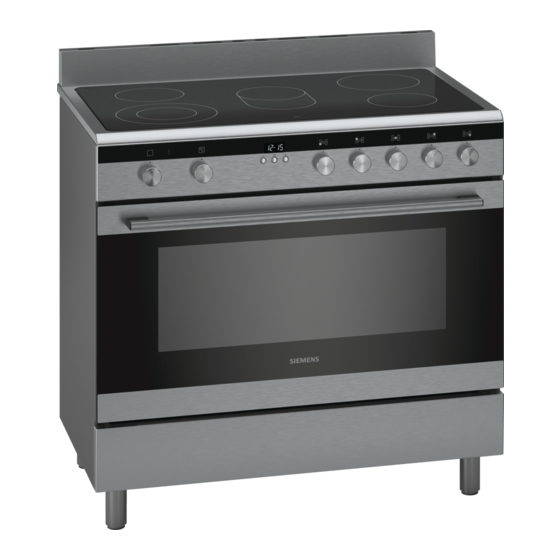
Getting to know your appliance Depending on the appliance model, individual Note: *Getting to know your details and colours may differ. appliance Individual details may differ depending on the appliance model. I n this chapter, we will explain the indicators and G e t t i n g t o k n o w y o u r a p p l i a n c e controls. -
Page 12: The Hob
Getting to know your appliance The hob The oven In order to operate the oven, you require two operating Warning – Risk of burns! knobs: The function selector and the temperature Hot air flows out from the ventilation opening on the selector. -
Page 13: Cooling Fan
Accessories Temperature selector _Accessories Use the temperature selector to set the temperature. Position Meaning Y our appliance is accompanied by a range of A c c e s s o r i e s accessories. Here, you can find an overview of the Û... -
Page 14: Before Using For The First Time
Before using for the first time KBefore using for the first 1Operating the appliance time Y ou have already learnt about the controls and how O p e r a t i n g t h e a p p l i a n c e they work. -
Page 15: Oven
Operating the appliance Oven Inserting the rotisserie spit Warning – Risk of burns! Operating the oven Never touch the hot surfaces of the cooking Switching on the oven compartment or the heating elements. Children must be kept at a safe distance from the appliance at all times. Always keep the appliance door closed when it is Note: Open the appliance door carefully. -
Page 16: Time-Setting Options
Time-setting options Removing the rotisserie spit OTime-setting options Warning – Risk of burns! Never touch the hot surfaces of the cooking S etting the clock T i m e - s e t t i n g o p t i o n s compartment or the heating elements. - Page 17 Time-setting options Semi-automatically programming the switch-off time Cancelling programming This function allows you to set the end of the cooking Pressing the "+" and "-" buttons at the same time for 2 time for your food. The oven will switch off automatically seconds will cancel any fully automatic or semi- at the end of the cooking time.
-
Page 18: Cleaning
Cleaning DCleaning Zone Cleaning agent Control panel Hot soapy water: Clean with a dish cloth and dry with a soft W ith good care and cleaning, your appliance will retain cloth. Do not use glass cleaner or glass scrap- C l e a n i n g its appearance and remain fully functioning for a long ers for cleaning. - Page 19 Cleaning Zone Cleaning agent Zone Cleaning agent Glass hob* Care: Protective/care products for glass Accessories Hot soapy water: Cleaning: Cleaning agents for glass. Soak and then clean with a dish cloth or a (depending on appli- Follow the cleaning instructions on the packag- brush.
-
Page 20: Surfaces In The Cooking Compartment
Cleaning Surfaces in the cooking compartment Detaching and refitting the rails The back wall and side parts in the cooking The rails can be removed for cleaning. The oven must compartment are self-cleaning. You can tell this from have cooled down. the rough surface. -
Page 21: Appliance Door
Appliance door Attaching the door qAppliance door Reattach the oven door in the reverse sequence to removal. W ith good care and cleaning, your appliance will retain A p p l i a n c e d o o r When attaching the oven door, ensure that both its appearance and remain fully functional for a long hinges are inserted straight into the opening... -
Page 22: Trouble Shooting
Trouble shooting technician. If repairs are required, contact the after- 3Trouble shooting sales service. Warning – Risk of injury! T r o u b l e s h o o t i n g Incorrect repairs may cause serious hazards. Repairs to the appliance must only be carried out by a qualified Fault table Fault... -
Page 23: Customer Service
Customer service 4Customer service O ur after-sales service is there for you if your appliance C u s t o m e r s e r v i c e needs to be repaired. We will always find an appropriate solution, also in order to avoid after-sales personnel having to make unnecessary visits. - Page 24 *9001281551* 9001281551 02049803...