Advertisement
Table of Contents
- 1 Table of Contents
- 2 Purpose of the Manual
- 3 Warnings, Precautions and General Notices for Performing Repairs
- 4 Instruments and Conventions for Performing Diagnosis and Repair, Assembling/Disassembling Instructions
- 5 Wiring and Connection Diagrams
- 6 Description of Diagnostic Indications
- 7 Set-Up Parameters
- 8 Description, Testing and Replacement of the Electronic Boards, Current Calibration
- 9 Available Spare Parts
- 10 Technical Specifications
- Download this manual
See also:
Instruction Manual
Advertisement
Table of Contents

Related Manuals for Selco Genesis 1100


Summary of Contents for Selco Genesis 1100
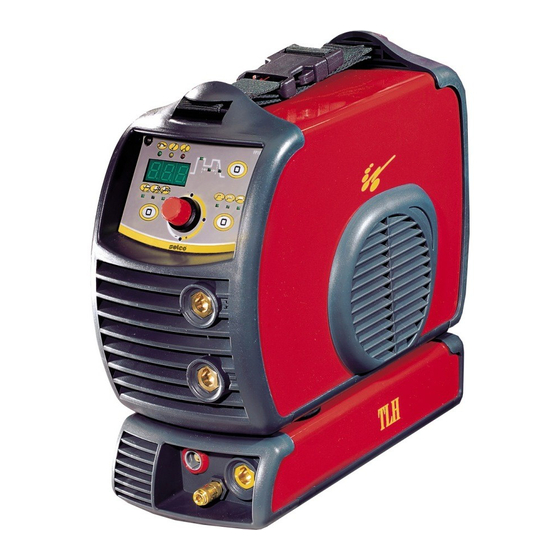
- Page 1 REPAIRS MANUAL Genesis 1100 Genesis 1500 Genesis 1500 TLH...
-
Page 2: Table Of Contents
Via Palladio, 19 I - 35010 ONARA DI TOMBOLO (Padova) Italy Tel. +39 049 9413111 Fax +39 049 9413311 e-mail: info@selco.it How to contact Selco Service Department: SELCO s.r.l. Service Department c/o SELCO 2 Via Macello, 61 I - 35010 CITTADELLA (Padova) Italy Tel. -
Page 3: Purpose Of The Manual
In order to avoid serious injury to persons or damage to things, this manual must be used only by qualified technicians. Selco S.r.l. accepts no liability for any injury to persons or dama- ge to things that may occur during performance of repairs, even after reading or practical application of this manual. -
Page 4: Warnings, Precautions And General Notices For Performing Repairs
2) WARNINGS, PRECAUTIONS AND GENERAL NOTI- Moving parts: CES FOR PERFORMING REPAIRS CAUTION ! Keep your hands well away from the fan when the machine is connected to the power Repairs must be performed by qualified personnel only. supply. Ensure that the machine is unplugged and that the fan is at a standstill before replacing it. -
Page 5: Instruments And Conventions For Performing Diagnosis And Repair, Assembling/Disassembling Instructions
3) INSTRUMENTS AND CONVENTIONS FOR PERFOR- 3.3) Conventions MING DIAGNOSIS AND REPAIR, ASSEMBLING/DISAS- By convention, when a measurement has to be taken between SEMBLING INSTRUCTIONS two points, for example a b , the arrow point indicates where to apply the red tip of the multimeter (a),while the black 3.1) Instruments for basic diagnosis tip is applied at the other end (b). - Page 6 3.4) Assembling/disassembling instructions Removing of the metal cover is required in order to reach internal parts of the power source. To remove the wraparound: remove the four screws as in fig.1, open slightly the rear plastic panel, remove the metal cover. To reach internal part of TLH MODULE (only 1500TLH), remove also the two screws and the gas-hose holder from rear plastic panel (see fig.
- Page 7 4) DESCRIPTION OF OPERATION OF THE POWER SOURCES (BLOCK DIAGRAMS) 4.1) GENESIS 1100 (Fig. 3) GENESIS 1100 a) Master switch b) Varistor c) EMI input filter d) Input rectifier e) DC link capacitor f) Zero Voltage Switching Phase Shifted Full Bridge Inverter...
- Page 8 4.2) GENESIS 1500/1500TLH (Fig. 4) GENESIS 1500/1500 TLH a) Master switch b) Varistor c) EMI input filter d) Input rectifier e) DC link capacitor f) Zero Voltage Switching Phase Shifted Full Bridge Inverter g) Primary current transformer h) Power transformer Output rectifier Voltage doubler k) Shunt...
-
Page 9: Wiring And Connection Diagrams
5) WIRING AND CONNECTION DIAGRAMS Wiring and connection diagrams... - Page 10 Wiring and connection diagrams...
- Page 11 Wiring and connection diagrams...
-
Page 12: Description Of Diagnostic Indications
The Genesis 1100, 1500 and 1500 TLH series automatically compensates for the variations in power supply voltage, which means that variations of ±15% with respect to the rated power supply voltage produce negligible variations in the welding current. - Page 13 6.2) Genesis 1500 TLH diagnostic indications Fig. 10 “GENESIS 1500 TLH” The microprocessor on the mainboard controls the status of the equipment and communicates it to the operator via the leds and the display on the panel. Power supply led (GREEN) Indicates the machine on status.
-
Page 14: Set-Up Parameters
7) SET-UP PARAMETERS [ONLY FOR G1500 TLH] The settings of the G1500 TLH front panel are incremented by those present inside the set-up, which is accessed as follows (see also figure 10 in sec. 6.2): - Switch the equipment on. - The machine performs an autotest, during which only the green power supply led remains on, the display shows "150"... - Page 15 TIG PROCEDURE Param. Description/meaning Range Pre-set Save changes and quit Set Up. Reset of user parameters [RESET]. Pre-gas time. 0.0 - 25.0s Initial current in absolute value or as a percentage of welding current (see 0 - 500 also parameter n°4). Reference scale of initial current, in absolute value [A] or as a percenta- 0 = A ge of welding current [%].
-
Page 16: Description, Testing And Replacement Of The Electronic Boards, Current Calibration
8) DESCRIPTION, TESTING AND REPLACEMENT OF THE ELECTRONIC BOARDS, CURRENT CALIBRATION The following sections illustrate the normal working conditions of the boards making up the power source and provide the standard values of the electrical quantities that can be identified at the main points of the boards. All the measurements indicated can be taken with a digital multimeter. - Page 17 8.1) Genesis 1100 The Genesis 1100 power source consists of the following boards (see also sec. 5.1): - 15.14.32901 CAPACITOR PC-BOARD - 15.14.334 MAIN/POWER PC-BOARD - 15.14.335 FRONT PANEL BOARD - 15.14.330 VOLTAGE DOUBLER PC-BOARD [in common with Genesis 1500 / 1500 TLH] - 15.14.306...
- Page 18 Description, testing and replacement of the electronic boards, current calibration Unless specified otherwise, all the measurements must be taken with the boards fitted, together with their connections!
- Page 19 Description, testing and replacement of the electronic boards, current calibration Unless specified otherwise, all the measurements must be taken with the boards fitted, together with their connections!
- Page 20 8.1.2.2) Instructions for replacement of the mainboard (fig. 13) - Components sensitive to electrostatic discharges! - Component fixing screw tightening torques: - POWER MODULE HEAT-SINK = MAX 2.2 N x m / 19 lb x in - POWER MODULE BOARD = MAX 0.2 Nx m / 1.7 lb x in - BOARD 15.14.350 DIODE...
- Page 21 8.1.2.3) Instructions for replacement of the secondary diode (fig. 14) To replace secondary power rectifier in G1100, order “Replacement kit” code 73.12.003. For G 1500-G 1500 TLH order “Replacement kit” code 73.12.004. Notes: “replacement kit” contains a diode module and a thermal interface 73.12.003 and 73.12.004 replacement kits contain substantially different diode modules! thermal grease can be ordered in single 80gr.
- Page 22 8.1.3) Panel 15.14.335 and current calibration in the G1100 (Fig. 15) The panel provides the interface between the operator and the machine. It is a simple passive board, without logic circuitry. The potentiometer P3 allows you to vary the current set. For the meaning of the two leds, refer to the previous section 6.1.
- Page 23 8.1.4) Voltage doubler board 15.14.330 [in common with Genesis 1500 / 1500 TLH] (Fig. 16) This board doubles the output voltage to optimise dynamic control of the arc and to ensure excellent arc striking in all welding con- ditions. Functional part Power source Component Test point...
- Page 24 8.1.5) Output filter board 15.14.306 [in common with Genesis 1500 / 1500 TLH] (Fig. 17) This board performs a filtering action for EMC purposes on the secondary (as the input board does on the primary - see section 8.1.1) and also filters control of the torch button from any interferences due to the HF in the model Genesis 1500 TLH. Due to the possible interferences generated by the HF stage, in particular in the model Genesis 1500 TLH, it is important to ensure earth connection of the wire from PZ1! Description, testing and replacement of the electronic boards, current calibration...
- Page 25 - 15.14.331 FRONT PANEL BOARD - 15.14.330 VOLTAGE DOUBLER PC-BOARD [in common with Genesis 1100 / 1500 TLH] - 15.14.306 OUTPUT FILTER PC-BOARD [in common with Genesis 1100 / 1500 TLH] Note: from the above it can be seen that the Genesis 1500 differs from the Genesis 1500 TLH due to the different panel and lack of the TLH module.
- Page 26 Description, testing and replacement of the electronic boards, current calibration Unless specified otherwise, all the measurements must be taken with the boards fitted, together with their connections!
- Page 27 Description, testing and replacement of the electronic boards, current calibration Unless specified otherwise, all the measurements must be taken with the boards fitted, together with their connections!
- Page 28 Description, testing and replacement of the electronic boards, current calibration Unless specified otherwise, all the measurements must be taken with the boards fitted, together with their connections!
- Page 29 8.2.2.2) Instructions for replacement of the mainboard of the G1500 For replacement of the mainboard of the G1500 the instructions are the same as those already seen for the G1100 (see previous sec. 8.1.2.2). 8.2.2.3) Instructions for replacement of the secondary diode of the G1500 For replacement of the secondary diode of the G1500, the instructions are the same as those already seen for the G1100 (see pre- vious sec.
- Page 30 For the meaning of the two leds, refer to the previous section 6.1. 8.2.4) Voltage doubler board 15.14.330 [in common with Genesis 1100 / 1500 TLH] This board is in common with the G1100, and you should therefore refer to the previous sec. 8.1.4.
- Page 31 SECONDARY RECTIFIER FILTER BOARD [in common with Genesis 1500] - 15.14.305 FRONT PANEL BOARD - 15.14.330 VOLTAGE DOUBLER PC-BOARD [in common with Genesis 1100 / 1500] - 15.14.306 OUTPUT FILTER PC-BOARD [in common with Genesis 1100 / 1500] - 15.14.311 HF PC-BOARD...
- Page 32 Description, testing and replacement of the electronic boards, current calibration Unless specified otherwise, all the measurements must be taken with the boards fitted, together with their connections!
- Page 33 Description, testing and replacement of the electronic boards, current calibration Unless specified otherwise, all the measurements must be taken with the boards fitted, together with their connections!
- Page 34 Description, testing and replacement of the electronic boards, current calibration Unless specified otherwise, all the measurements must be taken with the boards fitted, together with their connections!
- Page 35 CAUTION: the following procedure applies only to the power sources with "u09" software version (to identify the software version, see previous sec. 7). For power sources with the previous version, calibration can be performed only by Selco Service! Although the spare parts are accurately calibrated during manufacturing, if the mainboard or shunt are replaced, it may be neces- sary to re-calibrate the current delivered by the power source.
- Page 36 8.3.3) Panel board 15.14.305 (Fig. 21) The panel provides the interface between the operator and the machine. It is a simple passive board, without logic circuitry. The encoder SW3 allows you to vary the parameter shown at that moment on the display. For the meaning of the three diagnostic leds L1, L2 and L3, refer to the previous sec.
- Page 37 8.3.4) Voltage doubler board 15.14.330 [in common with Genesis 1100 / 1500 TLH] This board is in common with the G1100, and you should therefore refer to the previous sec. 8.1.4. 8.3.5) Output filter board 15.14.306 [in common with Genesis 1100 / 1500 TLH] This board is in common with the G1100, and you should therefore refer to the previous sec.
- Page 38 8.3.6.1) HF board 15.14.311 This board is enclosed within the TLH module and performs the TIG HF functions (gas solenoid valve, torch button interface, HF striking). The board also contains a separate auxiliary power supply for isolation of the logic circuitry (e.g. the microprocessor in the main- board 15.14.304) from circuits subject to potentially damaging voltages (e.g.
- Page 39 Description, testing and replacement of the electronic boards, current calibration Unless specified otherwise, all the measurements must be taken with the boards fitted, together with their connections!
-
Page 40: Available Spare Parts
9) AVAILABLE SPARE PARTS (Fig. 23) 55.02.022 GENESIS 1100 1x230V POS. DESCRIPTION CODE RIF. Q.TY CONF. NOTES Kit plastics 74.90.010 Silk-screen panel 03.07.109 Planar transformer 05.02.027 Switch 09.04.101 Fixed socket 10.13.010 Shunt 11.20.060 Kit diodes (with diode and thermic interface) 73.12.003... - Page 41 (Fig. 24) 55.02.030 GENESIS 1500 1x230V POS. DESCRIPTION CODE RIF. Q.TY CONF. NOTES Kit plastics 74.90.010 Silk-screen panel 03.07.103 Planar transformer 05.02.027 Switch 09.04.101 Fixed socket 10.13.010 Shunt 11.20.060 Kit diodes (with diode and thermic interface) 73.12.004 14.70.041 Main board (with board, power module and thermic interface) 15.14.3043 Output filter board...
- Page 42 (Fig. 25) 55.07.030 GENESIS 1500 TLH 1x230V GENESIS 1500 TLH 55.07.030 POS. DESCRIPTION CODE RIF. Q.TY CONF. NOTES External plastic elements kit 74.90.013 Silk-screen panel 03.07.103 Planar transformer 05.02.027 Switch 09.04.101 Fixed socket 10.13.010 Shunt 11.20.060 Kit diodes (with diode and thermic interface) 73.12.004 14.70.041...
-
Page 43: Technical Specifications
10) TECHNICAL SPECIFICATIONS Technical specifications...
Need help?
Do you have a question about the Genesis 1100 and is the answer not in the manual?
Questions and answers