Epson TM-U220 Reference Manual
Hide thumbs
Also See for TM-U220:
- User manual (197 pages) ,
- Service manual (102 pages) ,
- Product information manual (7 pages)
Table of Contents
Advertisement
Quick Links
Advertisement
Table of Contents

Related Manuals for Epson TM-U220


Summary of Contents for Epson TM-U220
- Page 1 TM-U220 Technical Reference guide English EPSON Rev. E 404455405...
- Page 2 ❏ Neither Seiko Epson Corporation nor its affiliates shall be liable to the purchaser of this product or third parties for damages, losses, costs, or expenses incurred by the purchaser or third parties as a result of: accident, misuse, or abuse of this product or unauthorized modifications, repairs, or alterations to this product, or (excluding the U.S.)
-
Page 3: About This Manual
TM-U220 Technical Reference Guide About This Manual Aim of the Manual This manual was created to provide information on the TM-U220 printer for anyone who is developing hardware, installations, or programs. Programmers will also want to consult other documents. Contents of the Manual Chapter 1, “General Information.”... - Page 4 This is a OCX driver EPSON OPOS ADK Manual This provides information for anyone who is programming using OPOS. This is included in the EPSON OPOS ADK EPSON Advanced Printer Driver This is a Windows driver EPSON Advanced Printer Driver Manual...
-
Page 5: Safety Precautions
EMC and Safety Standards Applied Product Name: TM-U220A / TM-U220B / TM-U220D Model Name: M188A / M188B/ M188D The following standards are applied only to the printers that are so labeled. (EMC is tested using the EPSON’s power supply.) Europe: CE marking Safety: TÜV (EN 60950) -
Page 6: Fcc Compliance Statement For American Users
FCC Compliance Statement For American Users This equipment has been tested and found to comply with the limits for a Class A digital device, pursuant to Part 15 of the FCC Rules. These limits are designed to provide reasonable protection against harmful interference when the equipment is operated in a commercial environment. - Page 7 Shut down your equipment immediately if it produces smoke, a strange odor, or unusual noise. Continued use may lead to fire or electric shock. Immediately unplug the equipment and contact your dealer or a Seiko Epson service center for advice. ❏...
- Page 8 CAUTION: ❏ Do not connect cables other than as described in this manual. Different connections may cause equipment damage and burning. ❏ Be sure to set this equipment on a firm, stable, horizontal surface. Product may break or cause injury if it falls. ❏...
-
Page 9: Table Of Contents
1.2.3 Related materials for TM-U220 ........1-3... - Page 10 3.5.1.1 Install and Set up......... 3-30 3.5.1.2 Package contents of EPSON OPOS ADK..... 3-33 3.5.2 Advanced Printer Driver (APD) .
- Page 11 TM-U220 Technical Reference Guide 4.3 Autocutter Jam ........... . . 4-3 4.4 Printer Stops Printing / Printer Repeats Printing on a Line .
- Page 12 B.2.2 TM-U220 (Type D) ........
- Page 13 TM-U220 Technical Reference Guide Appendix C Character Code Table C.1 Page 0 (PC437: USA, Standard Europe) ....... C-1 C.2 Page 1 (Katakana) .
- Page 14 Rev. E xiii...
-
Page 15: Chapter 1 General Information
General Information 1.1 Features The TM-U220 is a POS printer that can print receipt paper (paper roll). The TM-U220 is designed to be compatible with existing systems built around a TM-U210. 1.1.1 General ❏ Compact and lightweight. ❏ 3 model types are provided. (See “Printer types” (page 1-2)) ❏... -
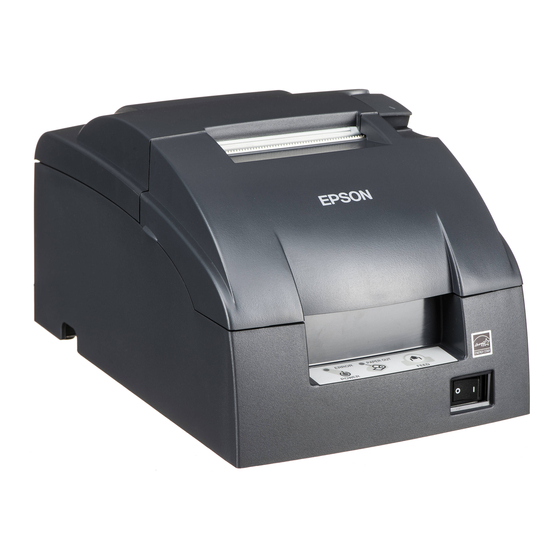
Page 16: Product Structure
1.2 Product Structure 1.2.1 Printer types TM-U220 has 3 model types: A, B, D. The features are as following. Type A Type B Type D Two color printing Autocutter Take up device paper width (mm) 76/ 69.5/ 57.5 76/ 69.5/ 57.5... -
Page 17: Related Materials For Tm-U220
Please contact your dealer to get these. Note: When you are using the TM-U220 with the “AC Adapter C“ power unit, which is packed in the carton box of Alphanumeric model, the DM-D series can’t get power from the TM-U220. If you want to provide power from the TM-U220 to a DM-D, you have to use “PS-180.“... -
Page 18: Consumables
1.3.1 Ribbons This printer needs a ribbon cassette to print receipts. We provide 3 ribbon cassettes: ❏ EPSON ribbon cassette, ERC-38 (B) (Life: 3,000,000 characters / Color: Black) ❏ EPSON ribbon cassette, ERC-38 (P) (Life: 4,000,000 characters / Color: Purple) ❏... -
Page 19: Product Specifications Overview
User NV memory: 8KB Power supply Power supplied by included AC adapter ANK model: AC Adapter.C or PS-180 (option) Multilingual model: PS-180 Operating voltage 24 VDC ± 7% (optional power supply: EPSON PS-180) Power Operating:Mean: Alphanumeric model: Approximately 31W consumption Multilingual* model:... -
Page 20: Printing And Paper Specifications
1.5 Printing and paper Specifications Printing method: Serial impact dot matrix 9-pin serial configuration Head wire configuration: Printing direction: Bidirectional printing (logic seeking) Print speed: *1 Approximately 4.7 lps (printing 40 columns per line at 16 cpi) Approximately 6.0 lps (printing 30 columns per line at 16 cpi, with 1/8" line spacing) (except data transmission and processing time) Paper width:... -
Page 21: General Information
TM-U220 Technical Reference Guide The dot width of the printable area depends on DIP switch setting and paper width as shown in the following table. Dot width of Printable area Paper width DIP SW2-1 setting 76 mm 385 half dots 400 half dots 69.5 mm... -
Page 22: Autocutter (For Type A / B)
1.5.1 Autocutter (for Type A / B) Cutting method: By separated-blade scissors ❏ Partial cut (one point left uncut) (standard factory settings) Cutting type: ❏ Full cut (completely cut off) (optional factory setting) Note: It is recommended to feed approximately 2.116 mm or more in advance before printing to prevent dot displacement after cutting. -
Page 23: Paper Specifications
TM-U220 Technical Reference Guide 1.5.2.1 Paper Specifications Paper feeding method: Friction feed Paper feed interval: Initial setting: Approximately 4.23mm {1/6"} Can be set in units of approximately 0.18mm {1/144"} by ESC/POS command Paper feed speed: 30 lps (approximately 4.99" /s) -
Page 24: Printable Area
1.5.2.2 Printable Area Cutting position (manual cutter) (Type A, B) Cutting position (autocutter) (Type A, B) Cutting position (manual cutter) (Type D) 34.9 22.1 (6.8) (5.8) 63.4 Maximum 200dots, 400 positions [Units: mm] Printable area for 76mm width paper 1-10 General Information Rev. - Page 25 TM-U220 Technical Reference Guide Cutting position (manual cutter) (Type B) Cutting position (autocutter) (Type B) Cutting position (manual cutter) (Type D) 34.9 22.1 (6.7) (5.8) Maximum 180 dots, 360 positions [Units: mm] 69.5 Printable area for 69.5mm width paper Rev. E...
-
Page 26: Other Specifications
[Units: mm] 57.5 Printable area for 57.5mm width paper 1.6 Other Specifications 1.6.1 EMI and Safety Standards Applied 1.6.1.1 Printer (TM-U220) EMC is Tested Using the EPSON’s AC adapter. Europe: CE Marking Directive 89/336/EEC EN55022 Class B EN55024 IEC 61000-4-2... -
Page 27: Ac Adapter C (Packaged In Ank Model)
Safety Standards: UL1950-2TH-D3 C-UL Japan: EMI: VCCI Class 1 Safety Standards: Electrical Appliance and Material Control Law of Japan. This unit meets EMI and EMC Standards, whether or not it is connected to an EPSON product. Rev. E General Information 1-13... -
Page 28: Reliability
Wearout and Random Failures up to the life of 7.5 million lines. Print head life: 150 million characters (using an average of 2 dots/wire per character). (The printing pattern is EPSON test pattern). 800,000 cuts Autocutter life: End of life is defined as the point at which the printer reaches the beginning of the wearout period. -
Page 29: Installation
TM-U220 Technical Reference Guide Vibration resistance: When packed: Frequency: 5 to 55 Hz Acceleration: 19.6m/s {2 G} Sweep: 10 minutes (half cycle) Duration: 1 hour Directions: x, y, and z No external or internal damage should be found after the vibration test, and the unit should operate normally. -
Page 30: External Dimensions And Mass
Type D 160 mm 138.5 mm 248 mm Approximately 2.5 kg {Approximately 6.3"} {Approximately 5.5"} {Approximately 9.8"} {5.1 lb} (All the numeric values are typical.) Color: EPSON standard color (ECW, EDG) 1.7.1.1 Overview (Type A) 1-16 General Information Rev. E... -
Page 31: Overview (Type B)
TM-U220 Technical Reference Guide 1.7.1.2 Overview (Type B) Rev. E General Information 1-17... -
Page 32: Overview (Type D)
1.7.1.3 Overview (Type D) 1-18 General Information Rev. E... -
Page 33: Chapter 2 System Planning
VisualBasic. This makes it possible to have bi-directional communication with the TM printer under the Windows standard printer driver environment. Note: The statusAPI is the API for controlling the printer, which is supplied exclusively by EPSON. Using this enables obtaining printer status and transmitting ESC/POS commands. Rev. E... -
Page 34: Epson Advanced Printer Driver Components
The following manuals can be installed: • Driver: User’s Manual • Status API: Reference Manual 2.1.1.3 EPSON Advanced Printer Driver Support Environment ❏ Supported interfaces • Serial, Parallel, USB, Ethernet ❏ Supported Operating Systems Please refer to the Installation Guide included with the driver package. -
Page 35: Epson Opos Adk
When developing an OPOS confirmed application, use the following control methods. EPSON OPOS ADK has the following features. ❏ EPSON OPOS ADK supports not only the OPOS Control (CO + SO) proposed by the OPOS committee but also totally supports the OPOS application development environment such... -
Page 36: Epson Opos Adk Contents
Logs for device status (acquires causes for offline and errors in devices) 2.1.2.2 EPSON OPOS ADK Contents Any installer later than EPSON OPOS ADK Ver2.10 supports the silent install function that can install the OPOS environment without a user interface, which offers easier installation. With this installer, OPOS Control for EPSON devices that are compatible with OPOS, manuals, utilities and sample programs described below can be installed. -
Page 37: Epson Opos Adk Supported Environment
2.1.3 ESC/POS Command Print/control by ESC/POS commands is direct control for TM printers using the ESC/POS commands proposed by EPSON. Sending ESC/POS commands to the printer from an application enables direct control of the printer. For the detailed information regarding the ESC/POS commands, contact the dealer where you purchased the product. -
Page 38: Connection Form And Cables
2.2 Connection Form and Cables 2.3 Serial Connection When the TM printer is connected to the host PC with a serial interface, the following connection forms are possible: • Stand alone • Y-connection • Pass-through connection Connections for usable serial cross cables are as follows: The type of cable that should be used depends on the operation and the handshake method for the TM printer. -
Page 39: Stand Alone
(*) When RTS/CTS control is used between the TM and DM. Note: When you would like to provide power from TM-U220 to a DM-D, you have to use “PS-180.“ The “AC Adapter C” can’t provide power to a DM-D. You need to use the UB-S09 interface when you use a modular connector. -
Page 40: Pass-Through Connections
2.3.3 Pass-through connections The TM printer is connected to the customer display (DM-D) via a serial port, and the DM-D is connected to the host PC via a serial port. Note: On the DM-D (DM-D500 etc...) which has a DIP switch to select Y-type connection, confirm that the DIP switch has been set to “Y-type connection: Disable.”... -
Page 41: Usb Connection
UB-U01II, use a self powered USB HUB as shown in the above figure. When you would like to provide power from TM-U220 to a DM-D, you have to use “PS-180.“ The “AC Adapter C” can’t provide power to a DM-D. -
Page 42: Ethernet Connection
TM printer. We provide the IP address setup utility“EPSON TMNet WinConfig,” for setting the IP address of the Ethernet model TM printer on the host PC. Please contact EPSON or your dealer about “EPSON TMNet WinConfig” and the procedure for installing. -
Page 43: Chapter 3 Setup
TM-U220 Technical Reference Guide Chapter 3 Setup 3.1 Part Name and Basic Operation 3.1.1 Part name unit (Type A only) roll paper cover ribbon casette cover manual cutter power switch control panel This figure is Type A. 3.1.1.1 Connectors WARNING: Do not connect a telephone line to the drawer kick-out connector or the display module connector;... -
Page 44: The Control Panel
You can connect up to four cables to the printer. They all connect to the connector panel (on the bottom rear of the printer), which is shown below. interface connector power supply drawer kick-out connector connector Note: This illustration shows the serial interface model. The other interface connector looks slightly different. 3.1.2 The Control Panel The control panel is shown below. -
Page 45: Control Panel Buttons
TM-U220 Technical Reference Guide PAPER OUT The roll paper near end (*1) or real end is detected. Off: Paper is loaded (normal condition). Flashing: Self-test waiting state for test print. Note: The roll paper near-end sensor is available as an factory option. If the printer is not equipped with the roll paper See “Adjusting Position of Roll... -
Page 46: Setup Flow
3.2 Setup Flow You have to set up your printer to use it. And you can adjust some features by customizing them. This section describes the setup. The set up flow of preparing to use printer is below. 1. Printer set up ❏... - Page 47 TM-U220 Technical Reference Guide Note: When you use OPOS (OCX driver from EPSON) or the Advanced Printer Driver, you need to install the driver. When you use ESC/POS commands, you don’t have to install drivers. For information on these drivers, see “Control Method” (page 2-1) and “Install a Printer Driver in the Host PC / POS Terminal”...
-
Page 48: Printer Setup
3.3.1 Installing or Replacing the Ribbon Cassette EPSON recommends the use of genuine EPSON ribbon cassettes. Ribbon cassettes not manufactured by EPSON may cause damage to your printer that is not covered by EPSON’s warranties. To install the ribbon cassette for the first time or to replace a used ribbon, follow the steps below: 1. -
Page 49: Installing The Roll Paper
TM-U220 Technical Reference Guide 3.3.2 Installing the Roll Paper The installing procedure is little different between Type A and Type B, D. CAUTION: Be sure to use roll paper that meets the specifications. Be sure not to touch the manual cutter. Otherwise your fingers might be injured. -
Page 50: Installing Rhe Roll Paper For Type B, D
3.3.2.1 Installing rhe Roll Paper for Type B, D 1. Using scissors, cut the leading edge of the roll paper, as shown in the left figure. 2. Turn on the printer and open the roll paper cover by using the tab, as shown in the left. -
Page 51: Installing The Roll Paper For Type A
TM-U220 Technical Reference Guide 3.3.2.2 Installing the Roll Paper for Type A 1. Using scissors, cut the leading edge of the roll paper, as shown in the left figure. 2. Turn on the printer and open the roll paper cover by using the tab, as shown in the left. - Page 52 4. Insert the roll paper, as shown in the left. Note: Note the direction the paper comes off the roll, as shown in following When using 2-ply roll paper, be sure that the top and bottom sheets are aligned at the paper exit. See below illustration.
- Page 53 TM-U220 Technical Reference Guide 8. Close the unit, as shown in the left illustration. 9. Insert the end of the bottom paper (journal paper) into the paper take-up spool, as shown in following. 10. Insert the paper take-up spool in the printer.
-
Page 54: Replacing The Roll Paper
Note: Since the printer does not feed even if the roll paper cover is open when the printer is turned off, make sure not to pinch the paper when the cover is closed. Do not open the roll paper cover during printing or paper feeding. When using the printer, be sure to cut the roll paper with the manual cutter after paper feeding is complete. -
Page 55: Connecting The Power Supply Unit
Chinese, Traditional Chinese, Thai characters, or Korean characters. WARNING: Make sure you use the AC Adapter C or EPSON PS-180 power supply or equivalent. Don’t use the PA-#### or PB-#### power supply unit with TM-U220. Using an incorrect power supply may cause fire or electrical shock. -
Page 56: Adjusting Various Settings
3. Plug the power supply cord into the connector shown below. Power supply connector Note: To remove the DC cable connector, make sure the power supply’s power cord is unplugged; then grasp the connector and pull it straight out. When you connect the power supply unit to the printer, we recommend to do a self test to confirm the operation. -
Page 57: Adjusting The Dip Switches
TM-U220 Technical Reference Guide 3.4.2 Adjusting the DIP Switches The printer has two sets of DIP switches. The function of the DIP switches is different for each interface model. If you need to change settings, follow the steps below to make your changes:... - Page 58 Parallel / USB / Ethernet model (Except serial) (DIP Switch 1) (DIP Switch 2) Function SW Function Auto line feed Enabled Disabled Print column selection 42/35 40/33 Receive buffer 40 bytes 4 KB Reserved Type A, B Type D capacity (Auto cutter enable/ Fixed to On Fixed to Off...
-
Page 59: Notes For Dip Switch 2-1
When you use OPOS or APD, generally you don’t need to adjust memory switch because OPOS or APD are able to set these items automatically. When you replace a TM-U210 with a TM-U220, you should adjust the Msw 8-5 to OFF. Rev. E... - Page 60 / close" in each status that is transmitted from the printer is changed every time the roll paper cover is open or closed. When you replace a TM-U210 with a TM-U220, you should adjust the Msw 8-5 to Off.
-
Page 61: Memory Switch Setup Mode
TM-U220 Technical Reference Guide Note: These setting can be set by “Memory switch setup mode.“ See “Memory Switch Setup Mode” on page 3- See “Adjusting Roll paper width” (page 3-24) also to adjust roll paper width. Serial communication Function Selectable value... -
Page 62: Starting The Memory Switch Setup Mode
3.4.4.1 Starting the memory switch setup mode Use the following procedure to start the memory switch setup mode. 1. Open the roll paper cover. 2. Turn the power on while pressing the paper FEED button. 3. Press the FEED button twice while POWER, ERROR, and PAPER OUT LEDs are lit. 4. -
Page 63: Operating Procedure
TM-U220 Technical Reference Guide 3.4.4.3 Operating procedure The procedures used for this process are described below. Entering Memory Switch Setting Mode 1. Open the paper roll cover and turn the power on while pressing the paper FEED button. 2. Press the paper FEED button twice while POWER, ERROR, and PAPER OUT LED are lighting. - Page 64 Selecting individual settings ❏ Basic serial interface setting To select transmission conditions, first choose “Serial interface settings”; then select “Data length, handshake, or parity.” Press the FEED button the number of times required to select the desired “Serial interface settings” used for transmission conditions. Press FEED button Setting selected 0 ~ 3 times:...
-
Page 65: Paper Width Setting
TM-U220 Technical Reference Guide ❏ Receive buffer full release condition Press the FEED button the number of times required to select the desired receive buffer full release condition setting. Press FEED button Receive buffer full release condition 0 times: No change... -
Page 66: Adjusting Roll Paper Width
3.4.5 Adjusting Roll paper width The TM-U220 accommodates 76 mm {3"},69.5 mm {2.74"}, 57.5 mm {2.26"} wide paper rolls. Note: When you use a near-end detector equipped model, be sure not to pinch the lead wires of the near-end detector between the roll paper guide and the roll paper holder, and to push the lead wires inside so that the lead wire of the paper-end detector does not contact the motor gear. -
Page 67: Adjusting Position Of Roll Paper Near End Detector
TM-U220 Technical Reference Guide 5. Tighten the spacer with two screws included with the guide. (See figure above.) 6. Set the memory switch (customize value) for the paper width. (See “Memory Switches” (page 3-17)) 3.4.6 Adjusting Position of Roll Paper Near End Detector Below are two reasons for the roll paper to require an NE detector adjustment. -
Page 68: Connecting The Printer To The Host Pc / Pos Terminal
3.4.7 Connecting the Printer to the Host PC / POS Terminal All cables are connected to the connector panel located on the lower rear side of the printer. Drawer kick connector Interface connector Power supply connector Connector panel Note: The figure above shows the connector panel for the serial interface model printer. The shape of the interface connector varies according to the type of interface used. -
Page 69: Serial Interface Model
TM-U220 Technical Reference Guide 3.4.7.1 Serial Interface model Before connecting any of the cables, make sure that both the printer and the host PC are turned off. 1. Plug the cable connector securely into the printer’s interface connector. 2. If the cable connector has screws on it, tighten the screws on both sides of the connector. - Page 70 (A UB-U02II can be directly connected to a UB-U01 hub.) 5. Install the UB-U01II/02II device driver on the host computer. Note: For information on how to obtain the required device drivers and their installation procedures, contact the nearest EPSON service center. 3-28 Setup Rev. E...
-
Page 71: Ethernet Interface
TM-U220 Technical Reference Guide 3.4.7.4 Ethernet interface The following view shows the part names of the UB-E01. Switch 10BASE-T Ethernet LED (green) LED (red) interface If you press and hold connector Be sure not to push the this switch when the... -
Page 72: Connecting A Drawer
2. The connecting is finished. 3.5 Install a Printer Driver in the Host PC / POS Terminal EPSON provides printer drivers for the TM-U220. The drivers are OPOS and Advanced Printer Driver (APD). They are for the Windows® environment. 3.5.1 OPOS 3.5.1.1 Install and Set up. - Page 73 TM-U220 Technical Reference Guide Outline of install and Setup procedure is as follows. START 1. Installation OPOS ADK (Execute the Setup.exe in DISK1, and continue to installation by wizard) Is installation completed? ERROR Completed For detail refer to [ User Manual] 2.
- Page 74 2.2. Device communication test by executing the CheckHealth ResultCode ERROR SUCCESS Confirm the error condition by The OPOS and device settings are right. referring to the [User's manual] & The Install and Setup are completed. (3. Confirmation by sample program) 4.
-
Page 75: Package Contents Of Epson Opos Adk
Visual Basic, Visual C++ programs. In this manual, it is introduced in the form of Visual Basic. 3.5.1.2 Package contents of EPSON OPOS ADK. Package contents of EPSON OPOS ADK are same as that of the previous one. ❏ Installer ❏ SetupPOS Utility ❏... -
Page 76: Advanced Printer Driver (Apd)
3.5.2 Advanced Printer Driver (APD) 3.5.2.1 Installing and Setting Up When you install and set up the APD, please refer to the “EPSON Advanced Printer Driver Install Manual.“ The Manual is a PDF file, which is provided with other manuals for the APD. - Page 77 4. Set up the printer port After installing APD (and “USB driver” or “EPSON Net Direct print“) you need to adjust the printer port setting for the printer interface model. See the Installation manual and the User’s manual for details.
-
Page 78: Self Test
Note: You can use the printer with sample program (written in Microsoft Visual Basic, Visual C++). The sample program is provided separately. 3.6 Self Test The self test lets you know if your printer is operating properly. It checks the control circuits, printer mechanisms, print quality, control software version, and DIP switch settings. -
Page 79: Chapter 4 Troubleshooting
TM-U220 Technical Reference Guide Chapter 4 Troubleshooting This section describes general troubleshooting. 4.1 LED Blinking Pattern 4.1.1 Error Types The printer stops all printer operations for the selected paper section, goes offline, and the ERROR LED blinks when an error is detected. -
Page 80: Recoverable Errors
4.1.1.2 Recoverable Errors When a recoverable error occurs, after the cause of the error is removed, the printer can recover from the error by receiving an error recovery command without turning off the power: ERROR LED Blinking Pattern 160 ms ERROR Description Recovery... -
Page 81: Removing A Paper Jam
TM-U220 Technical Reference Guide 4.2 Removing a Paper Jam CAUTION: Be sure not to touch the manual cutter. Otherwise your finger might be injured. 1. Turn the power off. 2. Open the roll paper cover by using the tab, as shown in the below illustration. -
Page 82: Printer Stops Printing / Printer Repeats Printing On A Line
When you connect the wrong power supply unit, printer will not perform correctly. See below to determine which power supply unit should be connected to the printer. TM-U220 Alphanumeric model (Type A,B, D) TM-U220 Multilingual model (Type A,B, D) AC Adapter C (which is packed with ANK model) - Page 83 TM-U220 Technical Reference Guide Note: *Multilingual means the printer model that can print any one of the following: Japanese Kanji, Simplified Chinese, Traditional Chinese, Thai characters, or Korean characters. Use the self test to confirm what model of printer you have, and then use the correct power supply. (See “Self Test Procedure”...
- Page 84 Alphanumeric model SELF-TEST Resident Character Alphanumeric The following models are called Multilingual SELF-TEST SELF-TEST Resident Character Resident Character Alphanumeric Alphanumeric Traditional Chinese Chinese GB18030 Simplified Chinese model Traditional Chinese model SELF-TEST SELF-TEST Resident Character Resident Character Alphanumeric Alphanumeric Thai 3 pass Korean Korean model Thai model...
-
Page 85: Printer Prints "?" Or Incorrect Data With Serial Interface
To improve the print speed, use a printer font. 4.7 Printer doesn’t cut roll paper with the autocutter TM-U220 Type D does not have an autocutter unit. If you use the type D model, you can’t use the autocutter function. Use the manual cutter. - Page 86 4. Run any software program that sends data to the printer. The printer prints “Hexadecimal Dump” and then all the codes it receives in a two-column format. The first column contains the hexadecimal codes and the second column gives the ASCII characters that correspond to the codes.
-
Page 87: Chapter 5 Application Development Information
TM-U220 Technical Reference Guide Chapter 5 Application Development Information This section contains usable information to develop POS systems that use this printer. 5.1 Various Status Categories This printer is able to send various status reports to the host PC. This section describes about the kind of statuses and handling. -
Page 88: Opos
5.1.2 OPOS Note This section describes the summary of status handling. Refer to “OPOS ADK Application Development Guide General Functions” for details. 5.1.2.1 Checking the printer state The state of the printer can be checked through properties supported by the printer. For example, if the user wants to check if the printer cover is open, the CoverOpen property can be used. -
Page 89: Printer Errors And Status
TM-U220 Technical Reference Guide method, change the FlagWhenIdle property to TRUE. When all data has finished printing, the printer becomes idle and a StatusUpdateEvent is fired to the application with the value of PTR_SUE_IDLE. 5.1.2.2 Printer Errors and Status A change in printer status when asynchronous data is being sent is made available to the program by the firing of an ErrorEvent and StatusUpdateEvent. -
Page 90: Cash Drawer Control
5.2 Cash Drawer Control 5.2.1 Advanced Printer Driver 5.2.1.1 Drawer Open When you control a drawer which is connected to this printer using APD, you have 2 methods to open the drawer. The first method is using “Control font,” second is using “Status API.“ Below is as example of a program (Visual Basic) to open a cash drawer using Control font. -
Page 91: Checking Drawer Status
TM-U220 Technical Reference Guide 5.2.1.2 Checking Drawer Status You can get drawer status by using Status API. Below is examples of program which checks the drawer status. 'get the current printer status rtn = BiGetStatus(m_hApi, getstatus) If rtn < 0 Then ErrMsg (rtn) ’Error handling... -
Page 92: Esc/Pos
When you drive a cash drawer which is connected to this printer, please refer to “FAQ about ESC/POS command.“ About “FAQ about ESC/POS command,“ please contact your dealer or EPSON. 5.3 NV memory This printer has NV memory (Non-volatile). The data of NV memory remains after you turn off the power. - Page 93 When you use User NV memory area by using OPOS or APD, you have to use “Direct I/O method” or “Control A font.” Please contact EPSON or your dealer for details. Note the following when writing to and erasing NV memory.
-
Page 94: Nv Bit-Image Printing
EPSON provides a tool, “TMFLogo” that enables registration of a bitmap image in the NV memory of an EPSON TM series printer. The bitmap image in the NV memory can be printed with the printer by using each control method. -
Page 95: Letterquality
TM-U220 Technical Reference Guide The available NVRAM size for the TM-U220 is 128KB. 5.4.2.2 LetterQuality It is possible to change the speed and quality of a bitmap by using the XXXLetterQuality property. RecLetterQuality = TRUE ‘print Receipt’s bitmap in quality mode. -
Page 96: Printing For Journal Used
5.6.1.1 A. Drawer specifications differ, depending on the manufacturer and the part number. We recommend to use a Drawer that is made by EPSON. These conditions also apply to any other devices that use the drawer kick-out connector. Any devices that do not satisfy all the following conditions must not be used. -
Page 97: Unable To Print A Part Of Page 0 In Visual Basic
TM-U220 Technical Reference Guide 5.6.2 Q. Unable to print a part of Page 0 in Visual Basic. Unable to print a part of Page 0 (for example ) ) in Visual Basic. 5.6.2.1 A. Follow the procedure When programming with Visual Basic, limitations prevent data from 81h through 9Fh and from E0h through FEh from being sent as characters. - Page 98 5-12 Application Development Information Rev. E...
-
Page 99: Chapter 6 Notices For Replacement Of The Tm-U210/Tm-U300
(cutting position.) 6.1.1.1 Printing area The TM-U220 has almost the same printing area as TM-U210 as shown in the following table and figures.Therefore, the TM-U220 can print same contents as the TM-U210 without adjusting any original control sources. -
Page 100: Characters
The cpl for the Kanji character font can be changed by anESC/POS command. (default:22cpl to 25cpl) 6.1.1.3 Cutting position from print start position TM-U220 has same distance between the auto cut position and the print start position as the TM-U210. Therefore the top margin is the same as the previous one when you replace the TM-U210 with the TM-U220 with autocutter. -
Page 101: Cutting Method
These values are reference values 6.1.2 Cutting Method The partial cut method for the TM-U220 (Type A, B) is a little different from the TM-U210. The TM-U210 always uses the partial cut method. The partial cut method is one point left uncut at the center position, so the method is different from that of the TM-U220 in respect to the uncut position. -
Page 102: Dimensions
6.1.3 Dimensions Some dimensions of the TM-U220 are smaller than those of the TM-U210 except Type D. Therefore, the TM-U220 Type A and B printers can be installed in the same space as the TM-U210 Type A and B. TM-U210... -
Page 103: Effect On The Application In The Condition Of Release Full State
Don’t use the PA-#### or PB-#### power supply unit with TM-U220. Connection to an improper power source may cause fire or shock. 6.1.5.2 Consumable compatibility TM-U220 can use same consumables as the TM-U210 except the carbon roll paper. (original + 2 copies. TM-U220 can’t print on carbon roll paper with 2 copies.) Consumables... - Page 104 See the next tables for the behavior. The status behavior is as following two tables. This printer doesn’t have cover open sensor. U210 Printer status bit Therefore, there are no status. Off-line Paper- Waiting Cover out LED on-line open Operation when paper-end recovery ASB(Auto Status Back) notification does not...
-
Page 105: Use For Journal
Therefore, if your application program watches the bit, confirm that it doesn't affect the performing of program. By the way, the ASB data transmitted timing of TM-U220 is same as TM-U210. You don't have to be afraid when your application program doesn’t watch the bit. -
Page 106: Memory Switch And Memory Switch Setup Mode
6.1.8.4 Memory Switch and memory switch setup mode The TM-U220 has a Memory switch which is a software DIP switch. The memory switch setup mode is for adjusting the memory switches by printer only (No host PC needed.) See “3.4.3 Memory Switches (3-17 page)”... -
Page 107: Printing Area
TM-U220 Technical Reference Guide 6.2.1.1 Printing area The TM-U220 has almost the same printing area as the TM-U300 as shown in the following table and figures. Therefore, the TM-U220 can print same contents as the TM-U300 without any adjustment of original control sources. -
Page 108: Cutting Position From Print Start Position
6.2.1.3 Cutting position from print start position The TM-U220 has almost the same distance from the auto cut position to the print start position as the TM-U300. Therefore the top margin is same as previous one when you replace the TM-U300 with the TM-U220 with an autocutter. -
Page 109: Cutting Method
There are two partial cut methods, one is three points left method, the other is one point left uncut. The TM-U220 allows you to select Partial cut (one point is left uncut at the right position) or Full cut (optional factory setting). These cannot be selected using the driver or with ESC/POS commands. -
Page 110: Effect To The Application When Condition Of Buffer Full Is Changed
The receive buffer of TM-U300 may cause lost data at bufferfull state when there is no FIFO setting, or the FIFO setting is larger than 10 bytes. However, the TM-U220 will have enough remaining receive buffer space to prevent data loss at bufferfull state when DIP SW1-2 is Off regardless of the setting of MemSW 8-7. -
Page 111: Provided Statuses And Detectors
❏ Roll paper near-end status (When equipped with a near-end detector [Factory option]) 6.2.7 Use for Journal TM-U220 Type A is able to be used for journal as TM-U300 (Type A, C.) However, notice the following item when you replace the TM-300 with the TM-U220. -
Page 112: Advanced Printer Driver
(APD). Therefore, the TM-U300 APD can’t drive the TM-U220. However, you can print almost the same output as the TM-U300 APD by using the TM-U220 APD. The print margin is little different from original output. See “6.2.1 About Printing format compatibility (6-8 page)” for the difference. -
Page 113: Appendix A Comparison Table For Tm-U220/U210/U300
Appendix A Comparison table for TM-U220/U210/U300 TM-U300 (Type A, B, C, D) TM-U210 (Type A, B, D) TM-U220 (Type A, B, D) Print specification Print method Serial 9 pin <== Bi-direction, logical seeking Print speed Approx. 3.5 lines/sec.(40 column, 16cpi) "Approx. - Page 114 TM-U300 (Type A, B, C, D) TM-U210 (Type A, B, D) TM-U220 (Type A, B, D) Paper supply Roll Paper install method Paper roll holding shaft Paper roll drop in <== functions Paper roll setting Auto-loading Auto-loading 1-2-3 setting Paper end detector <==...
- Page 115 TM-U300 (Type A, B, C, D) TM-U210 (Type A, B, D) TM-U220 (Type A, B, D) Take up unit Auto-take up (type A, C) Auto-take up (type A) <== Autocutter (type A/B) Full cut / partial cut; Partial cut (one point left...
- Page 116 TM-U300 (Type A, B, C, D) TM-U210 (Type A, B, D) TM-U220 (Type A, B, D) Applicable Power For North America PA-6509 or PB-6509 PB-6509 For ANK model: AC Adapter C supply unit which is in carton box. For Europe (Germany)
-
Page 117: Appendix B How To Install The Printer On A Wall With The
How to Install the Printer on a Wall with the WH-10 WH-10 is a option for the TM printer series, with it you can install a TM-U220 on a wall. This section describes how to install wall hanging TM-U220. See the “WH-10 installation Manual“ for details. -
Page 118: Installation
B.1.3.1 Installing the wall-mount CAUTION: The weight of the printer is approx. 2.5 kg for the TM-U220 Type B, and approx. 2.3 kg for the TM-U220 Type D. In order to insure that the wall-mount can properly support the weight of the printer, please secure it with screws appropriate to the type of wall the wall-mount is installed on. - Page 119 TM-U220 Technical Reference Guide 2. Loosen the detector adjustment screw a little bit by using a tool such as a coin and then loosen the screw gently by hand as until it stops. It must not be removed completely. detector...
- Page 120 roll paper roll paper holder guide 76 mm 70 mm 58 mm 7. Align the hole on the roll paper holder for hanging bracket with the dowel on the roll paper guide. (For a model that needs a change of paper width, the hole to be used will be different to match your roll paper width.) Putting the screw (3×6) in the hole on the roll paper holder for hanging bracket makes it easier for you to tighten the screw in the next step.
- Page 121 TM-U220 Technical Reference Guide 9. Tighten the screw (3×10) to fix the roll paper holder for hanging bracket and the roll paper holder. 10. Check that the brake arm is up as shown in the illustration below. brake arm CAUTION: Do not move the brake arm until the roll paper holder for hanging bracket is attached onto the base frame.
- Page 122 12. While you make sure the pin of the brake arm is in the groove on the inner side of the cam, rotate the cam along with the surface of the platen frame in the direction indicated by the arrow until it clicks into position. pin of brake arm 13.
-
Page 123: Installing The Brackets
TM-U220 Technical Reference Guide 14. Turn the printer over and then put it on a packing box as a platform horizontally. Fold this part inside and insert it into holes to assemble the package. 15. See the “Installing the Brackets” section for attaching the brackets. -
Page 124: Mounting The Printer On The Wall
B.1.7 Mounting the printer on the wall CAUTION: When mounting the printer, make sure that the wall-mount is securely fastened to the wall. When the brackets are attached properly for the TM-U220B/U220D, the printer’s operation panel will be on the top and the connector side on the bottom. If this is not the case, please see the installing the brackets section and reattach the brackets in the proper position. -
Page 125: Exterior Overviews
TM-U220 Technical Reference Guide B.2 Exterior Overviews B.2.1 TM-U220 (Type B) Rev. E How to Install the Printer on a Wall with the WH-10 B-9... -
Page 126: Tm-U220 (Type D
B.2.2 TM-U220 (Type D) Rev. E B-10 How to Install the Printer on a Wall with the WH-10... -
Page 127: Appendix C Character Code Table
TM-U220 Technical Reference Guide Appendix C Character Code Table C.1 Page 0 (PC437: USA, Standard Europe) (International character set: when U.S. is selected.) Rev. E Character Code Table C-1... -
Page 128: Katakana
C.2 Page 1 (Katakana) Rev. E C-2 Character Code Table... -
Page 129: Pc850: Multilingual
TM-U220 Technical Reference Guide C.3 Page 2 (PC850: Multilingual) Rev. E Character Code Table C-3... -
Page 130: Pc860: Portuguese
C.4 Page 3 (PC860: Portuguese) Rev. E C-4 Character Code Table... -
Page 131: Pc863: Canadian-French
TM-U220 Technical Reference Guide C.5 Page 4 (PC863: Canadian-French) Rev. E Character Code Table C-5... -
Page 132: Pc865: Nordic
C.6 Page 5 (PC865: Nordic) Rev. E C-6 Character Code Table... -
Page 133: Hiragana
TM-U220 Technical Reference Guide C.7 Page 6 (Hiragana) This page is available on the Japanese model only. Rev. E Character Code Table C-7... -
Page 134: One-Pass Printing Kanji Characters
C.8 Page 7 (One-pass printing Kanji characters) This page is available on the Japanese model only. Rev. E C-8 Character Code Table... -
Page 135: C.9 Page 8 (One-Pass Printing Kanji Characters)
TM-U220 Technical Reference Guide C.9 Page 8 (One-pass printing Kanji characters) This page is available on the Japanese model only. Rev. E Character Code Table C-9... -
Page 136: Wpc1252
C.10 Page 16 (WPC1252) Rev. E C-10 Character Code Table... -
Page 137: Pc866: Cyrillic #2
TM-U220 Technical Reference Guide C.11 Page 17 (PC866: Cyrillic #2) Rev. E Character Code Table C-11... -
Page 138: Pc852: Latin2
C.12 Page 18 (PC852: Latin2) Rev. E C-12 Character Code Table... -
Page 139: Pc858: Euro
TM-U220 Technical Reference Guide C.13 Page 19 (PC858: Euro) Rev. E Character Code Table C-13... -
Page 140: Thai Character Code 42
C.14 Page 20 (Thai character code 42) This page is available on the Thai model only. Rev. E C-14 Character Code Table... -
Page 141: Thai Character Code 11
TM-U220 Technical Reference Guide C.15 Page 21 (Thai character code 11) This page is available on the Thai model only. Rev. E Character Code Table C-15... -
Page 142: Thai Character Code 13
C.16 Page 22 (Thai character code 13) This page is available on the Thai model only. Rev. E C-16 Character Code Table... -
Page 143: Thai Character Code 14
TM-U220 Technical Reference Guide C.17 Page 23 (Thai character code 14) This page is available on the Thai model only. Rev. E Character Code Table C-17... -
Page 144: Thai Character Code 16
C.18 Page 24 (Thai character code 16) This page is available on the Thai model only. Rev. E C-18 Character Code Table... -
Page 145: Thai Character Code 17
TM-U220 Technical Reference Guide C.19 Page 25 (Thai character code 17) This page is available on the Thai model only. Rev. E Character Code Table C-19... -
Page 146: Thai Character Code 18
C.20 Page 26 (Thai character code 18) This page is available on the Thai model only. Rev. E C-20 Character Code Table... -
Page 147: Blank Page
TM-U220 Technical Reference Guide C.21 Page 254 (Blank page) Rev. E Character Code Table C-21... -
Page 148: C.22 Page 255 (Blank Page)
C.22 Page 255 (Blank page) Rev. E C-22 Character Code Table... -
Page 149: International Character Sets
TM-U220 Technical Reference Guide C.23 International Character Sets ASCII code (hexadecimal number) Country U.S. France Germany Denmark I Sweden Italy Spain I Japan Norway Denmark II Spain II Latin America Korea Rev. E Character Code Table C-23... - Page 150 Rev. E C-24 Character Code Table...
-
Page 151: Appendix D Power Supply Unit
TM-U220 Technical Reference Guide Appendix D Power Supply Unit D.1 AC Adapter C This power supply unit can be used with the TM-U220 ANK model only. When you use any other model of the TM-U220, please use PS-180. D.1.1 Case specifications ❏ Size: 54 mm(D) ×... -
Page 152: Usage Cautions
D.2 PS-180 This power supply unit can be used with all models of the TM-U220. D.2.1 Case specifications ❏ Size: 68 mm(D) × 136 mm(L) × 32 mm(H) {2.68 (D) × 5.35 (L) × 1.26" (H)} (excluding projections) Refer to the figure below.