
Related Manuals for Medela Mini Electric Plus


Summary of Contents for Medela Mini Electric Plus
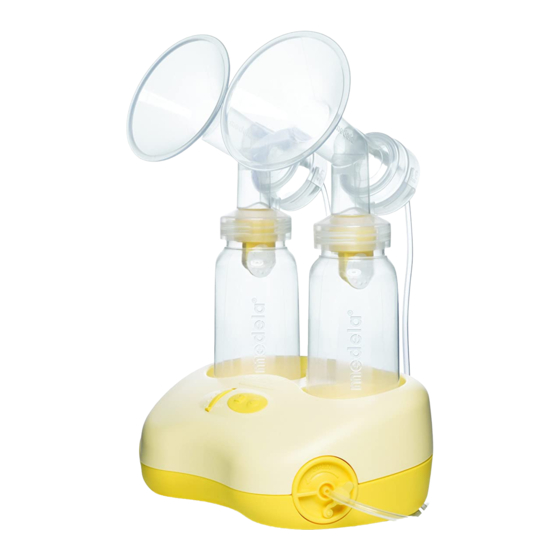
- Page 1 Mini Electric Plus ™ Instructions for use Mode d’emploi Gebruiksaanwijzing...
-
Page 2: Table Of Contents
Instructions for Use Page Various helpful information 3 – 5 Cleaning/Sterilization 5 – 6 Instructions for use 7 – 10 Troubleshooting Parts list Cooler Bag Technical Data Mode d’emploi Page Informations utiles 15 – 17 Nettoyage/Stérilisation 17 – 18 Instructions d’emploi 19 – 22 Identification des incidents Liste des pièces détachées Sac de transport réfrigérant... -
Page 3: Various Helpful Information
The benefits for the mother include contraction of the uterus in a natural way, reduced risk of breast and ovarian cancer and, in most cases, weight reduc- tion. If breastfeeding is not always possible, a Medela breastpump can ensure that your child gets the valuable breastmilk it needs. Our best wishes to you and your baby. - Page 4 General Information Be comfortably seated and relax. Use a footrest, when pump ing your breast or when feeding your baby. Elevating your feet puts you into proper sitting po- sition to avoid stress on the lower back and perineum. Hold the breastshield between index finger and middle finger and press it gently but firmly over the nipple, while supporting the breast a little with the same hand.
-
Page 5: Cleaning/Sterilization
Storage of Breastmilk Do not let breastmilk stand at room temperature. To inhibit the growth of bacteria, breastmilk which is not used immediately must be refrigerated or, if stored for more than 24 hours, must be frozen. For freezing, do not fill bottles more than ¾ full, to allow space for expansion or use the Pump & Save Breastmilk Bags. - Page 6 Prior to initital use and subsequently once daily, the individual com- ponents which come in contact with milk must be rinsed and placed in a sauce- pan of sufficient capacity. Fill the latter with cold water until the components are well covered, heat it up and allow to boil for 5 minutes. After draining the water off, the hot items should be spread out on a clean towel to cool and dry.
-
Page 7: Instructions For Use
Instructions for use 1. Snap the membrane onto the valve head. (Remove membrane for cleaning.) 2. Fit the valve to the breastshield (do not push too hard, so that it can easily be removed for cleaning). 3. Screw the bottle onto the breastshield. 4. - Page 8 5. Connect the other end of the tube to the breastpump. Follow steps 1–5 for the second breastshield. 6. Insert the power connector into the connection socket on the breastpump. Plug in the mains adapter. Use only the original Medela adapter. Other adapters may damage the pump or cause problems during use. 7. Set the vacuum regulator to minimum and switch on the breastpump.
- Page 9 8. Center the nipple in the breast- shield tunnel. Turn on the pump and check the following points: Your breastshield is the right size if your answer to the following questions is «Yes»: • Is your nipple moving freely in the tunnel? •...
- Page 10 Battery operation If the mains adapter cannot be used, the Mini Electric Plus Breastpump can also be used with batteries. Two C Baby LR 14 1.5 V alkaline batteries are required for this purpose. Leak- proof batteries should always be used to protect the unit. If the suction rhythm becomes too slow, replace the batteries.
-
Page 11: Troubleshooting
Troubleshooting If you do not feel any vacuum at the breast or if the pump i ng action is too weak: • Check that the breastshield forms a complete seal around the breast. • Check that the valve is clean and properly fitted (steps 1 and 2, page 7). If necessary, remove it for clea ning/sterilizati on and reassemble it. •... -
Page 12: Parts List
Parts List Order No. 1. Breastshield 810.0131 2. Valve (2-part) 800.0423 3. Valve head 810.0475 4. Valve membrane 820.7013 5. Bottle 811.0020 6. Lid 810.7062 7. Disk 810.0473 8. Cap 810.0474 9. Silicone tubing with connector 800.0436 10. Mains adapter for 230 V 920.0015 11. -
Page 13: Cooler Bag
CityStyle™ Breastpump Bag A stylish and attractive bag to transport a Medela breastpump and expressed breastmilk. Offers additional room for the breastpumps Swing, Harmony, Mini Electric Plus, Mini Electric or Manual Breastpump. Order-Nr. 200.0625... -
Page 14: Technical Data
Technical Data Suction strength: Infinitely-variable up to approx. 220 mmHg Suction cycles: approx. 34 cycles/minute Suction unit: 3 VDC/500 mA or 2 x 1,5 V batteries (Two C Baby LR 14, 1,5 V alcaline) Mains Adapter: Input: 230 V/50 Hz, Output: 3 VDC/500 mA Environmental Conditions for Transport and Storage: –... -
Page 15: Informations Utiles
Mais, comme l’allaitement au sein n’est pas toujours possible, Medela a mis au point toute une gamme de tire-lait, pour que votre enfant puisse bénéficier de la meilleure des nourritures: le lait maternel. - Page 16 Installez-vous confortablement et détendez-vous. Utilisez un repose-pied aussi bien pendant le pompage que lorsque vous allaitez votre enfant. Vos pieds étant légèrement surélevés, votre bassin sera dans une bonne position, ce qui vous épargnera une fatigue inutile au niveau du dos. Prenez la téterelle entre l’index et le majeur et appliquez-la sur le sein en appuyant légèrement au-dessus du mamelon, tout en soutenant le sein de la même main.
-
Page 17: Nettoyage/Stérilisation
Ne jamais laisser du lait maternel à température ambiante. Afin d’éviter la pro- lifération des bactéries, le lait non destiné à une utilisation immédiate doit être placé au réfrigérateur, ou congelé, s’il doit être conservé plus de 24 heures. En cas de congélation, ne remplir la bouteille qu’aux ¾ pour permettre la dilatation, ou alors, utiliser les Pump & Save Sachets pour lait maternel. - Page 18 casserole suffisamment grande. Remplissez-la ensuite d’eau froide, si possi- ble distillée, jusqu’à ce que tous les éléments soient entièrement immergés. Portez à ébullition pendant 5 minutes. Si vous utilisez de l’eau du robinet, vous pouvez ajouter une cuillère à café d’acide citrique (jus de citron) pour éviter la formation de calcaire.
-
Page 19: Instructions D'emploi
Instructions d’emploi 1. Enclenchez la membrane dans le corps de la valve. (La membrane doit être retirée pour le nettoyage.) 2. Insérez la valve dans l’embout de la téterelle (ne pas l’enfoncer trop fort, afin qu’elle puisse être enlevée facilement pour le nettoyage). 3. - Page 20 6. Introduisez le connecteur de l’adaptateur dans la prise du tire-lait, puis branchez l’adaptateur sur le secteur. N’utilisez que des adaptateurs originaux Medela, les autres p ouvant endommager le tire-lait ou être à l’origine d’incidents de fonctionnement. 7. Régler la force d‘aspiration au mini - mum et allumer le tire-lait. Ajuster la force d‘aspiration au niveau de...
- Page 21 8. Placer le mamelon au centre de l‘embout de la téterelle. Mettre le tire-lait en marche et vérifier les points suivants: Votre téterelle est à la bonne taille si vous pouvez répondre par «Oui» aux questions suivantes: • Le mamelon bouge-t-il librement dans l‘embout de la téterelle? •...
- Page 22 Fonctionnement sur piles Lorsqu’il est impossible d’utiliser l’adaptateur réseau, le tire-lait Mini Electric Plus peut fonction ner avec 2 piles alcalines d’1,5 V, type C LR 14. Pour éviter toute détérioration de l’appareil, n’utilisez que des piles de bonne qualité, qui ne coulent pas. Lorsque le rythme d’aspiration de- vient trop lent, remplacez les piles.
-
Page 23: Identification Des Incidents
Identification des incidents Si la force d’aspiration est trop faible, vérifiez que: • la téterelle adhère suffisamment au sein. • la valve est propre et correctement emboîtée dans la téterelle (cf. points 1 et 2, page 19). Si nécessaire, la retirer pour la nettoyer ou la stériliser, et la remettre en place. •... -
Page 24: Liste Des Pièces Détachées
Liste des pièces détachées Référence 1. Téterelle 810.0131 2. Valve (complète) 800.0423 3. Corps de la valve 810.0475 4. Membrane de la valve 820.7013 5. Biberon 811.0020 6. Bague 810.7062 7. Disque de transport 810.0473 8. Capuchon de protection 810.0474 9. Tuyau silicone avec embout 800.0436 10. -
Page 25: Sac De Transport Réfrigérant
Un sac très attrayant qui a du style ! Permet de transporter à la fois un tire-lait et le lait exprimé. Offre plus de place pour les tire-laits Swing, Harmony, Mini Electric Plus, Mini Electric ou Tire-lait manuel. Référence: 200.0625... -
Page 26: Caractéristiques Techniques
Caractéristiques techniques Force d’aspiration: Réglable en continu jusqu’à env. 220 mmHg Cycles d’aspiration: env. 34 cycles/min. Alimentation: 3 V CC/500 mA ou 2 piles alcalines 1,5 V, type C LR 14 Adaptateur secteur: Entrée: 230 V/50 Hz, Sortie: 3 V CC/500 mA Conditions admissibles au transport et au stockage: –... -
Page 27: Nuttige Informatie
Mocht het niet altijd mogelijk zijn uw baby zelf te voeden, helpt een borstpomp van Medela u de waardevolle moedermelk voor uw kindje veilig te stellen. Onze beste wensen voor u en uw baby! Hygiëne... - Page 28 Algemene informatie Ga gemakkelijk en ontspannen zitten. Gebruik een voetbankje tijdens het kol- ven of het voeden van de baby. Als daardoor uw voeten omhoog worden gebracht, komt uw bekken in de juiste stand te staan. Daardoor wordt over- belasting van de rug voorkomen. Houd het borstschild tussen wijs- en middel- vinger en druk het zachtjes over de tepel op de borst, terwijl de borst met dezelfde hand wordt ondersteund.
-
Page 29: Schoonmaken/Steriliseren
Bewaren van moedermelk Bewaar moedermelk niet op kamertemperatuur. Om het groeien van bac- teriën te voorkomen moet melk die niet onmiddellijk wordt gebruikt in de koelkast worden gezet of bij een bewaartijd van langer dan 24 uur worden ingevroren. Vul het flesje voor het invriezen maar ¾, om ruimte te laten voor het uitzetten of gebruik de Pump & Save Moedermelk bewaarzakjes. - Page 30 Vóór het eerste gebruik en daarna één keer per dag moeten alle onder- delen die met de melk in aanraking komen, afgespoeld en in een voldoende grote pan worden gelegd. De pan met koud, indien mogelijk gedestilleerd water vullen tot alle onderdelen bedekt zijn, het water verwarmen en 5 minu- ten laten koken.
-
Page 31: Gebruiksaanwijzing
Gebruiksaanwijzing 1. Klik de membraan op het klephuis vast (de membraan voor het schoon- maken losmaken). 2. Zet de klep op het borstschild (niet te hard aandrukken, zodat de klep voor het schoonmaken gemakkelijk verwijderd kan worden). 3. Schroef het borstschild op het flesje. 4. - Page 32 De stappen 1 tot 5 voor het tweede borstschild herhalen. 6. Steek de stekker van de netadapter in de aansluiting aan de pomp. Sluit de netadapter aan het stopcontact aan. Gebruik uitsluitend originele ad- apters van Medela. A ndere netadapters kunnen de pomp beschadi- gen of problemen bij de toepassing veroorzaken. 7. Zet de vacuümregelaar op mi- nimum en zet de borstkolf aan.
- Page 33 8. Centreer de tepel in de schacht van het borstschild. Schakel de pomp in en controleer de volgende punten: Uw borstschild heeft de goede maat als uw antwoord op de volgende vragen «Ja» is: • Kan de tepel vrij binnen de schacht bewegen? •...
- Page 34 Batterijvoeding Als de netadapter niet kan worden ge bruikt, kan de Mini Electric Plus borstpomp ook met batterijen wor- den gevoed. Daarvoor zijn twee 1,5 V alkali bat terijen type C Baby LR 14 nodig. Om beschadigingen van het toestel te voorkomen is het absoluut noodzakelijk een uitloop bestendig fa- brikaat te gebruiken.
-
Page 35: Het Oplossen Van Problemen
Het oplossen van problemen Als de pomp te zwak zuigt: • Controleren of het borstschild goed aansluit op de borst. • Controleren of de klep schoon en correct gemonteerd is (stappen 1 en 2, pag. 31). Indien nodig, verwijderen, schoon maken/steriliseren en opnieuw monteren. • Controleren of de slangen correct aangesloten zijn. •... -
Page 36: Onderdelenlijst
Onderdelenlijst Bestel-nr. 1. Borstschild 810.0131 2. Klep (2-delig) 800.0423 3. Klephuis 810.0475 4. Klep-membraan 820.7013 5. Flesje 811.0020 6. Ringdeksel 810.7062 7. Dekselinleg 810.0473 8. Beschermkap 810.0474 9. Siliconenslang met aansluitstuk 800.0436 10. Netadapter 230 V 920.0015 11. Kapje 810.0447 12. -
Page 37: Schoudertas
CityStyle™ Tas voor Borstkolf Een stijlvolle en aantrekkelijk uitziende tas voor het vervoeren van een Medela borstkolf en afgekolfde moedermelk. Biedt extra ruimte voor de borstkolven Swing, Harmony, Mini Electric Plus, Mini Electric of Handkolf. Bestelnummer: 200.0625... -
Page 38: Technische Gegevens
Technische gegevens Zuigkracht: traploos regelbaar tot ca. 220 mmHg Zuigcyclus: ca. 34 cycli/minuut Aandrijving: 3 VDC/500 mA of 2 x 1,5 V batterij (twee 1,5 V alkalibatterijen, type C Baby LR 14) Netadapter: Opgenomen stroom: 230 V/50 Hz, Afgegeven stroom: 3 VDC/500 mA Omgevingscondities voor transport en opslag: –... - Page 40 InTeRnATIonAL SALeS AUSTRALIA Medela AG, Medical Technology Medela Australia Pty Ltd, Lättichstrasse 4b Medical Technology 6341 Baar 3 Arco Lane, Heatherton Switzerland Victoria, 3202 Phone +41 (0)41 769 51 51 Australia +41 (0)41 769 51 00 contact@medela.com.au info@medela.ch www.medela.com.au www.medela.com...
Need help?
Do you have a question about the Mini Electric Plus and is the answer not in the manual?
Questions and answers