Table of Contents
Advertisement
Quick Links
Advertisement
Table of Contents

Related Manuals for Alecto DVM-70


Summary of Contents for Alecto DVM-70
- Page 1 USER MANUAL DVM-70...
-
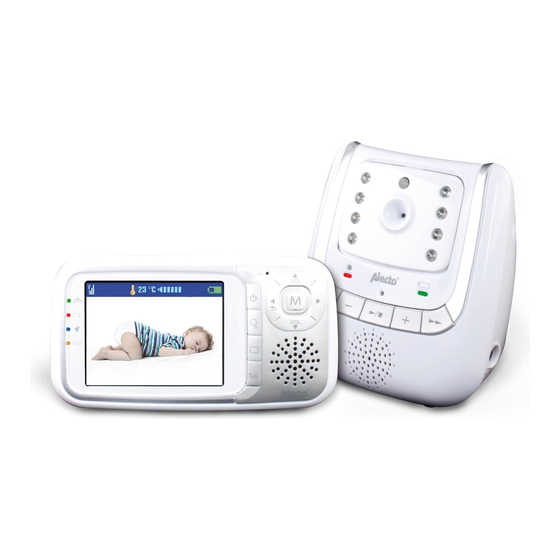
Page 2: Product Description
Once your baby falls asleep again, the DVM-70 switches itself automatically back into sleep mode. When you no longer need to use the DVM-70 as a baby monitor, you can use it for applications such as access control, room surveillance, etc. -
Page 3: Monitor Unit
MONITOR UNIT: connection indicator: - lights continuously: very good connection to camera unit - fl ashes slowly: good connection to camera unit - fl ashes quickly: no connection to camera unit battery indicator - lights when the battery is being charged, goes off when the battery is full (this indicator appears whether the monitor unit is switched on or off) - also lights when the unit is switched on but the mains adapter is not connected... -
Page 4: Camera Unit
CAMERA UNIT: 6VDC / 800mA 10 11 temperature sensor 12 power indication: light sensor (for night light) - lights steadily when the mains adapter is Infrared LEDs (for night vision) connected (whether or not batteries have built-in microphone been inserted) on/off indicator - off when the camera unit is powered by on/off button... - Page 5 Batteries: Unlock the battery cover of the camera unit by placing a fl at, blunt object in the slot on the bottom of the camera unit; the battery cover can now be released from the camera unit. Insert 4 x 1.5 V batteries, size AA (R6), in the battery compartment as indicated. High- quality alkaline batteries should preferably be used.
-
Page 6: Monitor Unit
Positioning tips • When using the unit as a baby monitor: position the camera unit at a minimum distance of 2 metres from your baby and make sure that the power cable is safely tucked away. • The temperature sensor projects out from the back of the camera unit. Make sure that the sensor is hanging freely, is not in direct sunlight and is not heated by light bulbs. - Page 7 Only use the supplied mains adapter with the small plug, MOSO MSP-C0800IC6.0-5W-DE or HONR ADS-5Q-06 06005GPG or TEN PAO INTERNATIONAL LTD, model nummer S006MV0600080. (6VDC, 800mA, Charging: As soon as you connect the monitor unit to the mains adapter and plug the adapter into a 230V wall socket, the battery will be charged.
-
Page 8: Usage
USAGE SWITCHING ON/OFF: • Briefl y press the button to switch the unit on. • Keep this button pressed for 2 to 3 seconds to switch the unit off. CONNECTION INDICATOR: • As soon as the monitor unit is switched on, the connection indicator fl... -
Page 9: Reception Indicator / Out Of Range Message
RECEPTION INDICATOR / OUT OF RANGE MESSAGE: • In the upper left-hand corner of the image on the monitor unit, there is an indication of the strength of the signal being received from the camera unit. : very good reception, : standard good reception, : reasonable reception •... -
Page 10: Eco Mode Operation
ECO MODE OPERATION: If ECO mode is disabled, there is a continuous connection between the camera unit and the monitor unit, and you have continuous video. The audio is only transmitted if the sound level you set under ‘Sensitivity’ is exceeded. If you enable ECO Mode, both the camera unit and the monitor unit go into sleep mode, and there is NO connection. -
Page 11: Settings
VIBRATING ALARM: If you have turned off the sound on the monitor unit, the DVM-70's vibrate function can still alert you to sound signals from the camera unit: • if ECO mode is on and the camera unit detects a noise, the image is switched on and the monitor unit vibrates 3 times in quick succession •... -
Page 12: Sensitivity
SENSITIVITY: You can set the sensitivity with which the camera unit's microphone picks up the sounds and transmits them to the monitor unit: press the M button to scroll to SENSITIVITY press the M button to scroll to the desired sensitivity Level 1: activated by loud sounds .. -
Page 13: Temperature
TEMPERATURE: At the top of the image the temperature is diplayed of the temperature in the room in which the camera unit is located. This display can be set to degrees Celsius or degrees Fahrenheit. You can also set an upper and lower limit, so that an alarm tone sounds whenever one of those limits is exceeded. -
Page 14: Possible Messages On Screen
POSSIBLE MESSAGES ON SCREEN The following messages may be displayed on screen during use, either accompanied by warn- ing tones or not: No link: The connection between the camera unit and the monitor unit has been lost. This may be caused by the distance between the units being too great, by the camera unit being switched off or by the camera unit being deactivated as a result of empty batteries. -
Page 15: Tips And Warnings
The DVM-70 system does not allow multiple camera units to be connected to a single monitor unit, or for the image from a single camera unit to be displayed on multiple moni- tor units. It is, however, possible to use multiple complete DVM-70 sets side by side at the same time. -
Page 16: Troubleshooting
Switch the monitor and the camera on. • If you are still not receiving any images or sound, please contact the Alecto service de- partment on telephone number +31 (0) 73 6411 355. -
Page 17: Specifications
WARRANTY The Alecto DVM-70 comes with 24 months warranty from the date of purchase. During this period we guarantee that any defects caused by errors in materials or construction will be repaired free of charge. This at the importer's discretion. -
Page 18: Table Of Contents
TABLE OF CONTENTS PRODUCT DESCRIPTION ..................... 2 OVERVIEW OF FUNCTIONS ICONS ON THE SCREEN ..................... 2 MONITOR UNIT ......................3 CAMERA UNIT ....................... 4 INSTALLATION CAMERA UNIT ........................ 4 MONITOR UNIT ......................6 USAGE SWITCHING ON/OFF ..................... 8 CONNECTION INDICATOR .................... 8 MONITOR UNIT VOLUME .................... - Page 19 MAINTENANCE ......................15 EXPANSION ........................15 TROUBLESHOOTING ....................16 RANGE.......................... 16 DELAYS IN VIDEO AND AUDIO ................... 16 8.10 ENVIRONMENT AND DISPOSAL................. 16 DECLARATION OF CONFORMITY ................16 SPECIFICATIONS ......................17 WARRANTY ........................17 TABLE OF CONTENTS ....................18...
- Page 20 Service Help Aziëlaan 12 ‘s-Hertogenbosch WWW.HESDO-SERVICE.NL INFO@HESDO-SERVICE.NL +31 (0) 73 6411 355 ver1.3...
Need help?
Do you have a question about the DVM-70 and is the answer not in the manual?
Questions and answers