Singular Sound BeatBuddy User Manual
Hide thumbs
Also See for BeatBuddy:
- Manual (56 pages) ,
- User manual (44 pages) ,
- Quick start manual (20 pages)
Table of Contents
Advertisement
Advertisement
Table of Contents

Related Manuals for Singular Sound BeatBuddy


Summary of Contents for Singular Sound BeatBuddy
- Page 2 This Manual was written for Firmware version 1.4.1. To check the Firmware version on your BeatBuddy, press the drum set and tempo knobs down at the same time and select ‘About BeatBuddy’. If you do not have the latest version of the firmware, please visit: myBeatBuddy.com/downloads Table of Contents 1.
- Page 3 BeatBuddy are collections (libraries) of WAV sound files - which are recordings of the actual drum sounds. The MIDI files trigger the WAV files in the drum sets. That is how the BeatBuddy is able to play any beat, any time signature, using any drum set at different tempo settings to get a completely different sound.
- Page 4 The entire combination of songs and drum sets on your BeatBuddy is called a Project and is all stored on the SD card. You may have one Project per SD card.
- Page 5 The beats are not changed by your instrument’s sound. No instrument needs to be plugged into the BeatBuddy for it to work normally, so the BeatBuddy can be a stand-alone tool used by any musician.
- Page 6 9V and center negative (most are) BEFORE plugging it in! To calculate if your pedal board’s power supply has enough Amps to power the BeatBuddy, add up all of the Amps that your other pedals require (usually written on the bottom of the pedal.
- Page 7 SD Card All of the BeatBuddy’s content (beats, drum sets) are stored on the SD card. The SD card must be properly inserted into the BeatBuddy for it to work. The BeatBuddy SD card comes loaded with 10 drum sets and 200+ songs in many different styles.
- Page 8 The BeatBuddy produces ‘line-out’ level analogue sound, similar to a standard music player or computer headphones jack. You can plug the BeatBuddy into any speaker system that accepts 1/4” (6.5mm) or 1/8” (3.5mm) audio jacks. However, like all audio, the better the sound system it is plugged into, the better the BeatBuddy will sound.
- Page 9 If you have the BeatBuddy plugged into an amp, any effects on the amp will affect the sound of BeatBuddy (unless the BeatBuddy is plugged into your amp’s AUX jack, then it is fine). So if your amp’s distortion is on, the beats will sound distorted.
- Page 10 BeatBuddy’s drum sounds. One additional issue that may arise from using the same amp to play your guitar and the BeatBuddy’s beats is that on some amps, the sound of the bass drum will cause the guitar to tremolo, or waver, a bit to the beat. While some people love this effect -- if you would like to reduce it, lower the Bass (Low) setting on your amp.
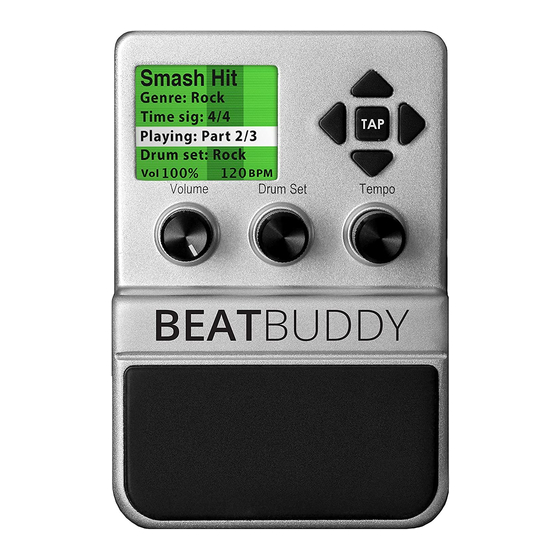
- Page 11 3. How to use the BeatBuddy 1. Visual Metronome: Shows where the beat is in the measure 2. Name of song 3. Folder where song is stored 4. Time signature of beat 5. Playback status 6. Drumset currently selected 7. Volume and tempo values...
- Page 12 Left/Right arrows: Selects folder/song (right arrow) exits folder (left arrow) f. Tap button: Enters Tap Tempo mode: Press the button or pedal to the tempo of a song, and the BeatBuddy will calculate the tempo BPM g. Headphones Volume: Controls the volume sent to the headphones...
- Page 13 While song is paused: • Tap pedal to restart the beat with a fill. • Hold down pedal to stop song. This is useful if you want to stop the BeatBuddy immediately without an ending fill by pausing it.
- Page 14 Visual Display: The BeatBuddy uses a first of it’s kind visual display to show you what is going on with the beat. It uses color codes to show what part is being played: Color Code Beat Stopped Intro/Outro Main song part loop...
- Page 15 If you are not using a BeatBuddy footswitch, make sure that the footswitch is compatible with the BeatBuddy and that the BeatBuddy is configured to the type of footswitch you are using. The BeatBuddy is compatible with standard momentary or latching dual footswitches which have a single TRS (Stereo) ¼”...
- Page 16 To configure the BeatBuddy to your footswitch, press the Drum Set and Tempo knobs down at the same time to enter the Settings menu. Select ‘Footswitch’ and then ‘Footswitch Detector’ and follow instructions. The BeatBuddy will save your settings, so you only have to use the ‘Footswitch Detector’...
- Page 17 4. Settings The settings give you many options to customize the BeatBuddy to suit your needs and playing style. To enter the Settings screen, press the Drum Set and Tempo knobs at the same time. Footswitch: Configure your BeatBuddy to the type of footswitch you’re using or set what the footswitch buttons do.
- Page 18 Footswitch > Footswitch Detector: Detects the type of footswitch that is plugged into the BeatBuddy. Use this whenever using a new footswitch with the BeatBuddy or if your footswitch doesn’t seem to be working correctly (such as it only works every other press, or triggers a command on both the press and release).
- Page 19 1st switch (Left) will do when pressed while no song is playing. Footswitch Functions > 1st Switch Playing: The function that the 1st switch (Left) will do when pressed while a song is playing. Footswitch Functions > 2nd Switch Stopped: The function that the 2nd switch (Right) will do when pressed while no song is playing.
- Page 20 Main Pedal > Intro > Enable: If an Intro beat is present in the song, it will play it normally Main Pedal > Intro > Count in: Instead of the intro beat, it will play a single sound for each beat in the first measure to ‘count you in’...
- Page 21 Intro starts or when the Main Beat starts. If the intro is less than a full measure long (many intros are just a few beats), then the Intro setting will cause the BeatBuddy to be out of sync with the other MIDI device.
- Page 22 THRU: The BeatBuddy by default sends its own MIDI commands to the OUT channel. We added the option to change it to MIDI THRU, so if the BeatBuddy is receiving a signal in the MIDI IN channel, it will pass that signal along unchanged to the MIDI OUT channel.
- Page 23 Main Pedal > Release Time: Our goal is to make the BeatBuddy sound perfect. And in pursuit of perfection, no detail is too small. When the drummer hits the hi-hat and then closes it, the hi-hat mutes, or ‘chokes’, the sound of the open hi-hat as it closes. On a physical drum set, the resonance of the open hi-hat fades out as the hi-hat closes.
- Page 24 5. MIDI Sync MIDI Sync is a powerful tool to integrate the BeatBuddy with your other MIDI enabled devices, such as MIDI Sync enabled loopers and effects, to create a powerful performance or recording system. For example, when the BeatBuddy is synced with a MIDI Sync...
- Page 25 Sync breakout cable (sold separately) is required to convert the BeatBuddy’s PS/2 MIDI Sync port into 2 standard full size 5-pin MIDI ports. You will still need a normal 5-pin MIDI cable to connect the MIDI Sync Cable to your other MIDI device.
- Page 26 BeatBuddy (no need to export the file into the BeatBuddy Manager!). This is also great to use with your electronic drum sets to get the BeatBuddy’s incredible sound instead of the drum set’s...
- Page 27 6. Tips and Tricks • End the song with fast presses on a cymbal crash accent hit to simulate a drummer doing a ‘swell’ as the song ends with a big finale. • Stepping on both the Pause and Accent hit footswitches at the same time stops the drums with a crash cymbal sound (if the accent hit is a crash cymbal) -- a nice effect.
- Page 28 • Use the BeatBuddy Manager (see Section 7) to create a folder on the BeatBuddy with the songs you’ll use for a show (you can name these folders “Coffee House Gig”, “Tuesday Nights”, etc.), so you don’t have to navigate to find the songs you want in a live performance.
- Page 29 SD card with the content. To use the BeatBuddy Manager software with your BeatBuddy, you can either connect the BeatBuddy to your computer with the included USB cable (make sure the SD card is properly inserted in the BeatBuddy), or put the BeatBuddy’s SD card in your computer’s...
- Page 30 8. Technical Support If you notice anything strange with your BeatBuddy, first make sure all the cables are firmly connected. Then power the pedal off for a minute then plug it back in. If that doesn’t work, the files on the SD card may have been...
-
Page 31: Technical Specifications
9. Technical Specifications Dimensions: 5” long x 3.5” wide x 2.5” high (127mm x 86mm x 63mm) Power: 9v DC, 300mA, center negative Output Impedance: ~26 ohms Input Impedance: > 1Meg ohms Max Input Level: 3.5 dBu Signal to Noise: 95 dB typical D/A: 24 bits, 44,1 kHz Frequency Response: 10Hz to 20 kHz... - Page 32 10. Warranty Your BeatBuddy comes with a full one year warranty on parts and workmanship from the date of purchase. During this period we will repair or replace (at our option) defective units free of charge. Most issues can be solved by writing to us at support@myBeatBuddy.com...
Need help?
Do you have a question about the BeatBuddy and is the answer not in the manual?
Questions and answers