Singular Sound BEATBUDDY User Manual
Hide thumbs
Also See for BEATBUDDY:
- Manual (56 pages) ,
- User manual (33 pages) ,
- Quick start manual (20 pages)
Advertisement
Quick Links
Advertisement

Related Manuals for Singular Sound BEATBUDDY


Summary of Contents for Singular Sound BEATBUDDY
- Page 1 BEATBUDDY USER MANUAL FIRMWARE V2.0.4 SINGUL AR SOUND...
- Page 2 Support@singularsound.com 305 - 809 - 6698 We love to help! :-) To check the Firmware version on your BeatBuddy, press the drum set and tempo knobs down at the same time and select ‘About BeatBuddy’. Don’t have the latest firmware? Download it here: https://singularsound.com/firmware/...
- Page 3 3. How to use Navigating content, controlling the beat, and visual display 4. Tips and Tricks Take your BB to the next level 5. BeatBuddy Manager Software Download and create content 6. Settings Functions, from defaults to the footswitch 7. MIDI Sync Everything you need to know 8.
- Page 4 Replace. • After the files are transferred, insert the SD card into your unplugged BeatBuddy. • Once the SD card is in, power the BeatBuddy on. Let the firmware upgrade take place (~20-30 seconds).
- Page 5 CHANGE LOG View all firmware change logs: https://singularsound.com/firmware/ 2.04 FIRMWARE I NEW FEATURES Settings Menu Improvements New Settings Menu Help System • Look for the (?) symbol next to a menu option • Press the right arrow button to highlight •...
- Page 6 Use the Footswitch as the Main Pedal: Use the BeatBuddy on a table- top (or keyboard) height. Set one of the footswitches to act like the main pedal (Settings > Footswitch > Function > Main pedal) Note: Latching footswitches can’t be used with the main pedal option.
- Page 7 New Accent Hit Options: • Global Accent Hit: A single sound triggered with any song or song part you are in (as opposed to the Default Accent Hit which is a sound set to the • Choose from all the Accent Hits available on the SD card and any WAV files added in the EFFECTS folder of the SD Card.
- Page 8 Cue Fill Options: We formerly used a percentage based cue fill period system (if you have it, then you have an older version of the firmware), and some users have said that the fills sound smoother if they start on the next half beat (1/8th note), next beat (1/4 note) or next measure rather than immediately when the pedal is...
- Page 9 MIDI Command Change: When unpausing with drum fill (by tapping the main pedal), the MIDI “Start” message is sent after the completion of the fill and the main loop begins. This means that the looper only begins playback after the fill is complete, which is a more ac- curate representation of what usually happens in a live performance.
- Page 10 Bug Fixes: • Fixed Midi Note In Problem. (Under some circumstance, some MIDI note received in the MIDI in port were retransmit on the MIDI out port even if it was set to MIDI-OUT. • Added quick release to reduce “clicking” sound when removing sounds (when max polyphony is reached) •...
- Page 11 1. Introduction Congratulations and thank you for purchasing your BeatBuddy! What it does BeatBuddy is the world’s first pedal drum machine that enables musicians to easily control the beat hands-free. Just by pressing a pedal, you can start a beat, insert fills, transition from verse to...
- Page 12 - which are recordings of the actual drum sounds. The MIDI files trigger the WAV files in the drum sets. That is how the BeatBuddy is able to play any beat, any time signature, using any drum set at different tempo settings to get a completely different sound.
- Page 13 Please note: Not all beats and drum sets sound good together -- it may sound strange to play jazz beats on a heavy metal drum set -- or it may sound cool! You decide. Please Note: There is one exception, and that is the Latin genre/drumset.
- Page 14 The entire combination of songs and drum sets on your BeatBuddy is called an SD Image and is all stored on the SD card. You may have one Project per SD...
- Page 15 What the BeatBuddy is Not The BeatBuddy is not a traditional drum machine: Drum machines have traditionally been used to create beats. The BeatBuddy is a performance tool, and cannot be used to create beats. New beats can be created on the many...
- Page 16 The BeatBuddy is not a traditional effect pedal: Unlike other effects ped- als, the BeatBuddy is not intended to modify your instrument’s sound. It has input jacks only in case you want to put both the BeatBuddy and your instrument into the same sound system without the need for a mixer.
- Page 17 Do not do this! The power supply must have a minimum of 300mA (0.3 Amps) for the BeatBuddy to turn on. More amps won’t harm your BeatBuddy. If you use a center-positive adapter, it won’t harm your BeatBuddy either, but your...
- Page 18 (most are) BEFORE plugging it in! To calculate if your pedal board’s power supply has enough Amps to power the BeatBuddy, add up all of the Amps that your other pedals require (usually written on the bottom of the pedal.
- Page 19 BeatBuddy for it to work. The BeatBuddy SD card comes loaded with 10 drum sets and 200+ songs in many different styles. If you lose your SD card, you can download the default BeatBuddy content to put on a new SD card at myBeatBuddy.com/downloads.
- Page 20 It will produce sound whether an instrument is plugged into it or not. The input jacks are there in case you want to put both the BeatBuddy and your instrument sounds into the same speaker without the need for a mixer.
- Page 21 BeatBuddy’s sound. Acoustic guitar and keyboard amps are full range. If you’re not sure if your amp is full range, listen to the BeatBuddy on high quality headphones to compare. If there is a considerably noticeable...
- Page 22 If you are using BeatBuddy with other effect pedals, it is recommended to place BeatBuddy after all of the other pedals in the effects chain so that the BeatBuddy’s sound isn’t affected by your other pedals.
- Page 23 One additional issue that may arise from using the same amp to play your guitar and the BeatBuddy’s beats is that on some amps, the sound of the bass drum will cause the guitar to tremolo, or waver, a bit to the beat. While some...
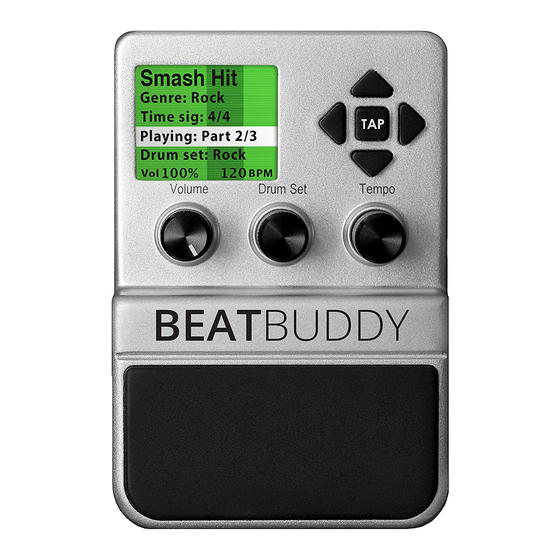
- Page 24 3. How to use the BeatBuddy Visual Display: The BeatBuddy uses a first of it’s kind visual display to show you what is going on with the beat. It uses color codes to show what part is being played. The dark bar is the Visual Metronome. It shows where the beats is in the measure.
- Page 25 Beat- Buddy footswitch (sold separately), since we designed our footswitch to withstand the heavy use of a BeatBuddy performance. If you are not using a BeatBuddy footswitch, make sure that the footswitch is compatible with the...
- Page 26 To configure the BeatBuddy to your footswitch, press the Drum Set and Tempo knobs down at the same time to enter the Settings menu. Select ‘Foots- witch’ and then ‘Footswitch Detector’ and follow instructions. The BeatBuddy will save your settings, so you only have to use the ‘Footswitch Detector’...
- Page 27 • Want to know which beat to use with a particular famous song? Or would you like to find a custom beat made just for that song? Look it up on the our BeatBuddy Tools page! • Navigate through settings, folder and song lists quickly by turning the Tempo knob.
- Page 28 • Starting a song with a double tap will play just the outro fill and end the song… when only a single fill is required! • If the song or drum set name is too long to be displayed on the screen, you can see it scroll again by pressing the Drum Set or Tempo knob twice.
- Page 29 • Use the BeatBuddy Manager (see Section 7) to create a folder on the Beat- Buddy with the songs you’ll use for a show (you can name these folders “Coffee House...
- Page 30 If you think of a cool new tip or trick, please share it with the BeatBuddy community at myBeatBuddy.com/forum. Thanks! :-) 5. BeatBuddy Manager Extra content can be downloaded from the BeatBuddy Online Library at myBeatBuddy.com/library or from the user forum at myBeatBuddy.com/forum.
- Page 31 To use the BeatBuddy Manager software with your BeatBuddy, you can either connect the BeatBuddy to your computer with the included USB cable (make sure the SD card is properly inserted in the BeatBuddy), or put the BeatBuddy’s SD card in your computer’s SD card reader.
- Page 32 IV. Font Size V. Sobriety VI. About BeatBuddy VII. Restore Default Settings I. Sleep Mode - This puts the BeatBuddy in a low power state -- wake it up any time by pressing any knob, button or the main pedal.
- Page 33 • Footswitch Detector - Detects the type of footswitch that is plugged into the BeatBuddy. Use this whenever using a new footswitch with the BeatBuddy or if your footswitch doesn’t seem to be working correctly (such as it only works every other press, or triggers a command on both the press and release).
- Page 34 • 1st Switch Stopped - The function that the 1st (left) switch will do when pressed while no song is playing. • No Action - Nothing happens when pressed • Accent Hit - Triggers a single sound that is set for the song part that is currently playing.
- Page 35 • 1st Switch Playing - The function that the 1st (left) switch will do when pressed while a song is playing (including when it is paused). • No Action - Nothing happens when pressed • Accent Hit - Triggers a single sound that is set for the song part that is currently playing.
- Page 36 III. Main Pedal • Intro - What happens when a song is started. • Enable: Plays the intro fill for the song, if present • Count in: Plays one sound for each beat of one measure and then starts the first song part beat. •...
- Page 37 • Default Tempo - When enabled, it will automatically load the saved tempo for each song. But if you know the tempo of a song you want to play but are searching for the best beat, select ‘Disable’ so the tempo doesn’t change every time you change the song.
- Page 38 • Mute Pause - When enabled, mutes the beat while paused. To be used if the BeatBuddy is 'Slave', controlled by an external MIDI clock. • Enable/Disable • MIDI-Activated - Mute Pause is automatically enabled when BeatBuddy is acting as Slave in MIDI Sync •...
- Page 39 • MIDI Messages - Please refer to our MIDI manual. • Cue Fill Period - Controls when the fill is triggered after the pedal is pressed. Please note that even when set on 'Immediately', if you press the pedal in the last half beat of the measure, it will play the fill in the next measure, because it's very unlikely that you want less than a half beat fill, so you...
- Page 40 • Enable/Disable • Release Time - Period of time over which the BeatBuddy fades out a choked sound (advanced feature). • 0ms - 250ms • Visual Metronome - Sets when the Visual Metronome (the moving bar on the screen) is active.
- Page 41 IV. Font Size- Sets the text size of the content and settings menu • Normal/Large/Extra Large V. Sobriety - Makes the BeatBuddy play like it's been drinking! Great for practice for those real life situations, or just to make your friends laugh :-) •...
-
Page 42: Technical Specifications
9. Technical Specifications Dimensions: 5" long x 3.5" wide x 2.5" high (127mm x 86mm x 63mm) Power: 9v DC, 300mA, center negative Output Impedance: ~26 ohms Input Impedance: > 1Meg ohms Max Input Level: 3.5 dBu Signal to Noise: 95 dB typical D/A: 24 bits, 44,1 kHz Frequency Response: 10Hz to 20 kHz... - Page 43 305-809-6698 If we cannot help you fix the problem, we will have you send the BeatBuddy in for servicing. The warranty remains valid only if the serial number on the unit is not defaced or removed. It does not cover damage due to misuse, unauthorized tampering, accident or neglect.
- Page 44 Thanks for reading the manual! If there is anything you don’t understand, or think that can be explained better, please contact us at Support@singularsound.com 305 - 809 - 6698 or visit the BeatBuddy Community Forum at http://forum.mybeatbuddy.com...
Need help?
Do you have a question about the BEATBUDDY and is the answer not in the manual?
Questions and answers