
Related Manuals for Qualcast CEM 30


Summary of Contents for Qualcast CEM 30
- Page 1 F016J10011A page 1 CEM 30 340W Electric cylinder mower with rear roller Qc electric cylinder mower OPERATING INSTRUCTIONS...
- Page 2 F016J10011A page 2 xx.xx kg XXXX 1/min IPX4 xxxxxxxxxxxx TYP F016 xxx xxx 230V ~ 50/60Hz XXXXW Made in UK. 20xx STOP CEM30...
- Page 3 F016J10011A Page 3...
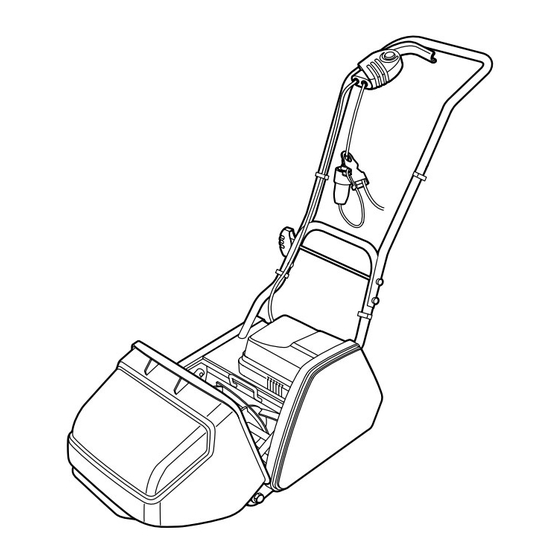
- Page 4 F016J10011A page 4 10 -15 mm 28 29...
-
Page 5: Safety Notes
Safety Notes Warning! Read these instructions care- Mowing on banks can be dangerous: fully, be familiar with the controls and – Mow across the face of slopes – never up and the proper use of the lawnmower. down. – Always be sure of your footing on slopes or wet Explanation of symbols on the lawnmower grass. -
Page 6: Intended Use
Product Specification Cylinder mower Qualcast CEM30 Part number CEM30 Rated power 340W Blade width [cm] Height of cut [mm] 9-32 Grassbox capacity [l] Self-propelled Rake Weight [kg] 23.5 Protection class / II Serial number See serial no 9 [rating plate] on machine... - Page 7 It is recommended for increased electrical Grassbox safety to use a Residual Current Device (RCD) Spring grassbox cradle 11 into pivot with a tripping current of not more than 30 mA. holes 12. Always check your RCD every time you use it. Attach/remove the grassbox as shown.
-
Page 8: Maintenance
Regularly check for obvious defects such as Starting and Stopping loose, dislodged or damaged blade, loose fix- ings, and worn or damaged components. The blade continues to rotate for a few Check that covers and guards are undamaged seconds after the machine is switched off. and correctly fitted. -
Page 9: After Mowing/Storage
Remove pulley 32 and belt 26 by removing Disposal 3 screws 27. Pull the cutting cartridge unit 25 out using the Product, accessories and packaging should be handle. Obtain assistance if required. sorted for environment-friendly recycling. Replace cartridge and retaining Only for EC countries: screws 24. -
Page 10: Fault Finding
Fault Finding The following table gives checks and actions that you can perform if your machine does not oper- ate correctly. If these do not identify/remedy the problem, contact your service agent. Warning: Switch off and remove plug from mains before investigating fault. Machine fails to operate Power turned off Turn power on Mains socket faulty... -
Page 11: Environmental Protection
It is in your best interests to follow the Operating Guarantee Instructions for your mower/scarifier, as a prop- erly cared for product should give many years Turfmech Machinery Ltd guarantees this product of excellent service. against manufacturing defects. We will repair Should you require spares always insist on genu- (or replace at our option) if manufacturing... - Page 12 Notes Your local dealer Turfmech Limited, Hangar 5, New Road, Hixon, Staffordshire ST18 0PJ England F016J10011A 09-11-11...
Need help?
Do you have a question about the CEM 30 and is the answer not in the manual?
Questions and answers