Table of Contents
Advertisement
Advertisement
Table of Contents

Related Manuals for Lamona LAM2300


Summary of Contents for Lamona LAM2300
- Page 1 60cm Canopy Extractor LAM2300 User & Installation Guide...
- Page 2 Dear Customer, Congratulations on your choice of domestic appliance which has been designed to give you excellent service. The user manual will help you use your product quickly and safely. • Please read this user manual before installing and using the oven. •...
-
Page 3: Table Of Contents
User manual LAM2300 Index Before using the extractor Safety General Fire Saftey Safety for Children Safety When Working With Electricity General Information & Operation Extractor Layout Control Panel Layout Using Your Cooker Hood General Cleaning Care and maintenance General Cleaning... -
Page 4: Before Using The Extractor
Before using the Extractor • Make sure that you have removed all packaging, wrappings, stickers and films from the Extractor • It is recommended that you clean the extractor’s surface before using for the first time. Safety • Repair procedures must always be performed This appliance is for domestic extraction by qualified service agents. The manufacturer purposes only. It must not be used for other shall not be held responsible for damages purposes. Commercial use will void the guarantee. arising from procedures carried out by unauthorised persons, which may also void The manufacturer shall not be liable for any damage... -
Page 5: Fire Safety
User manual LAM2300 Fire Safety Do not set your cooker hood less than 700mm above your cooker. When installing the hood, ensure that the following recommended distances are observed • When installed between adjoining wall between the highest point on the hob top... -
Page 6: General Information & Operation
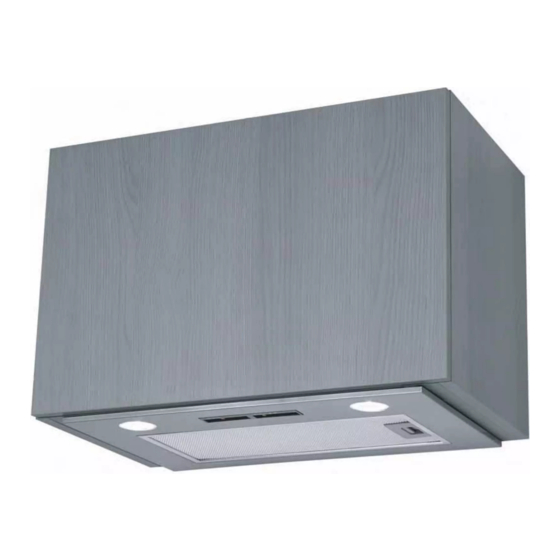
General Information & operation Extractor layout Exhaust / Recirculation Vent Extractor Body Light Control Panel Grease Filter Extractor Facia Dimensions: Features: Extractor width: 525mm • Slider control operation. Extractor depth: 275mm • 3 speed extraction. Extractor height: 162mm • 2 x 40W lights. ( Not including vent adapter) Required aperture: 495mm wide X 275mm • Ducted-out or recirculation modes. -
Page 7: Using Your Cooker Hood
User manual LAM2300 Using Your Cooker Hood This process must be followed before the cooker hood is used for the first time.You should clean the appliance using a damp new cloth and warm soapy water before using the appliance for the first time. You should then dry it thoroughly using a soft cloth. Make sure that it has been installed by a suitably qualified person, as per the installation instructions. To use your cooker hood... -
Page 8: Care And Maintenance
Care and maintenance Before cleaning or attempting any type of maintenance, always make sure that the electricity supply is disconnected. To avoid the possibility of fire, adhere strictly to all of the recommendations included in this booklet, paying particular attention to the grease filters to ensure grease deposits do not build up. The manufacturer declines all liability in cases where the instructions for the appropriate installation, maintenance and use of the extractor hood are not observed. -
Page 9: Carbon Filters
User manual LAM2300 Replacing the Lamps The extractor hood is fitted with lamps that may need to be replaced periodically. • To do this, ensure that the power is switched off and the lamps have had time to cool. • Apply finger pressure to the underside of the lamp that needs to be • Replaced, and twist anticlockwise (from below) to release. • Insert the new 40W type GU10. lamp and twist clockwise (from below) to engage the bayonet pins. -
Page 10: Installation
Installation Methods of Extraction The very best method of clearing the kitchen of unwanted odours is by connecting the appliance to an exhaust duct and venting to the outside atmosphere via the ceiling or an exterior wall. (Suitable ducting kits may be purchased from the depot where you bought the extractor.) You do not need charcoal filters when using the external ducting mode. -
Page 11: Before Beginning Instalation
User manual LAM2300 Before beginning installation • Check that the product purchased is of a suitable size for the chosen installation area. In addition check whether there is an electrical socket available that will be accessible once the hood is mounted. -
Page 12: Connecting To External Ducting
Installing your cooker hood You will have to decide before installing your cooker hood whether to use it in extraction mode or recirculation mode. We recommend that at least two people install this hood. Cut a rectangular aperture in the canopy unit 475mm wide X 275mm 14mm from the front 14mm edge... -
Page 13: Electrical Connections
User manual LAM2300 Electrical Connections IMPORTANT: Ensure that the electricity supply is switched off before connecting. WARNING: This appliance must be earthed! Howdens shall not be held responsible for any damage caused by using the extractor without an earthed connection. -
Page 14: Technical Specification
Technical specification TECHNICAL INFORMATION Dimensions: Extraction capacity: 220 m³/hr Noise level min/max: 48 - 90 dB Width : 525mm Depth : 275mm Height: 162 mm Your Cooker Hood is fitted with: Single motor 100w Slider control operation 3 Speed extraction x2 40W GU10 Lamps 1 Aluminium grease filter Optional Extras: Charcoal filter : HJA2901 (PK2) Ducting kits : APL 2805/6/7... -
Page 15: Troubleshooting
User manual LAM2300 Your guarantee Product Guarantee Details (UK only) Your appliance has the benefit of a comprehensive manufacturer’s guarantee which covers the cost of breakdown repairs. (Details of which are shown on your Proof of Purchase Document). • Any claim during the period of the guarantee (MUST BE ACCOMPANIED BY THE PROOF OF PURCHASE) •... -
Page 16: Your Guarantee
Issue: 09/2014 If supplied, please stick your self adhesive product rating plate here, or make a note of the product serial number below in the box below for future reference. Serial Number : ...................
Need help?
Do you have a question about the LAM2300 and is the answer not in the manual?
Questions and answers