Advertisement
ANS Z83.26-2007/CSA 2.37-2007 Gas-Fired Outdoor Infrared Patio Heaters
ANS Z83.26a-2008/CSA 2.37a-2008 Gas-Fired Outdoor Infrared Patio Heaters
ATTACH YOUR RECEIPT HERE
Serial Number
Purchase Date
Questions, problems, missing parts? Before returning to your retailer, call our
customer service department at 1-8888-775-1330, 8 a.m. - 4 p.m., PST, Monday -
Friday.
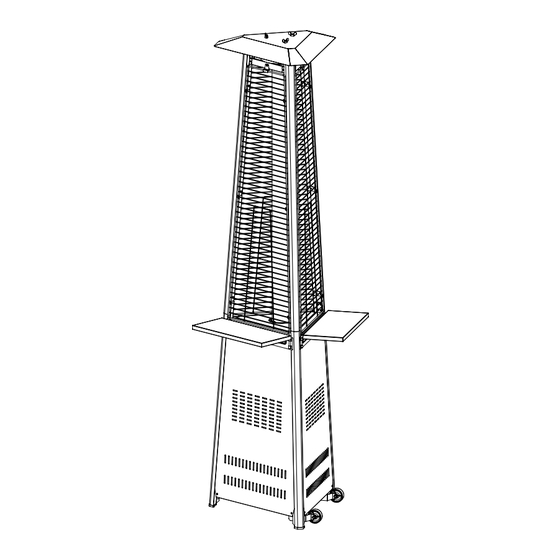
PATIO HEATER
MODEL #BSH-A-SS
Français p. 26
Español p. 51
!
DANGER
FOR YOUR SAFETY
If you smell gas:
1. Shut off gas to the appliance.
2. Extinguish any open flame.
3. If odor continues, keep away from
the appliance and immediately call
your gas supplier or fire department.
!
WARNING
Do not store or use gasoline or other
flammable vapors and liquids in the
vicinity of this or any other appliance.
An LP-cylinder not connected for use
shall not be stored in the vicinity of
this or any other appliance.
!
WARNING:
For Outdoor Use Only
CARBON MONOXIDE
DANGER
HAZARD
This appliance can
produce carbon monoxide
which has no odor. Using
it in an enclosed space
can kill you. Never use
this appliance in an
enclosed space such as a
camper, tent or home.
1
GAS
Advertisement
Table of Contents

Related Manuals for Garden Treasures Living BSH-A-SS


Summary of Contents for Garden Treasures Living BSH-A-SS
- Page 1 PATIO HEATER MODEL #BSH-A-SS Français p. 26 Español p. 51 DANGER FOR YOUR SAFETY If you smell gas: 1. Shut off gas to the appliance. 2. Extinguish any open flame. 3. If odor continues, keep away from the appliance and immediately call your gas supplier or fire department.
-
Page 2: Table Of Contents
TABLE OF CONTENTS PACKAGE CONTENTS Package Contents....................... 3 Hardware Contents.......................4 Safety Information....................... 4 Preparation ......................... 8 Assembly Instructions ......................9 Operating Instructions ......................11 Care and Maintenance ....................... 13 Troubleshooting........................14 Warranty..........................15 Replacement Parts List ...................... 16 PART DESCRIPTION QUANTITY PART DESCRIPTION... -
Page 3: Hardware Contents
HARDWARE CONTENTS (shown actual size) SAFETY INFORMATION DANGER • EXPLOSION - FIRE HAZARD M5 x 12 mm Screw Wing Nut Small Flat Stud M6 x 10 mm Bolt • Keep solid combustibles, such as building materials, paper or cardboard, a safe Qty. - Page 4 SAFETY INFORMATION SAFETY INFORMATION WARNING WARNING • CARBON MONOXIDE HAZARD • This product is fueled by propane gas. Propane gas is invisible, odorless, and flammable. An odorant is normally added to help detect leaks and can be described as a •...
-
Page 5: Preparation
ASSEMBLY INSTRUCTIONS SAFETY INFORMATION WARNING: Two people are required to safely assemble the product! A dented, rusted or damaged propane cylinder may be hazardous and should be checked by your 1. Assemble the three lower supports (K) to cylinder supplier. Never use a propane cylinder with the bottom plate (N) and control box assembly a damaged valve connection. - Page 6 ASSEMBLY INSTRUCTIONS ASSEMBLY INSTRUCTIONS 5. Use Phillips screwdriver (OO) to secure 3. Use Phillips screwdriver (OO) to secure the top plate (D) to the upper supports (E) the block belt (L) to the lower supports (K) with M5 x 12 mm screws (DD). with M5 x 12 mm screws (DD).
- Page 7 ASSEMBLY INSTRUCTIONS ASSEMBLY INSTRUCTIONS 7. Carefully install the glass tube (G) 9. Use Phillips screwdriver (OO) to install between the center of top plate (D) and side panels (J) to bottom of assembly control box assembly (I). Make sure the with M5 x 12 mm screws (DD).
- Page 8 ASSEMBLY INSTRUCTIONS ASSEMBLY INSTRUCTIONS 11. Use Phillips screwdriver (OO) to install 13. Secure the table connect panel (R) to the protective guards (F) to the upper supports (E) side door with M5 x 12 mm bolts (DD). Install with M5 x 12 mm screws (DD) and fixing table (Q) by putting the preassembled bolts brackets (FF) as shown.
-
Page 9: Operating Instructions
ASSEMBLY INSTRUCTIONS OPERATING INSTRUCTIONS To check for a leak: 15. Connect gas hose and regulator (P) to control WARNING 1. Make 2-3 oz. leak check solution (one part box assembly (I). Do not cross-thread. liquid dishwashing detergent and three parts Perform all leak tests outdoors. - Page 10 OPERATING INSTRUCTIONS OPERATING INSTRUCTIONS Lighting (continued): DANGER 4. Push and release the igniter button until pilot flame is • CARBON MONOXIDE HAZARD visible through the glass tube. • For outdoor use only. Never use inside 5. Once the pilot is lit, continue to depress the control knob house, or other unventilated or enclosed for 30 seconds.
-
Page 11: Care And Maintenance
OPERATING INSTRUCTIONS OPERATING INSTRUCTIONS Heater is away from gasoline or other flammable liquids or vapors. WARNING Heater is away from windows, air intake openings, sprinklers and other water sources. FOR YOUR SAFETY Heater is at least 24 in. on top and at least 36 in. on sides from combustible materials. Be careful when attempting to manually Heater is on a hard and level surface. -
Page 12: Troubleshooting
CARE AND MAINTENANCE TROUBLESHOOTING Between uses: PROBLEM POSSIBLE CAUSE CORRECTIVE ACTION • Turn Control Knob OFF. Pilot won’t light 1. Cylinder valve is closed 1. Open valve • Disconnect LP source. 2. Blockage in orifice or pilot tube 2. Clean or replace orifice or pilot •... -
Page 13: Warranty
WARRANTY REPLACEMENT PARTS LIST CUSTOMERS IN USA For replacement parts, call our customer service department at 1-888-775-1330, 8 a.m. - 4 p.m., PST, Monday - Friday. Do not return this product to the store where you purchased it. Please call 1-888-775-1330 for assistance.
Need help?
Do you have a question about the BSH-A-SS and is the answer not in the manual?
Questions and answers