Table of Contents
Advertisement
Advertisement
Table of Contents

Related Manuals for Gericom Cinema XXL G900


Summary of Contents for Gericom Cinema XXL G900
-
Page 3: Limitation Of Liability
Preface Copyright 2004 All Rights Reserved. The information in this document is subject to change without prior notice in order to improve reliability, design and function and does not represent a commitment on the part of the manufacturer. In no event will the manufacturer be liable for direct, indirect, special, incidental, or consequential damages arising out of the use or inability to use the product or documentation, even if advised of the possibility of... - Page 4 Notices Federal Communications Commission Radio Frequency Interference Statement This equipment has been tested and found to comply with the limits for a Class B digital device, pursuant to Part 15 of the FCC Rules. These limits are designed to provide reasonable protection against harmful interference in a residential installation.
-
Page 5: Table Of Contents
Table of Content Chapter 1: Before you Start ............1 Conventions of This Manual ............. 1 Safety Precautions................2 Wichtige Sicherheitshinweise ............4 Things you must remember before working on your computer..7 Chapter 2: Introduction ............... 9 Welcome to the Notebook PC ............9 Unpacking the Notebook.............. - Page 6 Using the Remote Control ..............63 WinDVR Mode ................. 64 Defining the Video Source ..............65 Chapter 11: Troubleshooting .............73 Locating a Problem ................73 Checking Cables and Connections ............ 74 The Power-On Self Test ..............75 General Hardware Problems.............. 75 Contacting Your Dealer ..............
-
Page 7: Personal Inventory
Canadian DOC Notice For Class B Computing Devices This Class B digital apparatus meets all requirements of the Canadian Interference - Causing Equipment Regulations. Cet appareil numerique de la classe B repecte toutes les exigences du Règlement sur le matèriel brouilleur du Canada. Personal Inventory This Notebook computer system is designed for years of productive and pleasurable computing. -
Page 9: Chapter 1: Before You Start
BEFORE YOU START Conventions of This Manual Use this manual will help you get the most from your notebook computer. • If you are an experienced user of computers and/or Microsoft’s Windows operating systems, you might find it useful to read the Quick Start Guide that comes along with your accessories. -
Page 10: Safety Precautions
Safety Precautions This section is designed to assist you in identifying potentially unsafe conditions while working with this product. Required safety features have been installed in the computer to protect you from injury. However, you should use good judgment to identify potential safety hazards: Please read these safety instructions carefully. - Page 11 The equipment has dropped and damaged. If the equipment has obvious sign of breakage. Do not leave this equipment in an environment unconditioned, storage temperature above 60°C (140°f), it may damage the equipment. The unit can be operated at an ambient temperature of max. 35°C. The sound pressure level at the operators position according to IEC 704-1: 1982 is equal or less than 70 dB(A).
-
Page 12: Wichtige Sicherheitshinweise
When using your telephone equipment, basic safety precautions should always be followed to reduce the risk of fire, electric shock and injury to persons. These precautions includes the following: • Do not use this product near water, for example, near a bathtub, washbowl, kitchen sink or laundry tub, in a wet basement or near a swimming pool. - Page 13 Verlegen Sie die Netzanschlußleitung so, daß niemand darüber fallen kann. Es sollte auch nichts auf der Leitun abgestellt werden. Alle Hinweise und Warnungen, die sich am Gerät befinden, sind zu beachten. Wird das Gerät üeinen längeren Zeitraum nicht benutzt, sollten Sie es vom Stromnetz trennen.
- Page 14 Das Kabel-Set muss für das Land, in dem es eingesetzt wird, zugelassen sein. Der Gerätestecker des Kabels muss in eine CEE22/ EN603/ IEC 320 Buchse passen. Für die USA und Kanada: Das Kabel-Set muss UL-gelistet und CSA zertifiziert sein. Die Minimalanforderungen für das Kabel entsprechen No.
-
Page 15: Things You Must Remember Before Working On Your Computer
• Benutzen Sie das Telefon nicht um ein Gasleck zu melden, falls es sich in der Nähe des Lecks befindet. • Benutzen Sie nur solch ein Stromkabel, wie in dieser Anleitung beschrieben. Benutzen Sie das Netzteil nicht in unmittelbarer Nähe zu Wasser oder anderen Flüssigkeiten. -
Page 16: Suitable Place To Work
Heat, Cold, Humidity, and Glare Find a suitable place for your computer that’s not too hot, too cold, too dark, or too bright. Glare can make it hard to read the screen. • Try to avoid the computer components from being destroyed if it is over heated, so try to allow plenty of room for air to circulate around the case. -
Page 17: Chapter 2: Introduction
INTRODUCTION Welcome to the Notebook PC Congratulations on your purchase of the Notebook PC. Your Notebook features the latest advances in portable computing technology. Notebook’s modular design provides maximum expandability without compromising portability. The high-performance CPU and enhanced IDE hard drive provides you with extra processing power for handling complex graphics and running large programs. -
Page 18: Getting To Know Your Computer
Do not throw the packaging materials away. You may need them later if you have to ship the computer for repairs. Because the Notebook computer is available in different configurations, some of the features mentioned in this manual might not be included on your computer or may differ slightly. - Page 19 To shutdown the system in non-Windows (DOS mode, System POST, Setup Manual or Quick Boot Manual) based environment, enable the lid switch. This will prevent the system from damaged if it exceed the temperature limit. In the windows environment the lid switch will be controlled by Windows.
- Page 20 PCMCIA Hard Disk access access Optical drive NumLock access mode CapsLock ScrollLock mode mode Wireless LAN Switch Button Power/Resume Button Short-cut Keys Please noted that the Music/DVD/TV function will only be applicable when the InterVideo applications on the Support installed into your system.
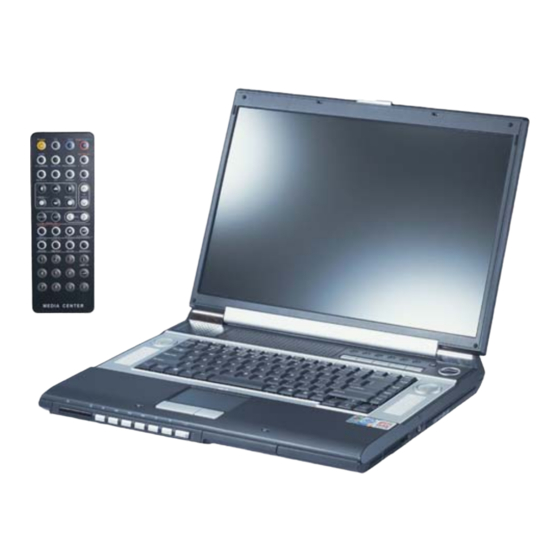
- Page 21 Internet Explorer Button Keyboard TouchPad TouchPad Buttons The Built-in Microphone Stereo Speakers The Front Side Infrared Remote Control The Stop Button The Previous Track Button The Play/Pause Button The Next Track Button The Volume Down Button The Volume Up Button Audio DJ Power Button You will not be able to use this button to turn off the Windows based CD Player application when the notebook...
- Page 22 The Left Side DC IN Connector PCMCIA Socket Cover PCMCIA Socket Button USB Ports LED Indicators Battery Charge This LED will light when the battery is in charging mode.
- Page 23 Suspend This LED will light when the system is in suspend mode. Power On This LED will light when the system is power on. The Right Side Card Reader Card Reader Eject Button Aside from the CardReader function, this model provides another kind of option with the RAID function that lets you respond for unexpected hardware or software failure and performance.
- Page 24 Front Speaker Jack Rear Speaker Jack Bass & Center Speaker Jack Fiber optic transmitting connector LAN Port When using a LAN, please use an EMI Shielding Cable to minimize an inteference when transmitting. Modem Port Always disconnect all telephone lines from the wall outlet before servicing or disassembling this equipment.
- Page 25 The Bottom Panel Hard Disk Drive/Card Reader Battery Battery Release Latch CPU Compartment Expansion Compartment Optical Drive Release Latch Optical Drive...
- Page 26 Page intentionally left blank...
-
Page 27: Chapter 3: Getting Started
GETTING STARTED Connecting to a Power Source Connecting the AC Adapter A universal AC adapter is provided to supply your computer with power and also charge the computer’s battery pack. The adapter’s AC input voltage can range anywhere from 100 to 240 volts, covering the standard voltages available in almost every country. -
Page 28: Turning On Your Notebook Computer
The best kind of AC power source to connect your Notebook to is a UPS (Uninterruptible Power Supply). Lacking this, use a power strip with a built-in surge protector. Do not use inferior extension cords as this may result in damage to your Notebook. -
Page 29: Inserting And Removing The Battery Pack
Operating on Battery Power Your computer comes with a rechargeable battery pack that lets you operate the computer without an external power source. When the battery pack is fully charged, you can operate the computer for approximately 2.5 hours under the following conditions: •... -
Page 30: Charging The Battery Pack
Turn off the notebook, and disconnect the AC adapter. Close the LCD panel and turn it over and place it on a solid, flat surface. Lift the release latch to release the battery from the bay. At this time the battery will now be angled slightly out of the bay. Hold the battery at the finger grip and lift it out of the compartment. -
Page 31: Chapter 4: Using The Notebook Computer
USING THE NOTEBOOK COMPUTER Adjusting the LCD Screen Display The LCD screen display can be adjusted by the following key combinations. KEYS FUNCTIONS [Fn] + [F7] Decreases the brightness level. [Fn] + [F8] Increases the brightness level. [Fn] + [F10] Use this key combination to expand your video screen or toggle to its original size. -
Page 32: External Crt Display
External CRT Display You can hook up an external monitor through the 15-pin CRT connector. • LCD only • CRT only • Simultaneous display of the LCD screen and CRT monitor • Simultaneous display of the LCD screen and TV screen •... - Page 33 To disable the Notebook numeric keypad while keeping the keypad on an external keyboard activated, use the [Fn] + [NumLk] hot key on the Notebook keyboard. The Notebook’s Hot Key Controls KEYS FUNCTION(S) Power Button Press this button once to power on or enter the suspend/resume mode.
-
Page 34: The Touchpad
KEYS FUNCTION(S) Email Button Open the Microsoft’s Outlook The TouchPad The touchpad is a rectangular electronic panel located just below your keyboard. You can use the static-sensitive panel of the touchpad and slit it to move the cursor. You can use the buttons below the touchpad as left and right mouse buttons. -
Page 35: Pcmcia Cards And Expansion Sockets
The HDD is removable allowing for easy upgrades. The DVD-ROM/Combo Features of the DVD-ROM/Combo Module The features of the DVD-ROM/Combo drive are listed below. • The Audio Play feature allows you to play music CDs • Front panel load/unload button •... -
Page 36: Power Saving Modes
The system will beep once to indicate that it has detected the PC card. To remove a PC card push the eject button, the button will pop-out, push the button again to eject the PCMCIA. When inserting a Type II PC card, make sure the connector is inserted in the socket. -
Page 37: Preparing The Battery Pack For Use
Preparing the Battery Pack for Use Before using the battery pack for the first time, the Smart Battery IC within the battery pack should be calibrated in order to get accurate reporting of remaining battery life status. To calibrate the battery pack follows the instructions below: Insert the battery into the battery compartment and turn on the Notebook. -
Page 38: Battery Status
Battery Status Windows XP has an applet in the Control Panel that will display an icon in the Windows taskbar indicating when the Notebook is running on battery power or is attached to the AC adapter. This applet also displays a meter that indicates how much charge is remaining in the battery. -
Page 39: Resetting The System
Never remove the battery pack while the power is on as this may result in data loss when the system loses power. Resetting the System After installing a software application package, you may be prompted to reset the system to load the changed operating environment. To reset the system, or “reboot,”... - Page 40 Page intentionally left blank...
-
Page 41: Chapter 5: Desktop Operation
DESKTOP OPERATION This chapter discusses those functions of your notebook that are typical of desktop systems. Audio The Multimedia Sound System The Notebook’s built-in audio capabilities allow you to take advantage of a wide range of education and entertainment multimedia software. The Notebook is equipped with internal stereo speakers, a microphone, and input audio ports for external audio units. -
Page 42: Playing Sound Files
For a high-quality sound, click on the "Volume Control" at the lower right end of your screen. From the Volume Control windows, click on the "Advanced" tab, click and select the "Microphone Boost" item. Playing Sound Files Your notebook can play audio files stored in MIDI, WAVE or MP3 file format. -
Page 43: Installing The Modem
Installing the modem Using the modem to connect to the Internet is a common practice. Connect the modem to this notebook according to the methods described on the rear, and then use a phone cable to connect the slot on the modem to the jack of the phone line. -
Page 45: Chapter 6: Configuring And Maintaining Your System
CONFIGURING AND MAINTAINING YOUR SYSTEM Introduction The BIOS (Basic Input and Output System) Setup program is a menu driven utility that enables you to make changes to the system configuration and tailor your system to reflect installed hardware or alter system performance. -
Page 46: Item Specific Help
Item Specific Help On the right side of the Setup screen is an area labeled Item Specific Help. This area will list navigation key shortcuts and information that is specific for the item that you are currently editing. The Menu Bar The top of the screen has a menu bar with the following selections: •... -
Page 47: Launching Submenus
Legend Key Alternate Function right. ↑ or ↓ arrow keys Moves the cursor up and down between fields. Enter Moves the cursor to the next position available in the field. Shift + Tab Moves the cursor to previous position available in the field. Scrolls backward through the Minus key ( values for the highlighted field. -
Page 48: Save Changes And Exit The Setup Program
Save Changes and Exit the Setup Program Refer to the Exit menu section of this chapter for detailed information on saving changes and exiting the setup program. The Main Menu When the Setup program is accessed, the following screen appears:... - Page 49 The Advanced Menu Selecting Advanced from the menu bar displays the advanced menu: If your system support InterVideo application, select the “InterVideo” item from the “Shortcut Key Working With” selection menu. If your system supports the WinXP MCE application, select the “WinXP MCE”...
- Page 50 The Security Menu The Notebook’s advanced system of security allows you to set a password to prevent unauthorized access to system resources, data, and the BIOS Setup Program.
-
Page 51: The Boot Menu
The Boot Menu The Boot menu allows the user to specify the order in which the Notebook is to check for a device to boot the system. You can also configure the way that the system will boot up. To make changes, select Boot from the menu bar. -
Page 52: The Exit Menu
The Exit Menu Once you have made all of your selections from the various menus in the Setup program, you should save your changes and exit Setup. Select Exit from the menu bar to display the following menu:... -
Page 53: Chapter 7: Raid Setting (Option)
RAID SETTING (OPTION) Raid Setting (If Your System Supports RAID) Short for Redundant Array of Independent (or Inexpensive) Disks, a category of disk drives that employ one or more drives in combination for to respond gracefully to an unexpected hardware or software failure and performance. -
Page 54: Installing The System Os
• Press <Ctrl-F> key combination to further enter the available option in installing the RAID setting. • Select from 1 to 5 for various option. • Press the “ESC” key to exit after the application has been properly installed. Installing the System OS The support CD that comes along with your package contain the RAID driver for you to install in order to run this application. - Page 55 • Connect the floppy disk drive along with the diskette inserted inside to your notebook computer. • Insert your OS CD into the optical drive. • Power on your computer and boot directly from the OS CD. • Follow the instruction on the display and press the “F6” button. •...
- Page 56 • Again press the “Enter” key to select the Win XP OS and proceed with the installation of the Win XP on your system.
-
Page 57: Chapter 8: Microsoft Center Edition (Mce) (Option)
MICROSOFT CENTER EDITION (MCE) (OPTION) Windows XP Media Center Edition (MCE) The Windows MCE is a complete software for home PC operating system for you to enjoy entertainment choices together in one place easily accessible from anywhere in the room. This will benefits the consumers to enjoy Media Center experience in their own living room. - Page 58 Page intentionally left blank...
-
Page 59: Chapter 9: The Software Utilities Disks
THE SOFTWARE UTILITIES DISKS There are two separate procedures on how to install the driver: AutoRun installation and Manual installation. AutoRun Installation Installing the AGP Driver Please follow these instructions to install the driver: • Insert the DVD-ROM Driver into your DVD-ROM drive. •... -
Page 60: Intalling The Audio Driver
Intalling the Audio Driver Please follow these instructions to install the driver: • Insert the DVD-ROM Driver into your DVD-ROM drive. • Click “Start” and Select “Run”. • Type the following: D:\Driver\Audio\Setup.exe (If D is not your DVD-ROM drive, substitute D with the correct drive letter). •... -
Page 61: Installing The Touchpad Driver
• Insert the DVD-ROM Driver into your DVD-ROM drive. • Click “Start” and Select “Run”. • Type the following: D:\Driver\TVTuner\ Setup.exe (If D is not your DVD-ROM drive, substitute D with the correct drive letter). • Click on “Setup” to begin the Installation Wizard. •... - Page 62 • Restart the system. Installing the Billionton/SmartLink Modem Driver Please follow these instructions to install the driver: • Insert the CD-ROM Driver into your CD-ROM/DVD-ROM drive. • Click “Start” and Select “Run”. • Type the following: D:\Driver\MDC\Billionton\Modem\Win2KXP\Setup.exe (If D is not your CD-ROM/DVD-ROM drive, substitute D with the correct drive letter).
- Page 63 • Double click on the "PCMCIA adapters" , double click the "Generic CardBus Controller" and click on the "Driver" tab. • Click the "Update Driver" tab and select the "Install from a list or specific location (Advanced)" item and click "Next". •...
-
Page 64: Vga Utilities
VGA Utilities After you have restarted Windows, open the “Control Panel” and double click on the “Display” icon. From the “Display Properties” window, select the “Settings” tab and click on the “Advanced” tab to enter the “(Multiple Monitors) on ATi MOBILITY RADEON 9600 Series Properties"... - Page 65 ATI Adapter ATI’s Display The ATI’s Display driver allows three simultaneous outputs to LCD, CRT, LCD/CRT, TV/LCD, LCD/TV and CRT. Before proceeding, be sure the monitor is connected to the computer. User can also use hotkeys by typing the name that corresponds with the combinations mentioned above.
- Page 67 Color You can adjust the right resolution for your screen display.
- Page 68 Options Display all the items concerning the ATI related function.
- Page 69 Overlay...
- Page 70 Page intentionally left blank...
-
Page 71: Chapter 10: Viewing Live Video
VIEWING LIVE VIDEO The Utility allows you to access the entire range of display controls and configuration options. Its live video can co-exist with other applications running at the time. In addition, you have the choice of keeping the default video window size, scaling it to any other size or using the entire screen for video display. -
Page 72: Cable Connection
• DVR Mode Button - Press the DVR button if you want to use the WinDVR software. “WinDVR” gives you high-quality digital recording of your favorite TV shows on your PC. • DVD Mode Button - Press the DVD button if you want to use the WinDVD software. -
Page 73: Defining The Video Source
Defining the Video Source Select the PAL, NTSC or SECAM, depending on which standard the selected source is using. The factory default is the standard used by your purchase country, and normally there is no need to change this setting. If you are working outside your country, you are required to adjust the setting of our video source. - Page 74 Application buttons in DVR mode TV - Launch the WinDVR application Channel Surfing - Surf channels by displaying 16 channels at once. Full screen - Change display size to full screen. Mute - Mute or restore sound when watching TV. C.C.
- Page 75 Select - Right-click menu for selection. CH Up & Down - Selects next higher or lower channel in channel memory. Replay - Playback recorded program from the list. Skip - Skip commercial. Volume (Volume up and down) - Increase and decrease sound. Stop - Stops functions such as record, play, rewind, forward and pause.
- Page 76 Application buttons in DVD mode DVD - Launch the WinDVD application. Audio Selection - Selects a language. Subtitle - Activates language subtitles. Full screen - Change display size to full screen. Angle (Angle Selection) - Allows multiple angle viewing Mute - Mute or restore sound when watching CD title or MPEG file.
- Page 77 Please take note that when you are playing the DVD applicaton, you will only be able to use the Remote Control DVD button if your system support the InterVideo WinCinema application. your system support WinXPMCE application, you will have to use the “Microsoft Remote Control”...
-
Page 78: Application Buttons In Music Mode
Application buttons in Music mode Music - Launch the WinRIP application. DSP Toggle – Let you enable or disable the DSP window when the WinRIP application is launched. Mute - Mute or restore sound when playing music. Arrow Up and Down - Navigates up or down. - Page 79 Application buttons in Audio DJ mode Audio DJ - Launch the Audio DJ application when the system is off. Mute - Mute or restore sound when listening audio DJ. Volume (Volume up and down) - Increase and decrease sound. REW - Play disc in fast reverse mode.
- Page 80 Page intentionally left blank...
-
Page 81: Chapter 11: Troubleshooting
TROUBLESHOOTING This chapter describes locating and solving problems that you may encounter while using your computer. Locating a Problem Problems with your computer can be caused by something as minor as an unplugged power cord – or as major as a damaged hard disk. The information in this chapter is designed to help you find and solve minor problems. -
Page 82: Checking Cables And Connections
Checking Cables and Connections Start by performing a careful visual inspection of the exterior of the computer. If no LEDs are illuminated, make sure that your computer and its peripherals are getting power and communicating with each other properly. To check the power cables, and connections: If you have been using battery power, connect the Notebook to an external power source and make sure that the battery has a charge. -
Page 83: The Power-On Self Test
The Power-On Self Test The Power-On Self Test (POST) runs every time you turn on or reset the Notebook. The POST checks memory, the main system board, the display, the keyboard, the disk drives, and other installed options. A few seconds after you turn on your computer, a copyright message appears on your display screen. - Page 84 Solution: Please discharged to less than 95% of its capacity then recharge the battery. Problem: Failure in the installation of the Audio driver. Be sure to first remove the current audio device from Solution: your system. Please follow the instruction on the installation of audio driver.
-
Page 85: Contacting Your Dealer
Problem: You can’t save data to disk. Solution: Ensure that the disk has been formatted. Consult your operating system manual for information on formatting floppy diskettes. Problem: You cannot use the mouse. Solution: Check the cable connection. Check the mouse with another application to see if there is a software incompatibility problem. - Page 86 Page intentionally left blank...
-
Page 87: Chapter 12: How Do I Expand My Notebook
HOW DO I EXPAND MY NOTEBOOK Upgrading your Memory Refer to the following instructions and illustration for information on upgrading your notebook's memory. Turn off the computer and disconnect the AC adapter and all peripherals. Open your computer and locate on the 4 grip of the keyboard attaching to the slot. -
Page 88: Easy To Upgrade Hdd Module
To install the new memory card, hold the card with its gold edge connector toward the edge connector slot of the compartment. To help you orient the cards, the edge connector has been made with two unequal-length sections. You will only be able to insert the card in one direction. - Page 89 How to install your New Hard Drive You will need to align the tabs on the drive bracket with the slots on the bay. Press down gently on the drive bracket until it engages with the system. Do not force the drive into place this can bend the pins on the hard drive.
-
Page 90: Cpu Upgrade
If your System supports CardReader (Optional) Another option if your system supports a 6-in-1 card reader module that is swappable with the 2 HDD. CPU Upgrade To upgrade your CPU, follow the procedures below: Turn the notebook over so that the rear ports are facing you. Locate for the expansion compartment. - Page 91 Remove all the screws attached to the heatsink. Before removing the screws, there are certain measures to followed in removing the heatsink To remove the heatsink, first loosen the screw carefully. After loosening one screw, be certain that the next to be loosen should be the screw on its adjacent side as shown on the illustration.
- Page 92 Page intentionally left blank...
-
Page 93: Appendix A: Specification
SPECIFICATION Detailed Notebook Specifications • Intel P4 Northwood series 2.4G/2.6G/2.8G/3.0G/3.2G CPU, 512KB L2 cache on die, CPU front-side bus (FSB) 800 MHz, supports Hyper-Threading Technology • Intel P4 Prescott series 2.8G/3.0G/3.2G CPU, 1 MB L2 cache on die, CPU front-side bus (FSB) 800 MHz, supports Hyper- Threading Technology •... -
Page 94: Main Memory
• USB 1.1/2.0 host controller • Dual IDE Master/ Slave Controller • Integrated Fast Ethernet MAC controller • Integrated Audio controller w/ AC97 interface: AC97 v2.2 compliance • Integrated IEEE 1394a host controller • Advanced Power Management: meets ACPI v1.0b requirement, meets APM 1.2 requirement •... - Page 95 Disk Array (Factory Option) Controller • Promise PDC20265R Bus Mastering Ultra DMA PCI— ATA/ATAPI Controller Features • Supports RAID 0 or RAID 1 • Single chip ATA/ATAPI controller implementation for easy integration • Bus mastering design takes full advantage of multi-tasking, multi- threading operating systems and greatly improves performance •...
-
Page 96: Pointing Devices
• USB bus power and self power capability. Lower power consumption. • Internal PLL, only takes 12MHz crystal to provide 48MHz frequency. Supports Compact Flash card (CF), Microdrive card (MD), Smart Media card (SM), Multi Media card (MMC), Secure Digital card (SD), and Memory Stick card (MS) interfaces Pointing Devices •... -
Page 97: Tv Tuner Module
• Ability to play DVD/Music when powering on the system • Operation keys: (Play/Pause, FF, RW, Stop, Volume Up, Volume Down) Communication Gigabit Lan (Factory Option) • Controller: Marvell 8001 Integrated Gigabit Ethernet Controller • Supports PCI 2.2, 32bit, 33/66 MHz •... - Page 98 DVD mode: For playing the DVD with high-quality picture and supporting the time stretching Music mode: For enjoying the music and lets you can record, store and organize your music collection AudioDJ mode: For enjoying the music from Audio DJ without power on the system I / O Ports Standard Ports...
-
Page 99: Power Management
Graphic and Video Controller • ATI Mobility M11-P, 708-pin BGA package Features • 3D Acceleration Feature: four parallel 3D rendering pipelines/ full DirectX9 Pixel Shader 2.0 support • Dual Display: Dual independent display (LCD/DVI, DVI/CRT, LCD/TV, CRT/TV, etc), integrated TV encoder w/ on-chip triple •... -
Page 100: Software Specifications
• Removable and rechargeable • Charging time for one battery pack: 3.5 hours to full charge when system off or in suspend • More than 2.0 hours battery lifetime under Ziff-Davis Inc. BatteryMark 4.01 Test with Intel 478 pin Northwood 2.4GHz CPU and 17”... - Page 101 • VGA driver, • Audio driver, • Touch-Pad driver, • Modem driver, • LAN driver, • WLAN driver, • RAID driver, • Card reader driver, • AV function applications...
Need help?
Do you have a question about the Cinema XXL G900 and is the answer not in the manual?
Questions and answers