Otto Bock Kimba neo Instructions For Use Manual
Hide thumbs
Also See for Kimba neo:
- Instructions for use manual (60 pages) ,
- Service manual (44 pages) ,
- Instructions for use manual (44 pages)

Related Manuals for Otto Bock Kimba neo


Summary of Contents for Otto Bock Kimba neo
- Page 1 Kimba neo Instructions for Use (User) ..................
- Page 2 2 | Ottobock Kimba neo...
-
Page 3: Table Of Contents
............................6.8.3 Grab rail ............................6.8.4 Armrests ............................6.8.5 Headrests ............................6.8.5.1 Headrest supports ..........................6.8.5.2 Integrated headrests ........................... 6.8.6 Safety belts ............................6.8.6.1 Lap belt ............................. 6.8.6.2 Four-point belt ............................ 6.8.6.3 Five-point belt ............................. Kimba neo Ottobock | 3... - Page 4 Disinfection ............................Maintenance ..............................Maintenance intervals .......................... Maintenance Tasks ..........................Disposal ................................Disposal Information ..........................Legal Information .............................. Service life ............................Liability .............................. CE Conformity ............................ Warranty terms ........................... Appendices ................................ 10.1 Technical Data ............................ 4 | Ottobock Kimba neo...
-
Page 5: Foreword
► Follow the safety instructions. INFORMATION ► These instructions for use (user) can be viewed and downloaded from the homepage www.ottobock.com. It is possible to increase the display size of the PDF document stored there. ► Please note that the instructions for use are revised regularly. The latest version can be viewed and down... -
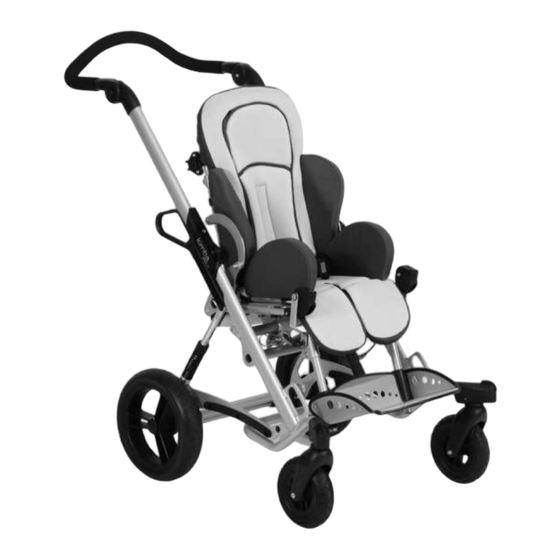
Page 6: Product Overview
Product Description 2.2 Product Overview Kimba Neo – outdoor mobility base with multifunctional seating unit and "swiveling" front wheels option 1 Plug-on rear wheel 6 Angle-adjustable backrest 2 "Swiveling" front wheel (option) 7 Adjustable push bar 3 Front lashing ring... - Page 7 Product Description Kimba neo – outdoor mobility base with multifunctional seating unit and "swiveling" front wheels option 1 Plug-on rear wheel 6 Adjustable push bar 2 "Swiveling" front wheel (option) 7 Release handle, folding mechanism 3 Swivel lock 8 Separate seat tilt feature on frame...
-
Page 8: Safety
Safety Kimba neo – outdoor mobility base with "fixed" front wheels 1 Plug-on rear wheel 5 Adjustable push bar 2 Plug-on "fixed" front wheel 6 Release handle, folding mechanism 3 Front lashing ring 7 Suspension 4 Seat adapter 8 Rear lashing ring 3 Safety 3.1 Explanation of Warning Symbols... -
Page 9: General Safety Instructions
► Using a rehab buggy beyond normal conditions may be dangerous. ► Please note that this product is not suitable for jogging, running, skating, etc. ► Do not exceed the maximum load capacity (see section "Technical Data"). Kimba neo Ottobock | 9... - Page 10 ► Check before using the product that the skin is not broken in areas subject to prolonged pressure (e.g., but tocks, back and rear side of the thighs). ► No liability is assumed for injuries caused by the use of the product with broken skin. 10 | Ottobock Kimba neo...
-
Page 11: Further Information
Should this happen, remove your product from the area where the alarm was triggered. 3.5 Name plate and warning labels 3.5.1 Name plate Label Meaning Type designation Manufacturer article number Maximum load capacity (see the chapter "Technical Data") Manufacturer information/address/country of origin Kimba neo Ottobock | 11... -
Page 12: Warning Labels
ACHTUNG! Lassen Sie Ihr Kind nicht unbeaufsichtigt! ATTENTION! Never leave your child unattended! ACHTUNG! Dieser Sitz ist für Kinder unter 6 Monaten nicht geeignet! ATTENTION! This seating unit is unsuitable for children aged below 6 months! 12 | Ottobock Kimba neo... -
Page 13: Delivery
► Secure the seating unit using the seat lock. The following steps must be taken to make the rehab buggy ready for use: Attaching the rear wheels 1) If wheel locks are engaged: disengage wheel locks. Kimba neo Ottobock | 13... - Page 14 3) Slide the seat lock to the left to engage it (see Fig. 10). 4) Check that the seat and the mobility base are securely connected. You can do this, for example, by pulling back the backrest. 14 | Ottobock Kimba neo...
-
Page 15: Usage
User tipping over or falling ► In the interest of the user's safety, check the product for correct function before each use. ► Please also read the instructions in the section "Maintenance" > "Maintenance Intervals". Kimba neo Ottobock | 15... -
Page 16: Multifunctional Seating Unit (Standard Seat)
3) Pull the release lever located under the seat up to the edge of the seat (see Fig. 12). → The clutch will now release the seat adapter. 4) Tip the seat back at an angle of approx. 45° and then lift it up (see Fig. 8). 16 | Ottobock Kimba neo... -
Page 17: Rotating The Seating Unit
→ The seat is now tilted forward approx. 10%. 2) Remove the seating unit (see Page 16). → The seat adapter is now freely accessible. 3) Pull the key ring (see Fig. 16/see Fig. 17, item 1) to release the locking pin. Kimba neo Ottobock | 17... -
Page 18: Adjusting The Backrest Angle
2) Move the backrest forward/backward to the desired position. The maximum position is lying flat (see Fig. 19) INFORMATION: Please note that in the maximum position (lying flat), the footrest must be adjusted so that the user's feet can comfortably reach it. 3) Turn the knob clockwise to fixate the back angle. 18 | Ottobock Kimba neo... -
Page 19: Adjusting The Seat Angle
If necessary, place your other hand at the backrest or under the seat to secure the user. ► Do not reach into the adjustment mechanism when changing the seat tilt settings. The alternative seating system can be adjusted as needed within the range from -10° to +35°: Kimba neo Ottobock | 19... -
Page 20: Footrest (Multifunctional Seating Unit)
2) Adjust the knee angle. 3) Firmly close the adjustment lever. 4) Prior to use, check the secure position of the footrest. To do so, press the footrest down. → The knee angle must not change. 20 | Ottobock Kimba neo... -
Page 21: Folding Up The Footrest
1) Press both buttons on the setting joints on both sides simultaneously (see Fig. 28, item 1). 2) Move the pushbar to the desired position (see Fig. 28, item 2). 3) Release the buttons. 4) Move the pushbar up or down slightly until the joints click audibly into place. Kimba neo Ottobock | 21... -
Page 22: Brake
The suspension can be adjusted continuously according to the user's weight and the conditions of the road/sur face: 1) Twist the adjustment rings on both sides of the frame equally (see Fig. 31, item 1). → Clockwise: the suspension becomes tighter. 22 | Ottobock Kimba neo... -
Page 23: Additional Options
The rehab buggy can be equipped with swiveling front wheels to make steering easier. If needed, the caster wheels can be locked with the integrated swivel lock. This function increases directional stability on uneven ground. Kimba neo Ottobock | 23... -
Page 24: Tip-Assist
3) Press down the grab rail until the tripod springs lock into place. 6.8.4 Armrests CAUTION Improper lifting by attendants User may fall or tip over ► The armrests must not be used to lift the seating unit or the entire rehab buggy. 24 | Ottobock Kimba neo... -
Page 25: Headrests
With this option (see Fig. 40), the free space in the head region is adjusted through the insertion of foam pads into the lateral supports (adjustment range: 3 cm in 1-cm increments). The option has been preset by the qualified personnel. Kimba neo Ottobock | 25... -
Page 26: Safety Belts
The rehab buggy can be equipped with a four-point belt (see Fig. 44). It additionally stabilises the pelvis and shoulders and prevents the user from sliding out of the seat. The buckle makes it easy to get in and out. 26 | Ottobock Kimba neo... -
Page 27: Five-Point Belt
3) Adjust the shoulder straps using the clip buckle at the base of the backrest (see Fig. 43). → The five-point belt is adjusted correctly when the closed belt buckle lies against the child's abdomen (see Fig. 45). Kimba neo Ottobock | 27... -
Page 28: Positioning Aids
The rehab buggy can be equipped with positioning systems. The option has been installed and preset by qualified personnel. If the option is too tight or cannot be locked, the positioning system can be adjusted subsequently if necessary. 28 | Ottobock Kimba neo... -
Page 29: Thoracic Supports
CAUTION! If the pelvic band is too loose, the pelvis can slide forward and lead to incorrect positioning or cause the user to slide out of the buggy. Make sure the user is correctly positioned in the seat. Kimba neo Ottobock | 29... -
Page 30: Chest And Shoulder Support
Please ensure that the child is posi tioned correctly in the seat. The lower pad belts must lie firmly against the spinae. 6.8.7.5 Fixation Vest INFORMATION For further information, please see the instructions for use included with the product. 30 | Ottobock Kimba neo... -
Page 31: Groin Strap
For further information, please see the instructions for use included with the product. The rehab buggy can be equipped with a groin strap that secures the pelvis in the seat for certain indications (see Fig. 62). Kimba neo Ottobock | 31... -
Page 32: Neck Support
6) By pulling on the free belt ends in the belt adjustment, the length of the leg straps can be adjusted, if needed (see Fig. 64, item 2). 6.8.7.7 Neck Support The shaped padding helps to immobilise the user's head in the rehab buggy. The option has already been installed by qualified personnel. 32 | Ottobock Kimba neo... -
Page 33: Lumbar Padding
(see Fig. 68). Using the hook-and-loop foot strap 1) Open the velcro/fleece fastener. 2) Place the foot on the footrest. 3) Pull the strap firmly around the shoe and close the velcro/fleece fastener fully. Kimba neo Ottobock | 33... -
Page 34: Tray
3) Adjust the angle: release the adjustment lever under the tray and set the tray angle by turning the tray at the joint (see Fig. 70, item 2). Then firmly close the adjustment lever. 6.8.9 Canopy CAUTION Exposed pinch points Risk of crushing or pinching the fingers ► Do not reach into the folding mechanism when folding/unfolding. 34 | Ottobock Kimba neo... - Page 35 Opening the window allows for permanent visual contact with the child (see Fig. 73). • Removal of the back part allows for improved ventilation (e.g., in case of accumulating heat in summer, see Fig. 74). • The rain cover bag contains the rain cover (see Fig. 76). Kimba neo Ottobock | 35...
-
Page 36: Rain Cover
→ Front: e.g., at the footrest tube (see Fig. 79, item 2) Using the slip sack 1) If needed: insert/remove winter part using snap fasteners. 2) Open the zipper and place the user inside. 3) Close the zipper and the closures. 36 | Ottobock Kimba neo... -
Page 37: Frame Padding
The rehab buggy can be equipped with a storage basket. The storage basket is fastened to the frame via snaps and hook-and-loop fasteners (see Fig. 81, item 1; see Fig. 82, item 1). The storage basket can be removed for cleaning purposes. Kimba neo Ottobock | 37... -
Page 38: Buggy Board
The securing strap can be fastened above the folding lock to the ratchet joint (see Fig. 85, item 1). Note on use • The folded-up buggy board must be secured with the securing strap supplied by the manufacturer (see Fig. 85, item 2). 38 | Ottobock Kimba neo... -
Page 39: Platform For Respirator
1) Only when the tube is vertical: secure the self-adhesive hook-and-loop straps in the desired position and at the correct distance apart. These secure the cup holder when the bottle is full. 2) Secure the cup holder with the hook-and-loop straps in the desired position. Kimba neo Ottobock | 39... -
Page 40: Footrest Padding
The option has been attached to the footrest by qualified personnel. 6.8.19 Incontinence Cover The incontinence cover (see Fig. 92) protects the padding of the multifunctional seating unit. The incontinence cover can be removed for washing. Close the hook-and-loop straps before washing. 40 | Ottobock Kimba neo... - Page 41 3) Remove the incontinence cover from the back padding. To do this, open all the hook-and-loop straps and remove the incontinence cover from the back padding. 4) Wash the incontinence cover according to the washing symbols on the label with care instructions. INFORMATION: Fully close the hook-and-loop straps before washing. Kimba neo Ottobock | 41...
-
Page 42: Disassembly/Transport
7) Only for versions with fixed front wheels: if needed, press down the locks on the front wheels and pull the wheels outwards (see Fig. 5, item 1). 8) Place the rehab buggy in the boot and use transport locks to secure it from sliding. 42 | Ottobock Kimba neo... -
Page 43: Use In A Wheelchair Accessible Vehicle
► When using the rehab buggy as a seat in a wheelchair accessible vehicle, the product may only be loaded as follows: → Kimba neo, size 1/size 2: max. user weight 40 kg (88 lbs) ► The storage basket must be emptied prior to use in a wheelchair accessible vehicle. -
Page 44: Permitted Use
2) Pull out the locking pin, rotate it to the left and reinsert it (see Fig. 103, item 1). → The locking pin is now engaged (see Fig. 104, item 1). 3) Tilt the seat adapter (see Fig. 104, item 2) against the locking pin. → The seat adapter must contact the locking pin without play. 44 | Ottobock Kimba neo... -
Page 45: Mygo Seating System
1) Pull out the locking pins on both sides and secure them in the disengaged position by turning them (see Fig. 105). 2) The locking pins are disengaged (see Fig. 106, item 1). The seat angle can now once again be adjusted by twisting the knob on the upper front part of the frame. Kimba neo Ottobock | 45... -
Page 46: Adjusting And Securing The Back Angle
INFORMATION: Please note the information in the separate instructions for use provided for the seating system. 6.10.7 Securing the Product in the Vehicle INFORMATION Please refer to the additional information in the brochure on using our products in wheelchair accessible vehicles, order number 646D158. 46 | Ottobock Kimba neo... -
Page 47: Securing The User In The Product
Severe injury in case of accident ► Please note that the use of the Mygo seating system in a wheelchair accessible vehicle is permitted only when a chest and shoulder belt or a chest and shoulder support is used. Kimba neo Ottobock | 47... - Page 48 → INFORMATION: The lap belt must be worn at an angle of 45° to 75° to the horizontal. When this is not possible in exceptional cases, an angle between 30° and 45° to the horizontal can also be chosen (see Fig. 116). 3) Engage the shoulder belt in the lap belt (see Fig. 117). 30° 45° 75° 48 | Ottobock Kimba neo...
-
Page 49: Care
The specialist deal er must be contacted promptly in order to correct these defects. • This also applies if loose, worn, bent or damaged components are identified. Kimba neo Ottobock | 49... -
Page 50: Maintenance Intervals
• Service and repairs may only be carried out by authorised dealers or the manufacturer. This will ensure that only Ottobock spare parts are used for repairs. 7.1 Maintenance intervals The functions described below can be checked by the user at home at the specified intervals. While these tasks... -
Page 51: Legal Information
56 – 70 Backrest angle 80° – 180° 80° – 180° Height of shoulder strap slots (min./max.) 30/45 30/45 Width of shoulder strap slots Lower leg length 19 – 31 20 – 37 Max. load capacity Kimba neo Ottobock | 51... - Page 52 Outdoor mobility base (max. 55 kg) – fully loaded seating unit (47.5 kg) = 7.5 kg for other accessories + weight in storage basket Folded dimensions of the outdoor mobility base with fixed front wheels: 97x60x53 cm. Observe the information in the section "Use in a Wheelchair Accessible Vehicle". 52 | Ottobock Kimba neo...
- Page 53 Kimba neo Ottobock | 53...
- Page 54 54 | Ottobock Kimba neo...
- Page 55 Pultikovo, Business Park „Greenwood“, Two Carlson Parkway North, Suite 100 T +49 (0) 5527 848-3433 · F +49 (0) 5527 848-1460 Building 7, 69 km MKAD Minneapolis, MN 55447 · USA healthcare@ottobock.de · www.ottobock.de 143441 Moscow Region/Krasnogorskiy Rayon T +1 (0) 763 553 9464 · F +1 (0) 763 519 6153 Russian Federation usa.customerservice@ottobockus.com Otto Bock Healthcare Products GmbH T +7 (0) 495 564 8360 ·...
- Page 56 Lindenstraße 13 · 07426 Königsee-Rottenbach/Germany Otto Bock Mobility Solutions GmbH Lindenstraße 13 · 07426 Königsee-Rottenbach/Germany T +49 (0) 69 9999 9393 · F +49 (0) 69 9999 9392 ccc@ottobock.com · www.ottobock.com Ottobock has a certified Quality Management System in accordance with ISO 13485.
Need help?
Do you have a question about the Kimba neo and is the answer not in the manual?
Questions and answers