Table of Contents
Advertisement
Quick Links
Operation/Repair/Parts
Airless Paint Sprayer
For application of architectural paints and coatings.
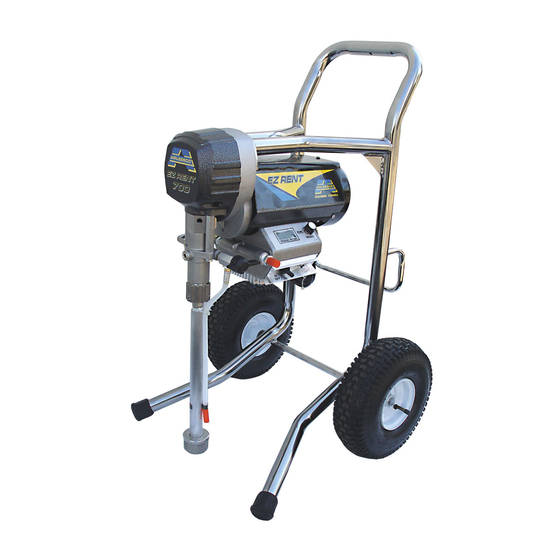
Airlessco - EZ Rent 570 Hi Boy (24F585), EZ Rent 570 Lo Boy (24F586)
Airlessco - EZ Rent 700 Hi Boy (24F588), EZ Rent 700 Lo Boy (24F587)
3000 psi (20.7 MPa, 207 bar) Maximum Working Pressure
Important Safety Instructions
Read all warnings and instructions in this
manual. Save these instructions.
Series B
Series B
3A1182B
ti16138a
ti16139b
EN
Advertisement
Table of Contents

Related Manuals for AIRLESSCO 3A1182B


Summary of Contents for AIRLESSCO 3A1182B
- Page 1 Airless Paint Sprayer For application of architectural paints and coatings. Airlessco - EZ Rent 570 Hi Boy (24F585), EZ Rent 570 Lo Boy (24F586) Airlessco - EZ Rent 700 Hi Boy (24F588), EZ Rent 700 Lo Boy (24F587) 3000 psi (20.7 MPa, 207 bar) Maximum Working Pressure...
- Page 2 • Make sure your extension cord is not damaged. If an extension cord is necessary, use 12 AWG (2.5 mm ) minimum to carry the current that the product draws. • An undersized cord results in a drop in line voltage and loss of power and overheating. 3A1182B...
- Page 3 • Turn off and disconnect power cord before servicing equipment. • Use only grounded electrical outlets. • Use only 3-wire extension cords. • Ensure ground prongs are intact on power and extension cords. • Do not expose to rain. Store indoors. 3A1182B...
- Page 4 • Do not kink or over-bend the hose. • Do not expose the hose to temperatures or to pressures in excess of those specified by Airlessco. • Do not use the hose as a strength member to pull or lift the equipment.
- Page 5 This equipment includes but is not limited to: • Protective eyewear, and hearing protection. • Respirators, protective clothing, and gloves as recommended by the fluid and solvent manufacturer. 3A1182B...
-
Page 6: Component Identification
Refer to Pressure Relief Procedure page 7 Prime/Pressure Relief Valve Closed Pressurizes system when closed. Valve is in closed position Position when there is a slight gap between valve handle and cam body. 3A1182B... -
Page 7: Operation
2. Connect an airless spray gun to the other end of the ti14791a hose. Do not install spray tip. NOTE: The valve handle can move both clockwise and NOTE: Do not use thread sealer on swivel unions as counterclockwise and can face different directions. they are made to self seal. 3A1182B... -
Page 8: Prime And Flush Storage Fluid
5. Open the prime/pressure relief valve to the open - and before repairing equipment. “Priming Position”. This will allow an easy start. Open Closed (Pressure) (Priming and Pressure Relief) ti14791a 3A1182B... - Page 9 Engage the gun trigger lock. See Storage, 10. 13. Whenever shutting down the sprayer, follow Pres- sure Relief Procedure, page 7. NOTICE To prevent damage and freezing during storage, never leave water in the fluid pump 3A1182B...
-
Page 10: Adjusting The Pressure
• To reduce the risk of injection, never hold your solvent such as mineral spirits or Graco or Airlessco hand, body, fingers or hand in a rag in front of the Pump Armor. -
Page 11: Daily Maintenance
Keep displacement pump packing nut/wet cup 1/3 full of Pump Conditioner and water, a 50’ 1/4” airless hose, air- Airlessco Throat Seal Oil at all times. The TSO helps less gun and tip on unit, open the prime/pressure relief protect the packings and rod. - Page 12 7. Tighten packing nut clockwise until resistance is felt against the Belleville Springs, go 3/4 if a turn more. Put five drops of Airlessco Throat Seal Oil in the packing nut. 8. Run the machine at full pressure for several min- ti16053a utes.
-
Page 13: Packing Replacement Procedures
Belleville Springs (16). Using the side down. Packing Adjustment Tool, tighten another 3/4 of a turn. 6. Take assembled glands and packings (13 pieces) and slide onto the lower half of the piston (14). 3A1182B... -
Page 14: Gear And Pump Assembly
(14) for wear/damage. Replace worn/damaged parts. 6. If gear grease needs replacing, replace with gear grease (Part No. 114819). 7. Clean mating surfaces of cover and box thoroughly. use Part No. 342899 Instant Gasket. 8. Reassemble in reverse order. ti16056a ti16058a 3A1182B... -
Page 15: Replacement Of Electrical Components
2. Disconnect potentiometer lead from pressure con- pinched. Upon reassembly, ensure all wires are con- trol assembly. nected and not pinched. 3. Use a 1/16” allen wrench, loosen set screw in the poteniometer knob and remove knob and spacer. 3A1182B... -
Page 16: Troubleshooting
If breaker reads good, see Power Source. Pressure Control Assembly If the power indicating light is still out after (Board) checking the control settings, fuse and power source, replace the pressure control assem- bly. 3A1182B... - Page 17 8-12k ohms. If it is out- side of this range replace the POT. If there is DC voltage at the motor brushes and the sensor and pressure control knob are functioning, replace the pressure control assembly. 3A1182B...
-
Page 18: Pressure Control Repair
Keep sprayer in cool location. If sprayer does not run when cool and continues to blink 6 times, replace motor. Eight times Sprayer stops or does not High input voltage Check power source for correct repeatedly voltage 3A1182B... - Page 19 Power is applied. Pressure less than 200 psi (14 Increase pressure if desired. bar, 1.4 MPa) Prime/pressure relief valve may be open. Sprayer stops or does not High input voltage Check power source for correct start voltage 3A1182B...
- Page 20 Tip clogs continually Debris in paint Thoroughly strain the paint before use Gun filter missing Do not operate without inlet strainer Coarse filter mesh Do not operate without inlet strainer Test the Pattern Spotty Pattern, Good, Full Increase Pressure ti15991a 3A1182B...
-
Page 21: Servicing The Inlet Valve
Replace worn/damage parts. 6. If gear grease needs replacing, replace with gear grease (Part No. 114819) 7. Clean mating surfaces or cover and box thoroughly. Use Part No. 342899. 8. Reassemble in reverse order. ti16115a 3A1182B... -
Page 22: Manifold Filter
Parts Parts Manifold Filter (866480) Ref. Part Description Qty. 867145 COVER 301356 SPRING 867377 O-RING 867214 FILTER 60 MESH 867647 SUPPORT 867077 BASE 867420 PLUG 867309 NIPPLE 3/8”M x 1/4”M 557391 PLUG 1/4” ti16052a 3A1182B... - Page 23 SPACER,3/4 ID .50 LG PVC 143029 COLLAR,SCREW,SET 131 331103 WASHER .562 .250 .060 .ST 331048 BOOT,RUBBER BOOT 136 866476 HANDLE,LB,SUBASSEMBLY HSE1450 HOSE,PAINT HOSE 1/4X50’ 331476 CUP,SUCTION/DRAIN KIT 289316 GUN,SPRAY, 009 (includes 127, 128, 129) 124 121112 SCREW,CAP, SOCKET HEAD 3A1182B...
- Page 24 Parts Hi-Boy Frame Parts Diagram ti17439a Ref. Part Description Qty. Ref. Part Description Qty. 143029 COLLAR,SCREW,SET 331491 MOTOR 331048 BOOT,RUBBER BOOT 331273 FRAME HSE1450 HOSE,PAINT HOSE 1/4X50’ 16F551 FASTENER,THREAD,EXTERNAL 289316 GUN,SPRAY, 009 866356 SPACER,SPACER .75 LG PVC 867736 WHEEL 3A1182B...
-
Page 25: Control Parts Diagram
116167 KNOB,POTENTIMETER 867822 Control Board Kit CONTROL,BOARD,120V (includes 20, 21, 22, 23, 27, 33, 92, 331342 SCREW,MACH,PANHEAD 95, 96, 97, 98, 99, 101, 102, 103) 866049 CABLE,ASSY 9” LG 867826 KIT, upgrade from old control board to new control board. 3A1182B... -
Page 26: Motor And Drive Parts Diagram
Parts Motor and Drive Parts Diagram ti17841a ti17840a 3A1182B... - Page 27 213 866480 KIT, FILTER W/FITTINGS 331038 YOKE,CROSSHEAD ASSY 331788 BOLT, MOTOR (not shown) 331074 SPACER,SPACER 2.691 LONG 866482 PUMP,PAINT,ASSY (includes 41a) 41a 331093 PISTON ASSEMBLY (not shown) ▲ Additional warning labels are available at no cost. 866082 PIN,CROSS PIN .375 3A1182B...
-
Page 28: Packing Replacement
Parts Packing Replacement 2* 2* 2* ti16057a 3A1182B... - Page 29 331025 WASHER, SPRING 331022 MALE GLAND 331023 PACKING POLYETHYLENE 331021 FEMALE GLAND 331019 PACKING HOLDER 331037 PACKING NUT 331307 PACKING LEATHER 331306 PACKING LEATHER 107313 WHITE O-RING 108771 BLACK O-RING 867783 CAP 331210 PACKING KIT 331093 PISTON ASSEMBLY ti16056a 3A1182B...
-
Page 30: Suction Assemblies
331290 SUCTION HOSE ASSEMBLY 1 331292 SUCTION SEAT ASSEMBLY 1 187651 INLET STRAINER 331400 INLET TUBE 867370 PTFE O-RING 187190 INLET STRAINER DRAIN HOSE 241920 THREADED DEFLECTOR 867759 MALE CONNECTOR 276888 DRAIN LINE CLIP * SOLD IN KIT 865721 3A1182B... - Page 31 Black Switch Power Plug Black White Green Black (+) Black (-) from Motor 2 x Red ti2471b Ref.Part Description Qty. Ref. Part Description Qty. 331163 ELECTRICAL CORD110V PRESSURE CONTROL ASSEMBLY 110V 1 301083 TOGGLE SWITCH 24B599 SENSOR 256219 POTENTIOMETER 3A1182B...
-
Page 32: Electrical Components
Parts Electrical Components ti16066a Ref. Part Description Qty. Ref. Part Description Qty. 867816 SCREW 117281 SPACER 867804 LABEL, PRESSURE CONTROL 1 867817 867731 WASHER 867798 WINDOW LCD DISPLAY (PSI) 867821 LCD DISPLAY KIT(PSI) Includes 1, 3, 4, 5, 7 3A1182B... - Page 33 STEP 2 2A. Check gun/hose connections to make sure they are tight. Lock gun trigger lock (Airlessco gun shown). NOTE: Plug into 3 pronged grounded electrical outlet. Extension cord must be 3 wire, 12 gauge. Do ti16069a not coil cord.
- Page 34 DO NOT DISCHARGE. Turn motor off while the suction tube remains in the bucket. Disconnect from power. 5C. Roll up hose and tape. Now reassemble gun with spray tip and tip guard. After you have discon- nected sprayer from electrical power, turn Prime/PR Valve to closed position for storage. ti16078a 3A1182B...
-
Page 35: Technical Data
Wetted parts ......... . . zinc and nickel-plated carbon steel, nylon, stain- less steel, PTFE, acetal, leather, UHMWPE, aluminum, tungsten carbide 3A1182B... -
Page 36: Airlessco Standard Warranty
With the exception of any special, extended, or limited warranty published by Airlessco, Airlessco will, for a period of twelve months from the date of sale, repair or replace any part of the equipment determined by Airlessco to be defective.
Need help?
Do you have a question about the 3A1182B and is the answer not in the manual?
Questions and answers