Advertisement
Table of Contents
- 1 Table of Contents
- 2 Safety Information
- 3 Appliance Components Overview
- 4 Using the Mixing Bowl
- 5 Tips for Baking
- 6 Meat Grinder Attachment
- 7 Pasta Maker Attachment
- 8 How to Use the Manual and
- 9 Suggested Recipes
- 10 Cleaning
- 11 Disposal of the Appliance
- 12 UK and EU Guarantee
- 13 Electrical Information
- Download this manual
Advertisement
Table of Contents

Related Manuals for Andrew James 7L Food Mixer


Summary of Contents for Andrew James 7L Food Mixer
- Page 1 7L Food Mixer Please read the manual fully before using the appliance and keep the manual safe for future reference...
-
Page 2: Table Of Contents
Contents Page Safety information Page 3-4 Appliance components overview Page 5 Using the mixing bowl Page 6 Tips for baking Page 7 Meat grinder attachment Page 8-9 (purchased separately) Pasta maker attachment Page 10 (purchased separately ) How to use the manual and Page 11 automatic modes Suggested recipes... -
Page 3: Safety Information
Safety Information When using any electrical appliance, basic safety precautions should always be followed including: This appliance can be used by children aged from 8 years and above and persons with reduced physical, sensory or mental capabilities or lack of experience and knowledge if they have been given supervision or instruction concerning use of the appliance in a safe way and understand the hazards involved. - Page 4 However, if it is necessary to use an extension cord, ensure that the extension cord is equal to or greater than the power consumption of the appliance to avoid overheating of the appliance and extension cord. Do not use any other appliance on the extension cord. Do not place the extension cord in a position where it can be pulled on by children or animals or be tripped over.
-
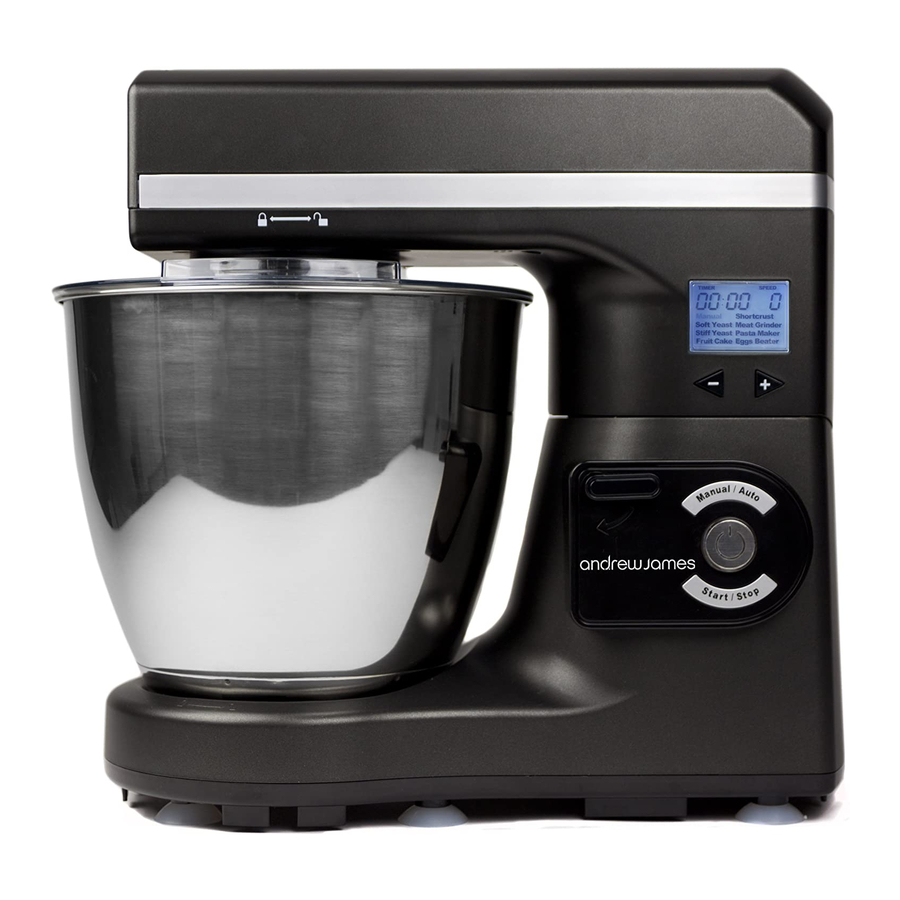
Page 5: Appliance Components Overview
Appliance Components Overview Main components and Standard accessories 1.Crush/ plunger (optional accessory) 8. Dough hook 2.Meat dish (optional accessory) 9. Stainless steel bowl (7L) 3.Meat grinder (optional accessory) 10. Power cord 4.Flat past maker (optional accessory) 11. Front end shield 5.Flexible beater blade 12. -
Page 6: Using The Mixing Bowl
Using the mixing bowl Place the mixing bowl into its holding device and turn the dish in the direction of “LOCK” until it locks into place. In order to lift the arm, press the lever (12) downwards in the direction of the arrow. The arm will now move upwards. Mount the required utensil by inserting the top into the drive shaft and locking the cotter pin in the shaft by turning it to the right. -
Page 7: Tips For Baking
Tips for baking To reduce the risk of curdling when making sponges add a little of the measured flour when mixing eggs to butter and sugar. Please ensure that the eggs will harden the butter rather than separate them. ... -
Page 8: Meat Grinder Attachment
Meat Grinder attachment purchased separately at www.andrewjamesworldwide.com Optional Accessories- Meat grinder attachment 1. Meat Dish 8. Cutter (Middle) 2. Crush/ plunger 9. Nut 3. Meat grinder 4. Roller 5. Blade 6. Cutter (fine) 7. Cutter (coarse) - Page 9 Inserting the attachment Lift up the front end shield. Holding the head, insert it into the inlet. Rotate the head in the same direction until a small sound can be heard. Try to gently rock the head to ensure it is firmly secured in the correct position.
-
Page 10: Pasta Maker Attachment
Pasta maker attachment purchased at www.andrewjamesworldwide.com Lift up the Front end shield and insert the past maker attachment. Flat pasta maker Pasta maker (thin noodle) Pasta maker (thick noodle) Basic Pasta menu 125g of wheat flour 1 egg per person Method Pour the flour into the middle of the mixing bowl. -
Page 11: How To Use The Manual And
How to use the manual and automatic modes: Plug the appliance into the electrical socket, push the on/off button and the LCD and the switch will display a blue light. The machine enters the standby mode : LCD lights up for 2 minutes, times display “00:00”... -
Page 12: Suggested Recipes
Suggested Recipes Dough Hook White Bread Smart Mode: White bread (Stiff Yeast dough) Recipes Flour weight: 500g (1tsp) salt 7g (1oz) dried yeast (1/2 tsp) sugar 250ml tepid water Method Place the dough hook on the mixer. Pour the liquid into the bowl. Then add the flour, sugar and salt. Use the “Stiff Yeast”... - Page 13 Banana Bread (soft yeast) 225g self raising flour ¼ tsp bi-carbonate of soda Pinch of salt 75g of butter 175g caster sugar 2 medium eggs (beaten) 450g bananas (mashed) 100g walnuts chopped Method Place all the ingredients in the mixing bowl. Insert the beater blade.
- Page 14 Method To make the sponge, use the beater blade and place the eggs, sugar, margarine and flour into the mixing bowl and choose the auto fruit cake setting Put the mixture into two 18cm greased and lined sandwich tins. Bake at 180˚C/350˚F/gas mark 4 for about 20 minutes until the cake springs back when lightly touched.
- Page 15 Balloon Whisk Egg white (meringues) Recipe 4-5 medium egg whites 200g caster sugar Method Line your baking tray with non-stick baking parchment. Place the egg whites in the mixing bowl. Whisk the egg whites choosing the egg beater auto setting. On speed 4-6, slowly add half of the caster sugar, until the meringue is stiff.
-
Page 16: Cleaning
Cleaning Before cleaning always unplug the appliance from the main supply. Never immerse the appliance in water. Do not use any sharp instruments or abrasive detergents to clean the appliance. Motor housing Only use a damp clean cloth to clean the outside of the appliance. Mixing bowl, mixing equipment and components of the meat grinder. -
Page 17: Disposal Of The Appliance
UK and EU Guarantee Your new Andrew James product comes with a 24 month guarantee and a 2 year fixed warranty, effective from receipt confirmation. Your receipt or order number is required as proof of purchase date so it is imperative that you keep it safe. - Page 18 If you wish to return your item for a full refund, you have the right to do so within the first 7 days. For our returns policy please go to www.andrewjamesworldwide.com Customers are responsible for any taxes applied to our products when they are shipped outside of the EU.
-
Page 19: Electrical Information
Electrical information Please note: It is extremely important that the wires or cores in the flex are connected to the correct terminals in the plug. If the colour of the mains lead of the appliance does not correspond with the coloured markings identifying the terminals in your plug proceed as follows: ... - Page 20 If a moulded plug is fitted and has to be removed take great care in disposing of the plug and severed cable, it must be destroyed to prevent it from engaging into a socket. If the supply cord is damaged it must be replaced by a service agent or a similarly Copyright Andrew James...
Need help?
Do you have a question about the 7L Food Mixer and is the answer not in the manual?
Questions and answers