Table of Contents
Advertisement
Quick Links
Advertisement
Table of Contents

Related Manuals for Symbol PDT 3100 Series


Summary of Contents for Symbol PDT 3100 Series
- Page 1 PDT 3100 Series Product Reference Guide...
- Page 3 PDT 3100 Series Product Reference Guide 72-60524-01 Revision A January 2003...
- Page 4 The software is provided strictly on an “as is” basis. All software, including firmware, furnished to the user is on a licensed basis. Symbol grants to the user a non-transferable and non-exclusive license to use each software or firmware program delivered hereunder (licensed program).
-
Page 5: Table Of Contents
Symbol Support Center ........ - Page 6 PDT 3100 Series Product Reference Guide Starting Communications........... . . 2-9 Ending Communications .
- Page 7 Contents PDT 3100 Decode Zone ........... . 4-17 Note on IEC825/EN60825 Class 1 .
- Page 8 PDT 3100 Series Product Reference Guide Appendix A. Port Pinouts Pinouts for PDT 3100 ............A-1 Appendix B.
-
Page 9: About This Guide
About This Guide The PDT 3100 Series Product Reference Guide provides general instructions for setting up, initializing, operating, troubleshooting, and maintaining your terminal. Chapter Descriptions Topics covered in this guide are as follows: • Chapter 1, The PDT 3100 System, describes your PDT 3100 terminal and provides parts diagrams and accessory information. -
Page 10: Notational Conventions
PDT 3100 Series Product Reference Guide Notational Conventions The following conventions are used in this document: • Italics are used to highlight specific items in the general text, and to identify chapters and sections in this and related documents. •... -
Page 11: Service Information
Call the Support Center from a phone near the scanning equipment so that the service person can try to talk you through your problem. If the equipment is found to be working properly and the problem is symbol readability, the Support Center will request samples of your bar codes for analysis at our plant. - Page 12 PDT 3100 Series Product Reference Guide Australia Austria/Österreich Symbol Technologies Pty. Ltd. Symbol Technologies Austria GmbH 432 St. Kilda Road Prinz-Eugen Strasse 70 / 2.Haus Melbourne, Victoria 3004 1040 Vienna, Austria 1-800-672-906 (Inside Australia) 01-5055794-0 (Inside Austria) +61-3-9866-6044 (Outside Australia)
- Page 13 Symbol Technologies Norway Postbus 24 7050 AA Hoybratenveien 35 C Varsseveld, Netherlands N-1055 OSLO, Norway 315-271700 (Inside Netherlands) +31-315-271700 (Outside Netherlands) Symbol’s repair depot and shipping address: Symbol Technologies Norway Enebakkveien 123 N-0680 OSLO, Norway +47 2232 4375 South Africa Spain/España Symbol Technologies Africa Inc.
- Page 14 Support E-Mail: Sweden.Support@se.symbol.com Customer support is available 24 hours a day, 7 days a week. If you purchased your Symbol product from a Symbol Business Partner, contact that Business Partner for service. For the latest version of this guide go to:http://www.symbol.com/manuals.
-
Page 15: Chapter Contents
Chapter 1 The PDT 3100 System Chapter Contents Introduction ..............1-3 Parts of the Series 3100 . - Page 16 PDT 3100 Series Product Reference Guide...
-
Page 17: Introduction
IBM PC-DOS . DR-DOS provides access to a number of commercially available programming tools. Additional programming tools are available from Symbol for easier system programming and access to special features. Power saving features of the Series 3100 include auto-off and power save modes, which reduce power consumption until an operator provides input. -
Page 18: Parts Of The Series 3100
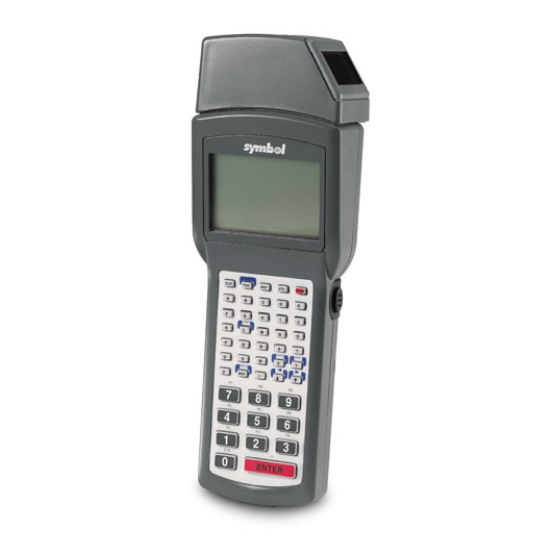
PDT 3100 Series Product Reference Guide Parts of the Series 3100 Integrated Laser Scan Element Scanner Window Scanner LED LCD Display Window Keyboard Scanner Trigger Serial Port (RJ41) Scanner Trigger Handstrap Holding Plugs Scanner Trigger Battery Connector Battery Sockets Compartment... -
Page 19: Accessories
Battery Chargers • Alkaline batteries (PDT 3100 only) • Rechargeable 600 Mah Nickel Metal Hydride (NiMH) battery packs (available from Symbol). NiMH batteries are charged using one of the charging accessories listed below. Table 1-1. Battery Charging Accessories Accessory Part Number... -
Page 20: Printers
PDT 3100 Series Product Reference Guide Printers The following printers can be used with Series 3100 terminals: • Paxar Renegade and SierraSport2 Series • O’Neil MF2t and MF4t Series • Zebra Encore, Cameo and QL320 Series. Miscellaneous Accessories Holsters are available for PDT 3100 terminals. -
Page 21: Chapter Contents
Chapter 2 Setting Up the Terminal Chapter Contents Introduction ..............2-3 Hardware Requirements . - Page 22 PDT 3100 Series Product Reference Guide...
-
Page 23: Introduction
Setting Up the Terminal Introduction Before using a Series 3100 terminal, perform the following procedures: • install the battery (refer to Chapter 6) • charge the battery, if using Nickel Metal Hydride (NiMH) rechargeable battery (refer Chapter 6, Maintaining the PDT 3100) •... -
Page 24: Connecting Host And Cradle
PDT 3100 Series Product Reference Guide Note: For details on the SENDHEX command, refer to the Series 3000 Application Programmer's Manual. Other software may be used in place of SENDHEX. Connecting Host and Cradle Serial Null Modem Cable Host Computer... -
Page 25: Connecting To Host Via 3115 Cca
Setting Up the Terminal 5. The green and red indicators light for about 3 seconds, blink for 3 seconds, then go out. 6. Place the terminal in the cradle. Verify that the terminal is OFF. 7. Go to Loading the Program on page 2-6. -
Page 26: Loading The Program
PDT 3100 Series Product Reference Guide Loading the Program Note: To cancel communications at any time during the session, press CLEAR on the terminal. To download the program, initiate the communications software on the host computer and terminal as described in the following sections. -
Page 27: Initiating Terminal Communications
Setting Up the Terminal In the example, the baud rate is set to 38400 bps and the communications port to COM2. The default values are accepted for the remaining parameters. Note: Versions of SENDHEX earlier than 3.0 do not support flow control. If you use an earlier version and encounter communication errors, use a lower baud rate. - Page 28 PDT 3100 Series Product Reference Guide 5. Baud Rate.The terminal displays: Comm Parameters Baud 4 9600 Scroll through the list using <UpArrow> or <DownArrow>. When the correct rate is displayed (38400 is recommended), press <ENTER>. 6. Data Bits. The terminal displays:...
-
Page 29: Starting Communications
Setting Up the Terminal Press the first letter of a flow control option (None, Xon/Xoff, or RTS/CTS), or scroll using <UpArrow> or <DownArrow> and press <ENTER> when the correct value is displayed. 9. The terminal is ready to receive the program. Starting Communications 1. - Page 30 PDT 3100 Series Product Reference Guide 2-10...
-
Page 31: Chapter Contents
Chapter 3 Spectrum24 RF Setup ® Chapter Contents Spectrum24 Terminals ............3-3 Optional Flash Disk . - Page 32 PDT 3100 Series Product Reference Guide...
-
Page 33: Spectrum24 Terminals
Spectrum24® RF Setup Spectrum24 Terminals Spectrum24 terminals use standard communications protocols to accomplish wireless connectivity. These protocols are generalized and take up considerably more space in the terminal’s NVM. With less space available in NVM for application files, Spectum24 terminals operate as diskless computing workstations. The terminal’s NVM contains system files required to connect to and download the application files from a network server and to provide network diagnostics and configuration. -
Page 34: Standard Spectrum24 Installation
BOOTP and DHCP. BOOTP is commonly used in UNIX and OS/ 2; DHCP is the protocol for Windows NT servers. By default, Symbol's Series 3000 Spectrum24 terminals expect IP addresses to be entered manually. To use the DHCP or BOOTP protocol, you must change the .boot. parameter in the [Spectrum24 Control] section of the NET.CFG file loaded on the terminal. -
Page 35: Editing Net.cfg
Spectrum24® RF Setup Editing NET.CFG The terminal is controlled by entries in the NET.CFG file. After you decide how to allocate IP addresses, edit NET.CFG to include the [Spectrum24 Control] section necessary to set the IP addressing mode. If you intend to make any changes to the terminal’s out-of-box default setup, you must add the [Spectrum24 Control] section, which specifies parameters that apply to all Spectrum24 uses, to NET.CFG. -
Page 36: Downloading Application Files To The Terminal
PDT 3100 Series Product Reference Guide Downloading Application Files to the Terminal To download application files you must have a Trivial File Transfer Protocol (TFTP) server on the network. If your site has more than 3 or 4 terminals, running a TFTP server on a DOS-based machine is impractical because the operating system restricts you to downloading to one terminal at a time. -
Page 37: Downloading Over The Network: Bootp (Default)
Spectrum24® RF Setup Downloading Over the Network: BOOTP (Default) Initiating Network Connection 1. Cold boot the terminal. Note: Verify that terminal is OFF before cold booting. a. Press and hold <A+B+D>. b. Press and release <PWR>. c. Release <A+B+D>. The terminal boots DR-DOS and loads the radio driver while displaying a series of boot messages. - Page 38 PDT 3100 Series Product Reference Guide 4. If you are not using a BOOTP or DHCP server, use the <UpArrow> and <DownArrow> to cursor to Boot Mode, then enter the following parameters: • Subnet Mask • Default Router • Terminal IP Address and press <ENTER>...
- Page 39 Spectrum24® RF Setup To cancel and set up a new ESS Id (obtained from the Network Administrator): 1. Press <Ctrl+C> to end the attempt. The terminal displays the message: Halt Batch process Y/N? 2. Type Y to exit to the DOS prompt (D:). 3.
- Page 40 <filename> is the file that was not fully downloaded. The terminal may be out of range of the AP and cannot find the files to transfer. Press <Ctrl+C> to exit and request help from the Symbol Support Center, or press a key to retry the file transfer.
-
Page 41: Downloading Over The Network: Dhcp
Spectrum24® RF Setup Downloading Over the Network: DHCP To use the DHCP protocol, you must edit NET.CFG and rebuild the HEX file before initiating the network connection. 1. Edit NET.CFG (see Editing NET.CFG on page 3-5). Add the section header and DHCP parameter line: Spectrum24 Control DHCP... - Page 42 PDT 3100 Series Product Reference Guide 3-12...
-
Page 43: Chapter 4. Operating The Pdt 3100
Chapter 4 Operating the PDT 3100 Chapter Contents Introduction ..............4-3 Powering a Terminal On and Off . - Page 44 PDT 3100 Series Product Reference Guide...
-
Page 45: Introduction
Operating the PDT 3100 Introduction This chapter describes how to operate a Series 3100 terminal, including: • Powering the terminal on/off • Booting the terminal • Adjusting the display • Using the keyboard • Entering data via the integrated scanner •... -
Page 46: Automatic Power
PDT 3100 Series Product Reference Guide Automatic Power Depending on the application, other events, discussed below, may turn a terminal on or off. Power On • The system powers on when a key other than <PWR> is pressed. • The system powers on when a scanner trigger is pressed. -
Page 47: Booting A Terminal
Operating the PDT 3100 Booting a Terminal Powering the terminal on does not boot the system or initialize the program or data. To initialize the terminal, perform either a warm or cold boot. Warm Boot A warm boot resets the operating system while preserving the program and data on the RAM disk. -
Page 48: Cold Boot
PDT 3100 Series Product Reference Guide Cold Boot A cold boot fully resets the system and clears memory, including the RAM disk. Any programs and data stored in memory or on the RAM disk are deleted. Nonvolatile memory (NVM, the Application EEPROM) is not affected. -
Page 49: Cold Boot Failure
If the system halts at one of these lines and displays a status value other than 0, the displayed device driver failed to load properly. If such a failure occurs cold boot the terminal. If this does not solve the problem, call Symbol Support Center. More troubleshooting information is found in the publications listed at the beginning of this manual. -
Page 50: Using The Backlight
PDT 3100 Series Product Reference Guide 46-Key Terminal 1. Power the terminal off 2. Press and hold <F> and <I>. 3. Press and release <PWR>. 4. Release <F> and <I>. Using the Backlight The terminal’s backlight illuminates the display in dimly lit areas. -
Page 51: Adjusting The Display
Operating the PDT 3100 Adjusting the Display The LCD display contrast is adjustable, making the display more readable in different lighting conditions, at various temperatures, with different attachments, and at other viewing angles. To increase contrast (darken) by one step, press the following keys in sequence: 21-Key Keyboard <Fn>... -
Page 52: The Series 3100 Keyboard
PDT 3100 Series Product Reference Guide The Series 3100 Keyboard The keyboard is used to enter data and issue commands to the terminal. Figure 4-1 illustrates the standard 35-key keyboard. For the other Series 3100 keyboards, refer to Appendix B, Keyboard Layouts. - Page 53 Operating the PDT 3100 ALPHA SPACE SHIFT FUNC CTRL LAMP CLEAR BK SP DARK LIGHT Figure 4-1. Series 3100 Standard 35-Key Keyboard 4-11...
-
Page 54: Modifier Keys
PDT 3100 Series Product Reference Guide Modifier Keys The <Shift>, <Alpha>, <Func>, and <Ctrl> keys are modifier keys. When pressed individually or in certain combinations, these keys change the keyboard state and possibly the character produced by the character key subsequently pressed. -
Page 55: Key Descriptions
Operating the PDT 3100 Key Descriptions Most of the keys are self-explanatory. Letter keys produce letters, number keys produce numbers. Keys that perform special functions are described in Table 4-1 on page 4-13. Table 4-1. Special Keys Key Name Description Shift Changes letter and number keys to punctuation marks and symbols (e.g., pressing <Shift + 5>... -
Page 56: Integrated Laser Scanner
PDT 3100 Series Product Reference Guide Integrated Laser Scanner Setting the Trigger To configure the integrated scanner: 1. Power on the system and scanner by pressing <PWR> or the scanner trigger. 2. Lift up and turn the the scan element on the top of the terminal to the preferred orientation for scanning. -
Page 57: Scanning 1D Bar Codes
Optimal scanning distance varies with bar code density and scanner optics, but most combinations work within 4 to 10 inches. Generally: • The larger the symbol, the farther away you should hold the scanner. • Move the scanner closer for symbols with bars that are close together. - Page 58 You need to find the right working range for the bar codes you are scanning. The best general advice is: • The larger the symbol, the farther away you should hold the scanner. • Move the scanner closer for symbols with bars that are close together.
-
Page 59: Pdt 3100 Decode Zone
152.4 165.1 177.8 Depth of Field *Minimum distance determined by symbol length and scan angle Figure 4-4. Decode Zone: Standard Range Note on IEC825/EN60825 Class 1 IEC825/EN60825 Class 1 is an international laser safety standard that limits the amount of energy emitted by the laser over a period of time. -
Page 60: Communications
PDT 3100 Series Product Reference Guide Communications Communicating with a Host PC 3115 Communications/Charger Adapter An optional communications/charger adapter (CCA) is available for communicating with a host PC when a cradle is not available. Note: It is not necessary to connect the terminal to a power source for communications. -
Page 61: Communicating With A Printer
Operating the PDT 3100 Communicating with a Printer The terminal has two accessories which provide communications with a printer, the 3115 CCA and the passive cable. Using the 3115 CCA To connect the PDT 3100 to a printer using the 3115 CCA: 1. - Page 62 PDT 3100 Series Product Reference Guide To connect the terminal to a printer: 1. Plug the passive cable’s 10-pin RJ-41 connector into the base of the Series 3100 terminal. 2. Plug the DB-9 connector into the communications port on the printer.
-
Page 63: Chapter Contents
Chapter 5 Error Recovery and Troubleshooting Chapter Contents Introduction ..............5-3 Error Messages . - Page 64 PDT 3100 Series Product Reference Guide...
-
Page 65: Introduction
Error Recovery and Troubleshooting Introduction This chapter provides information to assist in problem analysis and correction, including: • Error messages • Troubleshooting start-up failures • Troubleshooting Spectrum24 terminals • Running the self test function • Self test summaries • Keyboard test •... -
Page 66: Error Messages
PDT 3100 Series Product Reference Guide Error Messages PDT 3100 If ERR3000 is loaded in the system configuration, the terminal displays the following messages to indicate error conditions that affect system performance. A message is usually accompanied by one or more beeps, after which the system returns to its previous status. -
Page 67: Troubleshooting
If such a failure occurs, cold boot the terminal again. If this does not solve the problem, call Symbol Customer Support. More troubleshooting information is found in the documentation listed in the Related... -
Page 68: Spectrum24 Terminals (Pdt 3142/3146)
PDT 3100 Series Product Reference Guide Spectrum24 Terminals (PDT 3142/3146) The command mode troubleshooting procedures are not available to terminals operating in a Spectrum24 network environment. Typical initialization and operating problems and solutions for Spectrum24 terminals are listed in Table 5-2. -
Page 69: Scanning
Error Recovery and Troubleshooting Table 5-2. Troubleshooting Spectrum24 Terminals (continued) Problem Explanation Action Application does not Terminal disassociated from Applications using internal batch respond to interactive Access Point. mode continue to function until operations. required to transmit via radio, then fail to work. -
Page 70: Keyboard Test
PDT 3100 Series Product Reference Guide Keyboard Test Keyboard testing can be performed while the terminal displays Config Screen 1 results. Test any keys except Clear and PWR. When you press a key, the corresponding key code is displayed on the top row to the right of the test name. - Page 71 Error Recovery and Troubleshooting Table 5-4. 35-Key Keyboard Test Codes Test Code Test Code Alpha Space Shift Func Ctrl Backspace Enter...
- Page 72 PDT 3100 Series Product Reference Guide Table 5-5. 46-Key Keyboard Test Codes Test Code Test Code Control Shift Up Arrow Down Arrow Backspace Space (47-Key Only) Func Enter 5-10...
-
Page 73: Exiting Self Test
Error Recovery and Troubleshooting Exiting Self Test The test loop continues updating the time and battery status and processing keystrokes. To end the test, press <Clear>. The display returns to the Command Mode menu. Memory Transfer Program Command Mode includes a memory transfer utility that transfers data from a terminal to a host PC for program troubleshooting. - Page 74 PDT 3100 Series Product Reference Guide 3165 Cradle 3115 CCA RJ41 Connector DB-25 Connector Power Input Jack Figure 5-1. Connecting the 3100 Terminal for Memory Transfer 5-12...
-
Page 75: Setting Communications Parameters
Error Recovery and Troubleshooting Setting Communications Parameters Host 1. Start the Communications program on the host PC. 2. Set up the host communication parameters (these parameters must match the terminal’s parameters). At the DOS prompt on the host, enter: RCVHEX <filename.hex> <baud rate>... - Page 76 PDT 3100 Series Product Reference Guide Type a range and press <Enter>. 5. Specify a range of NVM to transfer. Choose All or None. 6. If the system has EMS installed, it prompts for the range to transfer (otherwise, the...
- Page 77 Error Recovery and Troubleshooting Starting Communications 1. The terminal is ready to send the data to the host PC and displays: Comm Parameters Start? <ENT> 2. Verify that the host is ready to receive data. 3. Press <Enter> on the terminal. While data is being transferred, the terminal displays a report of the 1 KB range being transferred: Memory Transfer...
-
Page 78: Scanning Problems
• Check to see if you are scanning from the proper distance. • Try scanning a test symbol of the symbology you are trying to read. Your terminal operates but scanned data is not displayed correctly? • Check the system power. -
Page 79: Chapter Contents
Chapter 6 Maintaining the PDT 3100 Chapter Contents Batteries ..............6-3 Battery Life . - Page 80 PDT 3100 Series Product Reference Guide...
-
Page 81: Batteries
The approximate battery life between charges (NiMH) or replacement (alkaline) is summarized in Table 6-1 Table 6-2. Note that these values vary with the application. Applications involving wireless communications shorten these times. Table 6-1. PDT 3100 Series Battery Life Battery Type Input Method Approx. Operating Approx. Operating Time: PDT 3100... -
Page 82: When To Replace Or Recharge Batteries
PDT 3100 Series Product Reference Guide When to Replace or Recharge Batteries The Series 3100 provides two types of indicators to notify you when battery power is running low: warning messages and modified cursors. These indicators may be changed or disabled by an application program. -
Page 83: Replacement Batteries
On receiving a low battery message, replace or recharge the primary batteries immediately. Replacement Batteries Rechargeable battery packs are available from Symbol Technologies: • NiMH battery pack — 600 MaH — KT-12596-04 9-Volt alkaline batteries vary slightly in size and some may not make good electrical contact. -
Page 84: Replacing Batteries
PDT 3100 Series Product Reference Guide Replacing Batteries Replacing Alkaline Batteries To replace the 9V alkaline battery: 1. Turn the terminal off. 2. Release the handstrap. 3. Unlock and remove the battery compartment door. Figure 6-1. Opening the PDT 3100 Battery Compartment 4. -
Page 85: Replacing Nimh Batteries
Maintaining the PDT 3100 To replace a NiMH battery with a 9V alkaline battery: 1. Perform steps 1-3 of Replacing Alkaline Batteries. 2. Remove the NiMH battery and battery connector. 3. Plug the 9V connector in the 9V socket (refer to Figure 6-2). -
Page 86: Charging The Nimh Battery
PDT 3100 Series Product Reference Guide 10. Recharge the battery pack (refer to Charging the NiMH Battery on page 6-8). Charging the NiMH Battery Charging in the Cradle To charge a NiMH battery using the one- or four-slot cradle: 1. Plug power connector in cradle’s power socket. -
Page 87: Charging Using The 3115 Cca (Kt-12596-04 Only)
Maintaining the PDT 3100 Charging using the 3115 CCA (KT-12596-04 Only) The optional 3115 Communications/Charger Adapter (CCA) provides power from a wall- mounted power supply for recharging the NiMH battery while the terminal is in use. To charge the terminal using the 3115 CCA: 1. -
Page 88: Storage
PDT 3100 Series Product Reference Guide Storage If the terminal is not used for more than a week, store it in a cool, dry place, away from dust. Remove the battery and repack the terminal in its original shipping container. - Page 89 Appendix A Port Pinouts This appendix provides reference information for Series 3100 ports and mappings for a null modem cable. Pinouts for PDT 3100 The PDT 3100 terminal’s RJ41 connector is located in the base of the terminal. Table A-1. RJ-45 Connector Pin# Signal Description...
- Page 90 PDT 3100 Series Product Reference Guide 3115 Communications/Charger Adapter - Straight through. DTE device with a female DB25 connector Table A-2. 3115 CCA Pin# Signal Description TXD* Transmit Data output RXD* Received Data input Request To Send output Clear To Send input...
- Page 91 Port Pinouts 3115 Communications/Charger Adapter - RTS/CTS Null Modem Female DB25 connector PDT 3100 PDT3100 DB25 RING RING...
- Page 92 PDT 3100 Series Product Reference Guide...
- Page 93 Appendix B Keyboard Layouts The following pages show the characters and character sequences produced by the keyboards using the default translation tables.
- Page 94 PDT 3100 Series Product Reference Guide These key definitions can be changed by the application program. The captions indicate what sequence of modifier keys produce the keyboard. 77 00 75 00 97 00 72 00 80 00 78 43 12 45 ––...
- Page 95 Keyboard Layouts 100 00 lamp 102 00 101 00 lighter darker 67 00 65 00 66 00 64 00 62 00 63 00 59 00 60 00 61 00 68 00 28 13 Scan Code Figure B-2. 21-Key Function-Modified PDT 3100 Keyboard...
- Page 96 PDT 3100 Series Product Reference Guide ALPHA SPACE SHIFT FUNC CTRL ‘ LAMP CLEAR BK SP DARK LIGHT Figure B-3. 35-Key PDT 3100 Keyboard...
- Page 97 Keyboard Layouts ALPHA SPACE SHIFT FUNC CTRL ‘ CLEAR BK SP Figure B-4. 35-Key Unmodified PDT 3100 Keyboard...
- Page 98 PDT 3100 Series Product Reference Guide ALPHA SPACE SHIFT FUNC CTRL CLEAR BK SP Figure B-5. 35-Key Alpha Key Modified PDT 3100 Keyboard...
- Page 99 Keyboard Layouts ALPHA SPACE SHIFT FUNC CTRL “ PRT SCR < & CLEAR BK SP > Figure B-6. 35-Key Shift Key Modified PDT 3100 Keyboard...
- Page 100 PDT 3100 Series Product Reference Guide ALPHA SPACE SHIFT CTRL CTRL FUNC CTRL CTRL CTRL CTRL CTRL CTRL CTRL CTRL CTRL CTRL CTRL CTRL CTRL CTRL CTRL CTRL CLEAR CTRL CTRL CTRL CTRL CTRL CTRL CTRL CTRL J LINE FEED...
- Page 101 Keyboard Layouts ALPHA SPACE SHIFT ‘ FUNC LAMP DARK LIGHT ’ LAMP HOME PG UP PG DN CLEAR DARK LIGHT Figure B-8. 35-Key Function Key Modified PDT 3100 Keyboard...
- Page 102 PDT 3100 Series Product Reference Guide ALPHA SPACE SHIFT CTRL/ FUNC CLEAR Figure B-9. 35-Key Alt Key Modified PDT 3100 Keyboard B-10...
- Page 103 Keyboard Layouts ALPHA SPACE SHIFT FUNC DARK LIGHT LAMP < SHIFT SHIFT SHIFT CLEAR SHIFT SHIFT SHIFT SHIFT SHIFT SHIFT SHIFT DARK LIGHT Figure B-10. 35-Key Shift + Func Modified PDT 3100 Keyboard B-11...
- Page 104 PDT 3100 Series Product Reference Guide ALPHA SHIFT FUNC LAMP DARK LIGHT CTRL CTRL CTRL HOME PG UP PG DN CTRL CTRL CTRL CLEAR CTRL CTRL CTRL BK SP CTRL CTRL CTRL CTRL DARK LIGHT Figure B-11. 35-Key Ctrl + Func Modified PDT 3100 Keyboard...
- Page 105 Keyboard Layouts ALPHA SHIFT FUNC ALT = DARK LIGHT LAMP CLEAR DARK LIGHT Figure B-12. 35-Key Alt + Func PDT 3100 Keyboard B-13...
- Page 106 PDT 3100 Series Product Reference Guide 42 00 Clear Func Shift Ctrl 32 100 18 101 33 102 34 103 35 104 23 105 36 106 37 107 38 108 50 109 49 110 24 111 25 112 19 114...
- Page 107 Keyboard Layouts 00 29 Clear Func Shift Ctrl 67 32 81 19 62 72 bksp & ENTER Figure B-14. 46-Key Shift Modified PDT 3100 Keyboard B-15...
- Page 108 PDT 3100 Series Product Reference Guide Clear Func Shift Ctrl Bksp ENTER Figure B-15. 46-Key Caplock Modified PDT 3100 Keyboard B-16...
- Page 109 Keyboard Layouts Clear Ctrl A Ctrl B Ctrl C Ctrl D Ctrl E Ctrl F Ctrl G Ctrl H Ctrl I Ctrl J Ctrl K Ctrl L Ctrl M Ctrl N Ctrl O Ctrl P Ctrl Q Ctrl R Ctrl S Ctrl T Ctrl U Ctrl V...
- Page 110 PDT 3100 Series Product Reference Guide Clear CapLk 18 101 34 103 91 27 93 39 Lamp Home Pg Up Dark Light 44 122 00 75 Space Pg Dn Figure B-17. 46-Key Func Modified PDT 3100 Keyboard B-18...
- Page 111 Keyboard Layouts Clear 41 126 43 124 26 123 27 125 Lamp < Dark Light Space Shf F7 Shf F8 Shf F9 Shf F4 Shf F5 Shf F6 Shf F1 Shf F2 Shf F3 Shf F10 Figure B-18. 46-Key Shift + Func Modified PDT 3100 Keyboard B-19...
- Page 112 PDT 3100 Series Product Reference Guide 00 32 Alt A Alt B Alt C Alt D Alt E Alt F Alt G Alt H Alt I Alt J Alt K Alt L Alt M Alt N Alt O Alt P...
- Page 113 Keyboard Layouts Clear Ctrl * Ctrl E Ctrl F Ctrl G Ctrl \ Ctrl - Lamp Ctrl [ Ctrl ] 119 00 117 00 CtlHm Ctl End Dark Light CtlPgup 00 115 00 116 Ctrl Z Space Ctrl Ctrl CtlPgDn Ctrl F7 Ctrl F8 Ctrl F9...
- Page 114 PDT 3100 Series Product Reference Guide Alt E 131 00 Alt F Alt G Alt = 130 00 Lamp Dark Light Alt Z Space Alt F7 Alt F8 Alt F9 Alt F4 Alt F5 Alt F6 Alt F1 Alt F2...
- Page 115 Appendix C Communications Status Codes The program loader status code consists of four hexadecimal digits which indicate whether or not the transfer was successful, and if not, the source of the communications error. A status code of 0000 indicates success; any other code indicates failure. Table C-1 lists the failures associated with the status codes.
- Page 116 PDT 3100 Series Product Reference Guide...
- Page 117 Appendix D Specifications Environment The terminal’s operating conditions are listed in Table D-1. Table D-1. Environmental Specifications Condition Range Operating Temperature C to 40 Storage Temperature C to 60 Humidity (Operating) 0 to 95% (noncondensing) Altitude Up to 10,000 feet Note: Batteries lose power faster at extremely high and low temperatures, and at temperatures below 0 C, the LCD operates slowly.
- Page 118 PDT 3100 Series Product Reference Guide Scanning Table 4-2. Standard 1D Scanning Specifications @ 23°C Item Description Power Requirements Input Voltage 3.0 - 5.5 VDC Scanning Current 65 mA typical; 100 mA maximum Standby Current 50 µA max. Surge Current 160 mA max.
- Page 119 Specifications Table 4-2. Standard 1D Scanning Specifications @ 23°C (continued) Item Description Laser Class The scan engine, by itself, is an unclassified component. It is intended for use in CDRH Class II/IEC Class 2 devices with proper housing, labeling, and instructions to comply with federal and/or international standards.
- Page 120 PDT 3100 Series Product Reference Guide...
- Page 121 A pattern of variable-width bars and spaces which represents numeric or alphanumeric data in machine-readable form. The general format of a bar code symbol consists of a leading margin, start character, data or message character, check character (if any), stop character, and trailing margin.
- Page 122 PDT 3100 Series Product Reference Guide BIOS Basic Input Output System. A collection of ROM-based code with a standard API used to interface with standard PC hardware. Binary digit. One bit is the basic unit of binary information. Generally, eight consecutive bits compose one byte of data.
- Page 123 Glossary Decode To recognize a bar code symbology (e.g., Codabar, Code 128, Code 3 of 9, UPC/EAN, etc.) and analyze the content of the bar code scanned. Development Kits A set of software tools provided to customers to help them create applications for their terminals.
- Page 124 PDT 3100 Series Product Reference Guide Interleaved 2 of 5 A binary bar code symbology representing character pairs in groups of five bars and five interleaved spaces. Interleaving provides for greater information density. The location of wide elements (bar/spaces) within each group determines which characters are encoded.
- Page 125 Refer to Subnet. Scanner An electronic device used to scan bar code symbols and produce a digitized pattern that corresponds to the bars and spaces of the symbol. Software Development Kit. SE 1200 Symbol's laser scan modules that can be integrated into portable computing devices.
- Page 126 PDT 3100 Series Product Reference Guide Terminate and Stay A program under DOS that ends its foreground execution to remain Resident (TSR) resident in memory to service hardware/software interrupts, providing background operation. It remains in memory and may provide services on behalf of other DOS programs.
- Page 127 Index Numerics backup ......6-5 chargers ..... . . 1-5 1D bar code .
- Page 128 PDT 3100 Series Product Reference Guide failure ......4-7 DHCP ......3-11 messages .
- Page 129 Index key descriptions ....4-13 NET.CFG modifier keys ....4-12 examples for download methods .
- Page 130 PDT 3100 Series Product Reference Guide Comtec ......1-6 see self test Monarch Rascal ....1-6 selecting the scanner trigger .
- Page 131 ......6-5 symbol support center ....ix...
- Page 132 PDT 3100 Series Product Reference Guide Index-6...
- Page 133 We’d like to know what you think about this Manual. Please take a moment to fill out this questionnaire and fax this form to: (631) 738-3318, or mail to: Symbol Technologies, Inc. One Symbol Plaza M/S B-4 Holtsville, NY 11742-1300 Attention: Technical Publications Manager IMPORTANT: If you need product support, please call the appropriate customer support number provided.
- Page 136 PDT 3100 Series Product Reference Guide 72-60524-01 Revision A - January 2003 Symbol Technologies, Inc. One Symbol Plaza, Holtsville N.Y. 11742-1300 http://www.symbol.com/manuals...
Need help?
Do you have a question about the PDT 3100 Series and is the answer not in the manual?
Questions and answers