Table of Contents
Advertisement
Advertisement
Table of Contents

Related Manuals for RDM EC9001f


Summary of Contents for RDM EC9001f
- Page 1 EC9000i Series Scanner User Guide July 2014...
- Page 2 In no event shall RDM Corporation be held liable for special, direct, indirect, or consequential damages, losses, cost, charges, claims, demands, or claim for lost profits, fees, or expenses of any nature or kind.
-
Page 3: Compliance Statements
Warning: Changes or modifications not expressly approved by RDM could void the user’s authority to operate the equipment. -
Page 4: Table Of Contents
Introduction ..............................6 About this guide ............................6 Requirements ............................6 Recommendations ............................ 6 RDM EC9000i models and features ......................7 Serial and model number .......................... 8 Programmable application button ......................8 Setting up your scanner ..........................9 Choose a location ............................. 9 Unpack the shipping box ........................... - Page 5 Card transactions do not function properly ..................... 24 Printer does not print ..........................24 Specifications .............................. 25 Part Numbers ............................27 Scanners ............................. 27 Additional parts ........................... 28 Warranty Information ........................... 29 LIMITED WARRANTY: ........................... 29 WARRANTY SPECIFICS: ........................29 ©2014 RDM Corporation Page 5...
-
Page 6: Introduction
Requirements The RDM EC9000i unit is for indoor use only. Keep the RDM EC9000i dry; avoid areas of high humidity. Do not remove any parts from areas that are not described in this guide. Removing parts from areas not described in this guide will void the warranty. -
Page 7: Rdm Ec9000I Models And Features
RDM EC9000i models and features RDM EC9000i models and features The RDM EC9000i series scanner is available in several optional model configurations. All models include an integrated ID card imager and a franker. All scanner models can also be licensed to perform optical character recognition (OCR) on documents with machine printed text (remittances, pay stubs). -
Page 8: Serial And Model Number
Developers can find information about programming the application button in the help file that is included with RDM’s application development kit (ADK). Developers can obtain the ADK by contacting RDM. Note: The programmable application button is not supported on some scanner models. The LED is supported on all models. -
Page 9: Setting Up Your Scanner
EC9000i Series Scanner User Guide Setting up your scanner Setting up your scanner To set up the RDM EC9000i scanner: • Choose a location. • Unpack the shipping box. • Inspect the scanner’s features. • Insert the franker cartridge. •... -
Page 10: Inspect The Scanner's Features
Inspect the scanner’s features EC9000i Series scanner (most models) Endorsement printer cover Exit pocket Insertion hopper Front cover Programmable Programmable Exit extension application button and application button and scanner status LED scanner status LED Insertion extension ©2014 RDM Corporation Page 10... -
Page 11: Ec9000I Series Scanner With Printer
Setting up your scanner EC9000i Series scanner with printer Endorsement printer cover Exit pocket Front cover Exit pocket tab Programmable application button and scanner status LED Insertion hopper Printer paper feeder Printer cover release button Printer cover ©2014 RDM Corporation Page 11... -
Page 12: Internal Components
EC9000i Series Scanner User Guide Setting up your scanner Internal components Inside the front cover - side view Image sensor (closed) Insertion hopper ID card entry slot Document feeder ©2014 RDM Corporation Page 12... -
Page 13: Inside The Front Cover - Back View
Inside the front cover - back view Some scanners do not include all of the pictured connection ports or buttons. Franker ID card entry imaging slot Franker cartridge latch Metal Plate (aligns with slot in franker cartridge) ©2014 RDM Corporation Page 13... -
Page 14: Inside The Front Cover And Endorsement Printer Cover - Top View
Franker ID card entry imaging slot Document track Image sensor Endorsement printer and panels (select models) (closed) Magnetic stripe reader (MSR) Metal post for top cover Scanner LED Exit pocket Insertion hopper Front (extensions retracted) ©2014 RDM Corporation Page 14... -
Page 15: Connection Ports
(not provided) that locks into the slot. Cables can be purchased from your local computer supply store. Removing the covers RDM EC9000i scanner has two covers that can be removed in order to clean the image sensor, replace cartridges, or clear paper jams. Front cover Remove the front cover when you need to clear paper jams, replace the franker cartridge, or to clean the image sensor. -
Page 16: Endorsement Printer Cover
Damage to the unit or the cartridge which results from modifying the inkjet cartridge is not the responsibility of RDM. • The inkjet cartridge is not refillable. • Inkjet cartridges are not licensed for modifications. • RDM may change product designs, features, or specifications at any time. ©2014 RDM Corporation Page 16... -
Page 17: Installing The Franker Cartridge
1. Disconnect the power cord from the scanner. 2. Remove the endorsement printer cover. 3. Pull the inkjet latch away from the printer cartridge. 4. Pull the inkjet cartridge out of the scanner. ©2014 RDM Corporation Page 17... -
Page 18: Replacing The Paper Roll For The Printer
When closed correctly, both sides of the printer cover are flush with the scanner. 5. Rip off any access paper sticking out of the printer cover. ©2014 RDM Corporation Page 18... -
Page 19: Connecting The Power Cord
Drivers and Applications The drivers for your scanner are installed on your computer when you install the check scanning application. There are many applications that support the RDM EC9000i scanner. Most are available from third-party vendors. If you are not sure where to acquire your check scanning application, check with whoever provided your scanner. -
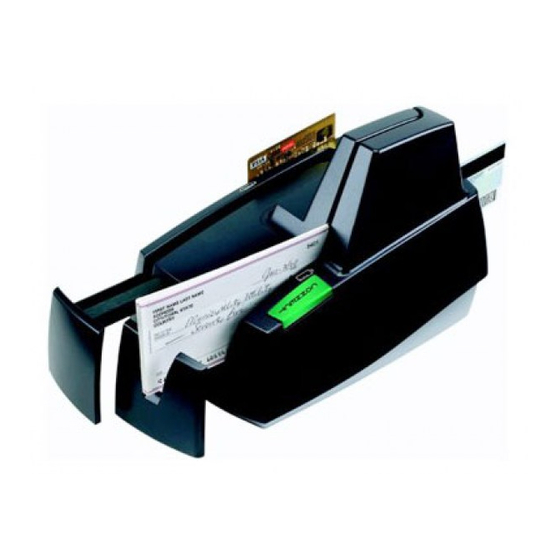
Page 20: Operating The Scanner
Note: Do not push documents past the check icon on the right side of the insertion hopper. 2. If you are required to do so, start the scanning process. For example, click Scan on your PC application. ©2014 RDM Corporation Page 20... -
Page 21: Swiping Magnetic Stripe Cards (Optional)
1. Insert the identification card into the back of the scanner track until you feel it pinch the card. The scanner pulls the card through the track. 2. Remove the card from the front of the scanner track. ©2014 RDM Corporation Page 21... -
Page 22: Light Signals And Beeps
2. The LED is Green (Flashing): The scanner is waiting for a document to be inserted for scanning. 3. The LED is Green/Red (Flashing): The scanning operation is in progress. 4. The LED is Green (Solid): The scanning operation is complete. The scanner has returned to its idle state. ©2014 RDM Corporation Page 22... -
Page 23: Maintaining Your Scanner
• A lens cleaning tissue. • A damp lint-free cloth. • A cotton swab dampened with rubbing alcohol. 4. Clean the glass on each panel thoroughly. 5. Replace each of the covers. ©2014 RDM Corporation Page 23... -
Page 24: Troubleshooting
EC9000i Series Scanner User Guide Troubleshooting Troubleshooting In the course of everyday operations, you might encounter minor malfunctions in the RDM EC9000i scanner. Before calling for service, review the troubleshooting steps below. Scanner does not respond 1. Ensure the cable that connects your scanner to your computer is properly connected to the correct port on the back of the scanner and computer (according to instructions provided by your distributor). -
Page 25: Specifications
[Depends on document thickness and condition]. Maintains the integrity of the order of the original source documents. Technical features MICR reader E13B or CMC7 MICR Fonts. Uses RDM’s Progressive MICR Method for optimum MICR read accuracy. OCR E13B MICR Assist. ©2014 RDM Corporation Page 25... - Page 26 (select models) Clamshell paper load. Paper width 80mm (3.15”). Print width 71mm (2.8”). Maximum print speed of 170mm/sec (6.7”/sec). Windows emulation. Uses power from scanner’s power supply. Connects to PC using the scanners USB cable connection. ©2014 RDM Corporation Page 26...
-
Page 27: Part Numbers
Supported operating Windows XP, Windows 7 (32/64-bit), Windows 8 (32/64-bit), Windows 8.1 systems (32/64-bit). Development software RDM EC Scanner Application Development Kit (ADK) includes API components, USB driver, Redistributable Installation Packages and Sample Applications. Environment Operating temperature 10 to 40 Degrees C (50 to 104 Degrees F). -
Page 28: Additional Parts
6000-9112-0000 EC9112f single-feed, MSR,OCR licensed 6000-9112-000R Additional parts Options and accessories RDM Part number Replacement franker cartridge – “Electronically Presented” red ink 6000-6065 Replacement HP inkjet printer cartridge black ink (for endorser) 6000-6060 (HP C6602A) EC9000i Ink Jet Blotter (14mm x 11mm x 2mm) - 5 Pack 302987 Paper Roll, Thermal, 3.125"... -
Page 29: Warranty Information
RDM EC9000i, even if the Corporation, such distributors and/or such manufacturers have been advised of the possibility of such damages. - Page 30 Warranty is void if any of the external case of the unit has been opened or removed or the unit has, in RDM’s opinion, been damaged through misuse or improper care. Units returned to RDM for warranty repair will be reconfigured with factory defaults and returned to customers.
Need help?
Do you have a question about the EC9001f and is the answer not in the manual?
Questions and answers